| 拷贝一份Git,向更改他的远程仓库,同时保存原来的log |
git push --mirror git@git.oschina.net:【名字】/ListViewAnimation.git 从刘俊伟拷贝的ListViewAnimation,保存了他的修改,现在远程git是自己的 |
|
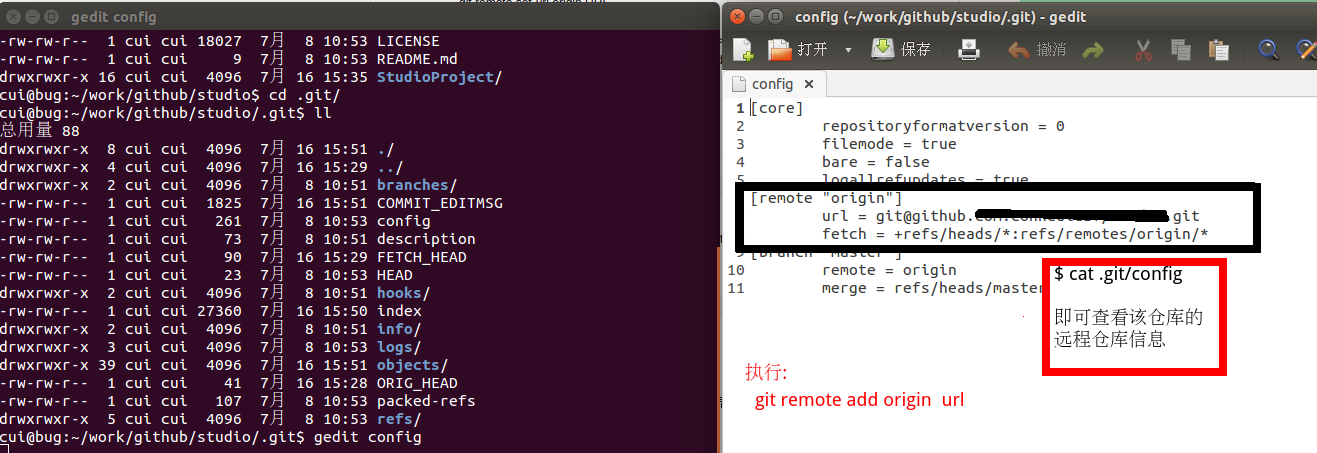
1:在本地创建了Eclipse/AndroidStudio/Idea ..工程 或者任意文件夹子 将该目录创建为git仓库 git init 得到一个git仓库,可以进行git add /git commit 等操作 2:在github 或者 git.oschina.net 创建了远程仓库 3:欲将本地仓库托管到远程 git remote add origin URL 4.在本地增加了新的分支branch_2,欲将该分支同步到托管服务器 git push orign branch_2
|
|
$ git push
No refs in common and none specified; doing nothing.
Perhaps you should specify a branch such as 'master'.
fatal: The remote end hung up unexpectedly
error: failed to push some refs to '/work/fun/git_experiments/bare'
the problem is that there are no commits in "bare". This is a problem with the first commit only, if you create the repos in the order (bare,alice). Try doing |
|
|
dss886@dss886-OptiPlex-3020:~/testgit/server$ git status
fatal: Not a git repository (or any parent up to mount point /home) Stopping at filesystem boundary (GIT_DISCOVERY_ACROSS_FILESYSTEM not set). |
当前目录不是一个git,不是一个仓库(但是他的子目录可以是git /仓库) | ||
| dss886@dss886-OptiPlex-3020:~/testgit/server$ git status 位于分支 master 无文件要提交,干净的工作区 |
当前目录或者当前仓库 所有内容都被提交到仓库(实际上是一种记录)
也就是更新到了最新
|
||
| Git hub |
dss886@dss886-OptiPlex-3020:~/testgit$ mkdir github
dss886@dss886-OptiPlex-3020:~/testgit$ cd github/ <之前配置了在乐视代码托管服务器上的账户 key
改账户无法在github上使用 当然了22222>
dss886@dss886-OptiPlex-3020:~/testgit/github$ git clone git@github.com:cghGit/bootstrap.git 正克隆到 'bootstrap'... The authenticity of host 'github.com (192.30.252.128)' can't be established. RSA key fingerprint is 16:27:ac:a5:76:28:2d:36:63:1b:56:4d:eb:df:a6:48. Are you sure you want to continue connecting (yes/no)? yes Warning: Permanently added 'github.com,192.30.252.128' (RSA) to the list of known hosts. Permission denied (publickey). fatal: Could not read from remote repository. Please make sure you have the correct access rights
and the repository exists. |
||
同一客户端多个git账号的配置http://my.oschina.net/csensix/blog/184434
http://blog.csdn.net/five3/article/details/8904635
|
步骤一:用ssh-keygen命令生成一组新的id_rsa_new和id_rsa_new.pub。 平时我们都是直接回车,默认生成id_rsa和id_rsa.pub。这里特别需要注意,出现提示输入文件名的时候要输入与默认配置不一样的文件名,比如: id_rsa_new。步骤二:配置~/.ssh/config文件,以我自己的机器为例。 Host就是每个SSH连接的单独代号,IdentityFile告诉SSH连接去读取哪个私钥。 步骤三:执行ssh-agent让ssh识别新的私钥。 该命令如果报错:Could not open a connection to your authentication agent.无法连接到ssh agent,可执行ssh-agent bash命令后再执行ssh-add命令。以后,在clone或者add remote的时候,需要把config文件中的host代替git@remoteaddress中的remoteaddress。 同时,你可以通过在特定的repo下执行下面的命令,生成区别于全局设置的user.name和user.email。 =============================================================================================
在linux下搭建git环境
1、创建Github账号,https://github.com 2、Linux创建SSH密钥:
4,修改文件 .ssh/config
添加
Host mygit1
  User conncuiGIT    //github 用户名
  Hostname github.com
  IdentityFile 第一步生成的密钥文件地址
5:ssh-add 私钥目录
5、测试验证是否成功。
同步github到本地 1、复制项目到本地:
本地提交项目到github 1、本地配置
分支版本操作 1、创建和合并分支
git命令使用思维图:【非常有料】 |
||
| smartgit 图形化界面工具 |
下载后 在解压目录下/bin 中的smartgithg.sh 设置smartgit 的运行环境(要求 1.7)
if [ "$SMARTGITHG_JAVA_HOME" = "" ] ; then SMARTGITHG_JAVA_HOME=$SMARTGIT_JAVA_HOME fi if [ "$SMARTGITHG_JAVA_HOME" = "" ] && [ -f "/usr/lib/jvm/java-7-openjdk-i386/jre/bin/java" ] ; then SMARTGITHG_JAVA_HOME="/usr/lib/jvm/java-7-openjdk-i386/jre" fi if [ "$SMARTGITHG_JAVA_HOME" = "" ] ; then SMARTGITHG_JAVA_HOME=$JAVA_HOME fi if [ "$SMARTGITHG_MAX_HEAP_SIZE" = "" ] ; then SMARTGITHG_MAX_HEAP_SIZE=$SMARTGIT_MAX_HEAP_SIZE fi if [ "$SMARTGITHG_MAX_HEAP_SIZE" = "" ] ; then SMARTGITHG_MAX_HEAP_SIZE=256m fi SMARTGITHG_JAVA_HOME=/usr/lib/jvm/java-7-openjdk-amd64 |
||

|
本地代码库回滚 |
git reset --hard commit-id :回滚到commit-id,讲commit-id之后提交的commit都去除 |
|
还有的时候,你希望查看某个指定文件的提交历史。譬如你希望查看'notes.c'文件每一次的提交历史
|
$
git log --pretty=oneline -- file |
| 用git管理Andoird Studio,IntellJieda时,ide产生大量的临时文件(gradle,build...)这些文件没有必要纳入git管理,所有用文件 .gitignore 来标记不纳入git的文件,文件夹 |
build : .gitignore 所在父目录下的所有build 将被忽略 /build:.gitignore 所在同等目录下的build .class :所有后缀为class 的文件 问题: 利用.gitignore过滤文件,如编译过程中的中间文件,等等,这些文件不需要被追踪管理。 现象:文件,以过滤该文件,但是通过git status查看仍显示file1文件的状态。 原因: 在git库中已存在了这个文件,之前push提交过该文件。 .gitignore文件只对还没有加入版本管理的文件起作用,如果之前已经用git把这些文件纳入了版本库,就不起作用了 解决: 需要在git库中删除该文件,并更新。 然后再次git status查看状态,file1文件不再显示状态。 ci@clinux:~/c/CuiDemo/studio/StudioProject$ git rm -r build error: 如下文件有本地修改: StudioProject/build/intermediates/dex-cache/cache.xml (使用 --cached 保留本地文件,或用 -f 强制删除) ci@clinux:~/c/CuiDemo/studio/StudioProject$ 请使用: ci@clinux:~/c/CuiDemo/studio/StudioProject$ git rm -r --cached build rm 'StudioProject/build/intermediates/dex-cache/cache.xml' rm 'StudioProject/build/intermediates/model_data.bin' ci@clinux:~/c/CuiDemo/studio/StudioProject$ 或者 ci@clinux:~/c/CuiDemo/studio/StudioProject$ git rm -r -f build |
廖雪峰的官方网站
http://www.liaoxuefeng.com/wiki/0013739516305929606dd18361248578c67b8067c8c017b000/0013752340242354807e192f02a44359908df8a5643103a000

使用Git管理本地项目
http://www.linuxidc.com/Linux/2014-03/98367.htm


和菜鸟一起学linux之本地git中心仓库建立
http://blog.csdn.net/eastmoon502136/article/details/7735957