NIO源码分析之Channel
Channel又称为“通道”,文档中描述如下:
A channel represents an open connection to an entity such as a hardware device, a file, a network socket, or a program component that is capable of performing one or more distinct I/O operations, for example reading or writing.
通道表示到实体,如硬件设备、文件、网络套接字或可以执行一个或多个不同 I/O 操作(如读取或写入)的程序组件的开放的连接。通过定义可以看到Channel其实是一个或者多个不同的I/O操作的抽象,类似于旧I/O的流,但是又和流有所区别,具体在以下几点:
- 流的读写是单向的,通道的读写是双向的。
- 通道可以异步的读写。
- 通道可以将数据读取到缓冲区,又可以从缓冲区中写入数据到通道。
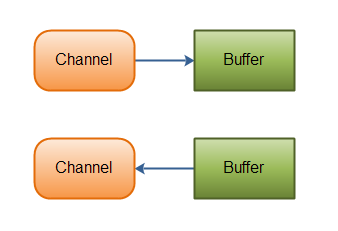
Java NIO: Channels read data into Buffers, and Buffers write data into Channels
常见的通道的实现类:
- DatagramChannel
- FileChannel
- SocketChannel
- ServerSocketChannel
DatagramChannel
DatagramChannel 能通过UDP读写网络中的数据。
FileChannel
FileChannel能读写文件中的数据。
SocketChannel
SocketChannel 能通过TCP读写网络中的数据。
ServerSocketChannel
ServerSocketChannel 允许你监听到来的TCP连接,就像一个web Server一样,对于每个连接,ServerSocketChannel都会创建一个SocketChannel。
我们通过FileChannel来简单查看下channel的读写实现的方式
FileChannel
FileChannel的实现类是FileChannleImpl,oracle的JDK并未提供源码,我们查看openJDK的源码,链接:
http://grepcode.com/file/repository.grepcode.com/java/root/jdk/openjdk/6-b14/sun/nio/ch/FileChannelImpl.java
read
 public int  read(ByteBuffer dst) throws IOException {
   		//判断通道是否打开状态
         ensureOpen();
         if (!readable)
             throw new NonReadableChannelException();
         synchronized (positionLock) {
             int n = 0;
             int ti = -1;
             try {
               	//标记可能无限期阻塞的 I/O 操作的开始。
                 begin();
               //判断通道是否打开
                 if (!isOpen())
                     return 0;
                 ti = threads.add();
                 do {
                   	//读取数据
                     n = IOUtil.read(fd, dst, -1, nd, positionLock);
                 } while ((n == IOStatus.INTERRUPTED) && isOpen());
                 return IOStatus.normalize(n);
             } finally {
                 threads.remove(ti);
                 end(n > 0);
                 assert IOStatus.check(n);
             }
         }
     }


    private void ensureOpen() throws IOException {
        if (!isOpen())
            throw new ClosedChannelException();
    }

	 protected final void begin() {
        if (interruptor == null) {
            interruptor = new Interruptible() {
                    public void interrupt(Thread target) {
                        synchronized (closeLock) {
                            if (!open)
                                return;
                            open = false;
                            interrupted = target;
                            try {
                                AbstractInterruptibleChannel.this.implCloseChannel();
                            } catch (IOException x) { }
                        }
                    }};
        }
        blockedOn(interruptor);
        Thread me = Thread.currentThread();
        if (me.isInterrupted())
            interruptor.interrupt(me);
    }

    public final boolean isOpen() {
        return open;
    }
可以看到FileChannel的read(读取数据到buffer)方法的核心实现是通过IOUtil的read方法实现的,我们继续查看其方法:
    static int read(FileDescriptor fd, ByteBuffer dst, long position,
                    NativeDispatcher nd, Object lock)
        throws IOException
    {
        if (dst.isReadOnly())
            throw new IllegalArgumentException("Read-only buffer");
        if (dst instanceof DirectBuffer)
            return readIntoNativeBuffer(fd, dst, position, nd, lock);

        // Substitute a native buffer
        ByteBuffer bb = null;
        try {
        	//复制一个和dst相同大小的(dst新建的空buffer,所以remaining() = limit )临时buffer
            bb = Util.getTemporaryDirectBuffer(dst.remaining());
            //调用 readIntoNativeBuffer方法,将读取动作委托给 NativeDispatcher
            int n = readIntoNativeBuffer(fd, bb, position, nd, lock);
            //切换到读取模式
            bb.flip();
            if (n > 0)
            	//把临时buffer数据put到 dst中
                dst.put(bb);
            return n;
        } finally {
        	//释放临时buffer
            Util.releaseTemporaryDirectBuffer(bb);
        }
    }


    private static int readIntoNativeBuffer(FileDescriptor fd, ByteBuffer bb,
                                            long position, NativeDispatcher nd,
                                            Object lock)
        throws IOException
    {
        int pos = bb.position();
        int lim = bb.limit();
        assert (pos <= lim);
        int rem = (pos <= lim ? lim - pos : 0);

        if (rem == 0)
            return 0;
        int n = 0;
        if (position != -1) {
            n = nd.pread(fd, ((DirectBuffer)bb).address() + pos,
                         rem, position, lock);
        } else {
            n = nd.read(fd, ((DirectBuffer)bb).address() + pos, rem);
        }
        if (n > 0)
            bb.position(pos + n);
        return n;
    }
可以看到IOUtil的read方法做了以下的事:
- 复制一个和dst相同大小的临时buffer
- 委托NativeDispatcher读取数据到临时buffer中
- 将临时buffer中数据读取到目标容器dst中
- 释放临时buffer
而我们通过查看NativeDispatcher源码,发现该实现由底层实现,所以到此为止。所以read方法其实存在两次数据复制的过程,一次是操作系统复制到临时buffer的过程,另外一次是临时buffer复制到目标buffer的过程。
write
    public int write(ByteBuffer src) throws IOException {
        ensureOpen();
        if (!writable)
            throw new NonWritableChannelException();
        synchronized (positionLock) {
            int n = 0;
            int ti = -1;
            try {
                begin();
                if (!isOpen())
                    return 0;
                ti = threads.add();
                if (appending)
                    position(size());
                do {
                    n = IOUtil.write(fd, src, -1, nd, positionLock);
                } while ((n == IOStatus.INTERRUPTED) && isOpen());
                return IOStatus.normalize(n);
            } finally {
                threads.remove(ti);
                end(n > 0);
                assert IOStatus.check(n);
            }
        }
    }
可以看到write方法和read方法比较类似,同样是调用了IOUtil的write方法。
static int write(FileDescriptor fd, ByteBuffer src, long position,
                     NativeDispatcher nd, Object lock)
        throws IOException
    {
        if (src instanceof DirectBuffer)
            return writeFromNativeBuffer(fd, src, position, nd, lock);

        // Substitute a native buffer
        int pos = src.position();
        int lim = src.limit();
        assert (pos <= lim);
        int rem = (pos <= lim ? lim - pos : 0);
        ByteBuffer bb = null;
        try {
            bb = Util.getTemporaryDirectBuffer(rem);
            bb.put(src);
            bb.flip();
            // Do not update src until we see how many bytes were written
            src.position(pos);

            int n = writeFromNativeBuffer(fd, bb, position, nd, lock);
            if (n > 0) {
                // now update src
                src.position(pos + n);
            }
            return n;
        } finally {
            Util.releaseTemporaryDirectBuffer(bb);
        }
    }

 private static int writeFromNativeBuffer(FileDescriptor fd, ByteBuffer bb,
                                           long position, NativeDispatcher nd,
                                             Object lock)
        throws IOException
    {
        int pos = bb.position();
        int lim = bb.limit();
        assert (pos <= lim);
        int rem = (pos <= lim ? lim - pos : 0);

        int written = 0;
        if (rem == 0)
            return 0;
        if (position != -1) {
            written = nd.pwrite(fd,
                                ((DirectBuffer)bb).address() + pos,
                                rem, position, lock);
        } else {
            written = nd.write(fd, ((DirectBuffer)bb).address() + pos, rem);
        }
        if (written > 0)
            bb.position(pos + written);
        return written;
    }
IOUtil的write方法做了以下的事:
- 复制一个和src相同大小的临时buffer
- 将src中的数据写入到临时buffer bb中
- 委托 NativeDispatcher 将临时buffer中的数据写入到文件中,由底层实现。
- 释放临时buffer
同样write方法也会使数据产生了两次复制,一次是src到临时buffer,一次是临时buffer到文件。
参考文章: