转载:https://segmentfault.com/a/1190000014085613
第一招:化繁为简的Watchers
场景还原:
created(){
    this.fetchPostList()
},
watch: {
    searchInputValue(){
        this.fetchPostList()
    }
}
组件创建的时候我们获取一次列表,同时监听input框,每当发生变化的时候重新获取一次筛选后的列表这个场景很常见,有没有办法优化一下呢?
招式解析:
首先,在watchers中,可以直接使用函数的字面量名称;其次,声明immediate:true表示创建组件时立马执行一次。
watch: {
    searchInputValue:{
        handler: 'fetchPostList',
        immediate: true
    }
}
第二招:一劳永逸的组件注册
场景还原:
import BaseButton from './baseButton'
import BaseIcon from './baseIcon'
import BaseInput from './baseInput'

export default {
  components: {
    BaseButton,
    BaseIcon,
    BaseInput
  }
}<BaseInput
v-model="searchText"
@keydown.enter="search"
/>
<BaseButton @click="search">
<BaseIcon name="search"/>
</BaseButton>我们写了一堆基础UI组件,然后每次我们需要使用这些组件的时候,都得先import,然后声明components,很繁琐!秉持能偷懒就偷懒的原则,我们要想办法优化!
招式解析:
我们需要借助一下神器webpack,使用 require.context() 方法来创建自己的(模块)上下文,从而实现自动动态require组件。这个方法需要3个参数:要搜索的文件夹目录,是否还应该搜索它的子目录,以及一个匹配文件的正则表达式。
我们在components文件夹添加一个叫global.js的文件,在这个文件里借助webpack动态将需要的基础组件统统打包进来。
import Vue from 'vue'

function capitalizeFirstLetter(string) {
  return string.charAt(0).toUpperCase() + string.slice(1)
}

const requireComponent = require.context(
  '.', false, /.vue$/
   //找到components文件夹下以.vue命名的文件
)

requireComponent.keys().forEach(fileName => {
  const componentConfig = requireComponent(fileName)

  const componentName = capitalizeFirstLetter(
    fileName.replace(/^.//, '').replace(/.w+$/, '')
    //因为得到的filename格式是: './baseButton.vue', 所以这里我们去掉头和尾,只保留真正的文件名
  )

  Vue.component(componentName, componentConfig.default || componentConfig)
})
最后我们在main.js中import 'components/global.js',然后我们就可以随时随地使用这些基础组件,无需手动引入了。
第三招:釜底抽薪的router key
场景还原:
下面这个场景真的是伤透了很多程序员的心...先默认大家用的是Vue-router来实现路由的控制。
假设我们在写一个博客网站,需求是从/post-page/a,跳转到/post-page/b。然后我们惊人的发现,页面跳转后数据竟然没更新?!原因是vue-router"智能地"发现这是同一个组件,然后它就决定要复用这个组件,所以你在created函数里写的方法压根就没执行。通常的解决方案是监听$route的变化来初始化数据,如下:
data() {
  return {
    loading: false,
    error: null,
    post: null
  }
},
watch: {
  '$route': {
    handler: 'resetData',
    immediate: true
  }
},
methods: {
  resetData() {
    this.loading = false
    this.error = null
    this.post = null
    this.getPost(this.$route.params.id)
  },
  getPost(id){

  }
}
bug是解决了,可每次这么写也太不优雅了吧?秉持着能偷懒则偷懒的原则,我们希望代码这样写:
data() {
  return {
    loading: false,
    error: null,
    post: null
  }
},
created () {
  this.getPost(this.$route.params.id)
},
methods () {
  getPost(postId) {
    // ...
  }
}
招式解析:
那要怎么样才能实现这样的效果呢,答案是给router-view添加一个unique的key,这样即使是公用组件,只要url变化了,就一定会重新创建这个组件。(虽然损失了一丢丢性能,但避免了无限的bug)。同时,注意我将key直接设置为路由的完整路径,一举两得。
<router-view :key="$route.fullpath"></router-view>第四招: 无所不能的render函数
场景还原:
vue要求每一个组件都只能有一个根元素,当你有多个根元素时,vue就会给你报错
<template>
  <li
    v-for="route in routes"
    :key="route.name"
  >
    <router-link :to="route">
      {{ route.title }}
    </router-link>
  </li>
</template>


 ERROR - Component template should contain exactly one root element.
    If you are using v-if on multiple elements, use v-else-if
    to chain them instead.
招式解析:
那有没有办法化解呢,答案是有的,只不过这时候我们需要使用render()函数来创建HTML,而不是template。其实用js来生成html的好处就是极度的灵活功能强大,而且你不需要去学习使用vue的那些功能有限的指令API,比如v-for, v-if。(reactjs就完全丢弃了template)
functional: true,
render(h, { props }) {
  return props.routes.map(route =>
    <li key={route.name}>
      <router-link to={route}>
        {route.title}
      </router-link>
    </li>
  )
}
第五招:无招胜有招的高阶组件
划重点:这一招威力无穷,请务必掌握
当我们写组件的时候,通常我们都需要从父组件传递一系列的props到子组件,同时父组件监听子组件emit过来的一系列事件。举例子:
//父组件
<BaseInput
    :value="value"
    label="密码"
    placeholder="请填写密码"
    @input="handleInput"
    @focus="handleFocus>
</BaseInput>

//子组件
<template>
  <label>
    {{ label }}
    <input
      :value="value"
      :placeholder="placeholder"
      @focus=$emit('focus', $event)"
      @input="$emit('input', $event.target.value)"
    >
  </label>
</template>
有下面几个优化点:
1.每一个从父组件传到子组件的props,我们都得在子组件的Props中显式的声明才能使用。这样一来,我们的子组件每次都需要申明一大堆props, 而类似placeholer这种dom原生的property我们其实完全可以直接从父传到子,无需声明。方法如下:
    <input
      :value="value"
      v-bind="$attrs"
      @input="$emit('input', $event.target.value)"
    >
$attrs包含了父作用域中不作为 prop 被识别 (且获取) 的特性绑定 (class 和 style 除外)。当一个组件没有声明任何 prop 时,这里会包含所有父作用域的绑定,并且可以通过 v-bind="$attrs" 传入内部组件——在创建更高层次的组件时非常有用。
2.注意到子组件的@focus=$emit('focus', $event)"其实什么都没做,只是把event传回给父组件而已,那其实和上面类似,我完全没必要显式地申明:
<input
    :value="value"
    v-bind="$attrs"
    v-on="listeners"
>

computed: {
  listeners() {
    return {
      ...this.$listeners,
      input: event =>
        this.$emit('input', event.target.value)
    }
  }
}$listeners包含了父作用域中的 (不含 .native 修饰器的) v-on 事件监听器。它可以通过 v-on="$listeners" 传入内部组件——在创建更高层次的组件时非常有用。
3.需要注意的是,由于我们input并不是BaseInput这个组件的根节点,而默认情况下父作用域的不被认作 props 的特性绑定将会“回退”且作为普通的 HTML 特性应用在子组件的根元素上。所以我们需要设置inheritAttrs:false,这些默认行为将会被去掉, 以上两点的优化才能成功。
转载:https://zhuanlan.zhihu.com/p/25623356
技巧一:任何地方都能写 jsx
写过 Vue jsx 的都知道,通常我们需要将 jsx 写在 render(h) {} 中。但是有些情况下我们想在其他方法里也能写 jsx,例如上篇文章的一个 Element 组件的例子。
const h = this.$createElement

this.$notify({
  title: 'GitHub',
  message: h('div', [
    h('p', '[GitHub] Subscribed to ElemeFE/element notifications'),
    h('el-button', {}, '已读')
  ])
})
调用 notification 服务,显示一段自定义的内容。这段代码并没有写在 render 里,但是其实我们也能写成 jsx,例如:
{
  methods: {
    showNotify() {
      const h = this.$createElement

      this.$notify({
        title: 'GitHub',
        message: (
          <div>
            <p>[GitHub] Subscribed to ElemeFE/element notification</p>
            <el-button>已读<el-button>
          <div>)
      })
    }
  }
}
使用 babel-plugin-transform-vue-jsx 插件,这段代码可以正常运行。原理其实很简单,vue-jsx 插件文档里提到 render(h) 中的 h 其实就是 this.$createElement,那么我们只需要在使用 jsx 的方法中声明一下 h 就完成了。如果有用到 eslint,可以加上 // eslint-disable-line 忽略提示:
const h = this.$createElement // eslint-disable-line
实际上在最新发布的 babel-plugin-transform-vue-jsx 3.4.0 里已经不在需要手动声明 h 变量,现在就可以愉快的写 jsx 在组件里的任何地方。
技巧二:$props 的使用姿势
Vue.js 2.2 中加入了一个新特性 —— $props。文档只是很简洁的介绍了是什么但并没有解释有什么用,那下面我给大家分享下哪些情况会需要这个属性。
1. 继承原生属性
当开发表单组件时,不得不解决的问题是继承原生组件的各种属性。例如封装一个 input 组件,要有原生的 placeholder 属性,那么我们的代码可能是这样:
<template>
  <div>
    <label>{{ label }}</label>

    <input
      @input="$emit('input', $event.target.value)"
      :value="value"
      :placeholder="placeholder">
  </div>
</template>

<script>
  export default {
    props: ['value', 'placeholder', 'label']
  }
</script>
但是如果需要支持其他原生属性就需要继续写模板内容:
<template>
  <div>
    <label>{{ label }}</label>

    <input
      @input="$emit('input', $event.target.value)"
      :value="value"
      :placeholder="placeholder"
      :maxlength="maxlength"
      :minlength="minlength"
      :name="name"
      :form="form"
      :value="value"
      :disabled="disabled"
      :readonly="readonly"
      :autofocus="autofocus">
  </div>
</template>

<script>
  export default {
    props: ['label', 'placeholder', 'maxlength', 'minlength', 'name', 'form', 'value', 'disabled', 'readonly', 'autofocus']
  }
</script>
如果还要设置 type,或者是要同时支持 textarea,那么重复的代码量还是很可怕的。但是换个思路,直接用 jsx 写的话或许会轻松一些:
export default {
  props: ['label', 'type', 'placeholder', 'maxlength', 'minlength', 'name', 'form', 'value', 'disabled', 'readonly', 'autofocus'],

  render(h) {
    const attrs = {
      placeholder: this.placeholder,
      type: this.type
      // ...
    }

    return (
      <div>
        <label>{ this.label }</label>
        <input { ...{ attrs } } />
      </div>
    )
  }
}
在 Vue 的 vnode 中,原生属性是定义在 data.attrs 中,所以上面 input 部分会被编译成:
h('input', {
  attrs: attrs
})
这样就完成了原生属性的传递,同理如果需要通过 type 设置 textarea,只需要加个判断设置 tag 就好了。
h(this.type === 'textarea' ? 'textarea' : 'input', { attrs })
目前为止我们还是需要定义一个 attrs 对象,但是所需要的属性其实都已经定义在了 props 中,那么能直接从 props 里拿到值岂不是更好?我们可以简单的写一个 polyfill 完成这件事。(实际上 Vue 2.2 中不需要你引入 polyfill,默认已经支持)
import Vue from 'vue'

Object.defineProperty(Vue.prototype, '$props', {
  get () {
    var result = {}
    for (var key in this.$options.props) {
      result[key] = this[key]
    }
    return result
  }
})
原理很简单,从 vm.$options.props 遍历 key 后从 vm 中取值,现在我们就可以直接从 vm.$props 拿到所有 props 的值了。那么我们的代码就可以改成这样:
render(h) {
  return (
    <div>
      <label>{ this.label }</label>
      <input { ...{ attrs: this.$props } } />
    </div>
  )
}
如果你留意过 Vue 文档介绍 v-bind 是可以传对象 的话,那我们的代码用 Vue 模板写的话就更简单了:
<template>
  <div>
    <label>{{ label }}</label>
    <input v-bind="$props">
  </div>
</template>
2. 继承自定义组件的属性
$props 的功能远不止于此。如果你需要基于上面的 input 组件封装成另一个组件时,那么我们要如何继承它的属性?
例如封装一个带校验功能的 input 组件,代码可能是这样:
<template>
  <div>
    <XInput />
    <div v-show="message && show-hit" class="hit">{{ message }}</div>
  </div>
</template>

<script>
  import XInput from './input.vue'

  export default {
    components: { XInput },

    props: {
      showHit: Boolean
    },

    data () {
      return {
        message: '错误提示'
      }
    }
  }
</script>
关键就是如何传 XInput 的 props。其实只需要在当前组件的 props 中把 Xinput 的 props 复制一遍后,用 v-bind 就完成了。
<template>
  <div>
    <XInput v-bind="$props" />
    <div v-show="message && show-hit" class="hit">{{ message }}</div>
  </div>
</template>

<script>
  import XInput from './input.vue'

  export default {
    components: { XInput },

    props: {
      showHit: Boolean,
      ...XInput.props
    },

    data () {
      return {
        message: '错误提示'
      }
    }
  }
</script>
或者用 Object.assign 也可以实现:
{
  props: Object.assign({ showHit: Boolean }, XInput.props)
}
以上就是 $props 的基本用法,如果你有其他看法或用法欢迎留言分享。好了这个系列的分享告一段落,所有例子的代码我都放在了 vue-tricks 仓库里。下次再见!
转载: 知乎 饿了么前端 Vue.js 的实用技巧(一) https://zhuanlan.zhihu.com/p/25589193
技巧二:vue-loader 特别的使用姿势
vue-loader 是处理 *.vue 文件的 webpack loader。它本身提供了丰富的 API,有些 API 很实用但很少被人熟知。例如接下来要介绍的 preserveWhitespace 和 transformToRequire。
1. 用 preserveWhitespace 减少文件体积
有些时候我们在写模板时不想让元素和元素之间有空格,可能会写成这样:
<ul>
  <li>1111</li><li>2222</li><li>333</li>
</ul>
当然还有其他方式,目的是为了去掉元素间的空格。其实我们完全可以通过配置 vue-loader 实现这一需求。
{
  vue: {
    preserveWhitespace: false
  }
}
它的作用是阻止元素间生成空白内容,在 Vue 模板编译后使用 _v(" ") 表示。如果项目中模板内容多的话,它们还是会占用一些文件体积的。例如 Element 配置该属性后,未压缩情况下文件体积减少了近 30Kb。
2. transformToRequire 再也不用把图片写成变量了
以前在写 Vue 的时候经常会写到这样的代码:把图片提前 require 传给一个变量再传给组件。
<template>
  <div>
    <avatar :default-src="DEFAULT_AVATAR"></avatar>
  </div>
</template>

<script>
  export default {
    created () {
      this.DEFAULT_AVATAR = require('./assets/default-avatar.png')
    }
  }
</script>
其实通过配置 transformToRequire 后,就可以直接配置。
{
  vue: {
    transformToRequire: {
      avatar: ['default-src']
    }
  }
}
于是我们代码就可以简化不少
<template>
  <div>
    <avatar default-src="./assets/default-avatar.png"></avatar>
  </div>
</template>
vue-loader 还有很多实用的 API 例如最近加入的 Custom Blocks,感兴趣的各位可以去文档里找找看。
技巧三:template + render function
在写 Vue 模板时,有时会遇到不得不手写 Render Function 的情况。如需要根据 prop 更改布局——Element 分页组件 ——或者根据 prop 判断生成指定标签。
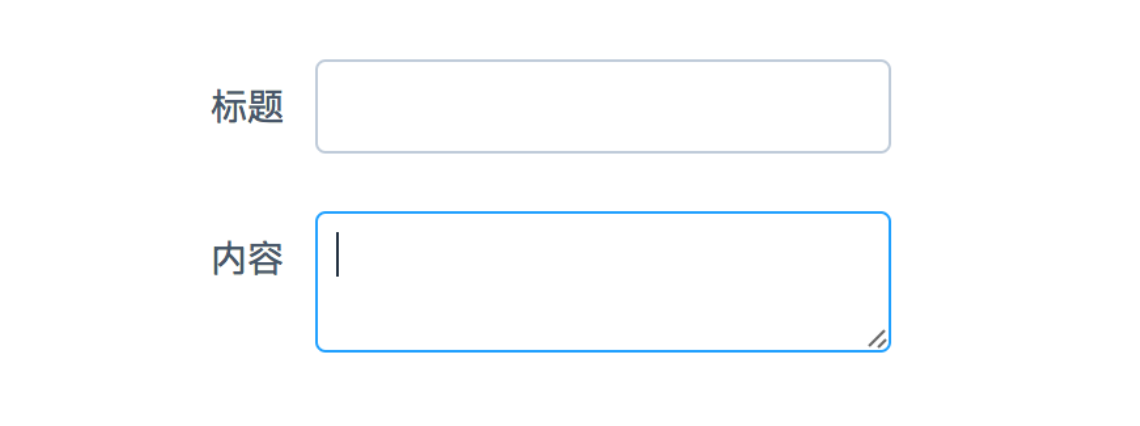
比如我们想实现 Element 里的 input 组件的用法:
<field label="标题" type="input" />
<field label="内容" type="textarea" />
会渲染出一个 input 和 textarea
 那么我们用 Vue 模板写就需要根据 type 判断当前渲染哪个组件。
<template>
  <div>
    <label>{{ label }}</label>

    <input v-if="type !== 'textarea'" :type="type">
    <textarea v-else></textarea>
  </div>
</template>

<script>
  export default {
    name: 'field',

    props: ['type', 'label']
  }
</script>
如果我们还需要传原生组件上的属性,例如 placeholder, name, disabled 以及各种校验属性和事件,那么重复代码就会非常多。但是如果我们用 jsx 写就会容易许多且代码也会更清晰。
export default {
  name: 'field',

  props: ['type', 'label'],

  render (h) {
    const tag = this.type === 'textarea' ? 'textarea' : 'input'
    const type = this.type === 'textarea' ? '' : this.type

    return (
      <div>
        <label>{ this.label }</label>
        { h(tag, { props: { type } }) }
      </div>
    )
  }
}
可是如果组件再复杂一些,需要加入表单验证的错误提示或者一些 icon 等内容,那么写模板就比写 Render Function 更容易阅读。那我们是否可以将两种方式结合起来?
在 Vue 里有一个强大的特性:Slots —— 给组件设置一个特殊的 slot 组件,让使用者可以传入自定义的模板内容。但是在实际使用中,我发现其实是可以给 slot 赋值的。还是用上面的例子,假设 label 部分我们想写成模板,input 的部分根据 type 生成特性的内容。那么我们模板可以写成:
<template>
  <div>
    <label>{{ label }}</label>
    <slot></slot>
  </div>
</template>
input 部分用 slot 代替,但是并不是让使用者自己定义,而是我们给这个 slot 赋值:
<script>
  export default {
    name: 'field',

    props: ['type', 'label'],

    created() {
      this.$slots.default = [ this.renderField() ]
    },

    methods: {
      renderField() {
        const h = this.$createElement
        const tag = this.type === 'textarea' ? 'textarea' : 'input'
        const type = this.type === 'textarea' ? '' : this.type

        return h(tag, { props: { type } })
      }
    }
  }
</script>
其中 renderField 就是我们手写的 Render Function,在组件 created 时调用并赋值给 this.$slots.default。意思就是我们用手写的 vnode 强制替换掉了 $slots.default 的 vnode,从而达到 vue template 和 Render Function 结合的目的。
但是这有个问题,这么做我们就破坏了 slot 的更新规则。看过源码可以知道 slots 是在父组件 的 vdom 更新时才更新的 slots,也就是说我们没法在组件内部触发 renderField 方法,除非用 watch,但是需要 watch 的 prop 多的话也很麻烦。
所以如果你只是需要在初始化时(created)用这种方式渲染组件,并且明白它的限制,其实还是可以发挥很大的用处的。例如 Element 的 notification,通过传入一段内容可以显示一个消息提醒。其实我们还可以传入 vdom 来显示一段自定义内容,在线例子
const h = this.$createElement

this.$notify({
  title: 'GitHub',
  message: h('div', [
    h('p', '[GitHub] Subscribed to ElemeFE/element notifications'),
    h('el-button', {}, '已读')
  ])
})

希望你喜欢这一期的分享,后面我们还会连载一些 Vue 实用技巧,下期见!