面向对象设计
与人脸检测和人脸识别一样,人脸跟踪也由两部分组成:数据和算法。算法通过预先储存(即离线)的数据来训练模型,然后对新来的(即在线)数据执行某类操作。因此,采用面向对象设计是不错的选择。
在 opencv 2.x 版本中,可方便引入 XML/YAML 文件存储类型,对算法来讲,会大大简化组织离线数据任务。下面通过一个假象类来展示这个功能
- 自定义类 foo
 1 // foo.h
 2 /*
 3     在下面的代码中,定义了一个序列化函数,可对 I/O 函数 read 和 write 实现序列化。
 4     FileStorage 类支持两种能被序列化的数据结构类型。
 5     为了简单起见,本章所有类将采用映射,其中每个用于存储的变量都会创建一个 FileNode::MAP 类型的 FileNode 对象。
 6     这需要分配给变量中的每个元素唯一键。为了保持一致性,将变量名作为标签
 7 */
 8
 9 #include <opencv2/opencv.hpp>
10 #include <iostream>
11 using namespace cv;
12 using namespace std;
13
14 class foo {
15 public:
16     int a, b;
17     void write(FileStorage &fs) const {            // 序列化存储自定义数据类型
18         assert(fs.isOpened());
19         fs << "{" << "a" << a << "b" << b << "}";        // 创建 FileNode::MAP 类型的对象
20     }
21     void read(const FileNode& node) {            // 读取数据
22         assert(node.type() == FileNode::MAP);
23         node["a"] >> a;    node["b"] >> b;
24     }
25 };
- 为了使 FileStorage 类的序列化能正常工作,还需要定义write, read函数
 1 template<class T>
 2 void
 3 write(FileStorage& fs,
 4       const string&,
 5       const T& x)
 6 {
 7   x.write(fs);
 8 }
 9 //==============================================================================
10 template<class T>
11 void
12 read(const FileNode& node,
13      T& x,
14      const T& d)
15 {
16   if(node.empty())x = d; else x.read(node);
17 }
- 为了让保存和加载采用了序列化的用户自定义类变得容易,采用模块化函数定义了load_ft,save_ft函数
 1 template <class T>
 2 T load_ft(const char* fname){
 3   T x; FileStorage f(fname,FileStorage::READ);
 4   f["ft object"] >> x; f.release(); return x;    // 定义与对象关联的标签都为 ft object
 5 }
 6 //==============================================================================
 7 template<class T>
 8 void save_ft(const char* fname,const T& x){
 9   FileStorage f(fname,FileStorage::WRITE);
10   f << "ft object" << x; f.release();
11 }
- 将以上定义在 ft.hpp 中
 ft.hpp
 1 /*
 2     ft.hpp
 3     用于加载、保存对象数据
 4 */
 5
 6 #ifndef _FT_FT_HPP_
 7 #define _FT_FT_HPP_
 8 #include <opencv2/opencv.hpp>
 9 //==============================================================================
10 // 为了让保存和加载采用了序列化的用户自定义类变得容易,采用模块化函数定义了load_ft,save_ft函数
11 template <class T>
12 T load_ft(const char* fname){
13   T x; FileStorage f(fname,FileStorage::READ);
14   f["ft object"] >> x; f.release(); return x;    // 定义与对象关联的标签都为 ft object
15 }
16 //==============================================================================
17 template<class T>
18 void save_ft(const char* fname,const T& x){
19   FileStorage f(fname,FileStorage::WRITE);
20   f << "ft object" << x; f.release();
21 }
22 //==============================================================================
23 // 为了使 FileStorage 类的序列化能正常工作,还需要定义write, read函数
24 template<class T>
25 void
26 write(FileStorage& fs,
27       const string&,
28       const T& x)
29 {
30   x.write(fs);
31 }
32 //==============================================================================
33 template<class T>
34 void
35 read(const FileNode& node,
36      T& x,
37      const T& d)
38 {
39   if(node.empty())x = d; else x.read(node);
40 }
41 //==============================================================================
42 #endif
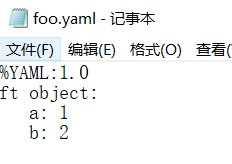
- 主函数,有一个问题,储存到 xml 文件总是报错,而 yaml 文件可以正常存取
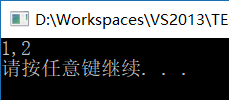
 1 /*
 2     main.cpp
 3     测试 opencv 文件储存
 4 */
 5
 6 #include "opencv_hotshots/ft/ft.hpp"
 7 #include "foo.h"
 8
 9 int main() {
10     foo A;                // 初始化自定义对象 A
11     A.a = 1; A.b = 2;
12     save_ft<foo>("foo.yaml", A);    // 将自定义对象存到 foo.yaml
13     foo B = load_ft<foo>("foo.yaml");    // 读取对象
14     cout << B.a << "," << B.b << endl;
15
16     system("pause");
17     return 0;
18 }
- 程序运行结果

数据收集:图像和视频标注
现代人脸跟踪技术几乎完全是数据驱动,即用来检测图像中面部特征位置的算法依靠面部特征的外观模型和几何依赖性,该依赖性来自样本集中人脸间的相对位置。样本集越大,算法就更具有鲁棒性,因为人脸所表现出的变化范围就更清楚。因此,构建人脸跟踪算法的第一步是创建用于进行图像/视频的标注工具,用户可用此工具来指定在每个样本图中想要的面部特征位置。
-
训练数据类型
训练人脸跟踪算法的数据一般由以下四部分构成:
-
- 图像:这部分是包含整个人脸图像(图像或视频帧)的集合
- 标注:这部分采用手工方法标注每幅图像中被跟踪的面部特征的相对位置
- 对称性索引:这部分对定义了双边对称特征的面部特征点都保留了一个编号,以便用来镜像训练图像,可有效地让训练集大小增加一倍
- 连通性索引:这部分是一组标注的索引对,它们定义了面部特征的语义解释。连通性对可视化跟踪结果很有用
这四个组件的可视化情形显示在下图中,从左到右依次是原始图像、脸部特征标注、颜色编码的双边对称点、镜像图像与相应标注、面部特征的连通性。

为了方便管理这种数据,需实现具有读写功能的类。本章将使用在 ft_data.hpp 头文件中定义的 ft_data 类,它是按人脸跟踪数据的特性专门设计的。所有元素都定义成类的公有成员变量,如下所示
1 class ft_data{                             //人脸跟踪数据
2 public:
3   vector<int> symmetry;                    // 人脸特征点的索引,维数与用户定义的特征点数一样
4   vector<Vec2i> connections;               // 定义一对连通的面部特征
5   vector<string> imnames;                  // 存储每个图像文件名
6   vector<vector<Point2f> > points;         // 存储特征点的位置
7   ...
8 }
ft_data 类实现了许多访问数据的有用方法。为了访问数据集的图像,可用 get_image 函数加载图像。使用该函数需指定加载图像的索引 idx ,以及是否将图像以 y 轴做镜像。该函数实现如下:
 1 Mat
 2 ft_data::
 3 get_image(const int idx,    // 图像索引
 4       const int flag)        // 0=gray,1=gray+flip,2=rgb,3=rgb+flip
 5 {
 6   if((idx < 0) || (idx >= (int)imnames.size()))return Mat();
 7   Mat img,im;
 8   if(flag < 2)img = imread(imnames[idx],0);        // gray
 9   else img = imread(imnames[idx],1);            // rgb
10   if(flag % 2 != 0)flip(img,im,1);                // 以 y 轴做镜像
11   else im = img;
12   return im;
13 }
为了通过指定的索引来得到相应图像的一个点集,可使用 get_points 函数通过镜像索引来得到一个基于浮点的坐标向量
 1 vector<Point2f>
 2 ft_data::
 3 get_points(const int idx,        // 相应图像的索引
 4        const bool flipped)        // 是否以 y 轴做镜像
 5 {
 6   if((idx < 0) || (idx >= (int)imnames.size()))return vector<Point2f>();
 7   vector<Point2f> p = points[idx];
 8   if(flipped){        // 以 y 轴做镜像
 9     Mat im = this->get_image(idx,0);    // im 用来获取图像的宽度
10     int n = p.size(); vector<Point2f> q(n);
11     for(int i = 0; i < n; i++){            // 沿竖直方向翻转
12       q[i].x = im.cols-1-p[symmetry[i]].x;
13       q[i].y = p[symmetry[i]].y;
14     }return q;
15   }else return p;
16 }
ft_data 类还实现了一个函数 rm_incomplete_samples,该函数删除集合中没有进行相应标注的样本,具体实现如下:
 1 void
 2 ft_data::
 3 rm_incomplete_samples()        // 删除集合中没有进行相应标注的样本
 4 {
 5   int n = points[0].size(),N = points.size();
 6   // 找出标注数最多的样本,作为标准样本
 7   for(int i = 1; i < N; i++)n = max(n,int(points[i].size()));
 8   for(int i = 0; i < int(points.size()); i++){
 9     if(int(points[i].size()) != n){        // 样本标注点的数量小于标准样本标注点数,从样本中删除
10       points.erase(points.begin()+i); imnames.erase(imnames.begin()+i); i--;
11     }else{
12       int j = 0;
13       for(; j < n; j++){
14         // 若点的(x,y)存在小于0,则可认为它在相应的图像中不存在
15         if((points[i][j].x <= 0) || (points[i][j].y <= 0))break;
16       }
17       if(j < n){    // 从样本中删除
18     points.erase(points.begin()+i); imnames.erase(imnames.begin()+i); i--;
19       }
20     }
21   }
22 }
ft_data 类还实现了函数 read 和 write 的序列化,这样就可以方便地存储和加载该类。
 1 void
 2 ft_data::
 3 write(FileStorage &fs) const
 4 {
 5   assert(fs.isOpened());
 6   fs << "{";
 7   fs << "n_connections" << (int)connections.size();        // 面部特征的语义解释
 8   for(int i = 0; i < int(connections.size()); i++){
 9     char str[256]; const char* ss;
10     sprintf(str,"connections %d 0",i); ss = str; fs << ss << connections[i][0];
11     sprintf(str,"connections %d 1",i); ss = str; fs << ss << connections[i][1];
12   }
13   fs << "n_symmetry" << (int)symmetry.size();            // 特征点的索引
14   for(int i = 0; i < int(symmetry.size()); i++){
15     char str[256]; const char* ss;
16     sprintf(str,"symmetry %d",i); ss = str; fs << ss << symmetry[i];
17   }
18   fs << "n_images" << (int)imnames.size();                // 图像绝对路径
19   for(int i = 0; i < int(imnames.size()); i++){
20     char str[256]; const char* ss;
21     sprintf(str,"image %d",i); ss = str; fs << ss << imnames[i];
22   }
23   int n = points[0].size(),N = points.size();            // 描述人脸特征点的结构
24   Mat X(2*n,N,CV_32F); X = -1;
25   for(int i = 0; i < N; i++){
26     if(int(points[i].size()) == n){
27       for(int j = 0; j < n; j++){
28     X.at<float>(2*j  ,i) = points[i][j].x;
29     X.at<float>(2*j+1,i) = points[i][j].y;
30       }
31     }
32   }
33   fs << "shapes" << X << "}";
34 }
35 //==============================================================================
36 void
37 ft_data::
38 read(const FileNode& node)
39 {
40   assert(node.type() == FileNode::MAP);
41   int n; node["n_connections"] >> n; connections.resize(n);
42   for(int i = 0; i < n; i++){
43     char str[256]; const char* ss;
44     sprintf(str,"connections %d 0",i); ss = str; node[ss] >> connections[i][0];
45     sprintf(str,"connections %d 1",i); ss = str; node[ss] >> connections[i][1];
46   }
47   node["n_symmetry"] >> n; symmetry.resize(n);
48   for(int i = 0; i < n; i++){
49     char str[256]; const char* ss;
50     sprintf(str,"symmetry %d",i); ss = str; node[ss] >> symmetry[i];
51   }
52   node["n_images"] >> n; imnames.resize(n);
53   for(int i = 0; i < n; i++){
54     char str[256]; const char* ss;
55     sprintf(str,"image %d",i); ss = str; node[ss] >> imnames[i];
56   }
57   Mat X; node["shapes"] >> X; int N = X.cols; n = X.rows/2;
58   points.resize(N);
59   for(int i = 0; i < N; i++){
60     points[i].clear();
61     for(int j = 0; j < n; j++){
62       Point2f p(X.at<float>(2*j,i),X.at<float>(2*j+1,i));
63       if((p.x >= 0) && (p.y >= 0))points[i].push_back(p);
64     }
65   }
66 }
为对数据集进行可视化操作, ft_data 实现了许多用于绘图的函数。
  1 void
  2 ft_data::
  3 draw_points(Mat &im,
  4         const int idx,
  5         const bool flipped,
  6         const Scalar color,
  7         const vector<int> &pts)
  8 {
  9   if((idx < 0) || (idx >= (int)imnames.size()))return;
 10   int n = points[idx].size();
 11   if(pts.size() == 0){
 12     for(int i = 0; i < n; i++){
 13       if(!flipped)circle(im,points[idx][i],1,color,2,CV_AA);
 14       else{
 15     Point2f p(im.cols - 1 - points[idx][symmetry[i]].x,
 16           points[idx][symmetry[i]].y);
 17     circle(im,p,1,color,2,CV_AA);
 18       }
 19     }
 20   }else{
 21     int m = pts.size();
 22     for(int j = 0; j < m; j++){
 23       int i = pts[j]; if((i < 0) || (i >= n))continue;
 24       if(!flipped)circle(im,points[idx][i],1,color,2,CV_AA);
 25       else{
 26     Point2f p(im.cols - 1 - points[idx][symmetry[i]].x,
 27           points[idx][symmetry[i]].y);
 28     circle(im,p,1,color,2,CV_AA);
 29       }
 30     }
 31   }
 32 }
 33 //==============================================================================
 34 void
 35 ft_data::
 36 draw_sym(Mat &im,
 37      const int idx,
 38      const bool flipped,
 39      const vector<int> &pts)
 40 {
 41   if((idx < 0) || (idx >= (int)imnames.size()))return;
 42   int n = points[idx].size();
 43   RNG rn; vector<Scalar> colors(n);
 44   for(int i = 0; i < n; i++)colors[i] = Scalar::all(0.0);
 45   for(int i = 0; i < n; i++){
 46     if(colors[i] == Scalar::all(0.0)){
 47       colors[i] = Scalar(rn.uniform(0,255),rn.uniform(0,255),rn.uniform(0,255));
 48       colors[symmetry[i]] = colors[i];
 49     }
 50   }
 51   vector<Point2f> p = this->get_points(idx,flipped);
 52   if(pts.size() == 0){
 53     for(int i = 0; i < n; i++){circle(im,p[i],1,colors[i],2,CV_AA);}
 54   }else{
 55     int m = pts.size();
 56     for(int j = 0; j < m; j++){
 57       int i = pts[j]; if((i < 0) || (i >= n))continue;
 58       circle(im,p[i],1,colors[i],2,CV_AA);
 59     }
 60   }
 61 }
 62 //==============================================================================
 63 void
 64 ft_data::
 65 draw_connect(Mat &im,
 66          const int idx,
 67          const bool flipped,
 68          const Scalar color,
 69          const vector<int> &con)
 70 {
 71   if((idx < 0) || (idx >= (int)imnames.size()))return;
 72   int n = connections.size();
 73   if(con.size() == 0){
 74     for(int i = 0; i < n; i++){
 75       int j = connections[i][0],k = connections[i][1];
 76       if(!flipped)line(im,points[idx][j],points[idx][k],color,1);
 77       else{
 78     Point2f p(im.cols - 1 - points[idx][symmetry[j]].x,
 79           points[idx][symmetry[j]].y);
 80     Point2f q(im.cols - 1 - points[idx][symmetry[k]].x,
 81           points[idx][symmetry[k]].y);
 82     line(im,p,q,color,1);
 83       }
 84     }
 85   }else{
 86     int m = con.size();
 87     for(int j = 0; j < m; j++){
 88       int i = con[j]; if((i < 0) || (i >= n))continue;
 89       int k = connections[i][0],l = connections[i][1];
 90       if(!flipped)line(im,points[idx][k],points[idx][l],color,1);
 91       else{
 92     Point2f p(im.cols - 1 - points[idx][symmetry[k]].x,
 93           points[idx][symmetry[k]].y);
 94     Point2f q(im.cols - 1 - points[idx][symmetry[l]].x,
 95           points[idx][symmetry[l]].y);
 96     line(im,p,q,color,1);
 97       }
 98     }
 99   }
100 }
2. 标注工具
为了使生成的标注能被本章中的代码使用,可在 annotate.cpp 文件中找到一个基本的标注工具。该工具将一个视屏流作为输入,这个视频流可以来自文件或相机、使用该工具的过程有如下五个步骤:
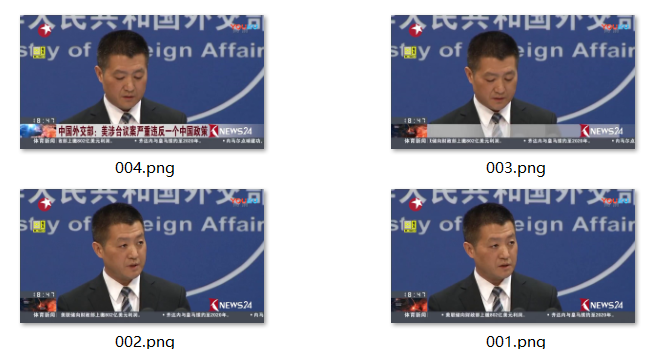
- 捕获图像:第一步是将图像流显示在屏幕上,用户按下 S 键就可选择图像进行标注。
- 主要代码如下:
 1 //选择图像进行标注
 2 annotation.set_capture_instructions();        // 显示帮助信息
 3 while (cam.get(CV_CAP_PROP_POS_AVI_RATIO) < 0.999999){    // 循环遍历每一帧
 4     Mat im, img; cam >> im;
 5     annotation.image = im.clone();
 6     annotation.draw_instructions();
 7     imshow(annotation.wname, annotation.image);        // 显示当前帧
 8     int c = waitKey(0);        // 等待按键,q 退出,s 选择图像进行标注,其它任意键 下一帧
 9     if (c == 'q')break;
10     else if (c == 's'){
11         int idx = annotation.data.imnames.size(); char str[1024];
12         if (idx < 10)sprintf(str, "00%d.png", idx);
13         else if (idx < 100)sprintf(str, "0%d.png",idx);
14         else               sprintf(str, "%d.png", idx);        // 文件名格式 三位整数.png
15         imwrite(str, im);        // 保存该帧图像
16         annotation.data.imnames.push_back(str);
17         cam >> im;                // 显示下一帧
18         imshow(annotation.wname, im);
19     }
20 }
21 if (annotation.data.imnames.size() == 0)return 0;
22 annotation.data.points.resize(annotation.data.imnames.size());
- 运行效果:

- 主要代码如下:
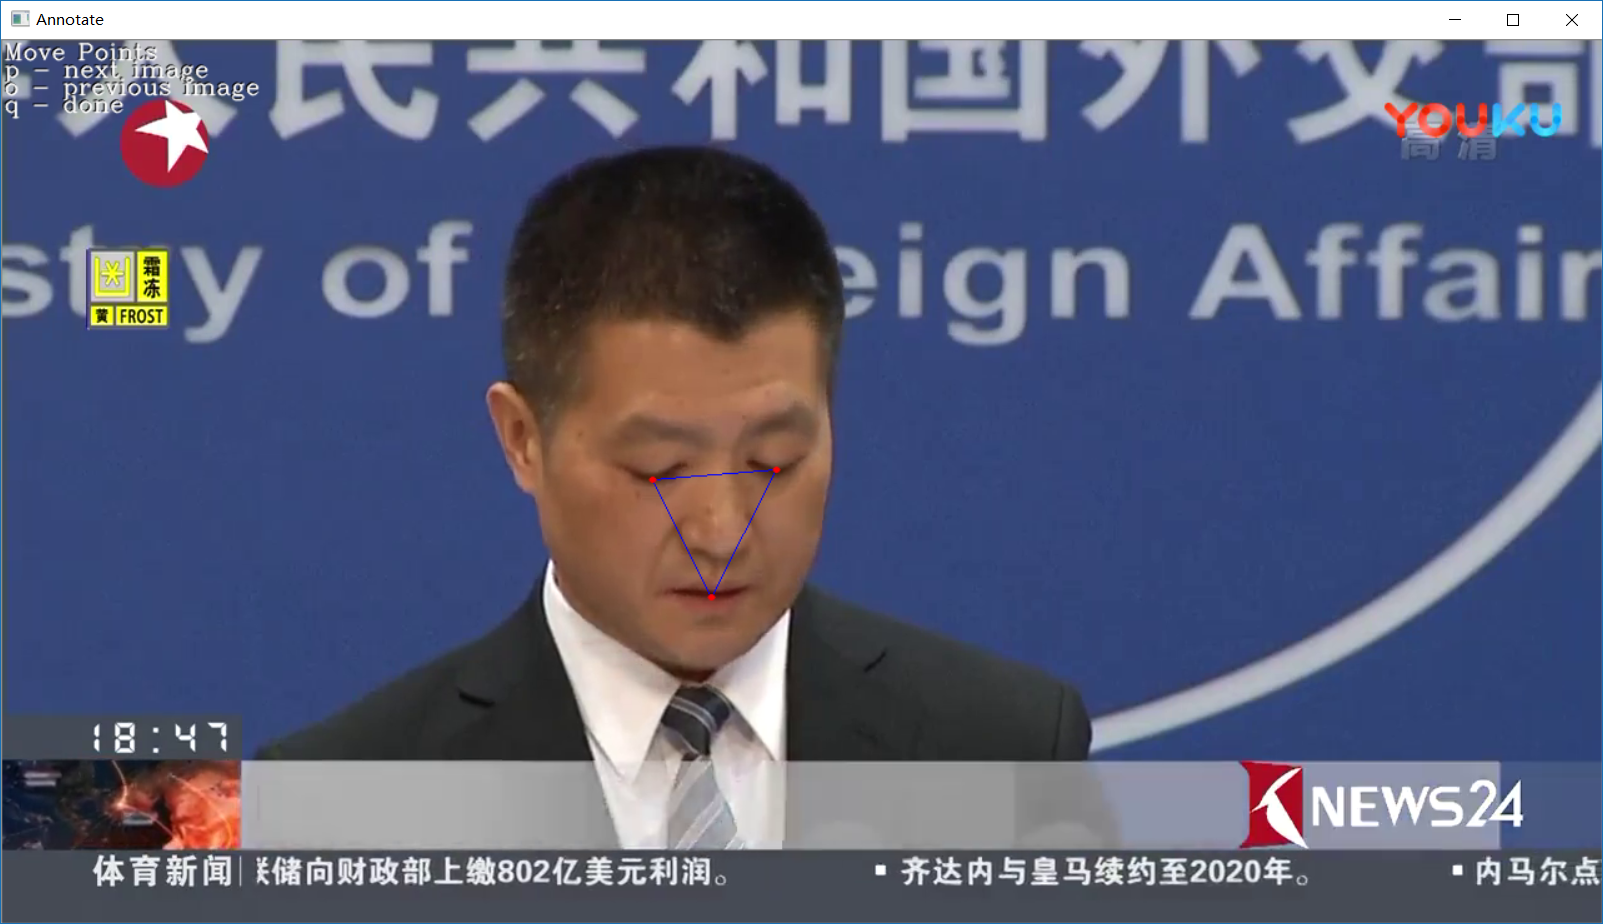
- 标注第一幅图:第二步首先将上一步中第一幅图呈现给用户,然后用户会在这幅图中选择需要跟踪的面部特征位置。
- 主要代码如下:
 1 // 标注第一幅图像
 2 setMouseCallback(annotation.wname, pp_MouseCallback, 0);
 3 annotation.set_pick_points_instructions();    // 显示帮助信息
 4 annotation.set_current_image(0);        // 选择第一幅图像
 5 annotation.draw_instructions();
 6 annotation.idx = 0;
 7 while (1){            // 在键入 q 之前,鼠标单击标注特征点
 8     annotation.draw_points();
 9     imshow(annotation.wname, annotation.image);
10     if (waitKey(0) == 'q')break;
11 }
12 if (annotation.data.points[0].size() == 0)return 0;
13 annotation.replicate_annotations(0);    // 保存特征点位置信息
- 运行效果(为检验代码,只选取三个特征点):
- 主要代码如下:

- 标注连通性:在这一步中,用户需选择将两组点连接起来,以建立人脸模型的连通性结构
- 主要代码如下:
 1 //标注连通性
 2 setMouseCallback(annotation.wname, pc_MouseCallback, 0);
 3 annotation.set_connectivity_instructions();    // 帮助信息
 4 annotation.set_current_image(0);
 5 annotation.draw_instructions();
 6 annotation.idx = 0;
 7 while (1){            // 在键入 q 之前,鼠标单击一组点建立连接
 8     annotation.draw_connections();
 9     imshow(annotation.wname, annotation.image); if (waitKey(0) == 'q')break;
10 }
11 save_ft(fname.c_str(), annotation.data);
- 运行效果如下:
- 主要代码如下:

- 标注对称性:这一步仍然使用上一步的图像,用户需选出左右对称的点。
- 主要代码如下:
 1 //标注对称性
 2 setMouseCallback(annotation.wname, ps_MouseCallback, 0);
 3 annotation.initialise_symmetry(0);
 4 annotation.set_symmetry_instructions();
 5 annotation.set_current_image(0);
 6 annotation.draw_instructions();
 7 annotation.idx = 0; annotation.pidx = -1;
 8 while (1){            // 在键入 q 之前,鼠标单击特征点标注对称性
 9     annotation.draw_symmetry();
10     imshow(annotation.wname, annotation.image); if (waitKey(0) == 'q')break;
11 }
12 save_ft(fname.c_str(), annotation.data);
- 运行效果如下:
- 主要代码如下:

- 标注剩下的图像:重复第 2 步至第 4 步,移动特征点使特征点对应特征位置
- 主要代码如下:
 1 //标注剩下的图像
 2 if (type != 2){
 3     setMouseCallback(annotation.wname, mv_MouseCallback, 0);
 4     annotation.set_move_points_instructions();        // 帮助信息
 5     annotation.idx = 1; annotation.pidx = -1;
 6     while (1){
 7         annotation.set_current_image(annotation.idx);
 8         annotation.draw_instructions();
 9         annotation.set_clean_image();        // 背景图
10         annotation.draw_connections();        // 连线
11         imshow(annotation.wname, annotation.image);
12         int c = waitKey(0);        // q 退出,p 下一幅图像,o 上一幅图像
13         if (c == 'q')break;
14         else if (c == 'p'){ annotation.idx++; annotation.pidx = -1; }
15         else if (c == 'o'){ annotation.idx--; annotation.pidx = -1; }
16         if (annotation.idx < 0)annotation.idx = 0;
17         if (annotation.idx >= int(annotation.data.imnames.size()))
18             annotation.idx = annotation.data.imnames.size() - 1;
19     }
20 }
21 save_ft(fname.c_str(), annotation.data);
- 运行效果如下:
- 主要代码如下:
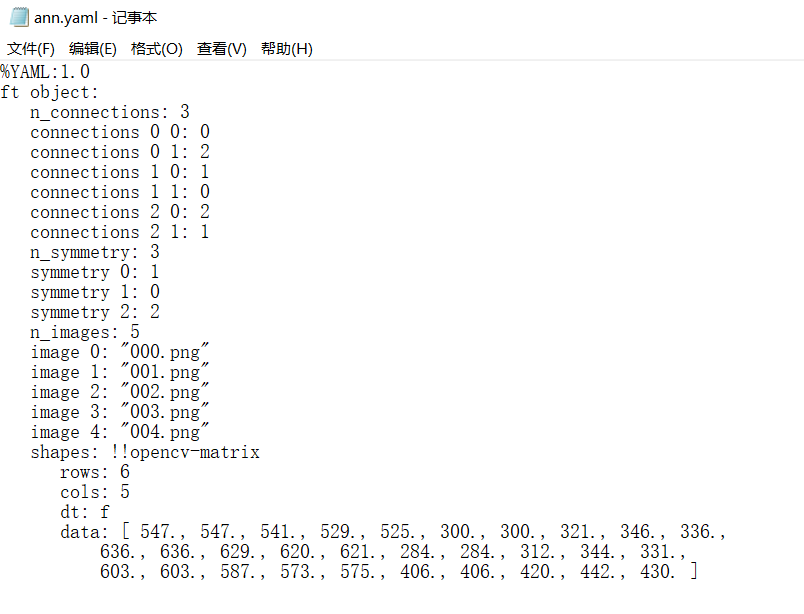
该工具将标注数据储存到 ann.yaml 中,如下:
3. 准备标注数据( MUCT 数据集)
为了让本章的标注工作变得轻松一些,可利用公开的 MUCT 数据集。这个数据集由 3755 张人脸图像构成,每张人脸有76个点作为标记。数据集的图像是在不同光照条件和头部姿势下拍摄的人,他们来自不同年龄和种族。
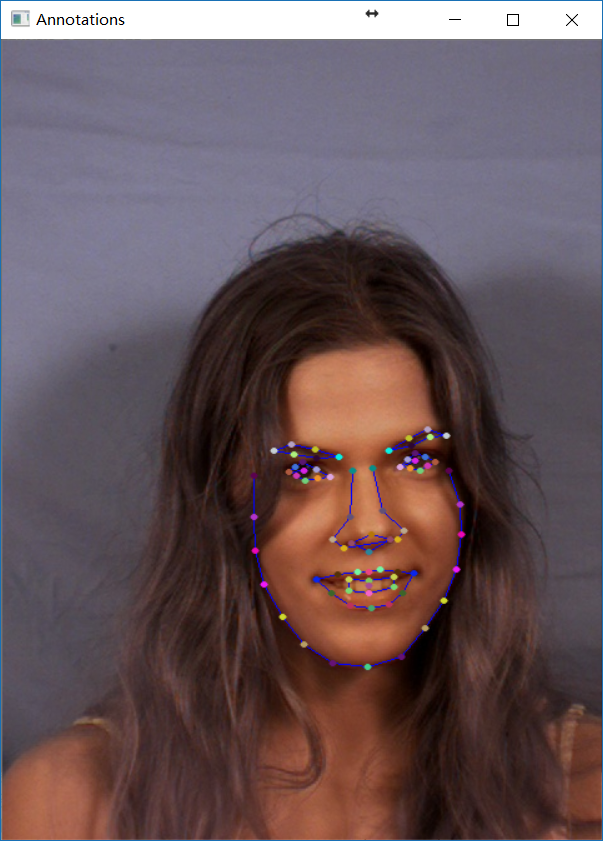
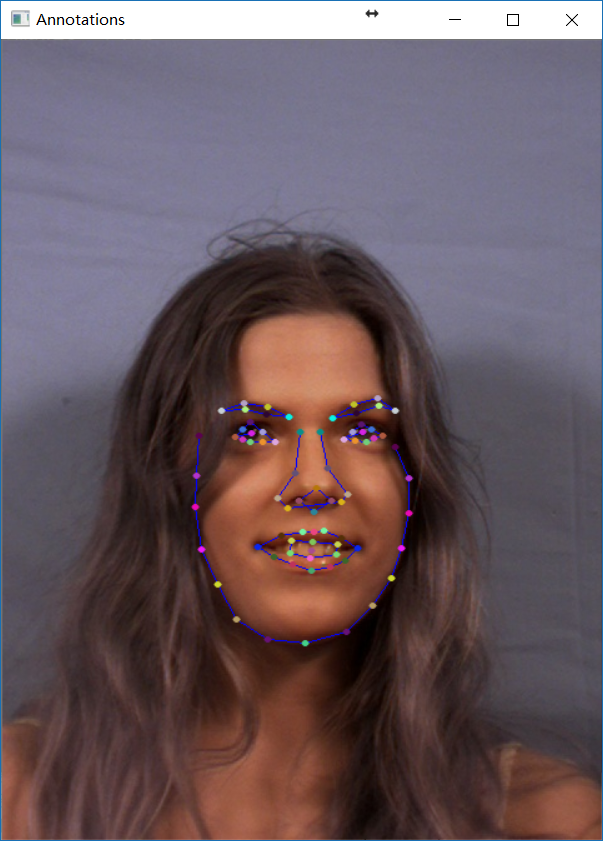
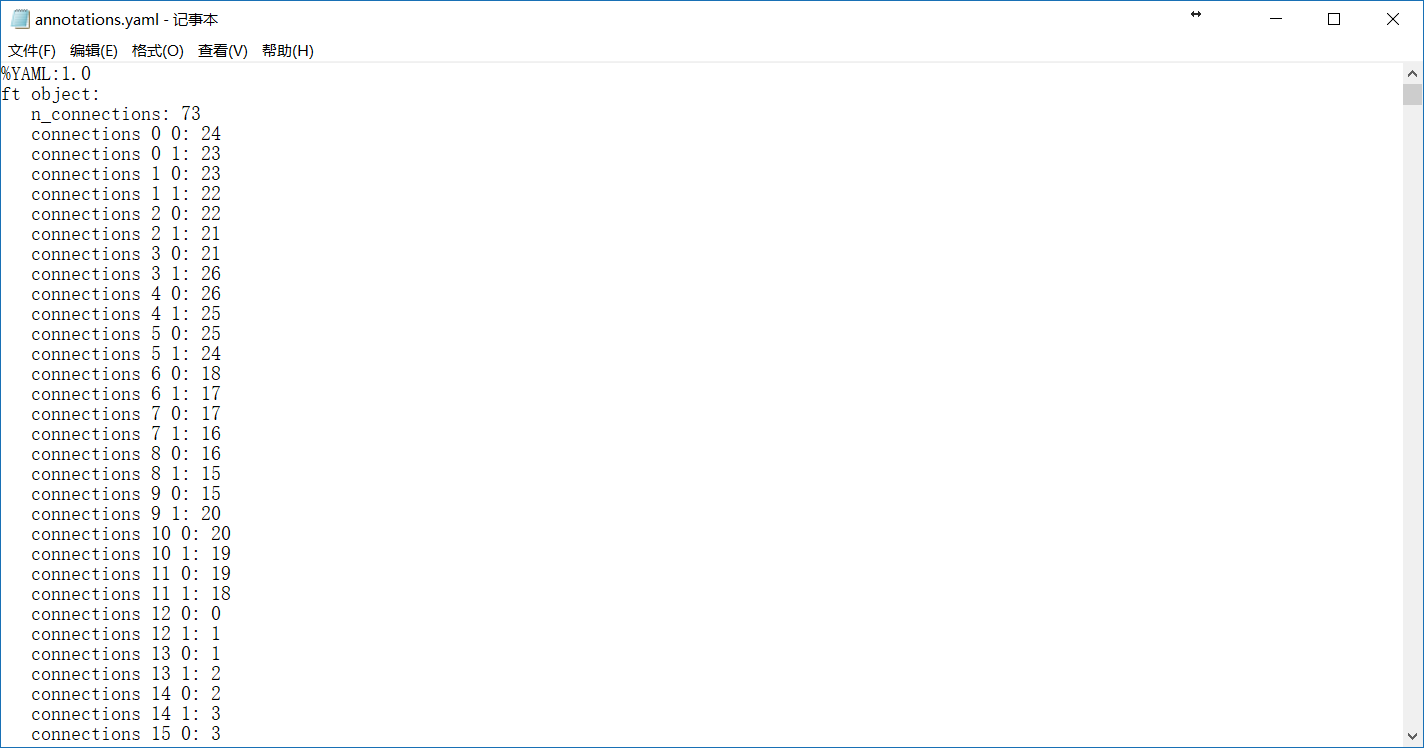
该数据集只包含了标注点,需要自定义连通性和对称性。标注连通性和对称性之后效果如下图左,标注数据储存在 annotations.yaml 中,如下图右:

visualize_annotations.cpp 实现对数据集可视化操作,关键代码如下:
 1 cout << "n images: " << data.imnames.size() << endl
 2     << "n points: " << data.symmetry.size() << endl
 3     << "n connections: " << data.connections.size() << endl;
 4 // 可视化标注数据
 5 namedWindow("Annotations");
 6 int index = 0; bool flipped = false;
 7 while(1){
 8 Mat image;
 9 if(flipped)image = data.get_image(index,3);
10 else image = data.get_image(index,2);            // 背景图片
11 data.draw_connect(image,index,flipped);            // 连通
12 data.draw_sym(image,index,flipped);                // 对称
13 imshow("Annotations",image);
14 int c = waitKey(0);            // q 退出,p 下一张,o 上一张,f 翻转
15 if(c == 'q')break;
16 else if(c == 'p')index++;
17 else if(c == 'o')index--;
18 else if(c == 'f')flipped = !flipped;
19 if(index < 0)index = 0;
20 else if(index >= int(data.imnames.size()))index = data.imnames.size()-1;
21 }
运行效果如下: