springSecurity是spring官方给我们提供的一个非常强大的一个安全框架。也是现在最受欢迎的安全框架,比shiro更强大
springSecurity主要工作原理是内置了许多过滤器,组成过滤器链,每个过滤器都有自己的明确分工,然后还有异常处理类,还有最后的一个认证授权类。看图
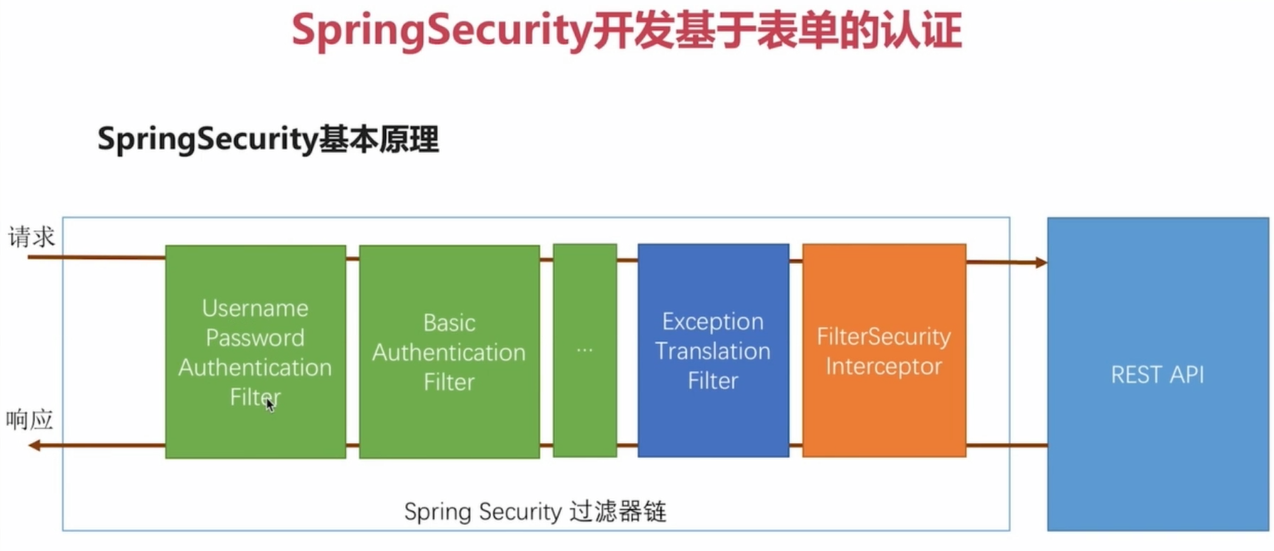
绿色的是代表过滤器链,我们可以自己配置增加和删除,蓝色的是异常处理类,后面黄色的是最后的认证处理类,这两个类的位置是不会变的,所以说,最终我们的请求会到filterSecurityInterceptor这个类中来判断到底能不能访问我们请求的url
比如说:我们直接一个请求(不是登陆请求),他先会到filterSecurityInterceptor这个类,然后验证,没有成功就会抛出异常,让ExceptionTranslationFiter这个类来处理(实际上就是一个转发到登录页面),然后填上账号密码,登陆,会让usernamepasswordAuthenticationFilter这个类拦截,然后最后还是在filterSecurityInterceptor这个类来判断是否要对我们所请求的url做请求
看下面的一个简单demo
BrowserSecurityConfig.java


package com.imooc.security.browser;

import org.springframework.context.annotation.Configuration;
import org.springframework.security.config.annotation.web.builders.HttpSecurity;
import org.springframework.security.config.annotation.web.configuration.WebSecurityConfigurerAdapter;

/**
 * Created by 敲代码的卡卡罗特
 * on 2018/4/15 21:48.
 */
@Configuration
public class BrowserSecurityConfig extends WebSecurityConfigurerAdapter {
    @Override
    protected void configure(HttpSecurity http) throws Exception {
//        http.httpBasic()   //弹出框请求
        http.formLogin()   //表单验证
                .and()
                .authorizeRequests() //开启认证请求
                .anyRequest()        //任何请求
                .authenticated();    //都需要认证
    }
}
声明一个配置文件,配置最基本的功能。
然后我们再访问url就需要登陆了,原始的用户名是user,密码是框架系统生成了验证码,我们需要改变一下。用我们自定义的账号和密码。
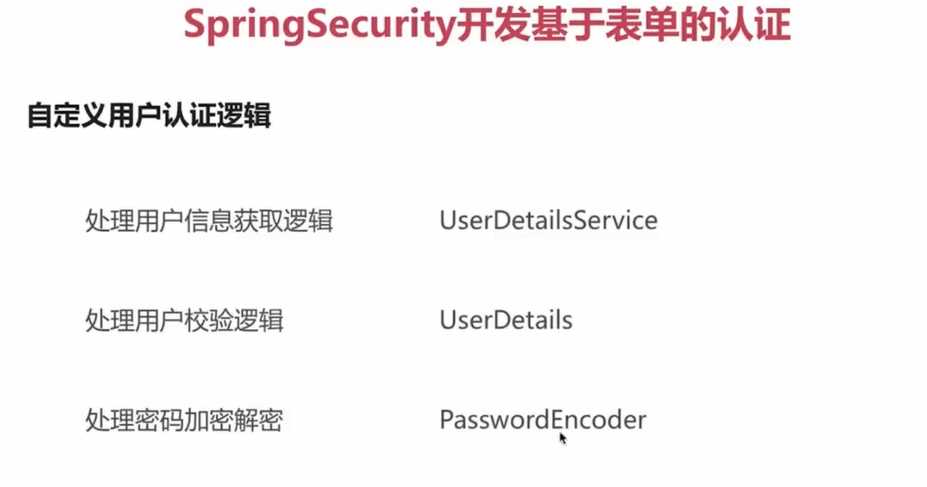
MyUserDetailService.java (最终返回一个User对象) 自定义用户很简单就是@Component 这个类,让spring管理就行
package com.imooc.security.browser;

import org.springframework.security.core.authority.AuthorityUtils;
import org.springframework.security.core.userdetails.User;
import org.springframework.security.core.userdetails.UserDetails;
import org.springframework.security.core.userdetails.UserDetailsService;
import org.springframework.security.core.userdetails.UsernameNotFoundException;
import org.springframework.stereotype.Component;

/**
 * Created by 敲代码的卡卡罗特
 * on 2018/4/15 22:08.
 */
@Component
public class MyUserDetailService implements UserDetailsService {
    @Override
    public UserDetails loadUserByUsername(String s) throws UsernameNotFoundException {

        //、、、、、、省略根据用户名从数据库得到user对象的过程  这个方法就是根据登陆的用户名然后返回一个user对象,这个user对象是框架提供给我们的
        //继承了UserDetails这个类。我们也可以自定义类继承UserDetails
        return new User(s,"123", AuthorityUtils.commaSeparatedStringToAuthorityList("admin"));
    }
}
UserDetails.java 源码解析
public interface UserDetails extends Serializable {
    //权限集合
    Collection<? extends GrantedAuthority> getAuthorities();
    //密码
    String getPassword();
    //账号
    String getUsername();
    //账号是否过期
    boolean isAccountNonExpired();
    //账号是否锁定
    boolean isAccountNonLocked();
    //密码是否过期
    boolean isCredentialsNonExpired();
    //账号是否可用
    boolean isEnabled();
}
密码--》很简单,只需要在配置文件配置一下这个bean就行, BCryptPasswordEncoder这个类是框架给我们提供的。
但是我们在平常用的时候肯定密码存的明文,所以我们需要一个加密算法,我们来配一个加密类。
@Bean
    public PasswordEncoder passwordEncoder(){
        return new BCryptPasswordEncoder();
    }
如果我们还想更加定制化一些呢?
比如说:登陆成功去那个方法,登陆失败去那一个方法。为了方便记录日志嘛。当然。这些可以在配置文件中配置,非常简单。看代码
自定义成功和失败的处理类,只需要new一个类实现框架给的特定的接口就行。然后在配置文件中配置
ImoocAuthenticationSuccessHandler.java //成功处理类
/**
 *
 */
package com.imooc.security.browser.authentication;

import java.io.IOException;

import javax.servlet.ServletException;
import javax.servlet.http.HttpServletRequest;
import javax.servlet.http.HttpServletResponse;

import org.slf4j.Logger;
import org.slf4j.LoggerFactory;
import org.springframework.beans.factory.annotation.Autowired;
import org.springframework.security.core.Authentication;
import org.springframework.security.web.authentication.SavedRequestAwareAuthenticationSuccessHandler;
import org.springframework.stereotype.Component;

import com.fasterxml.jackson.databind.ObjectMapper;
import com.imooc.security.core.properties.LoginResponseType;
import com.imooc.security.core.properties.SecurityProperties;

/**
 * @author zhailiang
 *
 */
@Component("imoocAuthenticationSuccessHandler")
public class ImoocAuthenticationSuccessHandler extends SavedRequestAwareAuthenticationSuccessHandler {

    private Logger logger = LoggerFactory.getLogger(getClass());

    @Autowired
    private ObjectMapper objectMapper;  //springboot默认注入了这个类,处理json的

    @Autowired
    private SecurityProperties securityProperties; //自定义的参数类,不用管。就是配置的url之类的。

    /*
     * (non-Javadoc)
     *
     * @see org.springframework.security.web.authentication.
     * AuthenticationSuccessHandler#onAuthenticationSuccess(javax.servlet.http.
     * HttpServletRequest, javax.servlet.http.HttpServletResponse,
     * org.springframework.security.core.Authentication)
     */
    @Override
    public void onAuthenticationSuccess(HttpServletRequest request, HttpServletResponse response,
            Authentication authentication) throws IOException, ServletException {
        // 注意authentication这个参数可牛了   这里面封装了你当前对象的所有信息
        logger.info("登录成功");
        //这是业务逻辑,不用管,就是说如果设置了json格式,就返回前台json,如果不是就返回页面
        if (LoginResponseType.JSON.equals(securityProperties.getBrowser().getLoginType())) {
            response.setContentType("application/json;charset=UTF-8");
            response.getWriter().write(objectMapper.writeValueAsString(authentication));
        } else {
            //调用父类的方法,其实就是跳转到原来的页面
            super.onAuthenticationSuccess(request, response, authentication);
        }

    }

}
onAuthenticationFailure.java //失败处理类
/**
 *
 */
package com.imooc.security.browser.authentication;

import java.io.IOException;

import javax.servlet.ServletException;
import javax.servlet.http.HttpServletRequest;
import javax.servlet.http.HttpServletResponse;

import org.slf4j.Logger;
import org.slf4j.LoggerFactory;
import org.springframework.beans.factory.annotation.Autowired;
import org.springframework.http.HttpStatus;
import org.springframework.security.core.AuthenticationException;
import org.springframework.security.web.authentication.SimpleUrlAuthenticationFailureHandler;
import org.springframework.stereotype.Component;

import com.fasterxml.jackson.databind.ObjectMapper;
import com.imooc.security.browser.support.SimpleResponse;
import com.imooc.security.core.properties.LoginResponseType;
import com.imooc.security.core.properties.SecurityProperties;

/**
 * @author zhailiang
 *
 */
@Component("imoocAuthenctiationFailureHandler")
public class ImoocAuthenctiationFailureHandler extends SimpleUrlAuthenticationFailureHandler {

    private Logger logger = LoggerFactory.getLogger(getClass());

    @Autowired
    private ObjectMapper objectMapper;

    @Autowired
    private SecurityProperties securityProperties;


    /* (non-Javadoc)
     * @see org.springframework.security.web.authentication.AuthenticationFailureHandler#onAuthenticationFailure(javax.servlet.http.HttpServletRequest, javax.servlet.http.HttpServletResponse, org.springframework.security.core.AuthenticationException)
     */
    @Override
    public void onAuthenticationFailure(HttpServletRequest request, HttpServletResponse response,
            AuthenticationException exception) throws IOException, ServletException {

        logger.info("登录失败");

        if (LoginResponseType.JSON.equals(securityProperties.getBrowser().getLoginType())) {
            response.setStatus(HttpStatus.INTERNAL_SERVER_ERROR.value());
            response.setContentType("application/json;charset=UTF-8");
            response.getWriter().write(objectMapper.writeValueAsString(new SimpleResponse(exception.getMessage())));
        }else{
            super.onAuthenticationFailure(request, response, exception);
        }


    }

}
BrowserSecurityConfig.java //配置文件
package com.imooc.security.browser;

import com.imooc.security.browser.authentication.ImoocAuthenctiationFailureHandler;
import com.imooc.security.browser.authentication.ImoocAuthenticationSuccessHandler;
import org.springframework.beans.factory.annotation.Autowired;
import org.springframework.context.annotation.Bean;
import org.springframework.context.annotation.Configuration;
import org.springframework.security.config.annotation.web.builders.HttpSecurity;
import org.springframework.security.config.annotation.web.configuration.WebSecurityConfigurerAdapter;
import org.springframework.security.crypto.bcrypt.BCryptPasswordEncoder;
import org.springframework.security.crypto.password.PasswordEncoder;

/**
 * Created by 敲代码的卡卡罗特
 * on 2018/4/15 21:48.
 */
@Configuration
public class BrowserSecurityConfig extends WebSecurityConfigurerAdapter {
    @Autowired
    ImoocAuthenticationSuccessHandler imoocAuthenticationSuccessHandler;
    @Autowired
    ImoocAuthenctiationFailureHandler imoocAuthenctiationFailureHandler;


    @Bean
    public PasswordEncoder passwordEncoder(){
        return new BCryptPasswordEncoder();
    }

    @Override
    protected void configure(HttpSecurity http) throws Exception {
//        http.httpBasic()   //弹出框请求
        http.formLogin()   //表单验证
                .loginPage("/authentication/require") //返回登录页,可以是一个action,也可以是一个html页面
                .loginProcessingUrl("/authentication/form") //点击登陆的action,默认是login 我们可以自定义
                .successHandler(imoocAuthenticationSuccessHandler) //配置登陆成功的处理类
                .failureHandler(imoocAuthenctiationFailureHandler)//配置登陆失败的处理类
                .and()
                .authorizeRequests() //开启认证请求
                .antMatchers("/imooc-signIn.html","/authentication/require").permitAll()//忽略认证
                .anyRequest()        //任何请求
                .authenticated();    //都需要认证

        http.csrf().disable();   //关闭csrf

    }
}
自定义未登陆跳转接口 (也就是进一步细化判断,写日志什么的,平常我们在配置文件中配的就是跳转到登陆页面,这是跳转到接口)
package com.imooc.security.browser;

import com.imooc.security.browser.support.SimpleResponse;
import com.imooc.security.core.properties.SecurityConstants;
import com.imooc.security.core.properties.SecurityProperties;
import org.apache.commons.lang.StringUtils;
import org.slf4j.Logger;
import org.slf4j.LoggerFactory;
import org.springframework.beans.factory.annotation.Autowired;
import org.springframework.http.HttpStatus;
import org.springframework.security.web.DefaultRedirectStrategy;
import org.springframework.security.web.RedirectStrategy;
import org.springframework.security.web.savedrequest.HttpSessionRequestCache;
import org.springframework.security.web.savedrequest.RequestCache;
import org.springframework.security.web.savedrequest.SavedRequest;
import org.springframework.web.bind.annotation.RequestMapping;
import org.springframework.web.bind.annotation.ResponseStatus;
import org.springframework.web.bind.annotation.RestController;

import javax.servlet.http.HttpServletRequest;
import javax.servlet.http.HttpServletResponse;
import java.io.IOException;

/**
 * Created by 敲代码的卡卡罗特
 * on 2018/4/16 0:16.
 */
@RestController
public class BrowserSecurityController {
    private Logger logger = LoggerFactory.getLogger(getClass());
    private RequestCache requestCache = new HttpSessionRequestCache();  //提供用缓存中得到url的类
    private RedirectStrategy redirectStrategy = new DefaultRedirectStrategy(); //提供跳转的类


    @Autowired
    private SecurityProperties securityProperties;
    /**
     * 当需要身份认证时,跳转到这里
     *
     * @param request
     * @param response
     * @return
     * @throws IOException
     */
    @RequestMapping(SecurityConstants.DEFAULT_UNAUTHENTICATION_URL)
    @ResponseStatus(code = HttpStatus.UNAUTHORIZED) //返回错误状态码
    public SimpleResponse requireAuthentication(HttpServletRequest request, HttpServletResponse response)
            throws IOException {

        SavedRequest savedRequest = requestCache.getRequest(request, response);

        if (savedRequest != null) {
            String targetUrl = savedRequest.getRedirectUrl();
            logger.info("引发跳转的请求是:" + targetUrl);
            if (StringUtils.endsWithIgnoreCase(targetUrl, ".html")) {
                redirectStrategy.sendRedirect(request, response, securityProperties.getBrowser().getLoginPage());
            }
        }

        return new SimpleResponse("访问的服务需要身份认证,请引导用户到登录页");
    }

}
最后:我们可以在代码的任何地方拿到当前登陆对象的信息(首先是已经登录) 有三种方法
@GetMapping("/user1")
    public Object getUser1() {
        return SecurityContextHolder.getContext().getAuthentication();
    }
    @GetMapping("/user2")
    public Object getUser2(Authentication authentication) {
        return authentication;
    }
    @GetMapping("/user3")
    public Object getUser3(@AuthenticationPrincipal UserDetails user) {
        return user;
    }
实现记住我功能 ,配置很简单,业务逻辑是,你配置好框架会给你在你数据库中创建一个表,包含用户名,token,时间等字段,然后也会在你本地存个cookie,登陆完成在表中插入一条数据,如果下次登陆的话,验证你信息,如果没有携带认证信息,最后会查你的数据库,然后得到你用户名,然后再调那个根据用户名得到用户的方法认证成功。看代码
@Autowired
    private UserDetailsService userDetailsService;
    @Autowired
    private SecurityProperties securityProperties;
    @Bean
    public PersistentTokenRepository persistentTokenRepository() {
        JdbcTokenRepositoryImpl tokenRepository = new JdbcTokenRepositoryImpl(); //new一个这个类
        tokenRepository.setDataSource(dataSource); //指定数据源,因为要存数据库
        tokenRepository.setCreateTableOnStartup(true);//在启动的时候创建表
        return tokenRepository;
    }

 @Override
    protected void configure(HttpSecurity http) throws Exception {
//        http.httpBasic()   //弹出框请求
        http.formLogin()   //表单验证
                .loginPage("/authentication/require") //返回登录页,可以是一个action,也可以是一个html页面
                .loginProcessingUrl("/authentication/form") //点击登陆的action,默认是login 我们可以自定义
                .successHandler(imoocAuthenticationSuccessHandler) //配置登陆成功的处理类
                .failureHandler(imoocAuthenctiationFailureHandler)//配置登陆失败的处理类
                .and()
                .rememberMe() //记住我
                .tokenRepository(persistentTokenRepository())  //指定TokenRepository的bean
                .tokenValiditySeconds(securityProperties.getBrowser().getRememberMeSeconds())//过期时间
                .userDetailsService(userDetailsService)//指定根据名字得到用户的类
                .and()
                .authorizeRequests() //开启认证请求
                .antMatchers("/imooc-signIn.html","/authentication/require").permitAll()//忽略认证
                .anyRequest()        //任何请求
                .authenticated();    //都需要认证

        http.csrf().disable();   //关闭csrf

    }
最后:前台传过来的一定是 name="remember-me" 这个字段