小程序第一次用canvas画海报的各种踩坑,浪费了很长的时间.这一次吸取了上次的经验,很快就上手了
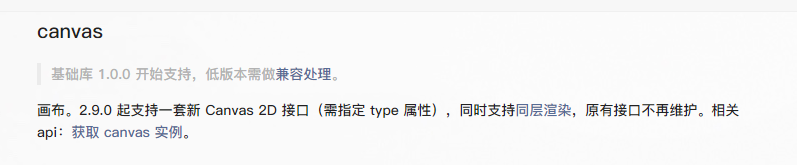
1.第一次小程序使用老版本canvas api会有提示(并且不再维护了):

2.这一次使用了最新的api
一.需求图

先拆分3个块, 然后针对每个块慢慢实现:
- 生成canvas,并且使用定位移除到屏幕外;
- 获取生成的图片url地址,
- 使用image预览url
二.canvas画图思路
1.关于微信canvas
(1) 新版 Canvas
新版 Canvas 2D 接口与 Web 一致, 但是微信小程序的文档又不完善, 导致会多一些调试时间, 还需要自己查一些api的调用方式.
(2)新版 Canvas获取实例方式改变了
- 新版使用了wx.createSelectorQuery()的方式,组件内调用要使用this.createSelectorQuery()替代(重点)
- 新版不再用canvas-id了,而是直接使用canvas标签上的id
- 新版要在canvas标签上声明type="2d"
- 新版其他内容可以看文档
// 通过 SelectorQuery 获取 Canvas 节点
      wx.createSelectorQuery()
      .select(`#${id}`)
      .fields({
        node: true,
        size: true,
      })
      .exec((res) => {
        if (res[0]) {
          // 业务代码
        }else {
          // 业务代码
        }
      });
2.不同设备的适配
重点是怎么才能把设计图完全的画到canvas中,并在不同设备上显示正常
-
- canvas中,画出来的任何图形都是物理宽度, 比如以iphone6为例, 屏幕物理宽度是375px, 但是以rpx为单位的宽度是750rpx; 可见dpr为2, 比较好计算.
-
- 单位换算是将设计图上的图形宽度根据屏幕像素比(dpr)换算为物理宽度,最终画出来,才能保证各机型完整的还原设计图(换算代码见下文代码).
-
- canvas内的坐标都是计算机内通行的坐标系,即左上角为原点,所以画任何图形取的坐标都应该是相对于canvas的左上角的.
-
- 在750宽度的设计图中,如果出现canvas的设计宽度不满750, 比如650的宽度, 那么思路就是设置canvas的宽度为650rpx, canvas内的图形的宽高等仍然以750为基准度量宽度. 比如, 650的canvas内画一个20x30的矩形, 此时只需要根据2中的单位换算, 将20和30换算为物理宽度, 并画到canvas上即可.
3.图片的相关问题
- 1.加载本地图片和加载网络图片
loadImg(canvas, imgUrl) {
    return new Promise((resolve, reject) => {
      const img = canvas.createImage();
      img.src = imgUrl;
      img.onload = () => {
        resolve(img);
      }
      img.onerror = () => {
        wx.showToast({
          title: '加载海报图片失败, 请稍后重试~',
          icon: 'none'
        })
        reject(null);
      }
    });
  },
- 2.加载base64图片
思路是将base64的数据,转换为ArrayBuffer后,写入到本地微信路径, 然后得到一个filepath, 最后调用1中的loadImg方法即可.
loadImgBase64(data) {
    return new Promise((resolve, reject) => {
      const fsm = wx.getFileSystemManager();
      const FILE_BASE_NAME = 'tmp_base64src';
      const filePath = `${wx.env.USER_DATA_PATH}/${FILE_BASE_NAME}`;
      //base64 数据转换为 ArrayBuffer 数据
      const buffer = wx.base64ToArrayBuffer(data);
      fsm.writeFile({
        filePath: filePath,
        data: buffer,
        encoding: 'binary',
        success: () => {
          resolve(filePath);
        },
        fail: err => {
          console.log('loadImgBase64失败', err);
          reject(null);
        },
      });
    });
  },
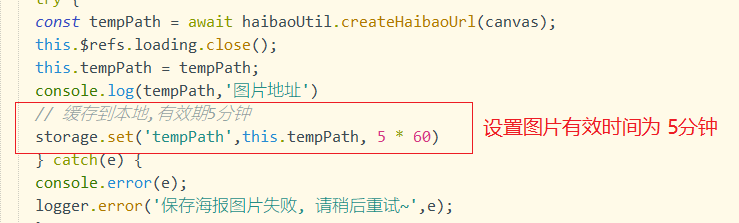
- 3.保存图片到本地
首先调用canvasToTempFilePath来生成一个临时的图片路径, 然后调用saveImageToPhotosAlbum保存到相册.
  createHaibaoUrl(canvas) {
    return new Promise((resolve, reject) => {
      wx.canvasToTempFilePath({
        x: 0,
        y: 0,
         canvas.width/dpr,
        height: canvas.height/dpr,
        destWidth: canvas.width,
        destHeight: canvas.height,
        canvas: canvas,
        fileType: 'png',
        success(res) {
          // 得到的临时图片路径
          resolve(res.tempFilePath);
        },
        fail(error) {
          reject(error);
        }
      })
    });
  },

    // 保存图片
  _saveImg(tempFilePath, cb) {
    wx.saveImageToPhotosAlbum({
      filePath: tempFilePath,
      success(res) {
        cb('success');
      },
      fail(e) {
        cb('fail');
      }
    })
  },
三.总结:
1.单位换算
思路是, 先算出实际运行机器的屏幕宽度和设计图750的宽度的缩放比率(如果设计图是别的宽度,此处就需要更改). 然后再得出要转换的单位的物理长度, 最后相乘得出实际画到canvas的长度.
/**
   * 获取屏幕和dpr后计算的数值
   * */
  computedWAndD(number) {
    // 屏幕缩放比率
    const zoomRate = windowWidth*dpr/750;
    // 物理长度
    const physicalLength = number/dpr;
    return zoomRate*physicalLength;
  },
2.画带圆角的矩形
微信并未提供相关的api.因此思路是, 一个带圆角的矩形, 只能一点点的拼接, 用直线和圆角完成.直线用lineTo方法, 圆角用arcTo方法.
另外,下面方法调用完成后, 如需圆角填充,则需要调用ctx.fill(); 如需圆角边不填充, 则需要调用ctx.stroke();
 /**
   * 画圆角矩形、圆角边框和圆角图片所用到的方法
   * @param params
   * @param ctx
   */
  toDrawRadiusRect(params, ctx) {
    const {
      left,
      top,
      width,
      height,
      borderRadius,
      borderTopLeftRadius,
      borderTopRightRadius,
      borderBottomRightRadius,
      borderBottomLeftRadius
    } = params
    ctx.beginPath()
    if (borderRadius) {
      // 全部有弧度
      const br = borderRadius / 2
      ctx.moveTo(left + br, top) // 移动到左上角的点
      ctx.lineTo(left + width - br, top) // 画上边的线
      ctx.arcTo(left + width, top, left + width, top + br, br) // 画右上角的弧
      ctx.lineTo(left + width, top + height - br) // 画右边的线
      ctx.arcTo(left + width, top + height, left + width - br, top + height, br) // 画右下角的弧
      ctx.lineTo(left + br, top + height) // 画下边的线
      ctx.arcTo(left, top + height, left, top + height - br, br) // 画左下角的弧
      ctx.lineTo(left, top + br) // 画左边的线
      ctx.arcTo(left, top, left + br, top, br) // 画左上角的弧
    } else {
      const topLeftBr = borderTopLeftRadius ? borderTopLeftRadius / 2 : 0
      const topRightBr = borderTopRightRadius ? borderTopRightRadius / 2 : 0
      const bottomRightBr = borderBottomRightRadius ? borderBottomRightRadius / 2 : 0
      const bottomLeftBr = borderBottomLeftRadius ? borderBottomLeftRadius / 2 : 0
      ctx.moveTo(left + topLeftBr, top)
      ctx.lineTo(left + width - topRightBr, top)
      if (topRightBr) { // 画右上角的弧度
        ctx.arcTo(left + width, top, left + width, top + topRightBr, topRightBr)
      }
      ctx.lineTo(left + width, top + height - bottomRightBr) // 画右边的线
      if (bottomRightBr) { // 画右下角的弧度
        ctx.arcTo(left + width, top + height,
          left + width - bottomRightBr, top + height, bottomRightBr)
      }
      ctx.lineTo(left + bottomLeftBr, top + height)
      if (bottomLeftBr) {
        ctx.arcTo(left, top + height, left, top + height - bottomLeftBr, bottomLeftBr)
      }
      ctx.lineTo(left, top + topLeftBr)
      if (topLeftBr) {
        ctx.arcTo(left, top, left + topLeftBr, top, topLeftBr)
      }
    }
  },
3.画圆角的头像
难点在于头像方形头像图片怎么才能切成圆形的. 思路是: 调用CanvasContext.clip()方法, 微信文档解释为,从原始画布中剪切任意形状和尺寸。一旦剪切了某个区域,则所有之后的绘图都会被限制在被剪切的区域内(不能访问画布上的其他区域)。可以在使用 clip 方法前通过使用 save 方法对当前画布区域进行保存,并在以后的任意时间通过restore方法对其进行恢复。
// 画头像
    ctx.save();
    ctx.beginPath();
    // 画出圆形, 同理可以画出方形等其他图形
    ctx.arc(haibaoUtil.computedWAndD(110), haibaoUtil.computedWAndD(1145), haibaoUtil.computedWAndD(50), 0, 2*Math.PI);
    ctx.clip();
    ctx.drawImage(imgAvatar, haibaoUtil.computedWAndD(60), haibaoUtil.computedWAndD(1095), haibaoUtil.computedWAndD(100), haibaoUtil.computedWAndD(100));
    ctx.restore();
4.文字缩略符
微信没有相关的api. 思路是算出文字的长度, 到达执行的行数, 指定的宽度后显示缩略符.
  /**
   * 画多行文本
   * 思路: 利用measureText计算文本最终渲染时的长度, 计算文本何时换行
   * @param {文本} str
   * @param {文本行高} lineHeight
   * @param {共画多少行文本} rows
   * @param {是否需要展示折叠符合(3个点)} needFold
   * @param {文本每行长度} maxWidth
   * @param {文本x坐标} x
   * @param {文本y坐标} y
   * return 实际画了多少行
   */
  drawTextWrapper(ctx, str, lineHeight, rows, needFold, maxWidth, x, y) {
    let strArray = str.split('');
    let renderStrArray = [];
    let tempStr = '';
    const maxWidth1 = this.computedWAndD(maxWidth);
    for (let index = 0; index < strArray.length; index++) {
      const item = strArray[index];
      tempStr = tempStr + item;
      const itemLength = ctx.measureText(tempStr).width;
      if (itemLength >= maxWidth1) {
        renderStrArray.push(tempStr);
        tempStr = '';
      } else if ((index + 1) === strArray.length){
        renderStrArray.push(tempStr);
      }
    }
    // 并未达到一行的长度
    if (renderStrArray.length === 0) {
      renderStrArray.push(tempStr);
    }
    const flag = Math.min(renderStrArray.length, rows);
    for (let index = 0; index < flag; index++) {
      let item = renderStrArray[index];
      // 最后一行
      if ((index + 1) === rows && needFold && ctx.measureText(item).width >= maxWidth1) {
        // 减掉3个点的长度
        item = item.substr(0, item.length - 1);
        item = item + '...';
      }
      ctx.fillText(item, this.computedWAndD(x), this.computedWAndD(y + lineHeight*index), maxWidth1);
    }
    return flag;
  }
}
四.封装的js文件
/**
 * 海报util
 */

let dpr = 0;
let windowWidth = 0;
function getSystemInfo() {
  const systemInfo = wx.getSystemInfoSync();
  dpr = systemInfo.pixelRatio;
  windowWidth = systemInfo.windowWidth;
}
getSystemInfo();

module.exports = {
  dpr: dpr,
  windowWidth: windowWidth,
  /**
   * 获取canvas实例和上下文
   * @param {canvas的id} canvasId
   */
  createHaibao(canvasId) {
    return new Promise((resolve, reject) => {
      // 通过 SelectorQuery 获取 Canvas 节点
      wx.createSelectorQuery()
      .select(`#${canvasId}`)
      .fields({
        node: true,
        size: true,
      })
      .exec((res) => {
        if (res[0]) {
          const width = res[0].width;
          const height = res[0].height;
          const canvas = res[0].node;
          this.canvas = canvas;
          const ctx = canvas.getContext('2d');
          canvas.width = width * dpr;
          canvas.height = height * dpr;
          ctx.scale(dpr, dpr);
          resolve({canvas, ctx});
        }else {
          // 生成海报失败
          wx.showToast({
            title: '生成海报失败, 请稍后重试~',
            icon: 'none'
          });
          reject({});
        }
      });
    });
  },
  /**
   * 生成canvas后,获取canvas生成的图片的临时路径
   * @param {canvas实例} canvas
   */
  createHaibaoUrl(canvas) {
    return new Promise((resolve, reject) => {
      wx.canvasToTempFilePath({
        x: 0,
        y: 0,
         canvas.width/dpr,
        height: canvas.height/dpr,
        destWidth: canvas.width,
        destHeight: canvas.height,
        canvas: canvas,
        fileType: 'png',
        success(res) {
          resolve(res.tempFilePath);
        },
        fail(error) {
          reject(error);
        }
      })
    });
  },
  /**
   * 保存canvas到本地图片
   */
  saveHaibao(tempPath) {
    const _this = this;
    return new Promise((resolve, reject) => {
      wx.getSetting({
        success: (res) => {
          let authSetting = res.authSetting
          if (authSetting['scope.writePhotosAlbum']) {
            // 已授权
            _this._saveImg(tempPath, (type) => {
              if (type === 'success') {
                resolve(type);
              } else {
                reject(type);
              }
            });
          } else if (!res.authSetting['scope.writePhotosAlbum']) {
            wx.hideLoading();
            wx.authorize({
              scope: 'scope.writePhotosAlbum',
              success() {
                _this._saveImg(tempPath, (type) => {
                  if (type === 'success') {
                    resolve(type);
                  } else {
                    reject(type);
                  }
                });
              },
              fail(e) {
                wx.hideLoading();
                wx.showModal({
                  title: '您未开启保存到相册的权限,是否去开启?',
                  success: res => {
                    console.log(res)
                    if (res.confirm) {
                      wx.openSetting()
                    }
                  }
                })
              }
            })
          }
        },
        fail(e) {
          console.log(e)
        }
      });
    });
  },
  // 保存图片
  _saveImg(tempFilePath, cb) {
    wx.saveImageToPhotosAlbum({
      filePath: tempFilePath,
      success(res) {
        cb('success');
      },
      fail(e) {
        cb('fail');
      }
    })
  },
    /**
   * 画圆角矩形、圆角边框和圆角图片所用到的方法
   * @param params
   * @param ctx
   */
  toDrawRadiusRect(params, ctx) {
    const {
      left, // x轴
      top,// y轴
      width, // 宽度
      height,// 高度
      borderRadius,// 角度
      borderTopLeftRadius, // 角度上
      borderTopRightRadius,// 角度右
      borderBottomRightRadius,// 角度下
      borderBottomLeftRadius// 角度左边
    } = params
    ctx.beginPath() // 创建一个路径
    if (borderRadius) {
      // 全部有弧度
      const br = borderRadius / 2
      ctx.moveTo(left + br, top) // 移动到左上角的点
      ctx.lineTo(left + width - br, top) // 画上边的线
      ctx.arcTo(left + width, top, left + width, top + br, br) // 画右上角的弧
      ctx.lineTo(left + width, top + height - br) // 画右边的线
      ctx.arcTo(left + width, top + height, left + width - br, top + height, br) // 画右下角的弧
      ctx.lineTo(left + br, top + height) // 画下边的线
      ctx.arcTo(left, top + height, left, top + height - br, br) // 画左下角的弧
      ctx.lineTo(left, top + br) // 画左边的线
      ctx.arcTo(left, top, left + br, top, br) // 画左上角的弧
    } else {
      const topLeftBr = borderTopLeftRadius ? borderTopLeftRadius / 2 : 0
      const topRightBr = borderTopRightRadius ? borderTopRightRadius / 2 : 0
      const bottomRightBr = borderBottomRightRadius ? borderBottomRightRadius / 2 : 0
      const bottomLeftBr = borderBottomLeftRadius ? borderBottomLeftRadius / 2 : 0
      ctx.moveTo(left + topLeftBr, top)
      ctx.lineTo(left + width - topRightBr, top)
      if (topRightBr) { // 画右上角的弧度
        ctx.arcTo(left + width, top, left + width, top + topRightBr, topRightBr)
      }
      ctx.lineTo(left + width, top + height - bottomRightBr) // 画右边的线
      if (bottomRightBr) { // 画右下角的弧度
        ctx.arcTo(left + width, top + height,
          left + width - bottomRightBr, top + height, bottomRightBr)
      }
      ctx.lineTo(left + bottomLeftBr, top + height)
      if (bottomLeftBr) {
        ctx.arcTo(left, top + height, left, top + height - bottomLeftBr, bottomLeftBr)
      }
      ctx.lineTo(left, top + topLeftBr)
      if (topLeftBr) {
        ctx.arcTo(left, top, left + topLeftBr, top, topLeftBr)
      }
    }
  },
  /**
   * 获取屏幕和dpr后计算的数值
   * */
  computedWAndD(number) {
    // 屏幕缩放比率
    const zoomRate = windowWidth*dpr/750;
    // 物理长度
    const physicalLength = number/dpr;
    return zoomRate*physicalLength;
  },
  loadImg(canvas, imgUrl) {
    return new Promise((resolve, reject) => {
      const img = canvas.createImage();
      img.src = imgUrl;
      img.onload = () => {
		// debugger
        resolve(img);
      }
      img.onerror = () => {
        wx.showToast({
          title: '加载海报图片失败, 请稍后重试~',
          icon: 'none'
        })
        reject(null);
      }
    });
  },
  // load base64 img
  loadImgBase64(data) {
    return new Promise((resolve, reject) => {
      const fsm = wx.getFileSystemManager();
      const FILE_BASE_NAME = 'tmp_base64src';
      const filePath = `${wx.env.USER_DATA_PATH}/${FILE_BASE_NAME}`;
      //base64 数据转换为 ArrayBuffer 数据
      const buffer = wx.base64ToArrayBuffer(data);
      fsm.writeFile({
        filePath: filePath,
        data: buffer,
        encoding: 'binary',
        success: () => {
          resolve(filePath);
        },
        fail: err => {
          console.log('loadImgBase64失败', err);
          reject(null);
        },
      });
    });
  },
  /**
   * 画多行文本
   * 思路: 利用measureText计算文本最终渲染时的长度, 计算文本何时换行
   * @param {文本} str
   * @param {文本行高} lineHeight
   * @param {共画多少行文本} rows
   * @param {是否需要展示折叠符合(3个点)} needFold
   * @param {文本每行长度} maxWidth
   * @param {文本x坐标} x
   * @param {文本y坐标} y
   * return 实际画了多少行
   */
  drawTextWrapper(ctx, str, lineHeight, rows, needFold, maxWidth, x, y) {
	  // debugger
    let strArray = str.split('');
    let renderStrArray = [];
    let tempStr = '';
    const maxWidth1 = this.computedWAndD(maxWidth);
    for (let index = 0; index < strArray.length; index++) {
      const item = strArray[index];
      tempStr = tempStr + item;
      const itemLength = ctx.measureText(tempStr).width;
      if (itemLength >= maxWidth1) {
        renderStrArray.push(tempStr);
        tempStr = '';
      } else if ((index + 1) === strArray.length){
        renderStrArray.push(tempStr);
      }
    }
    // 并未达到一行的长度
    if (renderStrArray.length === 0) {
      renderStrArray.push(tempStr);
    }
    const flag = Math.min(renderStrArray.length, rows);
    for (let index = 0; index < flag; index++) {
      let item = renderStrArray[index];
      // 最后一行
      if ((index + 1) === rows && needFold && ctx.measureText(item).width >= maxWidth1) {
        // 减掉3个点的长度
        item = item.substr(0, item.length - 1);
        item = item + '...';
      }
      ctx.fillText(item, this.computedWAndD(x), this.computedWAndD(y + lineHeight*index), maxWidth1);
    }
    return flag;
  }
}
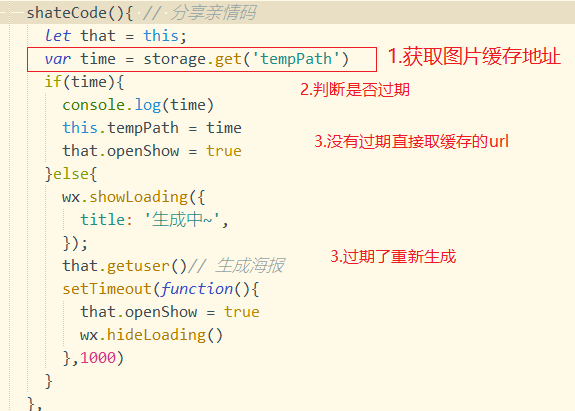
五.优化性能加载
因为每点一次就会生成一个海报,导致每次都要等,也损耗性能,所以最好把每次生成的图片url存在缓存里, 如果数据没有变化,就直接读缓存的图片路径, 如果数据发生变化,就重新生成海报
这里使用了缓存的 封装函数
代码地址github
https://github.com/cl1169451697/cavas-.git
@转载借鉴 :https://juejin.cn/post/6906790715418738702