在iOS中调用系统的某些功能用几行代码就能搞定,学习一下还是很实用的,在很多项目中都有用到,对项目开发也很有帮助。
- (void)viewDidLoad {
[super viewDidLoad];
// 写一个按钮,点击按钮调用短信
UIButton *smsButton = [[UIButton alloc]initWithFrame:CGRectMake(100, 100, 80, 30)];
smsButton.backgroundColor = [UIColor redColor];
[smsButton setTitle:@"短信" forState:(UIControlStateNormal)];
[smsButton addTarget:self action:@selector(smsButtonAction:) forControlEvents:(UIControlEventTouchUpInside)];
[self.view addSubview:smsButton];
// 写一个按钮,点击按钮调用电话
UIButton *telButton = [[UIButton alloc]initWithFrame:CGRectMake(100, 150, 80, 30)];
telButton.backgroundColor = [UIColor redColor];
[telButton setTitle:@"电话" forState:(UIControlStateNormal)];
[telButton addTarget:self action:@selector(telButtonAction:) forControlEvents:(UIControlEventTouchUpInside)];
[self.view addSubview:telButton];
// 写一个按钮,点击按钮调用浏览器
UIButton *urlButton = [[UIButton alloc]initWithFrame:CGRectMake(100, 200, 80, 30)];
urlButton.backgroundColor = [UIColor redColor];
[urlButton setTitle:@"网址" forState:(UIControlStateNormal)];
[urlButton addTarget:self action:@selector(urlButtonAction:) forControlEvents:(UIControlEventTouchUpInside)];
[self.view addSubview:urlButton];
// 写一个按钮,点击按钮调用系统邮件 实现系统的邮件发送,首先需要引入MessageUI.framework框架
UIButton *mailButton = [[UIButton alloc]initWithFrame:CGRectMake(100, 250, 80, 30)];
mailButton.backgroundColor = [UIColor redColor];
[mailButton setTitle:@"邮件" forState:(UIControlStateNormal)];
[mailButton addTarget:self action:@selector(mailButtonAction:) forControlEvents:(UIControlEventTouchUpInside)];
[self.view addSubview:mailButton];
}
// 短信按钮的点击事件
- (void)smsButtonAction:(UIButton*)sender
{
self.view.backgroundColor = [UIColor blackColor];
[[UIApplication sharedApplication]openURL:[NSURL URLWithString:@"sms://123"]];
}
// 电话按钮的点击事件
- (void)telButtonAction:(UIButton*)sender
{
self.view.backgroundColor = [UIColor yellowColor];
[[UIApplication sharedApplication]openURL:[NSURL URLWithString:@"tel://10086"]];
}
// 浏览器按钮的点击事件
- (void)urlButtonAction:(UIButton*)sender
{
self.view.backgroundColor = [UIColor blueColor];
[[UIApplication sharedApplication]openURL:[NSURL URLWithString:@"http://baidu.com"]];
}
// 邮件按钮的点击事件
- (void)mailButtonAction:(UIButton*)sender
{
self.view.backgroundColor = [UIColor grayColor];
MFMailComposeViewController *mailCompose = [[MFMailComposeViewController alloc]init];
// 这里首先要在遵循 MFMailComposeViewControllerDelegate
mailCompose.mailComposeDelegate = self;
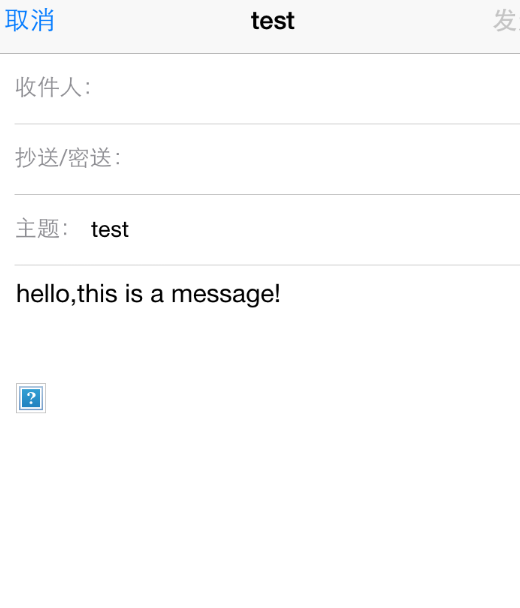
// 邮件主题
[mailCompose setSubject:@"test"];
// 邮件的接收者(可以不写,在后面再写接收者的邮箱)
[mailCompose setToRecipients:[NSArray arrayWithObjects:@"cityingHe@163.com",@"cityingma@163.com", nil]];
// 邮件正文
[mailCompose setMessageBody:@"hello,this is a message!" isHTML:NO];
// 获取截图附件(NSData)
NSData *imageData = UIImagePNGRepresentation(nil);//nil应该由其他图片名代替
[mailCompose addAttachmentData:imageData mimeType:@"image/png" fileName:@"attachmentName"];
[self presentViewController:mailCompose animated:YES completion:^{
NSLog(@"邮件");
}];
}
//代理方法的实现
- (void)mailComposeController:(MFMailComposeViewController*)controller
didFinishWithResult:(MFMailComposeResult)result
error:(NSError*)error
{
switch (result){
case MFMailComposeResultCancelled:
NSLog(@"Mail send canceled…");
break;
case MFMailComposeResultSaved:
NSLog(@"Mail saved…");
break;
case MFMailComposeResultSent:
NSLog(@"Mail sent…");
break;
case MFMailComposeResultFailed:
NSLog(@"Mail send errored: %@…", [error localizedDescription]);
break;
default:
break;
}
[self dismissModalViewControllerAnimated:YES];
}
下面是调用邮箱的效果: