** 项目一共有 16 个页面,是一个电商网销项目,自己在网上的某网上找的一个要做的网站的设计图;
页面主要包括: 登录页 -- 注册页 -- 首页 -- 产品列表页 -- 产品详情页 -- 会员中心页 -- 我的购物车页 -- 支付页 -- 支付成功页 -- 支付失败页 -- 评价页 -- 评价详情页 -- 我的订单页 -- 订单详情页 -- 确认订单页 -- 收货地址列表页;
后端技术: node express mongo;
前端技术:vue-cli elementui axios ;
编辑器: vscode;
项目的暂时github地址:https://github.com/13476075014/node-vue/tree/master/mynodeproject/10.moon ; 纯属个人记录下这个整个项目的过程,并非教程。 **
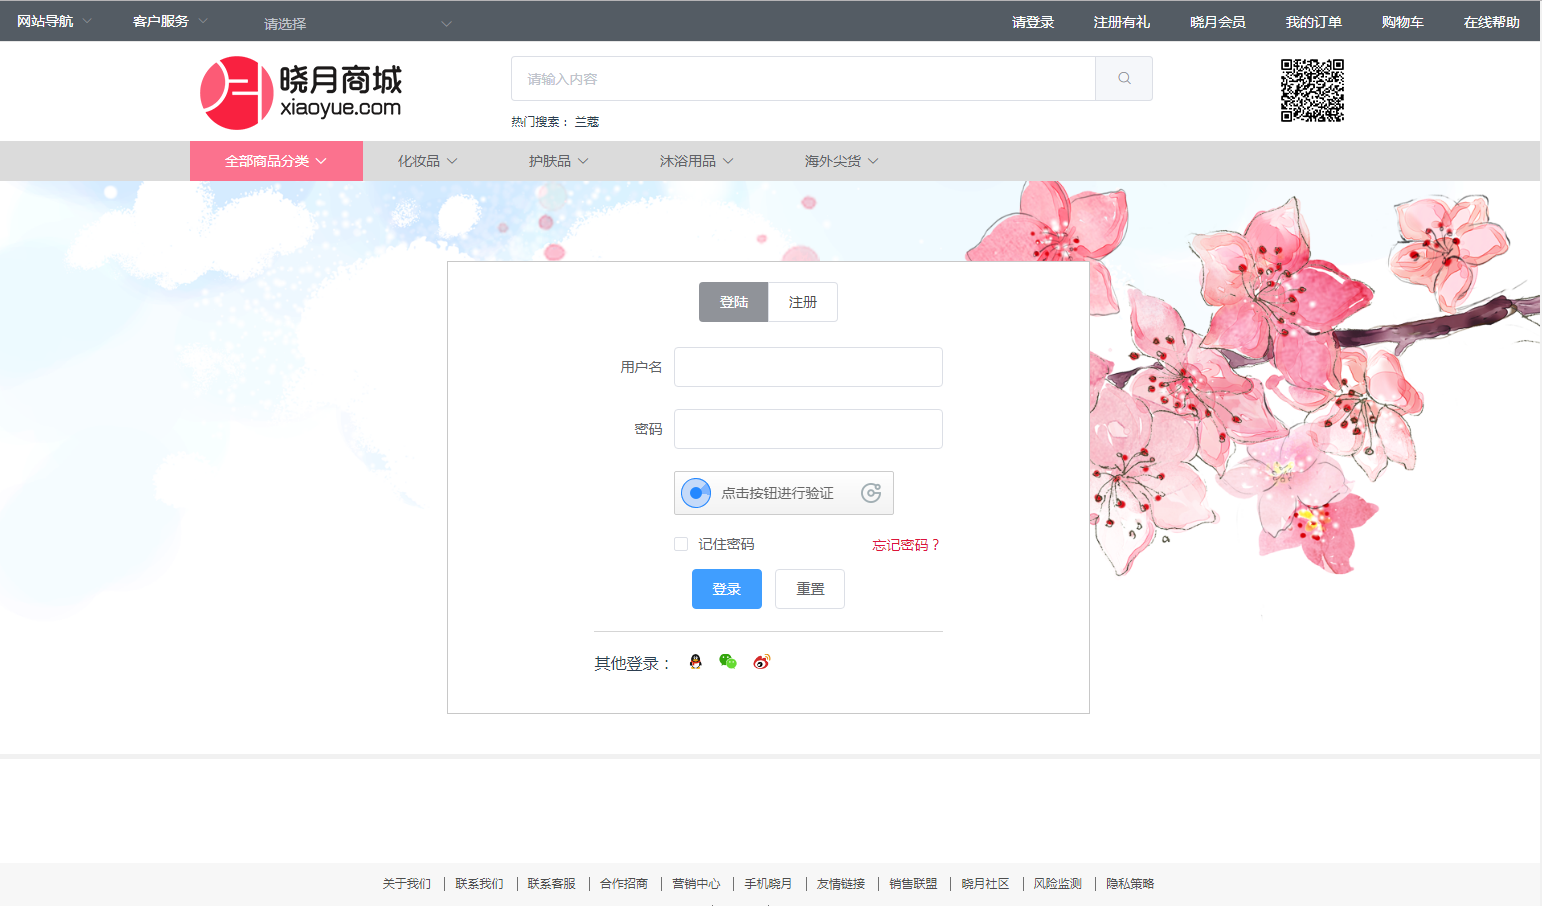
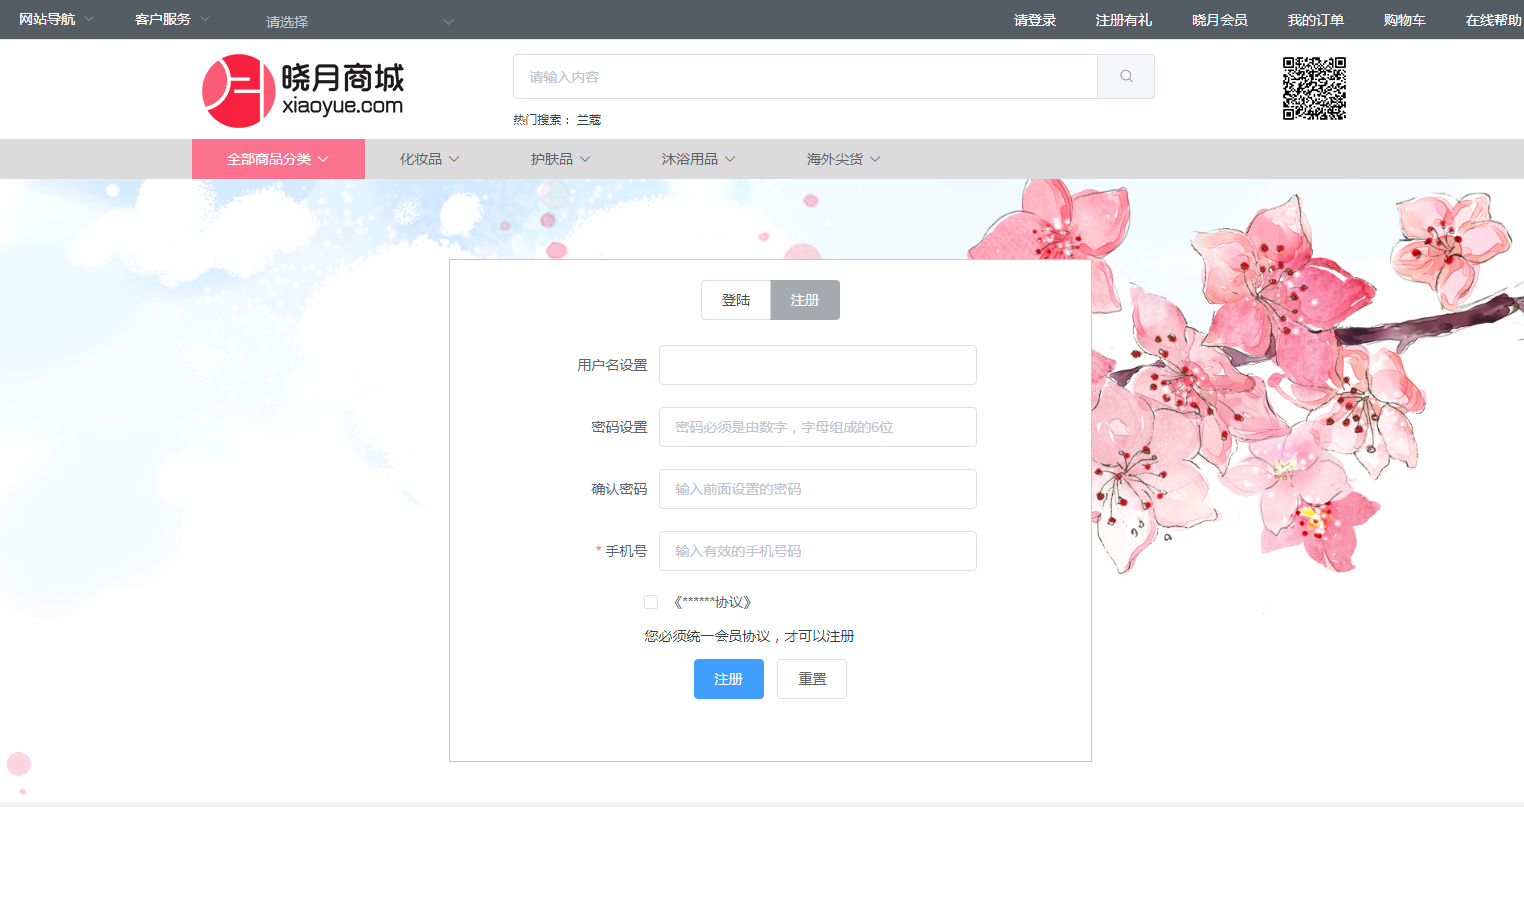
一 基本样式展示,如下图前台的基本实现
二:进入 client - src - components 文件夹,新建文件 head.vue( 是所有页面公用的头部组件文件),具体代码如下:


<!-- 这个是公用的头部的组件 -->

<template>
  <div id="headone">
      <el-menu
      :default-active="activeIndex2"
      class="el-menu-demo item head1"
      mode="horizontal"
      @select="handleSelect"
      background-color="#545c64"
      text-color="#fff"
      active-text-color="#ffd04b">
      <el-submenu class="head_item" index="1">
        <template slot="title">网站导航</template>
        <el-menu-item index="1-1"> <a class="map" href="#hot">热门商品</a> </el-menu-item>
        <el-menu-item index="1-2"><a class="map" href="#new">最新商品</a></el-menu-item>
        <el-menu-item index="1-3"><a class="map" href="#beauty">化妆品</a></el-menu-item>
      </el-submenu>

      <el-submenu class="head_item" index="2">
        <template slot="title">客户服务</template>
        <el-menu-item index="2-1">选项1</el-menu-item>
        <el-menu-item index="2-2">选项2</el-menu-item>
        <el-menu-item index="2-3">选项3</el-menu-item>
        <el-submenu index="2-4">
          <template slot="title">选项4</template>
          <el-menu-item index="2-4-1">选项1</el-menu-item>
          <el-menu-item index="2-4-2">选项2</el-menu-item>
          <el-menu-item index="2-4-3">选项3</el-menu-item>
        </el-submenu>
      </el-submenu>
      <el-menu-item class="item" index="3">
        <div class="block head_block">
          <el-cascader
            expand-trigger="hover"
            :options="options"
            v-model="selectedOptions2"
            @change="handleChange">
          </el-cascader>
        </div>
      </el-menu-item>

      <el-menu-item class="item" index="4" style="float:right;">
        <router-link to="{path:'/'}" target="_blank">
            在线帮助
        </router-link>
      </el-menu-item>
      <el-menu-item class="item" index="5" style="float:right;">
        <router-link to="{path:'/'}" target="_blank">
            购物车
        </router-link>
      </el-menu-item>
      <el-menu-item class="item" index="6" style="float:right;">
        <router-link to="{path:'/'}" target="_blank">
            我的订单
        </router-link>
      </el-menu-item>
      <el-menu-item class="item" index="7" style="float:right;">
        <router-link to="{path:'/'}" target="_blank">
            晓月会员
        </router-link>
      </el-menu-item>
      <el-menu-item class="item" index="8" style="float:right;">
        <router-link :to="{name:'register'}" target="_blank">
            注册有礼
        </router-link>
      </el-menu-item>
      <el-menu-item class="item" index="9" style="float:right;">
        <router-link :to="{path:'/'}" target="_blank">
            请登录
        </router-link>
      </el-menu-item>
    </el-menu>

    <div id="top2" style="text-align:left;padding-top:45px;">
         <el-row style="margin-top:10px;">
          <el-col :offset="3" :span="5">
            <a href="">
                <img src="../assets/images/login_01.png" alt="">
            </a>
          </el-col>

          <el-col :span="10">
               <el-input style="" placeholder="请输入内容" v-model="input_search" class="input-with-select">
                  <el-button slot="append" icon="el-icon-search"></el-button>
              </el-input>
              <p style="font-size:12px;">
                  <span>热门搜索:</span> 兰蔻
              </p>
          </el-col>


           <el-col :span="3" style="text-align:right;">
              <img src="../assets/images/login_02.png" alt="">
          </el-col>
           <el-col>

          </el-col>
        </el-row>
    </div>

     <!-- 头部3 -->
      <div id="top3" style="background:rgb(219,219,219);line-height:40px;text-align:left;">
        <el-row>
          <el-col :offset="3">
              <el-dropdown trigger="click" style="padding:0 35px;" v-for="(i,index) in drop" :key="index" :class="{'drop_active':index == active_index}" id="clickMe">
                <span class="el-dropdown-link" style="cursor:pointer;" @click="changetab(index)">
                  {{i.main}}<i class="el-icon-arrow-down el-icon--right"></i>
                </span>
                <el-dropdown-menu slot="dropdown">
                  <div  v-for="(de,index2) in i.detail" :key="index2">
                      <el-dropdown-item>{{de.top}}</el-dropdown-item>
                      <el-dropdown-item>
                          <div style="max-150px;">
                            <span v-for="(ii,index3) in de.bottom" :key="index3">{{ii}} /</span>
                          </div>
                      </el-dropdown-item>
                  </div>
                </el-dropdown-menu>
              </el-dropdown>
          </el-col>
        </el-row>
    </div>  <!-- 头部3结束 -->

  </div>
</template>

<script>
import city from '../assets/js/city.js'

export default {
  name:"oneHead",  //这个命名注意不要和一些内置的名重复尽量,不然会报错  "vue.esm.js?efeb:591 [Vue warn]: Do not use built-in or reserved HTML elements as component id: head"
   data() {
      return {
          activeIndex2: '1',
           active_index:0,
          options:city,
          selectedOptions2:[],
          input_search:"",
          drop:[ //头部3
              {main:"全部商品分类",detail:[{top:"化妆品",bottom:["口红","眼霜","面霜","口红","眼霜","面霜"]},{top:"化妆品",bottom:["口红","眼霜","面霜","口红","眼霜","面霜"]}]},
              {main:"化妆品",detail:[{top:"化妆品",bottom:["口红","眼霜","面霜","口红","眼霜","面霜"]},{top:"化妆品",bottom:["口红","眼霜","面霜","口红","眼霜","面霜"]}]},
              {main:"护肤品",detail:[{top:"化妆品",bottom:["口红","眼霜","面霜","口红","眼霜","面霜"]},{top:"化妆品",bottom:["口红","眼霜","面霜","口红","眼霜","面霜"]}]},
              {main:"沐浴用品",detail:[{top:"化妆品",bottom:["口红","眼霜","面霜","口红","眼霜","面霜"]},{top:"化妆品",bottom:["口红","眼霜","面霜","口红","眼霜","面霜"]}]},
              {main:"海外尖货",detail:[{top:"化妆品",bottom:["口红","眼霜","面霜","口红","眼霜","面霜"]},{top:"化妆品",bottom:["口红","眼霜","面霜","口红","眼霜","面霜"]}]}

            ]
      };
    },
    created:function(){
        //console.log(city);
    },
    methods: {
        handleSelect(key, keyPath) {
        console.log(key, keyPath);
      },
      handleChange(value) {
        console.log(value);
      },
      changetab:function(ins){
              this.active_index = ins;
        }
    }
}
</script>

<style scoped>
    .item{height:40px!important;line-height: 40px!important;}
    .head1{position: fixed;top:0;left:0;width:100%;z-index:2005;}
    .block{background:none;}
    .drop_active{background:rgb(251,114,142);color:white;}
    a.map{color:white!important;}
</style>
三:进入 client - src - components 文件夹,新建文件 foot.vue( 是所有页面公用的尾部组件文件),具体代码如下:
<template>
    <div id="onefoot" style="font-size:12px;background:rgb(247,247,247);">
        <el-row>
          <el-col :span="14" :offset="5">
              <p class="p1">
                <span v-for='(i,index) in top1' :key='index'>
                    <a class="bor_r" :href="i.url">
                      {{i.label}}
                    </a>
                </span>
              </p>
              <p class="p2">
                <span class="bor_r" v-for='(i,index) in top2' :key='index'>
                      {{i}}
                </span>
              </p>
              <p>
                <span v-for='(i,index) in top3' :key='index'>
                      {{i}}
                </span>
              </p>
          </el-col>
        </el-row>

    </div>
</template>


<script>
export default {
    name:"onefoot",
    data(){
      return {
          top1:[{label:"关于我们",url:""},{label:"联系我们",url:""},{label:"联系客服",url:""},{label:"合作招商",url:""},{label:"营销中心",url:""},{label:"手机晓月",url:""},{label:"友情链接",url:""},{label:"销售联盟",url:""},{label:"晓月社区",url:""},{label:"风险监测",url:""},{label:"隐私策略",url:""}]
          ,top2:["备案号","ICP证","资格证--经营证----"]
          ,top3:["互联网出版许可证","网络文化经营许可证","违法和不良信息举报电话"]
          ,top4:["Copyright"]
      }
    }
}
</script>


<style scoped>
.bor_r{border-right:1px solid rgb(113,113,113);padding:0 10px;}
#onefoot{position:absolute;bottom:0;left:0;width:100%;}

</style>
四:登录页面client - src - components 文件夹,新建 login.vue(登录的页面),具体如下
4.1: login.vue的html部分
主要可能要花点时间的就是极客验证的使用,使用方法在前面写过,地址:http://www.cnblogs.com/chun321/p/8818746.html ;剩下的基本是elementui里面的表单;
<template>
  <div id="login">
    <el-row>
      <el-col :span="10" :offset="7">
          <div class="login_inner">
              <el-button-group class="login_btn">
                <el-button type="info">
                  <router-link to="/" style="color:white;">登陆</router-link>
                </el-button>
                <el-button type="default">
                   <router-link to="/register">注册</router-link>
                </el-button>
              </el-button-group>

              <el-form style="border-bottom:1px solid rgb(213,213,213);margin-bottom:20px;" :model="ruleForm2" status-icon :rules="rules2" ref="ruleForm2" label-width="80px" class="demo-ruleForm">
                <el-form-item label="用户名" prop="username">
                  <el-input type="text" class="username" v-model="ruleForm2.username" auto-complete="off"></el-input>
                </el-form-item>
                <el-form-item label="密码" prop="pass">
                  <el-input type="password" class="password" v-model="ruleForm2.pass" auto-complete="off"></el-input>
                </el-form-item>
                 <!--极客验证的使用-->
                <div>
                    <div id="captcha">
                      <p id="wait" class="show">正在加载验证码......</p>
                    </div>
                </div>

                <div class="login_more">
                  <el-checkbox v-model="checked" class="remerber">记住密码</el-checkbox>
                  <a href="">忘记密码?</a>
                  <!-- <p>短信验证码登陆</p> -->
                </div>

                <el-form-item class="login_submit">
                  <el-button type="primary" id="btn">登录</el-button>
                  <el-button @click="resetForm('ruleForm2')">重置</el-button>
                </el-form-item>
              </el-form>

              <div style="text-align:left;" class="login_other">
                    其他登录: <img src='../assets/images/login_05.png' alt=""> <img src='../assets/images/login_06.png' alt=""> <img src='../assets/images/login_04.png' alt="">
              </div>
          </div>
      </el-col>
    </el-row>
  </div>
</template>
4.2:js的部分
 import jqu from "../assets/js/jquery-1.9.0.js" ;
    import gt from "../assets/js/gt.js" ;  //极客验证的包
    import sli from "../assets/js/slider.js" ;  //极客验证的包


export default {
  name:"login",
  data() {
      var validatePass = (rule, value, callback) => { //表单密码的验证
        if (value === '') {
          callback(new Error('请输入密码'));
        } else {
          if (this.ruleForm2.checkPass !== '') {
            this.$refs.ruleForm2.validateField('checkPass');
          }
          callback();
        }
      };
      var checkName= (rule,value,callback) =>{//表单用户名的验证
          if(value === ""){
            callback(new Error('请输入用户名'));
          }else{
            callback();
          }
      };
      return {
        checked:false,
        ruleForm2: {//表单里面的字段
          pass: '',
          checkPass: '',
          username:""
        },
        rules2: {
          username:[
            { validator: checkName, trigger: 'blur' }
          ],
          pass: [
            { validator: validatePass, trigger: 'blur' }
          ]
        }
      };
    },


  methods: {
    //登录的放在了slider.js里面;
      resetForm(formName) {//重置表单
        this.$refs[formName].resetFields();
      }
    },
  created:function(){//调用极客验证里面的方法,来进行验证和登录请求
    sli(this);
  }
}
4.3:部分样式的调整,暂时有的标签是eleui的标签,还没有实例化,对其样式的调整放在了主页面index.html中;下面是当前页面的style
<style scoped>
     #login{border-bottom:5px solid rgb(241,241,241);padding:80px 0 40px;background:url('../assets/images/login_03.png')left top no-repeat;background-size:cover;}
    .login_inner{background:white;padding:20px calc(15% + 50px) 40px;border:1px solid rgb(200,200,200);}
    .login_inner .login_btn{margin-bottom:25px;}
    .login_other img{width:30px;height:15px;}
    .login_more{text-align: left;margin-bottom:15px;}
    .login_more .remerber{margin-left:80px;}
    .login_more a{float:right;font-size:14px;color:crimson;}
    .login_more p{font-size:14px;text-align: left;padding-left:80px;}
</style>