需求:
exchange 和 queue 都能重复声明不会影响已有数据,但是 DLX 只能在 queue 第一次创建的时候一起定义,否则运行时就需要通过 WEB UI 或者 rabbitmqctl set_policy 命令行指令来添加 DLX。如果对已经存在的 queue 使用 java API 的方式添加 DLX 绑定则会报错。而我在写demo时定义了默认的 exchange 和 queue,所以希望默认的 dlx 也能通过 java API 方式重复声明。
解决方案:
去官网找了一些 HTTP API 资料,但官网只给出 SET_POLICY 方式,相应的 HTTP API 没有给出具体示例。于是根据已有资料中一些其他的 HTTP API 的规则、WEB UI 中 Policies 接口的存在,还有 SET_POLISY DLX 的规律,猜测 DLX policy HTTP API 的调用方式,最后比较简单地试出了 DLX HTTP API 的调用方式。
代码会跟随 RabbitMQ 的某个小demo不久后会正式分享到 github,现在就直接贴代码吧。
Policies HTTP 设置 DLX 代码:
PS:DELETE 方法中 pattern 为 ""(空字符串)就可以了。这里没有完全优化。
 1 private static final String DEFAULT_DLX_URL = "http://192.168.33.50:15672/api/policies/%2f/DLX"
 2
 3 public static void declareDlxForDefaultQueueViaHttpClient(boolean bind) {
 4         HttpEntityEnclosingRequestBase request;
 5         if (bind) {
 6             request = new HttpPut(DEFAULT_DLX_URL);
 7         } else {
 8             request = new HttpDeleteWithEntity(DEFAULT_DLX_URL);
 9         }
10         CredentialsProvider credentialsProvider = new BasicCredentialsProvider();
11         Credentials credentials = new UsernamePasswordCredentials(DEFAULT_USERNAME, DEFAULT_USER_PWD);
12         // 这里可以用 AuthScope.ANY 替代。表示任何 URL domain 都使用同一个 AUTH
13         credentialsProvider.setCredentials(new AuthScope(DEFAULT_HOST, DEFAULT_MANAGEMENT_PORT), credentials);
14         // BasicAuth 验证由 HttpClient API 来处理
15         CloseableHttpClient httpClient = HttpClientBuilder.create().setDefaultCredentialsProvider(credentialsProvider).build();
16         JSONObject dlxJson = new JSONObject();
17         dlxJson.put("pattern", "origin\..*");
18         JSONObject definition = new JSONObject();
19         definition.put("dead-letter-exchange", "origin.dlx");
20         dlxJson.put("definition", definition);
21         dlxJson.put("apply-to", "queues");
22         StringEntity entity = new StringEntity(dlxJson.toString(), ContentType.APPLICATION_JSON);
23         // 有些方法不能带请求体,所以请求体不能放到 HttpClient API 里
24         request.setEntity(entity);
25         try {
26             CloseableHttpResponse httpResponse = httpClient.execute(request);
27             int statusCode = httpResponse.getStatusLine().getStatusCode();
28             HttpEntity responseEntity = httpResponse.getEntity();
29             String responseBody = responseEntity == null ? "empty response body" : EntityUtils.toString(responseEntity);
30             log.info("IN declare DLX for DEFAULT QUEUE:request method=" + request.getMethod()
31                     + ", statusCode=" + statusCode + ", responseBody=" + responseBody);
32         } catch (IOException e) {
33             e.printStackTrace();
34         }
35     }
模拟 HttpPut 构造 HttpDeleteWithEntity 代码:
 1 public class HttpDeleteWithEntity extends HttpEntityEnclosingRequestBase {
 2
 3     public final static String METHOD_NAME = "DELETE";
 4
 5     public HttpDeleteWithEntity() {
 6         super();
 7     }
 8
 9     public HttpDeleteWithEntity(final URI uri) {
10         super();
11         setURI(uri);
12     }
13
14     /**
15      * @throws IllegalArgumentException if the uri is invalid.
16      */
17     public HttpDeleteWithEntity(final String uri) {
18         super();
19         setURI(URI.create(uri));
20     }
21
22     @Override
23     public String getMethod() {
24         return METHOD_NAME;
25     }
26 }
pom.xml 代码:


 1 <dependencies>
 2         <!-- https://mvnrepository.com/artifact/org.apache.httpcomponents/httpclient -->
 3         <dependency>
 4             <groupId>org.apache.httpcomponents</groupId>
 5             <artifactId>httpclient</artifactId>
 6             <version>4.5.10</version>
 7         </dependency>
 8
 9         <dependency>
10             <groupId>com.alibaba</groupId>
11             <artifactId>fastjson</artifactId>
12             <version>1.2.62</version>
13         </dependency>
14
15         <dependency>
16             <groupId>junit</groupId>
17             <artifactId>junit</artifactId>
18             <version>4.12</version>
19             <scope>test</scope>
20         </dependency>
21
22         <dependency>
23             <groupId>com.rabbitmq</groupId>
24             <artifactId>amqp-client</artifactId>
25             <version>5.4.3</version>
26             <scope>compile</scope>
27         </dependency>
28
29         <dependency>
30             <groupId>org.projectlombok</groupId>
31             <artifactId>lombok</artifactId>
32             <version>1.18.10</version>
33             <scope>provided</scope>
34         </dependency>
35
36         <!--logback 日志框架,只需要引入这个-->
37         <dependency>
38             <groupId>ch.qos.logback</groupId>
39             <artifactId>logback-classic</artifactId>
40             <version>1.2.3</version>
41         </dependency>
42     </dependencies>
需要注意:
当 DLX 关系存在或不存在时,API 的返回稍微有点不同,某些情况需要额外判断,如上面代码中对 responseEntity 的判断。
用 POSTMAN 来模拟 policies set dlx:
图1:因为我单独建了一个 collection,默认当前 collection 下所有请求都使用 Basic Auth 并自动把 username 和 password 都填了。所以没有设置这个默认选项的同学手动选一下,图中位置下拉框选中 Basic Auth,填上 RabbitMQ management 管理账号就可以了
PS:注意 HTTP 方法要选择 PUT。
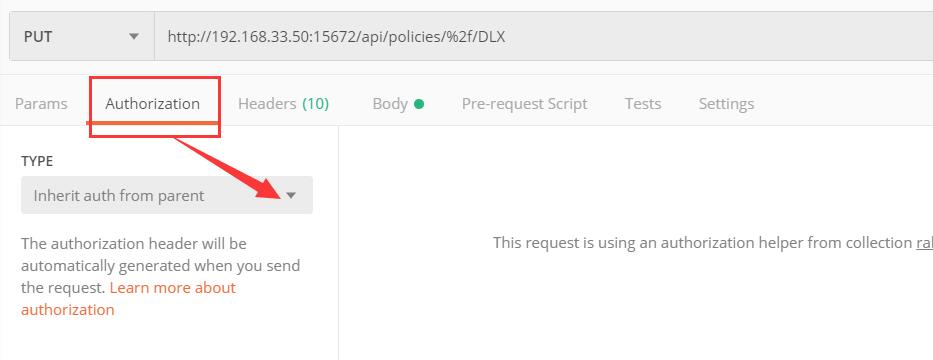
图2:header 设置,这是发完请求后才截图的,可以看到 temporary headers 里面有 Authorization ~
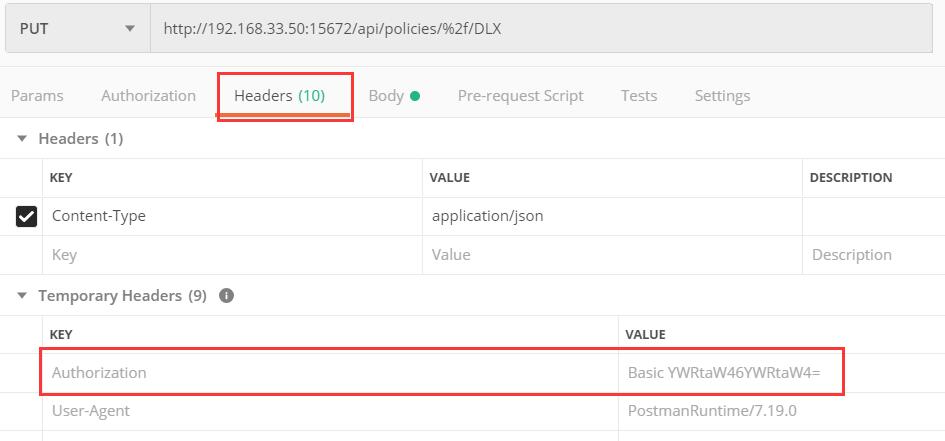
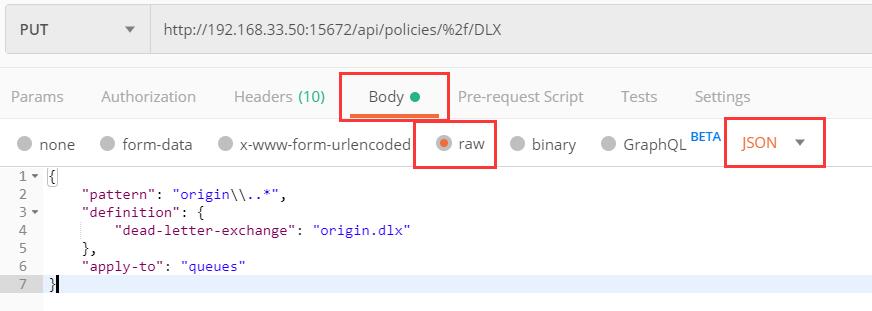
图3:body 设置
嗯,在 POSTMAN 里面发个请求比在 java 程序里跑个 test 方法快多了。
参考资料:
https://lists.rabbitmq.com/pipermail/rabbitmq-discuss/2013-May/027573.html
RabbitMQ 官网 DLX 和 HTTP API 相关参考:
https://www.rabbitmq.com/parameters.html
https://www.rabbitmq.com/dlx.html
HttpClient:https://hc.apache.org/httpcomponents-client-ga/tutorial/html/authentication.html#d4e1023
HttpDelete 缺失 Set Entity 方法相关解决办法参考:https://stackoverflow.com/questions/43241436/java-http-delete-with-request-body
Basic Auth 作为一种 http header 的基本原理:https://www.baeldung.com/how-to-use-resttemplate-with-basic-authentication-in-spring#maven