页面的跳转,在html里都是通过a元素来进行页面跳转的,href指定的链接就相当于指定了跳转的路由。
而在vue的单页面应用中,这里的路由本质上是进行了页面重渲染。
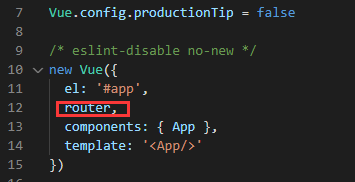
在入口main.js里面已经将router装载进项目了。
1、在定义新的路由之前,先定义一个跳转的自定义组件。在src/components下新建一个Hello.vue
<template>
  <div class='hello'>{{msg}}</div>
</template>

<script>
export default {              //这个标志提供给外部引用
  name: 'Hello',
  data () {
    return {
      msg: 'Hello my first component!'
    }
  },
}
</script>
<style>
.hello{
  color: rgb(0, 38, 255)
}
</style>
2、组件是可以引入其他组件的,比如在创建一个组件叫HelloHello
<template>
    <hello></hello>    //最后在组件的template中使用组件
</template>

<script>
import Hello from '@/components/Hello'      //import来导入组件,,最后在组件的template中使用组件
export default {
  name: 'HelloHello',
  components: {                             //用components来声明使用组件
    Hello
  }
}
</script>
3、组件弄好了,那就来定义一个新的路由,打开router文件夹下的index.js文件。
import Vue from 'vue'
import Router from 'vue-router'
import HelloWorld from '@/components/HelloWorld'
import HelloHello from '@/compoonets/HelloHello'          //引入组件

Vue.use(Router)

export default new Router({
  routes: [
    {
      path: '/',
      name: 'HelloWorld',
      component: HelloWorld
    },
    {
      path: '/HelloHello',                       //定义路由
      name: 'HelloHello',                        //路由名称
      component: HelloHello                      //绑定跳转组件
    }
  ]
})
4、在根组件app.vue中使用<router-link></router-link> 元素进行路由跳转绑定
<template>
  <div id="app">
    <img src="./assets/logo.png">
     <router-view></router-view>
    <router-link  to="/HelloHello">HelloHello</router-link>
    <router-link  to="/">HelloWorld</router-link>
  </div>
</template>

<script>
export default {
  name: 'App'
}
</script>
生成一下,发现有一些错误。代码上的要求挺严格

修改完成后,点击HelloHello显示Hello的组件,点击HelloWorld显示HelloWorld组件的内容。

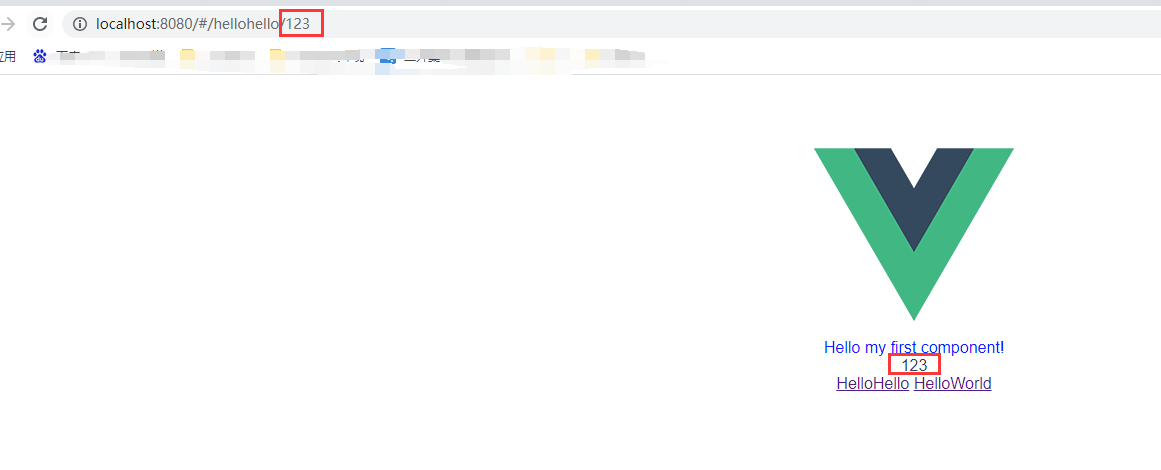
5、动态路径参数,顾名思义就是在路由指定某些参数,类似于http://www.baidu.com/1234这种
定义路由时指定参数名id,格式是冒号+参数名
 {
      path: '/hellohello/:id',
      name: 'HelloHello',
      component: HelloHello
    }
使用:this.$route.params.参数名 来获取参数。在HelloHello.vue里添加显示这个id的div
<template>
    <div>
    <hello></hello>
    <div>{{this.$route.params.id}}</div>
    </div>
</template>
在根组件的跳转路由里天上值
<router-link to="/hellohello/123">HelloHello</router-link>
最后显示的结果
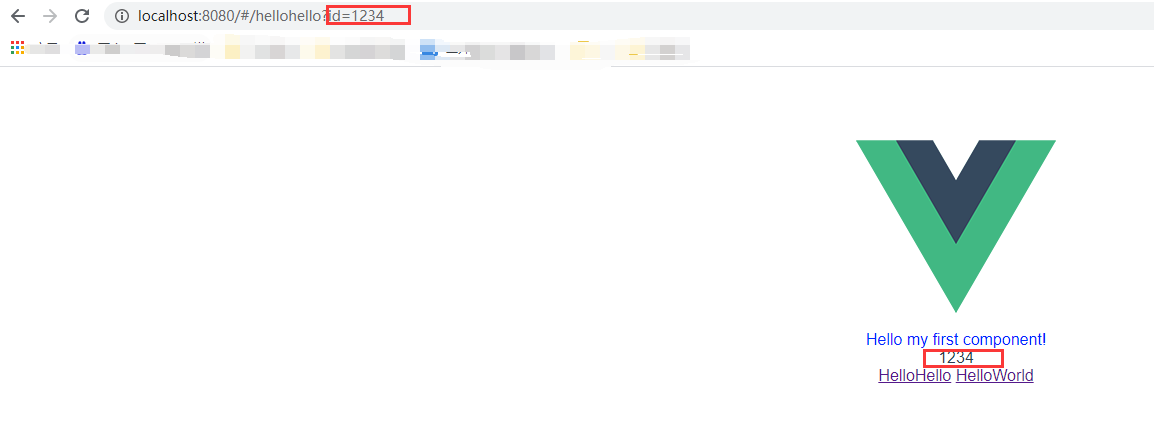
6、查询参数,相当于http://www.baidu.com?id=1234 这种,定义使用query: { userId: 123 } 添加参数
在根组件的跳转路由里声明查询参数
<router-link :to="{path: '/hellohello',query:{id :'1234'}}" >HelloHello</router-link>
使用:this.$route.query.参数名 来获取参数。在HelloHello.vue里添加显示这个id的div
<template>
    <div>
    <hello></hello>
    <div>{{this.$route.query.id}}</div>
    </div>
</template>
结果
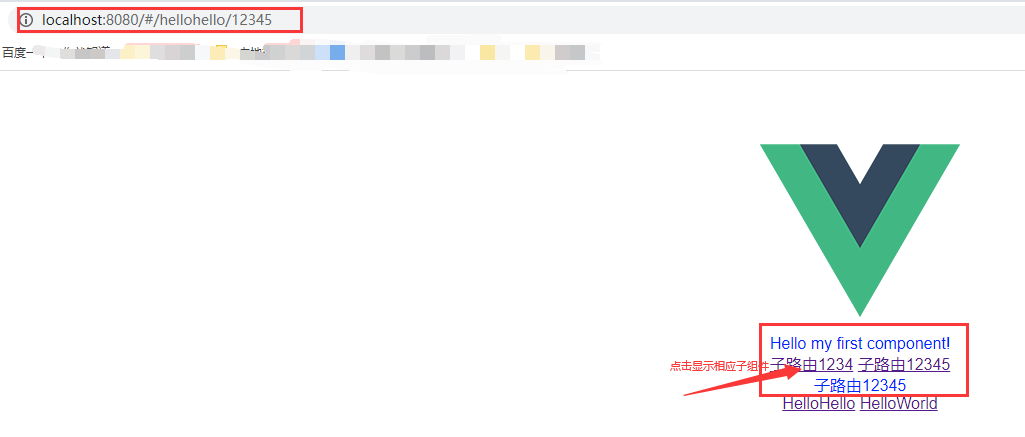
7、嵌套路由:嵌套路由就是在一个被路由过来的页面下可以继续使用路由,嵌套也就是路由中的路由的意思。即子组件里面也可以使用<router-view>显示其他组件。
先给路由添加嵌套路由,记得引进用子组件
  {
      path: '/hellohello',
      name: 'HelloHello',
      component: HelloHello,
      children: [
        {
          path: '1234',
          component: a1234
        },
        {
          path: '12345',
          component: a12345
        }]
    }
在子组件里声明需要嵌套的路由信息
<template>
    <div>
    <hello></hello>
      <router-link to="/hellohello/1234">子路由1234</router-link>
      <router-link  to="/hellohello/12345">子路由12345</router-link>
      <router-view></router-view>
    </div>
</template>
上面声明了两个子路由指定了两个组件,那么这两个组件也定义新建一下,在componts下
<template>
<div>
  <div class='hello'>子路由1234</div>
</div>
</template>

<script>
export default {
  name: '1234',
  data () {
  }
}
<template>
<div>
  <div class='hello'>子路由12345</div>
</div>
</template>

<script>
export default {
  name: '12345',
  data () {
  }
}
这样就完成了,运行一下
8、编程时导航路由:即通过编写代码来实现路由的跳转。this.$router.push('path');会把当前的组件替换掉。
在hellohello.vue新增一个button按钮,用于触发点击事件,绑定方法用于动态变更路由
<template>
    <div>
    <hello></hello>
     <button @click="trun">点击</button>
     <router-view></router-view>
    </div>
</template>

<script>
import Hello from '@/components/Hello'
export default {
  name: 'HelloHello',
  components: {
    Hello
  },
  methods: {
    trun () {
       this.$router.push('12345') // 根据路由的path来跳转
      // this.$router.push({name: '12345'}) // 根据路由的name来跳转
      // this.$router.push({ name: '12345', params: { id: '123' }})
      // 上一行是根据路由的name来跳转,带路径参数,要求path带路径参数[如果提供了 path,params 会被忽略]
      //this.$router.push({path: '/12345', query: {id: 123}}) // 带查询参数
    }
  }
}
</script>
再给组件12345定义一个路由
 {
      path: '/12345',
      name: '12345',
      component: a12345
    }
保存,运行


