水平分片实例分布图:

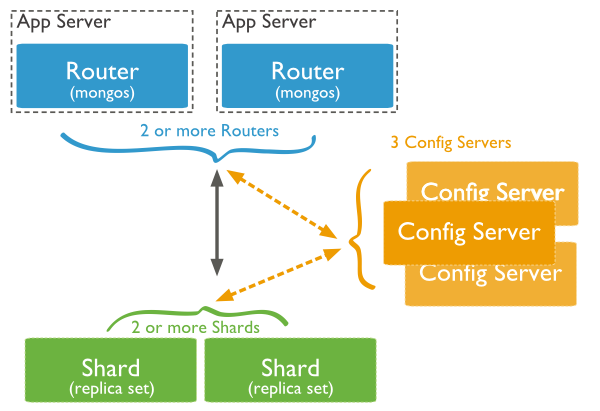
mongodb sharding 服务器架构
1. 添加mongdb两个shared实例
1 # mkdir -p /home/m17 //home/m18 /home/m20 /home/mlog
2
3 ./bin/mongod --dbpath /home/m17 --logpath /home/mlog/m17.log --fork --port 27017 --smallfiles
4 ./bin/mongod --dbpath /home/m18 --logpath /home/mlog/m18.log --fork --port 27018 --smallfiles
2.配置 configdb
# ./bin/mongod --dbpath /home/m20 --logpath /home/mlog/m20.log --fork --port 27020 --configsvr
3. 配置路由
1 # ./bin/mongos --logpath /home/mlog/m30.log --port 30000 --configdb 127.0.0.1:27020 --fork
4. 定制分片信息
4.1 连接到 configDB
1 # ./bin/mongo --port 30000
2 MongoDB shell version: 2.4.9
3 connecting to: 127.0.0.1:30000/test
4.2 添加分片实例以及需要分片的表
 1 mongos> sh.addShard('127.0.0.1:27018')
 2 { "shardAdded" : "shard0000", "ok" : 1 }
 3 mongos> sh.addShard('127.0.0.1:27017')
 4 { "shardAdded" : "shard0001", "ok" : 1 }
 5 mongos> sh.enableSharding('shop');
 6 { "ok" : 1 }
 7
 8 mongos> sh.status();
 9 --- Sharding Status ---
10   sharding version: {
11         "_id" : 1,
12         "version" : 3,
13         "minCompatibleVersion" : 3,
14         "currentVersion" : 4,
15         "clusterId" : ObjectId("5746614b92e27268fdc306b4")
16 }
17   shards:
18         {  "_id" : "shard0000",  "host" : "127.0.0.1:27018" }
19         {  "_id" : "shard0001",  "host" : "127.0.0.1:27017" }
20   databases:
21         {  "_id" : "admin",  "partitioned" : false,  "primary" : "config" }
22         {  "_id" : "test",  "partitioned" : false,  "primary" : "shard0001" }
23         {  "_id" : "shop",  "partitioned" : true,  "primary" : "shard0000" }
4.3 配置表分片(分片键为 goods_id)
 1 mongos> sh.shardCollection('shop.goods',{goods_id:1});
 2 { "collectionsharded" : "shop.goods", "ok" : 1 }
 3 mongos> sh.status();
 4 --- Sharding Status ---
 5   sharding version: {
 6         "_id" : 1,
 7         "version" : 3,
 8         "minCompatibleVersion" : 3,
 9         "currentVersion" : 4,
10         "clusterId" : ObjectId("5746614b92e27268fdc306b4")
11 }
12   shards:
13         {  "_id" : "shard0000",  "host" : "127.0.0.1:27018" }
14         {  "_id" : "shard0001",  "host" : "127.0.0.1:27017" }
15   databases:
16         {  "_id" : "admin",  "partitioned" : false,  "primary" : "config" }
17         {  "_id" : "test",  "partitioned" : false,  "primary" : "shard0001" }
18         {  "_id" : "shop",  "partitioned" : true,  "primary" : "shard0000" }
19                 shop.goods
20                         shard key: { "goods_id" : 1 }
21                         chunks:
22                                 shard0000       1
23                         { "goods_id" : { "$minKey" : 1 } } -->> { "goods_id" : { "$maxKey" : 1 } } on : shard0000 Timestamp(1, 0)
24
25 修改分片大小
26 mongos> use config
27 switched to db config
28 mongos> db.settings.find();
29 { "_id" : "chunksize", "value" : 64 }
30 mongos> db.settings.save({_id:'chunksize',"value":1});
注:
mongodb不是从单篇文档的级别,绝对平均的散落在各个片上, 而是N篇文档,形成一个块"chunk",优先放在某个片上,当这片上的chunk,比另一个片的chunk,区别比较大时, (>=3) ,会把本片上的chunk,移到另一个片上, 以chunk为单位,维护片之间的数据均衡
问: 为什么插入了10万条数据,才2个chunk?
答: 说明chunk比较大(默认是64M)
在config数据库中,修改chunksize的值.
问: 既然优先往某个片上插入,当chunk失衡时,再移动chunk,
自然,随着数据的增多,shard的实例之间,有chunk来回移动的现象,这将带来什么问题?
答: 服务器之间IO的增加,
接上问: 能否我定义一个规则, 某N条数据形成1个块,预告分配M个chunk,
M个chunk预告分配在不同片上.
以后的数据直接入各自预分配好的chunk,不再来回移动?
答: 能, 手动预先分片!
5.预先分片
5.1 以user表为例
1 mongos>sh.shardCollection('shop.user',{userid:1});
5.2 预先在1K 2K...40K这样的界限切好chunk(虽然chunk是空的), 这些chunk将会均匀移动到各片上
1 mongos> for(var i=1;i<=40;i++) { sh.splitAt('shop.user',{userid:i*1000}) } .
5.3 查看状态 发现分片已经均匀的分布在两台实例上了
 1 mongos> sh.status();
 2 --- Sharding Status ---
 3 sharding version: {
 4 "_id" : 1,
 5 "version" : 3,
 6 "minCompatibleVersion" : 3,
 7 "currentVersion" : 4,
 8 "clusterId" : ObjectId("5746614b92e27268fdc306b4")
 9 }
10 shards:
11 { "_id" : "shard0000", "host" : "127.0.0.1:27018" }
12 { "_id" : "shard0001", "host" : "127.0.0.1:27017" }
13 databases:
14 { "_id" : "admin", "partitioned" : false, "primary" : "config" }
15 { "_id" : "test", "partitioned" : false, "primary" : "shard0001" }
16 { "_id" : "shop", "partitioned" : true, "primary" : "shard0000" }
17 shop.goods
18 shard key: { "goods_id" : 1 }
19 chunks:
20 shard0000 1
21 { "goods_id" : { "$minKey" : 1 } } -->> { "goods_id" : { "$maxKey" : 1 } } on : shard0000 Timestamp(1, 0)
22 shop.user
23 shard key: { "userid" : 1 }
24 chunks:
25 shard0001 20              --  实例1 20个分片
26 shard0000 20              --  实例2 20个分片
27 too many chunks to print, use verbose if you want to force print
5.4 通过mongos添加user数据. 数据会添加到预先分配好的chunk上, chunk就不会来回移动了.
1 for(var i=1;i<=40000;i++) {db.user.insert({userid:i,username:'hello world '+i});};
5.5 查看数据分片以及数据分布情况
1 --节点1
2 > db.user.count();
3 19999
4
5 --节点2
6 > db.user.count();
7 20001