一、NSURLConnection补充
前面提到的NSURLConnection有些知识点需要补充
NSURLConnectionDataDelegate的代理方法有一下几个
- (void)connection:(NSURLConnection *)connection didReceiveResponse:(NSURLResponse *)response
{

}

- (void)connection:(NSURLConnection *)connection didReceiveData:(NSData *)data
{

}

- (void)connectionDidFinishLoading:(NSURLConnection *)connection
{

}

- (void)connection:(NSURLConnection *)connection didFailWithError:(NSError *)error
{

}
我们可以监听NSURLConnection的回调代理方法是在主线程中执行还是在子线程中执行?
默认情况下是在主线程中执行的
注意:
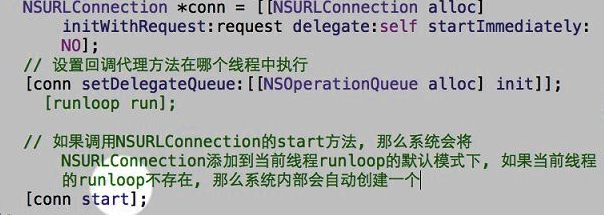
只要利用NSURLConnection发送一个请求, 那么系统会就自动将NSURLConnection加入到当前线程的RunLoop中
如果是在主线程中发送求情, 那么主线程的RunLoop永远存在, 所以NSURLConnection不会被释放
如果是在子线程中发送请求, 那么子线程默认没有RunLoop, 所以NSURLConnection会被释放
NSURLConnection在子线程发送请求时要手动添加到runloop中,否则局部变量会被释放

start方法会自动添加到runloop,如果没有会自动创建runloop,那么系统内部会自动创建一个
二、NSURLSession
1、NSURLSession
利用NSURLSession发送请求的使用步骤
- 创建NSURLSession
- 利用NSURLSession创建Task
- 执行Task
比如:
// 1.创建Session
NSURLSession *session = [NSURLSession sharedSession];
// 2.根据Session创建Task
NSURLSessionDownloadTask *task = [session downloadTaskWithRequest:request completionHandler:^(NSURL *location, NSURLResponse *response, NSError *error) {

}];
// 3.执行Task
[task resume];
Task的类型
2、获得NSURLSession
// 获得共享的Session
+ (NSURLSession *)sharedSession;

// 自定义Session
+ (NSURLSession *)sessionWithConfiguration:(NSURLSessionConfiguration *)configuration;

// 第一个参数:Session的配置信息
// 第二个参数: 代理
// 第三个参数: 决定了代理方法在哪个线程中执行
+ (NSURLSession *)sessionWithConfiguration:(NSURLSessionConfiguration *)configuration delegate:(id <NSURLSessionDelegate>)delegate delegateQueue:(NSOperationQueue *)queue;
3、NSURLSessionTask常见方法
// 暂停
[self.task suspend];
// 继续
[self.task resume];

// 取消
// 注意点: 任务一旦取消, 就不能恢复了
[self.task cancel];

// 如果是调用cancelByProducingResumeData方法, 方法内部会回调一个block, 在block中会将resumeData传递给我们
// resumeData中就保存了当前下载任务的配置信息(下载到什么地方, 从什么地方恢复等等)
[self.task cancelByProducingResumeData:^(NSData *resumeData) {
self.resumeData = resumeData;
}];

@property (readonly, copy) NSError *error; // 错误
@property (readonly, copy) NSURLResponse *response; // 响应
三、NSURLSession相关方法
1、NSURLSessionDataTask
// data: 服务器返回给我们的数据
// response : 响应头
// error: 错误信息
- (NSURLSessionDataTask *)dataTaskWithRequest:(NSURLRequest *)request completionHandler:(void (^)(NSData *data, NSURLResponse *response, NSError *error))completionHandler NS_CLASS_AVAILABLE(NSURLSESSION_AVAILABLE, 7_0);


// 如果是通过传入url的方法创建Task, 方法内部会自动根据URL创建一个Request
// 如果是发送Get请求, 或者不需要设置请求头信息, 那么建议使用当前方法发送请求

- (NSURLSessionDataTask *)dataTaskWithURL:(NSURL *)url completionHandler:(void (^)(NSData *data, NSURLResponse *response, NSError *error))completionHandler NS_CLASS_AVAILABLE(NSURLSESSION_AVAILABLE, 7_0);
2、NSURLSessionDownloadTask
// location: 下载好的文件在沙盒中的位置
// NSURLSessionDownloadTask已经默认帮我们实现了, 边下载边写入到沙盒
- (NSURLSessionDownloadTask *)downloadTaskWithRequest:(NSURLRequest *)request completionHandler:(void (^)(NSURL *location, NSURLResponse *response, NSError *error))completionHandler NS_CLASS_AVAILABLE(NSURLSESSION_AVAILABLE, 7_0);

- (NSURLSessionDownloadTask *)downloadTaskWithURL:(NSURL *)url completionHandler:(void (^)(NSURL *location, NSURLResponse *response, NSError *error))completionHandler NS_CLASS_AVAILABLE(NSURLSESSION_AVAILABLE, 7_0);

- (NSURLSessionDownloadTask *)downloadTaskWithResumeData:(NSData *)resumeData completionHandler:(void (^)(NSURL *location, NSURLResponse *response, NSError *error))completionHandler NS_CLASS_AVAILABLE(NSURLSESSION_AVAILABLE, 7_0);
3、NSURLSessionUploadTask
利用NSURLSessionUploadTask上传的步骤(和NSURLConnection类似)
3.1.创建URL
NSURL *url = [NSURL URLWithString:@"http://120.25.226.186:32812/upload"];
3.2.根据URL创建NSURLRequest
NSMutableURLRequest *request = [NSMutableURLRequest requestWithURL:url];
  3.2.1设置请求头
request.HTTPMethod = @"POST";
[request setValue:@"multipart/form-data; boundary=分割线" forHTTPHeaderField:@"Content-Type"];

3.2.2设置请求体
NSMutableData *data = [NSMutableData data];
  2.2.1设置文件参数
  2.2.2设置非文件参数
  2.2.3设置结束符号
request.HTTPBody = data;

3.3.利用NSURLConnetion发送请求
// 注意点: The body stream and body data in this request object are ignored.
// 也就是说, 如果利用NSURLSessionUploadTask上传文件, 那么请求体必须写在fromData参数中, 不能设置在request中
// 如果设置在request中会被忽略
// request.HTTPBody = body;
NSURLSession *session = [NSURLSession sharedSession];
NSURLSessionUploadTask *task = [session uploadTaskWithRequest:request fromData:body completionHandler:^(NSData *data, NSURLResponse *response, NSError *error) {

}];
// 第一个参数: 需要请求的地址/请求头/请求体
// 第二个参数: 需要上传文件的URL
// 注意:fromFile方法是用于PUT请求上传文件的
// 而我们的服务器只支持POST请求上传文件
- (NSURLSessionUploadTask *)uploadTaskWithRequest:(NSURLRequest *)request fromFile:(NSURL *)fileURL completionHandler:(void (^)(NSData *data, NSURLResponse *response, NSError *error))completionHandler NS_CLASS_AVAILABLE(NSURLSESSION_AVAILABLE, 7_0);


- (NSURLSessionUploadTask *)uploadTaskWithRequest:(NSURLRequest *)request fromData:(NSData *)bodyData completionHandler:(void (^)(NSData *data, NSURLResponse *response, NSError *error))completionHandler NS_CLASS_AVAILABLE(NSURLSESSION_AVAILABLE, 7_0);
四、Data、下载、上传代理方法
1、NSURLSessionDataDelegate
// 接收到服务器的响应时调用
- (void)URLSession:(NSURLSession *)session dataTask:(NSURLSessionDataTask *)dataTask didReceiveResponse:(NSURLResponse *)response completionHandler:(void (^)(NSURLSessionResponseDisposition))completionHandler
{
// 注意: 在NSURLSessionDataTask的代理方法中, 默认情况下是不接受服务器返回的数据的, 所以didReceiveData方法和didCompleteWithError默认不会被调用
// 如果想接收服务器返回的数据, 必须手动的告诉系统, 我们需要接收数据

// void (^)(NSURLSessionResponseDisposition)
// 返回值 (block)(参数)
completionHandler(NSURLSessionResponseAllow);
}
// 接收到服务器返回的数据时调用
// data 此次接收到的数据
- (void)URLSession:(NSURLSession *)session dataTask:(NSURLSessionDataTask *)dataTask didReceiveData:(NSData *)data
{
}

// 请求完毕时调用, 如果error有值, 代表请求错误
- (void)URLSession:(NSURLSession *)session task:(NSURLSessionTask *)task didCompleteWithError:(NSError *)error
{
}
2、NSURLSessionDownloadDelegate
// 接收到服务器返回的数据时调用
// 该方法会调用一次或多次
// didWriteData : 此次接收到的数据大小
// totalBytesWritten : 总共接收到的数据大小
// totalBytesExpectedToWrite : 服务器总共会返回给我们的文件大小
- (void)URLSession:(NSURLSession *)session downloadTask:(NSURLSessionDownloadTask *)downloadTask didWriteData:(int64_t)bytesWritten totalBytesWritten:(int64_t)totalBytesWritten totalBytesExpectedToWrite:(int64_t)totalBytesExpectedToWrite
{
}
// 写入完成时调用
- (void)URLSession:(NSURLSession *)session downloadTask:(NSURLSessionDownloadTask *)downloadTask didFinishDownloadingToURL:(NSURL *)location
{
}
// 恢复下载时调用
- (void)URLSession:(NSURLSession *)session downloadTask:(NSURLSessionDownloadTask *)downloadTask didResumeAtOffset:(int64_t)fileOffset expectedTotalBytes:(int64_t)expectedTotalBytes
{
}

// 下载完成时调用
// 如果调用改方法时error有值, 代表着下载出现错误
- (void)URLSession:(NSURLSession *)session task:(NSURLSessionTask *)task
didCompleteWithError:(NSError *)error
{
}
3、NSURLSessionTaskDelegate
// 上传过程中调用
// bytesSent: 当前这一次上传的数据大小
// totalBytesSent: 总共已经上传的数据大小
// totalBytesExpectedToSend: 需要上传文件的大小
- (void)URLSession:(NSURLSession *)session task:(NSURLSessionTask *)task didSendBodyData:(int64_t)bytesSent totalBytesSent:(int64_t)totalBytesSent totalBytesExpectedToSend:(int64_t)totalBytesExpectedToSend
{
    // 计算上传进度
    NSLog(@"%f", 1.0 * totalBytesSent / totalBytesExpectedToSend);
}

// 请求完毕时调用
- (void)URLSession:(NSURLSession *)session task:(NSURLSessionTask *)task didCompleteWithError:(NSError *)error
{
}
五、利用NSURLSession断点下载
#import "ViewController.h"
#import "NSString+NJ.h"

@interface ViewController ()<NSURLSessionDataDelegate>

@property (weak, nonatomic) IBOutlet UIProgressView *progressView;

- (IBAction)start:(UIButton *)sender;

- (IBAction)pause:(UIButton *)sender;

- (IBAction)goOn:(UIButton *)sender;

@property (nonatomic, assign)NSUInteger totalLength; /**< 总大小 */
@property (nonatomic, assign)NSUInteger currentLength; /**< 当前已经下载的大小 */

@property (nonatomic, strong) NSOutputStream *outputStream ; /**< 输出流 */

@property (nonatomic, strong) NSURLSession *session; /**< session */

@property (nonatomic, strong) NSURLSessionDataTask *task; /**< 任务 */

@property (nonatomic, copy) NSString *path; /**< 文件路径 */

@end

@implementation ViewController

- (void)viewDidLoad
{
    [super viewDidLoad];
    // 初始化操作
    // 1.初始化文件路径
    self.path = [@"minion_02.mp4" cacheDir];
    NSLog(@"%@",self.path);
    // 2.初始化当前下载进度
    self.currentLength = [self getFileSizeWithPath:self.path];
}

- (IBAction)start:(UIButton *)sender
{
    // 3.执行Task
    [self.task resume];
}

- (IBAction)pause:(UIButton *)sender
{
    [self.task suspend];
}

- (IBAction)goOn:(UIButton *)sender
{
    [self.task resume];
}

// 根据路径获取文件大小
- (NSUInteger)getFileSizeWithPath:(NSString *)path
{
    NSUInteger currentSize = [[[NSFileManager defaultManager] attributesOfItemAtPath:path error:nil][NSFileSize] integerValue];
    return currentSize;
}

#pragma mark - NSURLSessionDataDelegate
// 接收到服务器的响应时调用
- (void)URLSession:(NSURLSession *)session dataTask:(NSURLSessionDataTask *)dataTask didReceiveResponse:(NSURLResponse *)response completionHandler:(void (^)(NSURLSessionResponseDisposition))completionHandler
{
    NSLog(@"didReceiveResponse");
    // 告诉系统需要接收数据
    completionHandler(NSURLSessionResponseAllow);

    // 初始化文件总大小
    self.totalLength = response.expectedContentLength + [self getFileSizeWithPath:self.path];

    // 打开输出流
    self.outputStream = [NSOutputStream outputStreamToFileAtPath:self.path append:YES];
    [self.outputStream open];
}

// 接收到服务器返回的数据时调用
// data 此次接收到的数据
- (void)URLSession:(NSURLSession *)session dataTask:(NSURLSessionDataTask *)dataTask didReceiveData:(NSData *)data
{
//    NSLog(@"didReceiveData");
    // 累加已经下载的大小
    self.currentLength += data.length;

    // 计算进度
    self.progressView.progress = 1.0 * self.currentLength / self.totalLength;

    // 写入数据
    [self.outputStream write:data.bytes maxLength:data.length];
}

// 请求完毕时调用, 如果error有值, 代表请求错误
- (void)URLSession:(NSURLSession *)session task:(NSURLSessionTask *)task didCompleteWithError:(NSError *)error
{
    NSLog(@"didCompleteWithError");

    // 关闭输出流
    [self.outputStream close];
}

#pragma mark - lazy
- (NSURLSession *)session
{
    if (!_session) {

         // 1.创建Session
        _session =  [NSURLSession sessionWithConfiguration:[NSURLSessionConfiguration defaultSessionConfiguration] delegate:self delegateQueue:[NSOperationQueue mainQueue]];
    }
    return _session;
}

- (NSURLSessionDataTask *)task
{
    if (!_task) {
        NSURL *url = [NSURL URLWithString:@"http://120.25.226.186:32812/resources/videos/minion_02.mp4"];
        NSMutableURLRequest *request = [NSMutableURLRequest requestWithURL:url];
        // 设置请求头
        NSString *range = [NSString stringWithFormat:@"bytes:%zd-", [self getFileSizeWithPath:self.path]];
        [request setValue:range forHTTPHeaderField:@"Range"];

        _task = [self.session dataTaskWithRequest:request];
    }
    return _task;
}
@end
六、AFN基本使用
1、AFN简介

// 1.创建AFN管理者
    AFHTTPRequestOperationManager *manager = [AFHTTPRequestOperationManager manager];

    // 2.利用AFN管理者发送请求
    /*
     第1个参数: 需要请求的URL地址字符串
     第2个参数: 请求时需要传递的参数
     第3个参数: 请求成功的回调
     第4个参数: 请求失败的回调
     */
    // 注意: 字典参数中不需要写? , AFN会自动添加
    NSDictionary *dict = @{
                           @"username":@"520it",
                           @"pwd":@"520it",
                           @"type":@"JSON",
                           };
    [manager GET:@"http://120.25.226.186:32812/login" parameters:dict success:^(AFHTTPRequestOperation *operation, id responseObject) {

        // responseObject 服务器返回的数据
        // 注意点: 如果服务器返回的是JSON, AFN会自动转换为OC对象
        NSLog(@"%@", responseObject);

    } failure:^(AFHTTPRequestOperation *operation, NSError *error) {
        NSLog(@"error");
    }];
POST
// 1.创建AFN管理者
    AFHTTPRequestOperationManager *manager = [AFHTTPRequestOperationManager manager];

    // 2.利用AFN管理者发送请求
    NSDictionary *dict = @{
                           @"username":@"520it",
                           @"pwd":@"520it",
                           @"type":@"JSON",
                           };
    [manager POST:@"http://120.25.226.186:32812/login" parameters:dict success:^(AFHTTPRequestOperation *operation, id responseObject) {
        NSLog(@"%@", responseObject);
    } failure:^(AFHTTPRequestOperation *operation, NSError *error) {
        NSLog(@"error");
    }];
3、AFN对NSURLSession封装
GET
    // 1.创建AFN管理者
    AFHTTPSessionManager *manager = [AFHTTPSessionManager manager];
    // 2.利用AFN发送请求
    NSDictionary *dict = @{
                           @"username":@"520it",
                           @"pwd":@"520it",
                           @"type":@"JSON",
                           };
    [manager GET:@"http://120.25.226.186:32812/login" parameters:dict success:^(NSURLSessionDataTask *task, id responseObject) {
        NSLog(@"%@", responseObject);
    } failure:^(NSURLSessionDataTask *task, NSError *error) {
        NSLog(@"error");
    }];
POST
    // 1.创建AFN管理者
    AFHTTPSessionManager *manager = [AFHTTPSessionManager manager];
    // 2.利用AFN发送请求
    NSDictionary *dict = @{
                           @"username":@"520it",
                           @"pwd":@"520it",
                           @"type":@"JSON",
                           };
    [manager POST:@"http://120.25.226.186:32812/login" parameters:dict success:^(NSURLSessionDataTask *task, id responseObject) {
        NSLog(@"%@", responseObject);
    } failure:^(NSURLSessionDataTask *task, NSError *error) {
        NSLog(@"error");
    }];
4、使用AFN下载文件
    // 1.创建AFN管理者
    AFHTTPSessionManager *manager = [AFHTTPSessionManager manager];
    // 2.利用AFN下载文件
    NSURLRequest *request = [NSURLRequest requestWithURL:[NSURL URLWithString:@"http://120.25.226.186:32812/resources/images/minion_02.png"]];
    NSURLSessionDownloadTask *task = [manager downloadTaskWithRequest:request progress:nil destination:^NSURL *(NSURL *targetPath, NSURLResponse *response) {
        // 请求完成的回调
        // targetPath : 下载好的文件的路径
        // response: 响应头
        // block的返回值: 告诉AFN框架, 是否需要将下载好的文件移动到其它路径下
        NSLog(@"targetPath = %@", targetPath);
        NSString *path = [response.suggestedFilename cacheDir];
        NSURL *destURL = [NSURL fileURLWithPath:path];
        NSLog(@"destURL = %@", destURL);
        return destURL;
    } completionHandler:^(NSURLResponse *response, NSURL *filePath, NSError *error) {
        // 下载完成的回调
        // filePath : 移动之后的文件路径
        NSLog(@"filePath = %@", filePath);
    }];

    [task resume];
监听下载进度
在NSProgress有两个属性
@property int64_t totalUnitCount; 需要下载文件的总大小
@property int64_t completedUnitCount; 已经下载文件的总大小
使用KVO进行监听completedUnitCount值的变化
- (void)download2
{
    // 1.创建AFN管理者
    AFHTTPSessionManager *manager = [AFHTTPSessionManager manager];

    NSProgress *progress = nil;
    self.progress = progress;

    // 2.利用AFN下载文件
    NSURLRequest *request = [NSURLRequest requestWithURL:[NSURL URLWithString:@"http://120.25.226.186:32812/resources/videos/minion_02.mp4"]];

    // 只要将NSProgress对象传递给AFN, AFN就会在内部自动给NSProgress赋值 会自动修改NSProgress的下载进度
    NSURLSessionDownloadTask *task = [manager downloadTaskWithRequest:request progress:&progress destination:^NSURL *(NSURL *targetPath, NSURLResponse *response) {
        // 请求完成的回调
        NSString *path = [response.suggestedFilename cacheDir];
        NSURL *destURL = [NSURL fileURLWithPath:path];
        return destURL;
    } completionHandler:^(NSURLResponse *response, NSURL *filePath, NSError *error) {
        // 下载完成的回调
        // filePath : 移动之后的文件路径
        NSLog(@"filePath = %@", filePath);
    }];

    // 给NSProgress注册监听, 监听它的completedUnitCount属性的改变
    [progress addObserver:self forKeyPath:@"completedUnitCount" options:NSKeyValueObservingOptionNew context:nil];

    // 注意: 必须手动执行才会开始下载
    [task resume];

}

- (void)dealloc
{
    [self removeObserver:self.progress forKeyPath:@"completedUnitCount"];
}

- (void)observeValueForKeyPath:(NSString *)keyPath ofObject:(id)object change:(NSDictionary *)change context:(void *)context
{
    if ([object isKindOfClass:[NSProgress class]]) {
        NSProgress *progress = (NSProgress *)object;
        // 计算下载进度
        NSLog(@"%f", 1.0 * progress.completedUnitCount / progress.totalUnitCount);
    }
}
5、AFN上传文件
 // 1.创建AFN管理者
    AFHTTPSessionManager *manager = [AFHTTPSessionManager manager];

    // 2.利用AFN上传文件
    NSDictionary *dict = @{
                           @"username":@"lnj"
                           };
    [manager POST:@"http://120.25.226.186:32812/upload" parameters:dict constructingBodyWithBlock:^(id<AFMultipartFormData> formData) {
        // 在这个block中上传文件数据
        // formData就是专门用于保存需要上传文件的二进制数据的

        NSData *data = [NSData dataWithContentsOfFile:@"/Users/chg/Desktop/胸小别讲话.jpg"];
        // 注意: 该方法不能用于POST上传
//        [formData appendPartWithFormData:data name:@"file"];
        /*
         第一个参数: 需要上传的文件二进制
         第二个参数: 服务器对应的参数名称
         第三个参数: 文件的名称
         第四个参数: 文件的MIME类型
         */
//        [formData appendPartWithFileData:data name:@"file" fileName:@"abc.png" mimeType:@"image/png"];

        /*
         第一个参数: 需要上传的文件的URL
         第二个参数: 服务器对应的参数名称
         第三个参数: 文件的名称
         第四个参数: 文件的MIME类型
         */
        NSURL *url = [NSURL fileURLWithPath:@"/Users/chg/Desktop/胸小别讲话.jpg"];
//        [formData appendPartWithFileURL:url name:@"file" fileName:@"def.png" mimeType:@"image/png" error:nil];

        // 如果使用以下方法上传文件, AFN会自动获取文件的名称和类型
        [formData appendPartWithFileURL:url name:@"file" error:nil];

    } success:^(NSURLSessionDataTask *task, id responseObject) {
        NSLog(@"成功的回调 %@", responseObject);
    } failure:^(NSURLSessionDataTask *task, NSError *error) {
        NSLog(@"失败的回调");
    }];
6、AFN序列化
    // 1.创建AFN管理者
    AFHTTPSessionManager *manager = [AFHTTPSessionManager manager];

    // 如果服务器返回的不是JSON数据, 那么需要提前告诉AFN如何处理处理数据

    // 只要给AFN的responseSerializer属性, 赋值为AFXMLParserResponseSerializer, 以后AFN就会将服务器返回的数据当做XML来处理
//    manager.responseSerializer = [AFXMLParserResponseSerializer serializer];

    // 只要给AFN的responseSerializer属性, 赋值为AFHTTPResponseSerializer, 以后AFN就会将服务器返回的数据当做二进制来处理, 也就是说不做任何处理
//    manager.responseSerializer = [AFHTTPResponseSerializer serializer];


    // 2.利用AFN发送请求
    NSDictionary *dict = @{
                           @"username":@"520it",
                           @"pwd":@"520it",
                           @"type":@"XML",
                           };

    [manager POST:@"http://120.25.226.186:32812/resources/images/minion_02.png" parameters:nil success:^(NSURLSessionDataTask *task, id responseObject) {
        // 注意: AFN默认会将服务器返回的数据当做JSON处理
        // 如果服务器返回的是JSON数据, 那么会自动转换为OC对象
        NSLog(@"%@", responseObject);

        // 只要设置AFN的responseSerializer为XML, 那么返回的responseObject就是NSXMLParser解析器

    } failure:^(NSURLSessionDataTask *task, NSError *error) {
        NSLog(@"error");
    }];
7、网络检测
    // 1.创建网络监听管理者
    AFNetworkReachabilityManager *manager = [AFNetworkReachabilityManager sharedManager];

    // 2.设置网络变化的回调
    [manager setReachabilityStatusChangeBlock:^(AFNetworkReachabilityStatus status) {
        // 只要用户的网络发生改变, 就会调用这个block
        /*
         AFNetworkReachabilityStatusUnknown          = 不能识别,
         AFNetworkReachabilityStatusNotReachable     = 没有网络,
         AFNetworkReachabilityStatusReachableViaWWAN = 蜂窝网,
         AFNetworkReachabilityStatusReachableViaWiFi = 局域网,
         */
        switch (status) {
            case AFNetworkReachabilityStatusReachableViaWWAN:
                NSLog(@"蜂窝网");
                break;
            case AFNetworkReachabilityStatusReachableViaWiFi:
                NSLog(@"局域网");
                break;
            case AFNetworkReachabilityStatusNotReachable:
                NSLog(@"没有网络");
                break;
            default:
                NSLog(@"不能识别");
                break;
        }
    }];

    // 3.开始监听
    [manager startMonitoring];
苹果的有个类(Reachability)用于检测网络
这个类需要自己下载

如果要检测当前网络可以这样实现
- (void)viewDidLoad {
    [super viewDidLoad];

    // 1.创建Reachability对象
    self.r1 = [Reachability reachabilityForLocalWiFi];
    // 2.给Reachability对象注册通知
    [[NSNotificationCenter defaultCenter] addObserver:self selector:@selector(getNetworkStatus) name:kReachabilityChangedNotification object:nil];
    // 3.让Reachability对象发送网络改变的通知
    [self.r1 startNotifier];

}

- (void)dealloc
{
    [[NSNotificationCenter defaultCenter] removeObserver:self];
}

- (void)getNetworkStatus
{
    if ([Reachability reachabilityForLocalWiFi].currentReachabilityStatus != NotReachable) {
        NSLog(@"当前是WiFi");
    }else if ([Reachability reachabilityForInternetConnection].currentReachabilityStatus != NotReachable)
    {
        NSLog(@"当前是蜂窝网");
    }else
    {
        NSLog(@"没有网络");
    }
}
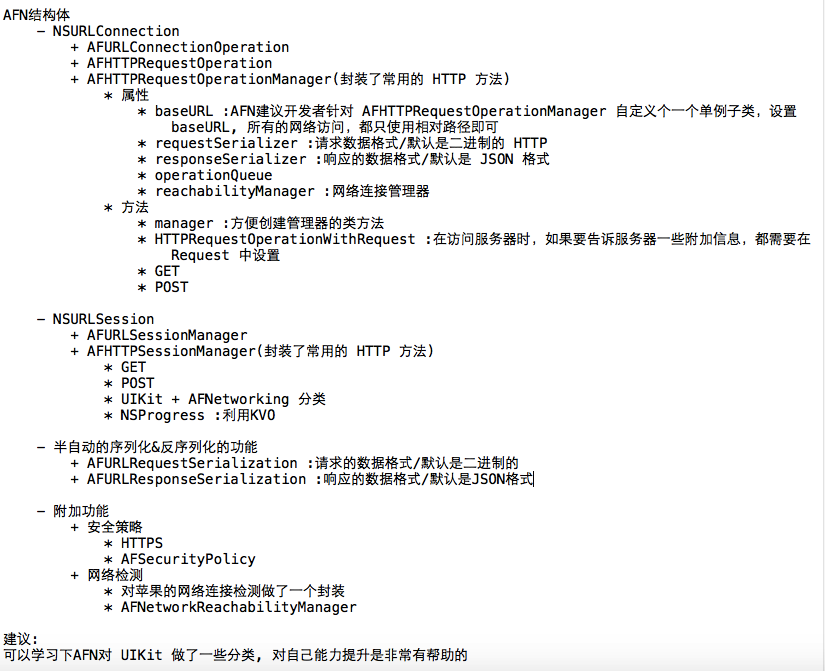
8、总结
总的来说AFN框架分为5大块,通过下面这张图可以一目了然
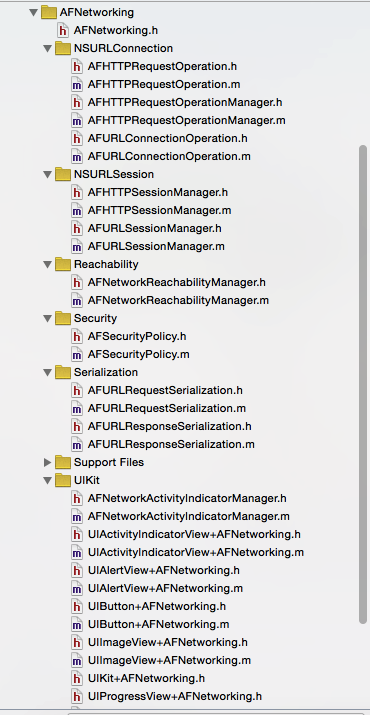
通过cocoapods更新该框架也可以看到作者已经为这个框架的类用文件夹分好了,有助于我们阅读