这篇文章主要介绍TF Serving的使用,主要用于在生产环境中部署TensorFlow模型;
分成四个部分进行介绍:
TF Serving概述:介绍其基本概念、作用、原理;- 模型准备:通过自定义一个简单的神经网络,包含数据准备、模型训练,并导出所需模型;
- 服务器端:编写服务器端相关程序;
- 客户端:在客户端如何使用服务器端提供的模型服务;
- 多模型部署:
以上五个部分对应1-5节内容;
注意:这篇文章只是提供了基本功能的实现,很多原理,还不理解;先这样,后续再更新;
项目地址:tfserving
1. TF Serving概述
TF Serving是一个用于机器学习模型部署的高性能开源库,可以将训练完成的模型直接上线并提供服务;
一个重要的特性是:支持热更新与模型版本自动管理,这意味着一旦部署成功,不需要再为线上服务担心,只需要关心线下的模型训练即可;
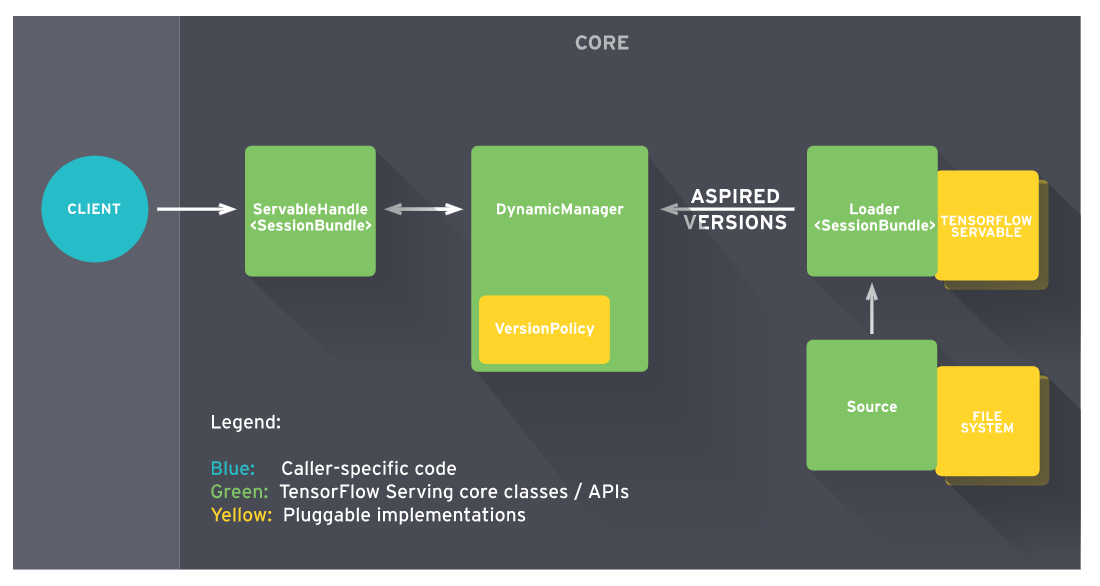
核心模块如下图所示:
Source用于管理本地的模型文件系统;Source会对需要加载的模型创建一个Loader,Loder中会包含要加载模型的全部信息;Source通知Manager有新的模型需要进行加载;Manager通过版本管理策略Version Policy来确定哪些模型需要被下架,哪些模型需要被加载;Manager在确认需要加载的模型是否符合加载策略,便通知Loader来加载最新的模型;Client向服务器端请求模型结果,可以指定版本;
2. 模型准备
这一部分主要目的是为了得到训练完成的模型文件,类型为.pb格式;
这里提供一个简单的程序,演示从数据准备、模型训练、模型保存的过程中;
其中,重点是最后一步模型保存,需要保存成pb格式,如果你这边是其他格式,需要将其转换成pb;
另外,在TensorFlow 2.0+版本中,model.save()默认的存储格式就是pb形式;
训练完成后,模型文件如下:
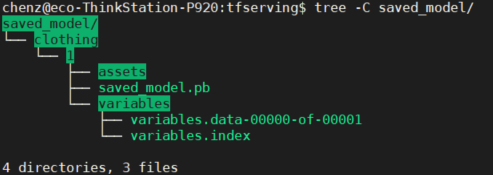
- 其中,
clothing表示该模型用于识别衣服类型;(可自定义名称) 1表示clothing模型的版本号,目的是为了后续更新模型;
完成程序model_training.py如下:
# -*- coding: utf-8 -*-
# =================================================

"""
2. Model Prepare:
    Train a neural network model to classify image of clothing, like sneakers and shirts.
    Finally, output a '.pb' model
"""

import tensorflow as tf

# =========================
# ===== Load dataset ======
# =========================
fashion_mnist = tf.keras.datasets.fashion_mnist
(train_images, train_labels), (test_images, test_labels) = fashion_mnist.load_data()
print("train_images: {}, train_labels: {}".format(train_images.shape, train_labels.shape))
print("test_images: {}, test_labels: {}".format(test_images.shape, test_labels.shape))

# =========================
# ====== Preprocess =======
# =========================
train_images = train_images / 255.0
test_images = test_images / 255.0

# =========================
# ==== Build the model ====
# =========================
model = tf.keras.Sequential([
    tf.keras.layers.Flatten(input_shape=(28, 28)),
    tf.keras.layers.Dense(128, activation='relu'),
    tf.keras.layers.Dense(10, activation='softmax')
])

# =========================
# ==== Train the model ====
# =========================
model.compile(optimizer='adam',
              loss=tf.keras.losses.SparseCategoricalCrossentropy(from_logits=True),
              metrics=['accuracy'])

model.fit(train_images, train_labels, epochs=10)

# =========================
# ==== Save the model ====
# =========================
model.save('./saved_model/clothing/1/', save_format='tf')  # save_format: Defaults to 'tf' in TF 2.X, and 'h5' in TF 1.X.
3. 服务器端
服务器端的目的是基于上面的模型文件,提供模型服务,方便通过客户端进行调用,实现模型推理;
这里提供的方式是通过利用docker进行部署;
3.1 docker安装
首先,确定docker是否安装:
sudo docker --version
得到:
Docker version 19.03.6, build 369ce74a3c
如果没有安装docker,请先安装;
3.2 拉取docker-serving镜像
sudo docker pull tensorflow/serving:2.3.0
完成后,通过下面命令查看:
sudo docker images
3.3 启动TF Serving服务
创建一个运行在后台服务的容器
sudo docker run -p 8500:8500 -p 8501:8501 --mount type=bind,source=/***/saved_model/clothing,target=/models/clothing -e MODEL_NAME=clothing -t tensorflow/serving:2.3.0
-p 8500:8500 -p 8501:8501表示将本地的端口映射到容器的端口,其中8500表示通信方式使用gPRC,8501使用Rest API进行通信,二选一,这里选择8500;--mount表示将本地目录挂载到容器内部;source表示模型文件本地存储的绝对路径,到clothing这一级目录;target表示模型文件被映射到容器内部的路径;MODEL_NAME表示模型名称,用于在发送POST请求时唯一标识符;--name表示给容器赋予一个名称,后续对容器的关闭、删除、重启,都可以使用该名称;-t表示Docker为要创建的容器分配一个伪tty终端;
启动成功后,可以通过下面命令查看容器状态:
sudo docker ps -a
4. 客户端
编写客户端程序,完成对下面这张图片的预测;

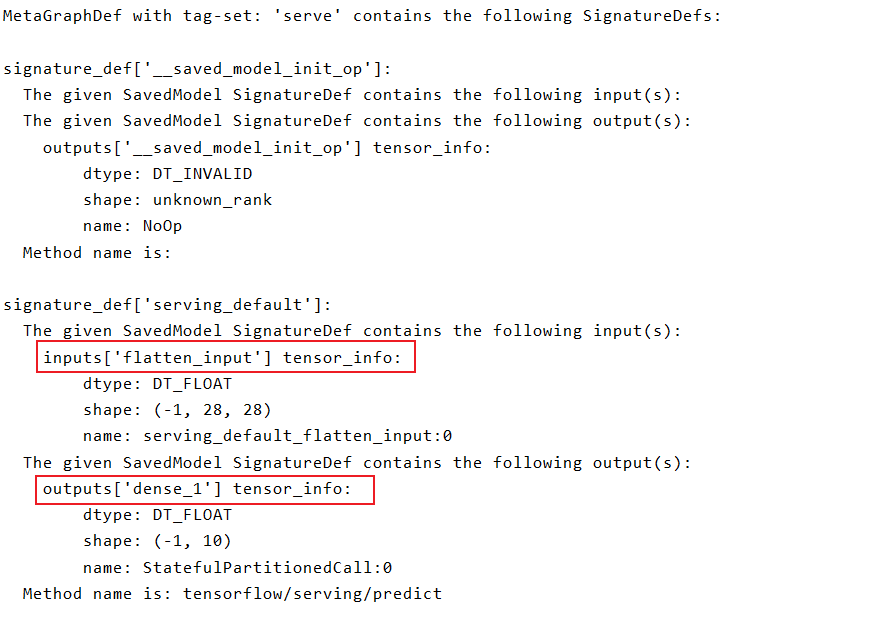
4.1 查看网络输入输出节点
使用下面的命令查看网络模型的输入、输出节点名称,也可以在定义网络时指明节点名称:
saved_model_cli show --dir='saved_model/clothing/1/' --all
4.2 客户端推理
完整程序如下:
# -*- coding: utf-8 -*-
# =================================================

import numpy as np
from PIL import Image
from deploy import PredictModelGrpc

"""
4. Client
"""

# =======================
# ===== Load image ======
# =======================
image_path = './test_images/img_1.png'
img = Image.open(image_path)
img = np.array(img) / 255.0

# =======================
# ===== Load image ======
# =======================
model = PredictModelGrpc(model_name='clothing', input_name='flatten_input', output_name='dense_1')
res = model.inference(img)
print(res)
其中,PredictModelGrpc定义在deploy.py中,如下:
# -*- coding: utf-8 -*-
# =================================================

import tensorflow as tf
from tensorflow_serving.apis import predict_pb2
from tensorflow_serving.apis import prediction_service_pb2_grpc
import grpc
import numpy as np


class PredictModelGrpc(object):
    def __init__(self, model_name, input_name, output_name, socket='0.0.0.0:8500'):
        self.socket = socket
        self.model_name = model_name
        self.input_name = input_name
        self.output_name = output_name
        self.request, self.stub = self.__get_request()

    def __get_request(self):
        channel = grpc.insecure_channel(self.socket, options=[('grpc.max_send_message_length', 1024 * 1024 * 1024),
                                                              ('grpc.max_receive_message_length',
                                                               1024 * 1024 * 1024)])  # 可设置大小
        stub = prediction_service_pb2_grpc.PredictionServiceStub(channel)
        request = predict_pb2.PredictRequest()

        request.model_spec.name = self.model_name
        request.model_spec.signature_name = "serving_default"

        return request, stub

    def inference(self, frames):
        self.request.inputs[self.input_name].CopyFrom(tf.make_tensor_proto(frames, dtype=tf.float32))  # images is input of model
        result = self.stub.Predict.future(self.request, 10.0)
        res = tf.make_ndarray(result.result().outputs[self.output_name])[0]
        return res

if __name__ == '__main__':
    model = PredictModelGrpc(model_name='03_win_day')
    import time
    for i in range(10):
        s = time.time()
        data = np.random.uniform(0, 1, (1, 12, 3, 3, 11))
        result = model.inference(data)
        print(result.shape)
        e = time.time()
        print(e-s)
4. 多模型部署
在实际部署的时候,可能包含有多个模型,不同之处在于两点:
- 启动
TF Serving时,需要指定一个config文件,用于指定多个模型的路径; - 客户端使用时,调用不同的模型,需要指定具体的
model_name;
4.1 多个模型
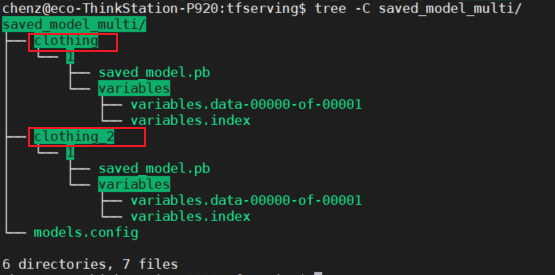
如下图所示,假设存在两个模型clothing和clothing_2:
4.2 多模型配置文件
在saved_model_multi目录下,创建models.config文件,用于启动TF Serving时使用;
model_config_list:{
    config:{
        name: "clothing",
        base_path: "/models/saved_model_multi/clothing",
        model_platform: "tensorflow",
        model_version_policy:{
            all: {}
        }
    },
    config:{
        name: "clothing_2",
        base_path: "/models/saved_model_multi/clothing_2",
        model_platform: "tensorflow",
    }
}
- 其中,
model_config_list包含多个config,用于配置每一个模型; name表示模型唯一标识符;base_path表示当前模型在容器内部的路径,与docker run挂载到容器内目录保持一致;
4.3 启动TF Serving服务
sudo docker run -p 8500:8500 --mount type=bind,source=/data1/chenz/workspace/tfserving/saved_model_multi,target=/models/saved_model_multi --name=tfserving_test_multi -t tensorflow/serving:2.3.0 --model_config=/models/saved_model/models.config &
-p 8500:8500将本地端口映射到容器端口;--mount挂载命令,将本地目录挂载到容器内部;type=bind挂载类型;source本地目录;target容器内部目录;--name容器别名,方便对容器进行操作:停止、删除、重启;-t使用的镜像;--model_config多模型部署时的配置文件;
4.4 客户端使用
在客户端使用时,只需要根据自定义的条件,给PredictModelGrpc传递不同的参数即可:
model = PredictModelGrpc(model_name='clothing', input_name='flatten_input', output_name='dense_1')
或者:
model = PredictModelGrpc(model_name='clothing_2', input_name='flatten_input', output_name='dense_1')