一、一些概念
事件是可以被控件识别的操作,如按下确定按钮,选择某个单选按钮或者复选框。每一种控件有自己可以识别的事件,如窗体的加载、单击、双击等事件,编辑框(文本框)的文本改变事,等等。事件有系统事件和用户事件。系统事件由系统激发,如时间每隔24小时,银行储户的存款日期增加一天。用户事件由用户激发,如用户点击按钮,在文本框中显示特定的文本。事件驱动控件执行某项功能。
触发事件的对象称为事件发送者;接收事件的对象称为事件接收者。
事件模型一般用到了观察者模式,下面简单介绍下:
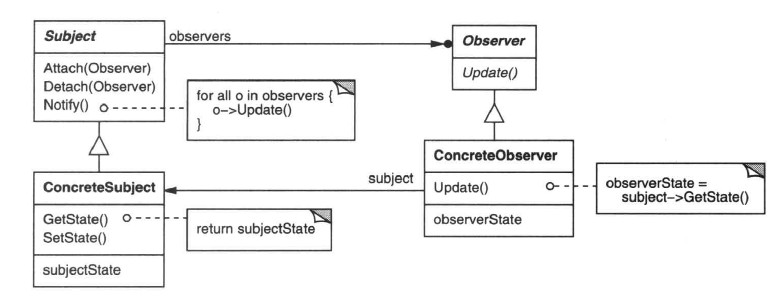
- SUBJECT
- 目标知道它的观察者。可以有任意多个观察者观察同一个目标。
- 提供注册和删除观察者对象的接口。
- Observer(观察者)
- 为那些在目标发生改变时需获得通知的对象定义一个更新接口。
- ConcreteSubject(具体目标)
- 将有关状态存入各ConcreteObserver对象。
- 当它的状态发生改变时,向它的各个观察者发出通知。
- ConcreteObserver(具体观察者)
- 维护一个指向ConcreteSubject对象的引用。
- 存储有关状态,这些状态应与目标的状态保持一致。
- 实现Observer的更新接口以使自身状态与目标的状态保持一致。
二、spring事件机制
首先上图一张:
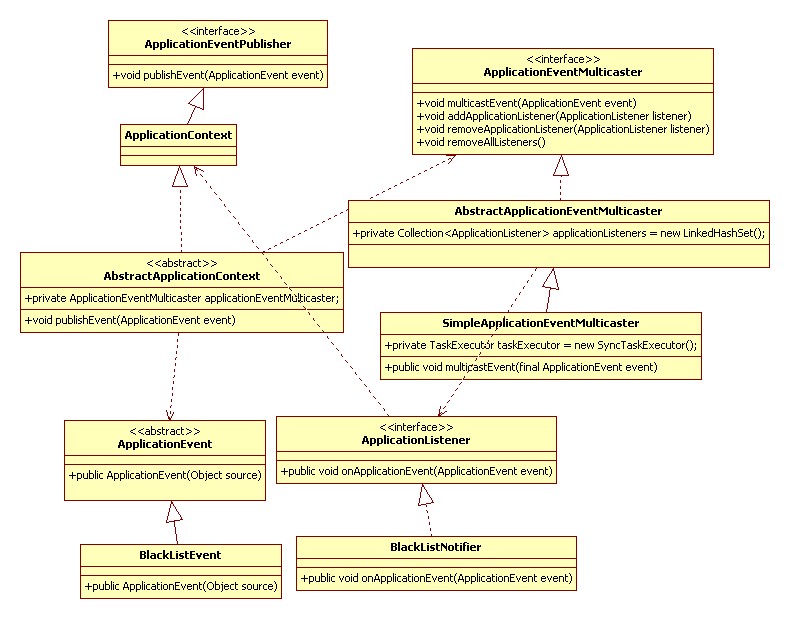
- ApplicationListener 就是我们的 Observer,需要到容器中注册。他要关心他所关心的ApplicationEvent 。一般有如下代码:if (event instanceof BlackListEvent) {}
- ApplicationEventMulticaster是我们的SUBJECT一个代理。他会管理我们的 ApplicationListener 。
- ApplicationEvent 是事件,它就是媒介,充当介质的作用。
在spring中,容器管理所有的 bean。是ApplicationEvent 驱动的,一个ApplicationEvent publish了,观察这个事件的监听者就会送到通知。
具体核心代码如下: ApplicationEventMulticaster 会遍历所有的 监听器,再启动一个线程调用监听器的onApplicationEvent方法。
[java] view plaincopy
- public void multicastEvent(final ApplicationEvent event) {
- for (Iterator it = getApplicationListeners().iterator(); it.hasNext();) {
- final ApplicationListener listener = (ApplicationListener) it.next();
- getTaskExecutor().execute(new Runnable() {
- public void run() {
- listener.onApplicationEvent(event);
- }
- });
- }
- }
三、实例代码
场景:程序发现一个有问题的用户,再会把这个的用户记录下来,采取 事件模型就这样设计
-
- 发现有问题的用户
- 把问题记录下来
- 媒介也就是事件
- package spring;
- import org.springframework.context.ApplicationEvent;
- public class BlackListEvent extends ApplicationEvent {
- private static final long serialVersionUID = 1000L;
- private String address;
- public String getAddress() {
- return address;
- }
- public BlackListEvent(String address) {
- super(address);
- this.address = address;
- }
- }
- package spring;
- import org.springframework.context.ApplicationEvent;
- import org.springframework.context.ApplicationListener;
- public class BlackListNotifier implements ApplicationListener {
- public void onApplicationEvent(ApplicationEvent event) {
- System.out.println(event);
- if (event instanceof BlackListEvent) {
- System.out.println(((BlackListEvent) event).getAddress());
- //TODO 处理这个邮件地址
- }
- }
- }
- package spring;
- import java.util.List;
- import org.springframework.beans.BeansException;
- import org.springframework.context.ApplicationContext;
- import org.springframework.context.ApplicationContextAware;
- public class EmailBean implements ApplicationContextAware {
- private List<String> blackList;
- private ApplicationContext ctx;
- public void setBlackList(List<String> blackList) {
- this.blackList = blackList;
- }
- public void setApplicationContext(ApplicationContext applicationContext) throws BeansException {
- this.ctx = applicationContext;
- }
- public void sendEmail(String address) {
- if (blackList.contains(address)) {
- BlackListEvent event = new BlackListEvent(address);
- ctx.publishEvent(event);
- return;
- }
- }
- }
- <?xml version="1.0" encoding="UTF-8"?>
- <beans xmlns="http://www.springframework.org/schema/beans"
- xmlns:xsi="http://www.w3.org/2001/XMLSchema-instance"
- xsi:schemaLocation="http://www.springframework.org/schema/beans
- http://www.springframework.org/schema/beans/spring-beans-2.5.xsd"
- default-autowire="byName">
- <bean id="emailer" class="spring.EmailBean">
- <property name="blackList">
- <list>
- <value>black@list.org</value>
- <value>white@list.org</value>
- <value>john@doe.org</value>
- </list>
- </property>
- </bean>
- <bean id="blackListListener" class="spring.BlackListNotifier" />
- </beans>
- package spring;
- import org.springframework.context.ApplicationContext;
- import org.springframework.context.support.ClassPathXmlApplicationContext;
- public class Test {
- public static void main(String[] args) {
- ApplicationContext ctx = new ClassPathXmlApplicationContext("spring.xml");
- EmailBean email = (EmailBean) ctx.getBean("emailer");
- email.sendEmail("black@list.org");
- }
- }
1、先来一个事件
[java] view plaincopy
2、一个监听器
[java] view plaincopy
3、发现有问题的用户,并且publish
[java] view plaincopy
4、配置文件
[xhtml] view plaincopy
5、调用方法
[java] view plaincopy