原文:《Start Developing iOS Apps Today》
Review the Source Code
入口函数main.m
#import <UIKit/UIKit.h>

#import "XYZAppDelegate.h"

int main(int argc, char * argv[])
{
    @autoreleasepool
  {
        return UIApplicationMain(argc, argv, nil, NSStringFromClass([XYZAppDelegate class]));
    }
}
The call to UIApplicationMain creates two important initial components of your app:
- An instance of the
UIApplicationclass, called the application object. - An instance of the
XYZAppDelegateclass, called the app delegate
XYZAppDelegate.h
#import <UIKit/UIKit.h>

@interface XYZAppDelegate : UIResponder <UIApplicationDelegate>

@property (strong, nonatomic) UIWindow *window;

@end
XYZAppDelegate.m


#import "XYZAppDelegate.h"

@implementation XYZAppDelegate

- (BOOL)application:(UIApplication *)application didFinishLaunchingWithOptions:(NSDictionary *)launchOptions
{
    self.window = [[UIWindow alloc] initWithFrame:[[UIScreen mainScreen] bounds]];
    // Override point for customization after application launch.
    self.window.backgroundColor = [UIColor whiteColor];
    [self.window makeKeyAndVisible];
    return YES;
}

- (void)applicationWillResignActive:(UIApplication *)application
{
    // Sent when the application is about to move from active to inactive state. This can occur for certain types of temporary interruptions (such as an incoming phone call or SMS message) or when the user quits the application and it begins the transition to the background state.
    // Use this method to pause ongoing tasks, disable timers, and throttle down OpenGL ES frame rates. Games should use this method to pause the game.
}

- (void)applicationDidEnterBackground:(UIApplication *)application
{
    // Use this method to release shared resources, save user data, invalidate timers, and store enough application state information to restore your application to its current state in case it is terminated later.
    // If your application supports background execution, this method is called instead of applicationWillTerminate: when the user quits.
}

- (void)applicationWillEnterForeground:(UIApplication *)application
{
    // Called as part of the transition from the background to the inactive state; here you can undo many of the changes made on entering the background.
}

- (void)applicationDidBecomeActive:(UIApplication *)application
{
    // Restart any tasks that were paused (or not yet started) while the application was inactive. If the application was previously in the background, optionally refresh the user interface.
}

- (void)applicationWillTerminate:(UIApplication *)application
{
    // Called when the application is about to terminate. Save data if appropriate. See also applicationDidEnterBackground:.
}

@end
During a significant runtime event—for example, app launch, low-memory warnings, and app termination—the application object calls the corresponding method in the app delegate, giving it an opportunity to respond appropriately. You don’t need to do anything special to make sure these methods get called at the correct time—the application object handles that part of the job for you.
Create a Storyboard
- To create a new storyboard
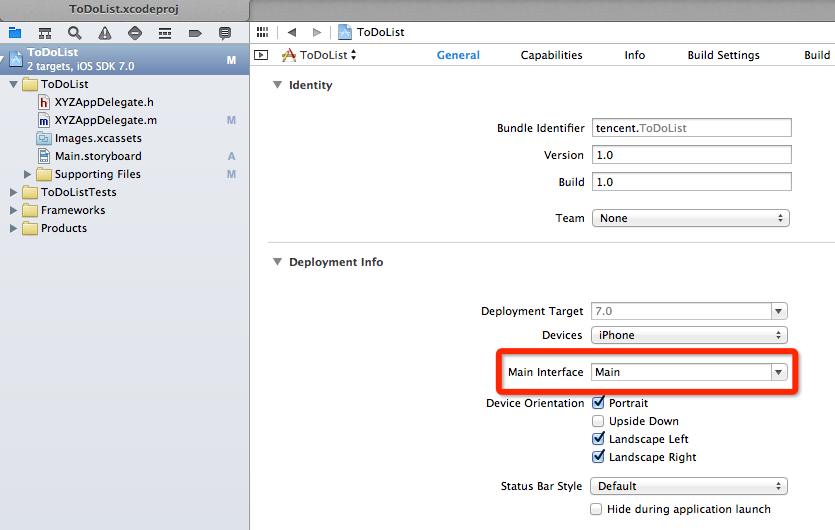
- To set the storyboard as the app’s main interface
The View Hierarchy
Even though a view instance can have multiple subviews, it can have only one superview.
At the top of the view hierarchy is the window object. Represented by an instance of the UIWindow class, a window serves as the basic container into which you can add your view objects for display onscreen.

A view controller isn’t part of the view hierarchy and it’s not an element in your interface.
Each content view hierarchy that you build in your storyboard needs a corresponding view controller, responsible for managing the interface elements and performing tasks in response to user interaction. This usually means writing a customUIViewController subclass for each content view hierarchy. If your app has multiple content views, you use a different custom view controller class for each content view.
注:一个界面对应一个View和一个View Controller?
Navigation Controller
A navigation controller manages transitions backward and forward through a series of view controllers.
The first item added to the stack becomes the root view controller and is never popped off the stack. Other view controllers can be pushed on or popped off the navigation stack.
Specifically, navigation controller presents a navigation bar—the view at the top of the screen that provides context about the user’s place in the navigation hierarchy—which contains a back button and other buttons you can customize.
You generally don’t have to do any work to pop a view controller off of the navigation stack; the back button provided by the navigation controller handles this for you. However, you do have to manually push a view controller onto the stack. You can do this using storyboards.
It’s important to make sure that one of the view controllers is marked as being the initial view controller.
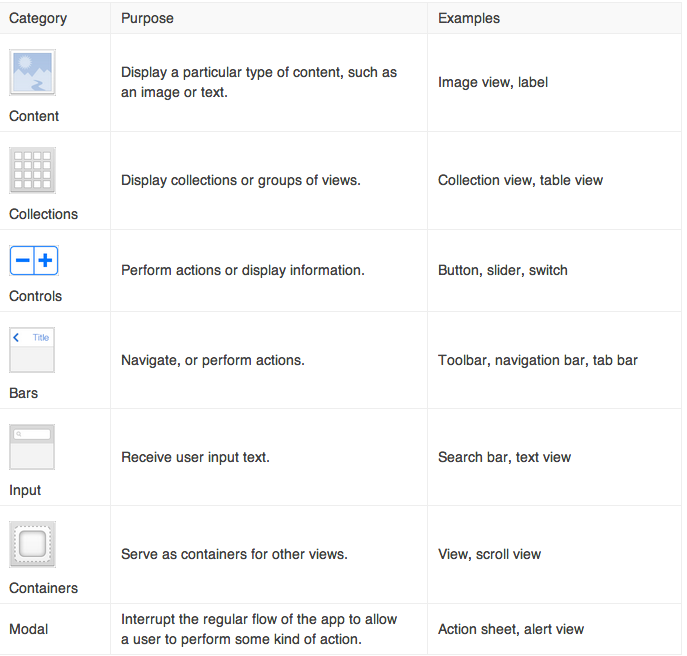
UIKit Views
Inspectors
-
 File. Lets you specify general information about the storyboard.
 -
 Quick Help. Provides useful documentation about an object.
 -
 Identity. Lets you specify a custom class for your object and define its accessibility attributes.
 -
 Attributes. Lets you customize visual attributes of an object.
 -
 Size. Lets you specify an object’s size and Auto Layout attributes.
 -
 Connections. Lets you create connections between your interface and source code.
Segue
There are several types of segues you can create:
-
Push. A push segue adds the destination view controller to the navigation stack. Push segues may only be used when the source view controller is connected to a navigation controller.
-
Modal. A modal segue is simply one view controller presenting another controller modally, requiring a user to perform some operation on the presented controller before returning to the main flow of the app. A modal view controller isn’t added to a navigation stack; instead, it’s generally considered to be a child of the presenting view controller. The presenting view controller is responsible for dismissing the modal view controller it created and presented.
-
Custom. You can define your own custom transition by subclassing
UIStoryboardSegue. -
Unwind. An unwind segue moves backward through one or more segues to return the user to an existing instance of a view controller. You use unwind segues to implement reverse navigation.
注:模态对话框(Modal Dialogue Box),是指在用户想要对对话框以外的应用程序进行操作时,必须首先对该对话框进行响应。如单击【确定】或【取消】按钮等将该对话框关闭
Adopt Auto Layout
- Control-drag from the text field to the top, ending in the superview, to create a “Top Space to Container” constraint.
- Control-drag from the text field to the right, ending in the superview, to create a “Trailing Space to Container” constraint.
- Control-drag from the text field to the left, ending in its superview, to create a “Leading Space to Container” constraint.
注:通过限制各边距来实现布局的屏幕适应
To create a static cell in your table view
-
In the outline view for your interface, select Table View under Table View Controller.
-
With the table view selected, open the Attributes inspector
in the utility area. -
In the Attributes inspector, choose Static Cells from the pop-up menu next to the Content option.
Three empty table view cells appear in your table view.
-
In the outline view or on the canvas, select the top cell.
-
In the Attributes inspector, choose Basic from the pop-up menu next to the Style option.
The Basic style includes a label, so Xcode creates a label with the text “Title” in the table cell.
-
In the outline view or on the canvas, select the label.
-
In the Attributes inspector, change the text of the label from “Title” to “Mow the Lawn.” For the change to take effect, press Enter or click outside the utility area.
Alternatively, you can edit a label by double-clicking it and editing the text directly.
-
Repeat steps 4–7 for the other cells, giving them text for other likely to-do items.
-
Create enough cells so that the items more than fill the screen. You can create new cells by copying and pasting them or by holding down the Option key when dragging a cell.
To add a navigation controller to your table view controller
-
In the outline view, select Table View Controller.
-
With the view controller selected, choose Editor > Embed In > Navigation Controller.
To configure the navigation bar
-
In the outline view or on the canvas, select Navigation Item under Table View Controller.
Navigation bars get their title from the view controller that the navigation controller currently displays—they don’t themselves have a title. You set the title using the navigation item of your to-do list (the table view controller) rather than setting it directly on the navigation bar.
-
In the Attributes inspector, type
My To-Do Listin the Title field. -
If necessary, open the Object library.
-
Drag a Bar Button Item object from the list to the far right of the navigation bar in the table view controller.
A button containing the text “Item” appears where you dragged the bar button item.
-
In the outline view or on the canvas, select the bar button item.
-
In the Attributes inspector, find the Identifier option in the Bar Button Item section. Choose Add from the Identifier pop-up menu.
The button changes to an Add button (
+).
To configure the Add button
-
On the canvas, select the Add button.
-
Control-drag from the button to the add-to-do-item view controller.
-
Choose “push” from the shortcut menu.
To update the Auto Layout constraints
-
In the outline view or on the canvas, select the text field.
-
On the canvas, open the Resolve Auto Layout Issues pop-up menu
 , and choose Update Constraints.
Alternatively, you can choose Editor > Resolve Auto Layout Issues > Update Constraints.
The constraints are updated and the Xcode warnings disappear.
To change the segue style
-
In the outline view or on the canvas, select the segue from the table view controller to the add-to-do-item view controller.
-
In the Attributes inspector, choose Modal from the pop-up menu next to the Style option.
To create a subclass of UIViewController
-
Choose File > New > File (or press Command-N).
-
On the left of the dialog that appears, select the Cocoa Touch template under iOS.
-
Select Objective-C Class, and click Next.
-
In the Class field, type
AddToDoItemafter theXYZprefix. -
Choose
UIViewControllerin the “Subclass of” pop-up menu.The class title changes to “XYZAddToDoItemViewController.” Xcode helps you by making it clear from the naming that you’re creating a custom view controller. That’s great, so leave the new name as is.
-
Make sure the “Also create XIB file” option is unselected.
-
Click Next.
-
The save location will default to your project directory. Leave that as is.
-
The Group option will default to your app name, ToDoList. Leave that as is.
-
The Targets section will default to having your app selected and the tests for your app unselected. That’s perfect, so leave that as is.
-
Click Create.
To identify your class as the view controller for a scene
-
In the project navigator, select
Main.storyboard. -
If necessary, open the outline view
 .
. -
In the outline view, select the “View Controller – Add To-Do Item” view controller.
Click the disclosure triangle next to the “View Controller – Add To-Do Item” scene to show the objects in your scene. The first one should be the view controller. Click it to select it. Notice that the scene row has a different icon from the view controller row.
-
With the view controller selected, open the Identity inspector
in the utility area.The Identity inspector appears at the top of the utility area when you click the third button from the left. It lets you edit properties of an object in your storyboard related to that object’s identity, such as what class it is.
-
In the Identity inspector, open the pop-up menu next to the Class option.
You’ll see a list of all the view controller classes Xcode knows about. The last one in the list should be your custom view controller,
XYZAddToDoItemViewController. Choose it to tell Xcode to use your view controller for this scene.
To unwind back to XYZToDoListTableViewController
-
In the project navigator, open
XYZToDoListTableViewController.h. -
Add the following code below the
@interfaceline:- (IBAction)unwindToList:(UIStoryboardSegue *)segue;
-
In the project navigator, open
XYZToDoListTableViewController.m. -
Add the following code below the
@implementationline: -
- (IBAction)unwindToList:(UIStoryboardSegue *)segue
{
}
To link buttons to the unwindToList: action
-
In the project navigator, select
Main.storyboard. -
On the canvas, Control-drag from the Cancel button to the Exit item in the add-to-do-item scene dock.
- Choose
unwindToList:from the shortcut menu.
Target-Action
The action message is a selector defined in source code, and the target—the object that receives the message—is an object capable of performing the action, typically a view controller. The object that sends the action message is usually a control—such as a button, slider, or switch.
注:按下按钮,调用ViewController类的方法就是一种Target-Action模式,Sender是按钮,Target是ViewController,Action是被调用的方法。
Delegate
The delegating object keeps a reference to the other object—the delegate—and at the appropriate time sends a message to it. The message informs the delegate of an event that the delegating object is about to handle or has just handled. The delegate may respond to the message by updating the appearance (or state) of itself or of other objects in the app, and in some cases it will return a value that affects how an impending event is handled.
注:
delegating object:发出委托的对象
delegate:被委托的对象
delegating object一般会有一个delegate的成员变量,delegating object发出消息给delegate,告诉它delegating object即将处理或已经处理的事件,delegate会对该消息做出反应,有时候会返回一个值告诉delegating object即将发生的事件如何处理。
Xcode already made ViewController the delegate of the Controller when you configured it in the storyboard.
比如使用StoryBoard时,文本框类中的delegate变量会自动指向自身的ViewController。当按下键盘的Return键时,文本框发出消息textFieldShouldReturn给delegate,即ViewController,若Viewcontroller实现了textFieldShouldReturn的方法,那么就会响应该消息,使文本框失去焦点而达到隐藏键盘的目的(为什么要使用delegate?因为文本框自己不能处理textFiledShouldReturn)。
delegate是一种架构设计模式。 在iOS中,它是通过@protocol 来实现的。举一个通过协议来实现委托的例子(转自ios中关于delegate(委托)的使用心得)。我想买个手机,所以我有个buyPhone 方法,但是我不知道到谁那买手机,所以把这个需求发布出去(声明这个协议),如果有卖手机的商人(也就是说他能实现buyPhone这个方法)看到,他就会接受我的委托,(在商人自己的类中声明该协议并实现buyPhone方法),那么我的委托对象就指向了这个商人(我的类成员变量delegate存的是对该商人的引用),当我要买手机的时候,直接找他就行了(发送buyPhone消息给自己的类成员变量delegate)。
协议是在delegating object中制定的,即@protocol的内容写在delegating object中;而delegate负责遵循该协议,即写的是<Mydelegate>。
Me.h大概长这样
@protocol MyDelegate
-(void)buyPhone:(NSString *)phoneType money:(NSString *)money;
@end

@interface Me : NSObject
{
    id<MyDelegate> delegate;
}
@property(assign,nonatomic)id<MyDelegate> delegate;
@end
商人类的头文件Business.h
#import <Foundation/Foundation.h>
#import "Me.h"
@interface Business : NSObject<MyDelegate>
@end
商人类的实现文件Business.m
#import "Business.h"
@implementation Business
-(void)buyPhone:(NSString *)phoneType money:(NSString *)money
{
    NSLog(@"手机有货,这个价钱卖你了,发货中!!");
}
@end
当我指定买这个商人的手机的时候
delegate = business; //business为Business的一个实例
买手机的函数大概长这样
-(void)willBuy
{
    [delegate buyPhone:@"iphone 4s" money:@"4888"];
}
这样就应该很清楚Delegate是怎么回事了。我要买手机的时候,将delegate指向某个商人,Me发送buyPhone消息给delegate,即那个商人,那个商人接收到消息之后,由于实现了buyPhone方法,所以会调用该方法。
委托方法通常包括3种动词:should、will、did。
should表示一个动作发生前,通常带有返回值,可以在动作发生之前改变对象状态。
will在动作发生前,委托可以对动作做出响应,但不带有返回值。
did在动作发生后做出的响应。
class extension
#import "XYZToDoItem.h"

@interface XYZToDoItem ()
@property NSDate *completionDate;
@end

@implementation XYZToDoItem

@end
注:
Class Extension v.s. Class Category
Class Extension只能在.m中声明(一般在本类的实现文件的最上方),@interface后面添加类名和空括号,即可补充方法也可补充属性。
Class Category倾向于写在独立的文件中(声明写在新的.h,实现写在新的.m),@interface后面添加类名和带分类名的括号,只能在Category中补充方法。
Display Table View Cell
To make something a data source of the table view, it needs to implement the UITableViewDataSource protocol.
To have a functioning table view requires three methods.
The first of these isnumberOfSectionsInTableView:, which tells the table view how many sections to display.
The next method, tableView:numberOfRowsInSection:, tells the table view how many rows to display in a given section.
The last method, tableView:cellForRowAtIndexPath:, asks for a cell to display for a given row.
Interface Builder takes the static cells you configured and converts them all into prototypes.
注:利用一个Static Cell当作原型,改Table的其他元素的样式均按照该Static Cell来产生。
To mark an item as completed or uncompleted
-
In the project navigator, select
XYZToDoListTableViewController.m. -
Add the following lines to the end of the file, just above the
@endline:#pragma mark - Table view delegate - (void)tableView:(UITableView *)tableView didSelectRowAtIndexPath:(NSIndexPath *)indexPath { }
-
You want to respond to taps but not actually leave the cell selected. Add the following code to deselect the cell immediately after selection:
[tableView deselectRowAtIndexPath:indexPath animated:NO];
-
Search for the corresponding
XYZToDoItemin yourtoDoItemsarray.XYZToDoItem *tappedItem = [self.toDoItems objectAtIndex:indexPath.row];
-
Toggle the completion state of the tapped item.
tappedItem.completed = !tappedItem.completed;
- Tell the table view to reload the row whose data you just updated.
-
[tableView reloadRowsAtIndexPaths:@[indexPath] withRowAnimation:UITableViewRowAnimationNone];
prepareForSegue
Before a segue executes, the system gives the view controller involved a chance to prepare by calling prepareForSegue:.
- (void) prepareForSegue:(UIStoryboardSegue *)segue sender:(id)sender
{
}
Others
运行提示:Application windows are expected to have a root view controller at the end of application launch.找到XXXAppDelegate.m文件中的didFinishLaunchingWithOptions函数,将
self.window = [[UIWindow alloc] initWithFrame:[[UIScreen mainScreen] bounds]];
这句注释掉即可。
运行提示:Terminating app due to uncaught exception 'NSInternalInconsistencyException', reason: 'unable to dequeue a cell with identifier ListPrototypeCell1 - must register a nib or a class for the identifier or connect a prototype cell in a storyboard'.
经过摸索,发现TableView的连接检视器中的outlets下dataSource和delegate都没有绑定TableViewController(另一个跟着教程走的成功运行的程序却绑定了),不过问题好象不在这里。
而是TableViewCell属性检视器中的Identifier必须为ListPrototypeCell,然后找到XXXViewController.m文件中的cellForRowAtIndexPath函数,检查CellIdentifier的设置是否正确,名字也一定要是ListPrototypeCell。我还一直以为可以自定义,只要两边对应上就行了。
static NSString *CellIdentifier = @"ListPrototypeCell";