Scrapy
Scrapy是一个为了爬取网站数据,提取结构性数据而编写的应用框架。 其可以应用在数据挖掘,信息处理或存储历史数据等一系列的程序中。
Scrapy囊括了爬取网站数据几乎所有的功能,是一个扩展性很强的一个框架,Scrapy在爬虫界里相当于web的Django
Scrapy 使用了 Twisted异步网络库来处理网络通讯。整体架构大致如下
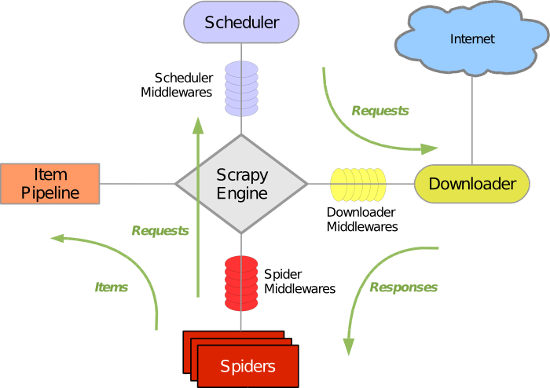
Scrapy主要包括了以下组件:
- 引擎(Scrapy)
用来处理整个系统的数据流处理, 触发事务(框架核心) - 调度器(Scheduler)
用来接受引擎发过来的请求, 压入队列中, 并在引擎再次请求的时候返回. 可以想像成一个URL(抓取网页的网址或者说是链接)的优先队列, 由它来决定下一个要抓取的网址是什么, 同时去除重复的网址 - 下载器(Downloader)
用于下载网页内容, 并将网页内容返回给蜘蛛(Scrapy下载器是建立在twisted这个高效的异步模型上的) - 爬虫(Spiders)
爬虫是主要干活的, 用于从特定的网页中提取自己需要的信息, 即所谓的实体(Item)。用户也可以从中提取出链接,让Scrapy继续抓取下一个页面 - 项目管道(Pipeline)
负责处理爬虫从网页中抽取的实体,主要的功能是持久化实体、验证实体的有效性、清除不需要的信息。当页面被爬虫解析后,将被发送到项目管道,并经过几个特定的次序处理数据。 - 下载器中间件(Downloader Middlewares)
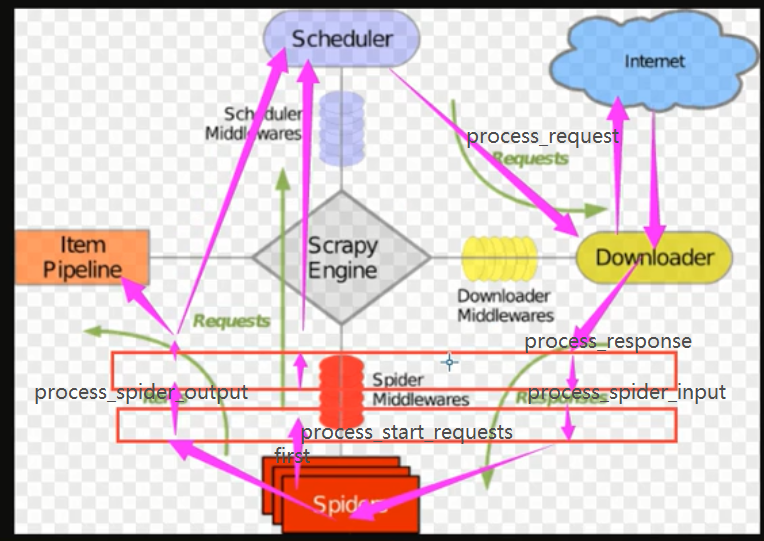
位于Scrapy引擎和下载器之间的框架,主要是处理Scrapy引擎与下载器之间的请求及响应。 - 爬虫中间件(Spider Middlewares)
介于Scrapy引擎和爬虫之间的框架,主要工作是处理蜘蛛的响应输入和请求输出。 - 调度中间件(Scheduler Middewares)
介于Scrapy引擎和调度之间的中间件,从Scrapy引擎发送到调度的请求和响应。
Scrapy运行流程大概如下:
- 引擎从调度器中取出一个链接(URL)用于接下来的抓取
- 引擎把URL封装成一个请求(Request)传给下载器
- 下载器把资源下载下来,并封装成应答包(Response)
- 爬虫解析Response
- 解析出实体(Item),则交给实体管道进行进一步的处理
- 解析出的是链接(URL),则把URL交给调度器等待抓取
1.Scrapy的安装


Windows
      a. pip3 install wheel
      b. 下载twisted http://www.lfd.uci.edu/~gohlke/pythonlibs/#twisted
      c. 进入下载目录,执行 pip3 install Twisted‑17.1.0‑cp35‑cp35m‑win_amd64.whl
      d. pip3 install scrapy
      e. 下载并安装pywin32:https://sourceforge.net/projects/pywin32/files/
2.命令使用
1. scrapy startproject 项目名称
   - 在当前目录中创建中创建一个项目文件(类似于Django)

2. scrapy genspider [-t template] <name> <domain>
   - 创建爬虫应用
   如:
      scrapy gensipider -t basic oldboy oldboy.com
      scrapy gensipider -t xmlfeed autohome autohome.com.cn
   PS:
      查看所有命令:scrapy gensipider -l
      查看模板命令:scrapy gensipider -d 模板名称

3. scrapy list
   - 展示爬虫应用列表

4. scrapy crawl 爬虫应用名称
   - 运行单独爬虫应用
3.Spiders介绍
Spiders里主要装的是爬虫的目录,和爬虫的编写。
name = 'chouti'

#设置allowed_domains的含义是过滤爬取的域名,在插件OffsiteMiddleware启用的情况下(默认是启用的),不在此允许范围内的域名就会被过滤
    allowed_domains = ['chouti.com']


    #起始urls,在引擎调用调度器的时候,调度器会循环起始urls列表
    start_urls = ['http://dig.chouti.com']


#在这里我们可以自定义起始url:
    1. start_requests
#         def start_requests(self):
#             for url in self.start_urls:
#                 yield Request(url=url,callback=self.parse)
#
#         def start_requests(self):
#             req_list = []
#             for url in self.start_urls:
#                 req_list.append(Request(url=url,callback=self.parse))
#             return req_list
#            两种都是可以的
#         因为scrapy内部会将返回值转换成迭代器。
解析器
可以在Chrome 右击某个标签copy-->copyxpath可以获取该路径
#有两种执行解析器的方法
# 方式一:
        # response.xpath('//div[@id="content-list"]/div[@class="item"]')

# 方式二:
   # from scrapy.selector import HtmlXPathSelector
    #hsx=HtmlXPathSelector(response=response)
    # div = hsx.xpath('//div[@id="content-list"]/div[@class="item"]')

查找规则:
# // 代表子子孙孙  / 表示后代   .// 当前标签下的子子孙孙
#             //a
#             //div/a
#             //a[re:test(@id, "id+")]
#
#             items = hxs.xpath("//div[@id='content-list']/div[@class='item']")
#             for item in items:
#                 item.xpath('.//div')
#
  #    text = row.xpath('.//div[@class="part1"]//a[1]/text()').extract_first()
  #  texe是文本内容
  #         href = row.xpath('.//div[@class="part1"]//a[1]/@href').extract_first()
#    href是属性内容


#         解析:
#             标签对象:xpath('/html/body/ul/li/a/@href')
#             列表:    xpath('/html/body/ul/li/a/@href').extract()
#             值:      xpath('//body/ul/li/a/@href').extract_first()
4.items
设置数据存储模板,用于结构化数据,如:Django的Model
class XianglongItem(scrapy.Item):
    # define the fields for your item here like:
    # name = scrapy.Field()
    title = scrapy.Field()
    href = scrapy.Field()
5.pipelines
数据处理行为,如:一般结构化的数据持久化
#             class FilePipeline(object):
#                 def process_item(self, item, spider):
#                     print('写入文件',item['href'])
#
#                                     将item传递给下一个类
#                     return item
#
#                 def open_spider(self, spider):
#                     """
#                     爬虫开始执行时,调用
#                     :param spider:
#                     :return:
#                     """
#                     print('打开文件')
#
#                 def close_spider(self, spider):
#                     """
#                     爬虫关闭时,被调用
#                     :param spider:
#                     :return:
#                     """
#                     print('关闭文件')
如果想要丢弃,不给后续pipeline使用:
#                 from scrapy.exceptions import DropItem
#                 class FilePipeline(object):
#
#                     def process_item(self, item, spider):
#                         print('写入文件',item['href'])
#
#                         # return item
#                         raise DropItem()
#         - 根据配置文件读取相关值,再进行pipeline处理
#             class FilePipeline(object):
#                 def __init__(self,path):
#                     self.path = path
#                     self.f = None
#
#                 @classmethod
#                 def from_crawler(cls, crawler):
#                     """
#                     初始化时候,用于创建pipeline对象
#                     :param crawler:
#                     :return:
#                     """
#         - 根据配置文件读取相关值,再进行pipeline处理
#                     path = crawler.settings.get('XL_FILE_PATH')
#                     return cls(path)
#
#                 def process_item(self, item, spider):
#                     self.f.write(item['href']+'
')
#                     return item
#
#                 def open_spider(self, spider):
#                     """
#                     爬虫开始执行时,调用
#                     :param spider:
#                     :return:
#                     """
#                     self.f = open(self.path,'w')
#
#                 def close_spider(self, spider):
#                     """
#                     爬虫关闭时,被调用
#                     :param spider:
#                     :return:
#                     """
#                     self.f.close()
###配置文件###
ITEM_PIPELINES = {
   'xianglong.pipelines.FilePipeline': 300,
   'xianglong.pipelines.DBPipeline': 301,
}
#数字越小优先级越高

class FilePipeline(object):

    def process_item(self, item, spider):
        '''
        :param item:
        :param spider:
        :return:
        '''
        print('写入文件')
        # 返回值会返回给下一个process_item
        return item
        raise DropItem() # 后续的pipeline不能在使用item (丢弃item)
    def open_spider(self,spider):
        '''

        :param spider: 开始时被调用
        :return:
        '''

        print('打开文件')
    def close_spider(self,spider):
        '''
        :param spider:爬虫关闭时被调用
        :return:
        '''
        print('关闭文件')

class DBPipeline(object):
    def process_item(self, item, spider):
        print('写入数据库')
        return item

    def open_spider(self, spider):
        print('打开数据库')

    def close_spider(self, spider):
        print('关闭数据库')

#执行顺序,先执行FilePipeline的open_spider--->DBPipeline的open_spider
FilePipeline的process_item---->DBPipeline的process_item
FilePipeline的close_spider--->DBPipeline的close_spider
6.post访问/请求头的设置/cookies
自动登录抽屉+点赞
#
#         POST+请求头:
#             from scrapy.http import Request
#             req = Request(
#                 url='http://dig.chouti.com/login',
#                 method='POST',
#                 body='phone=8613121758648&password=woshiniba&oneMonth=1',
#                 headers={'Content-Type': 'application/x-www-form-urlencoded; charset=UTF-8'},
#                 cookies={},
#                 callback=self.parse_check_login,
#             )
#         cookies:
#             手动:
#               from scrapy.http.cookies import CookieJar
#                 cookie_dict = {}
#                 cookie_jar = CookieJar()
#                 cookie_jar.extract_cookies(response, response.request)
#                 for k, v in cookie_jar._cookies.items():
#                     for i, j in v.items():
#                         for m, n in j.items():
#                             cookie_dict[m] = n.value
#
#                 req = Request(
#                     url='http://dig.chouti.com/login',
#                     method='POST',
#                     headers={'Content-Type': 'application/x-www-form-urlencoded; charset=UTF-8'},
#                     body='phone=8615131255089&password=pppppppp&oneMonth=1',
#                     cookies=cookie_dict, # 手动携带
#                     callback=self.check_login
#                 )
#                 yield req
#             自动:****meta={'cookiejar': True}*****
#                 class ChoutiSpider(scrapy.Spider):
#                     name = 'chouti'
#                     allowed_domains = ['chouti.com']
#                     start_urls = ['http://dig.chouti.com/',]
#
#                     def start_requests(self):
#                         for url in self.start_urls:
#                             yield Request(url=url,callback=self.parse_index,meta={'cookiejar':True})
#
#                     def parse_index(self,response):
#                         req = Request(
#                             url='http://dig.chouti.com/login',
#                             method='POST',
#                             headers={'Content-Type': 'application/x-www-form-urlencoded; charset=UTF-8'},
#                             body='phone=8613121758648&password=woshiniba&oneMonth=1',
#                             callback=self.parse_check_login,
#                             meta={'cookiejar': True}
#                         )
#                         yield req
#
#                     def parse_check_login(self,response):
#                         # print(response.text)
#                         yield Request(
#                             url='https://dig.chouti.com/link/vote?linksId=19440976',
#                             method='POST',
#                             callback=self.parse_show_result,
#                             meta={'cookiejar': True}
#                         )
#
#                     def parse_show_result(self,response):
#                         print(response.text)
#
#         配置文件制定是否允许操作cookie:
#             # Disable cookies (enabled by default)
#             # COOKIES_ENABLED = False
7.去重
访问过的url不再访问,减少不必要的资源浪费。
#     5. 去重规则
#         配置:
#             DUPEFILTER_CLASS = 'xianglong.dupe.MyDupeFilter'
#         编写类:
#             class MyDupeFilter(BaseDupeFilter):
#                 def __init__(self):
#                     self.record = set()
#
#                 @classmethod
#                 def from_settings(cls, settings):
#                     return cls()
#
#                 def request_seen(self, request):
#                     if request.url in self.record:
#                         print('已经访问过了', request.url)
#                         return True
#                     self.record.add(request.url)
#
#                 def open(self):  # can return deferred
#                     pass
#
#                 def close(self, reason):  # can return a deferred
#                     pass
#
#         问题:为请求创建唯一标识
#
#
#             http://www.oldboyedu.com?id=1&age=2
#             http://www.oldboyedu.com?age=2&id=1
#
#             from scrapy.utils.request import request_fingerprint
#             from scrapy.http import Request
#
#
#             u1 = Request(url='http://www.oldboyedu.com?id=1&age=2')
#             u2 = Request(url='http://www.oldboyedu.com?age=2&id=1')
#
#             result1 = request_fingerprint(u1)
#             result2 = request_fingerprint(u2)
#             print(result1,result2)
#                    其内部将url用哈希加密成一个64位的字符串,那么建立索引的时候就可#以用char字段
                       result1=result2


#         问题:记录到低要不要放在数据库?【使用redis集合存储】
#             访问记录可以放在redis中。
#
#
#         补充:dont_filter到低在哪里?
#             from scrapy.core.scheduler import Scheduler
#              def enqueue_request(self, request):
#                 # request.dont_filter=False
#                     # self.df.request_seen(request):
#                     #   - True,已经访问
#                     #   - False,未访问
#                 # request.dont_filter=True,全部加入到调度器
#                 if not request.dont_filter and self.df.request_seen(request):
#                     self.df.log(request, self.spider)
#                     return False
#                 # 如果往下走,把请求加入调度器
#                 dqok = self._dqpush(request)
8.中间件
1.下载中间件
下载中间件的作用?
在每次下载前和下载后对请求和响应可以定制功能。例如:user-agent/代理/cookie
代理实例:
#     1. 下载中间件
#         问题:scrapy中如何添加代理?
#         解决方案:
#             方式一:内置添加代理功能
#                 # -*- coding: utf-8 -*-
#                 import os
#                 import scrapy
#                 from scrapy.http import Request
#
#                 class ChoutiSpider(scrapy.Spider):
#                     name = 'chouti'
#                     allowed_domains = ['chouti.com']
#                     start_urls = ['https://dig.chouti.com/']
#
#                     def start_requests(self):
#                         os.environ['HTTP_PROXY'] = "http://192.168.11.11"
#
#                         for url in self.start_urls:
#                             yield Request(url=url,callback=self.parse)
#
#                     def parse(self, response):
#                         print(response)
#
#             方式二:自定义下载中间件
#                 import random
#                 import base64
#                 import six
#                 def to_bytes(text, encoding=None, errors='strict'):
#                     """Return the binary representation of `text`. If `text`
#                     is already a bytes object, return it as-is."""
#                     if isinstance(text, bytes):
#                         return text
#                     if not isinstance(text, six.string_types):
#                         raise TypeError('to_bytes must receive a unicode, str or bytes '
#                                         'object, got %s' % type(text).__name__)
#                     if encoding is None:
#                         encoding = 'utf-8'
#                     return text.encode(encoding, errors)
#
#                 class MyProxyDownloaderMiddleware(object):
#                     def process_request(self, request, spider):
#                         proxy_list = [
#                             {'ip_port': '111.11.228.75:80', 'user_pass': 'xxx:123'},
#                             {'ip_port': '120.198.243.22:80', 'user_pass': ''},
#                             {'ip_port': '111.8.60.9:8123', 'user_pass': ''},
#                             {'ip_port': '101.71.27.120:80', 'user_pass': ''},
#                             {'ip_port': '122.96.59.104:80', 'user_pass': ''},
#                             {'ip_port': '122.224.249.122:8088', 'user_pass': ''},
#                         ]
#                         proxy = random.choice(proxy_list)
#                         if proxy['user_pass'] is not None:
#                             request.meta['proxy'] = to_bytes("http://%s" % proxy['ip_port'])
#                             encoded_user_pass = base64.encodestring(to_bytes(proxy['user_pass']))
#                             request.headers['Proxy-Authorization'] = to_bytes('Basic ' + encoded_user_pass)
#                         else:
#                             request.meta['proxy'] = to_bytes("http://%s" % proxy['ip_port'])
#
#
#
#                 配置:
#                     DOWNLOADER_MIDDLEWARES = {
#                        # 'xiaohan.middlewares.MyProxyDownloaderMiddleware': 543,
#                     }
#
2.爬虫中间件
2. 爬虫中间件
#         编写:
#             middlewares.py
#                 class XiaohanSpiderMiddleware(object):
#                     # Not all methods need to be defined. If a method is not defined,
#                     # scrapy acts as if the spider middleware does not modify the
#                     # passed objects.
#                     def __init__(self):
#                         pass
#                     @classmethod
#                     def from_crawler(cls, crawler):
#                         # This method is used by Scrapy to create your spiders.
#                         s = cls()
#                         return s
#
#                     # 每次下载完成之后,未执行parse函数之前。
#                     def process_spider_input(self, response, spider):
#                         # Called for each response that goes through the spider
#                         # middleware and into the spider.
#
#                         # Should return None or raise an exception.
#                         print('process_spider_input',response)
#                         return None
#
#                     def process_spider_output(self, response, result, spider):
#                         # Called with the results returned from the Spider, after
#                         # it has processed the response.
#
#                         # Must return an iterable of Request, dict or Item objects.
#                         print('process_spider_output',response)
#                         for i in result:
#                             yield i
#
#                     def process_spider_exception(self, response, exception, spider):
#                         # Called when a spider or process_spider_input() method
#                         # (from other spider middleware) raises an exception.
#
#                         # Should return either None or an iterable of Response, dict
#                         # or Item objects.
#                         pass
#
#                     # 爬虫启动时,第一次执行start_requests时,触发。(只执行一次)
#                     def process_start_requests(self, start_requests, spider):
#                         # Called with the start requests of the spider, and works
#                         # similarly to the process_spider_output() method, except
#                         # that it doesn’t have a response associated.
#
#                         # Must return only requests (not items).
#
#                         print('process_start_requests')
#                         for r in start_requests:
#                             yield r
#
#         应用:
#             SPIDER_MIDDLEWARES = {
#                'xiaohan.middlewares.XiaohanSpiderMiddleware': 543,
#             }
#
9.自定义扩展
engine_started = object()
engine_stopped = object()
spider_opened = object()
spider_idle = object()
spider_closed = object()
spider_error = object()
request_scheduled = object()
request_dropped = object()
response_received = object()
response_downloaded = object()
item_scraped = object()
item_dropped = object()
扩展方法:
#     3. 扩展:信号
#         单纯扩展:
#             extends.py
#                 class MyExtension(object):
#                     def __init__(self):
#                         pass
#
#                     @classmethod
#                     def from_crawler(cls, crawler):
#                         obj = cls()
#                         return obj
#             配置:
#                 EXTENSIONS = {
#                     'xiaohan.extends.MyExtension':500,
#                 }
#
#         扩展+信号:
#             extends.py
#                 from scrapy import signals
#
#
#                 class MyExtension(object):
#                     def __init__(self):
#                         pass
#
#                     @classmethod
#                     def from_crawler(cls, crawler):
#                         obj = cls()
#                         # 在爬虫打开时,触发spider_opened信号相关的所有函数:xxxxxxxxxxx
#                         crawler.signals.connect(obj.xxxxxxxxxxx1, signal=signals.spider_opened)
#                         # 在爬虫关闭时,触发spider_closed信号相关的所有函数:xxxxxxxxxxx
#                         crawler.signals.connect(obj.uuuuuuuuuu, signal=signals.spider_closed)
#                         return obj
#
#                     def xxxxxxxxxxx1(self, spider):
#                         print('open')
#
#                     def uuuuuuuuuu(self, spider):
#                         print('close')
#
#                             return obj
#             配置:
#             EXTENSIONS = {
#                 'xiaohan.extends.MyExtension':500,
#             }
#
10.settings详解
# -*- coding: utf-8 -*-

# Scrapy settings for step8_king project
#
# For simplicity, this file contains only settings considered important or
# commonly used. You can find more settings consulting the documentation:
#
#     http://doc.scrapy.org/en/latest/topics/settings.html
#     http://scrapy.readthedocs.org/en/latest/topics/downloader-middleware.html
#     http://scrapy.readthedocs.org/en/latest/topics/spider-middleware.html

# 1. 爬虫名称
BOT_NAME = 'step8_king'

# 2. 爬虫应用路径
SPIDER_MODULES = ['step8_king.spiders']
NEWSPIDER_MODULE = 'step8_king.spiders'

# Crawl responsibly by identifying yourself (and your website) on the user-agent
# 3. 客户端 user-agent请求头
# USER_AGENT = 'step8_king (+http://www.yourdomain.com)'

# Obey robots.txt rules
# 4. 禁止爬虫配置
# ROBOTSTXT_OBEY = False

# Configure maximum concurrent requests performed by Scrapy (default: 16)
# 5. 并发请求数
# CONCURRENT_REQUESTS = 4

# Configure a delay for requests for the same website (default: 0)
# See http://scrapy.readthedocs.org/en/latest/topics/settings.html#download-delay
# See also autothrottle settings and docs
# 6. 延迟下载秒数
# DOWNLOAD_DELAY = 2


# The download delay setting will honor only one of:
# 7. 单域名访问并发数,并且延迟下次秒数也应用在每个域名
# CONCURRENT_REQUESTS_PER_DOMAIN = 2
# 单IP访问并发数,如果有值则忽略:CONCURRENT_REQUESTS_PER_DOMAIN,并且延迟下次秒数也应用在每个IP
# CONCURRENT_REQUESTS_PER_IP = 3

# Disable cookies (enabled by default)
# 8. 是否支持cookie,cookiejar进行操作cookie
# COOKIES_ENABLED = True
# COOKIES_DEBUG = True

# Disable Telnet Console (enabled by default)
# 9. Telnet用于查看当前爬虫的信息,操作爬虫等...
#    使用telnet ip port ,然后通过命令操作
# TELNETCONSOLE_ENABLED = True
# TELNETCONSOLE_HOST = '127.0.0.1'
# TELNETCONSOLE_PORT = [6023,]


# 10. 默认请求头
# Override the default request headers:
# DEFAULT_REQUEST_HEADERS = {
#     'Accept': 'text/html,application/xhtml+xml,application/xml;q=0.9,*/*;q=0.8',
#     'Accept-Language': 'en',
# }


# Configure item pipelines
# See http://scrapy.readthedocs.org/en/latest/topics/item-pipeline.html
# 11. 定义pipeline处理请求
# ITEM_PIPELINES = {
#    'step8_king.pipelines.JsonPipeline': 700,
#    'step8_king.pipelines.FilePipeline': 500,
# }


# 12. 自定义扩展,基于信号进行调用
# Enable or disable extensions
# See http://scrapy.readthedocs.org/en/latest/topics/extensions.html
# EXTENSIONS = {
#     # 'step8_king.extensions.MyExtension': 500,
# }


# 13. 爬虫允许的最大深度,可以通过meta查看当前深度;0表示无深度
# DEPTH_LIMIT = 3

# 14. 爬取时,0表示深度优先Lifo(默认);1表示广度优先FiFo

# 后进先出,深度优先
# DEPTH_PRIORITY = 0
# SCHEDULER_DISK_QUEUE = 'scrapy.squeue.PickleLifoDiskQueue'
# SCHEDULER_MEMORY_QUEUE = 'scrapy.squeue.LifoMemoryQueue'
# 先进先出,广度优先

# DEPTH_PRIORITY = 1
# SCHEDULER_DISK_QUEUE = 'scrapy.squeue.PickleFifoDiskQueue'
# SCHEDULER_MEMORY_QUEUE = 'scrapy.squeue.FifoMemoryQueue'

# 15. 调度器队列
# SCHEDULER = 'scrapy.core.scheduler.Scheduler'
# from scrapy.core.scheduler import Scheduler


# 16. 访问URL去重
# DUPEFILTER_CLASS = 'step8_king.duplication.RepeatUrl'


# Enable and configure the AutoThrottle extension (disabled by default)
# See http://doc.scrapy.org/en/latest/topics/autothrottle.html

"""
17. 自动限速算法
    from scrapy.contrib.throttle import AutoThrottle
    自动限速设置
    1. 获取最小延迟 DOWNLOAD_DELAY
    2. 获取最大延迟 AUTOTHROTTLE_MAX_DELAY
    3. 设置初始下载延迟 AUTOTHROTTLE_START_DELAY
    4. 当请求下载完成后,获取其"连接"时间 latency,即:请求连接到接受到响应头之间的时间
    5. 用于计算的... AUTOTHROTTLE_TARGET_CONCURRENCY
    target_delay = latency / self.target_concurrency
    new_delay = (slot.delay + target_delay) / 2.0 # 表示上一次的延迟时间
    new_delay = max(target_delay, new_delay)
    new_delay = min(max(self.mindelay, new_delay), self.maxdelay)
    slot.delay = new_delay
"""

# 开始自动限速
# AUTOTHROTTLE_ENABLED = True
# The initial download delay
# 初始下载延迟
# AUTOTHROTTLE_START_DELAY = 5
# The maximum download delay to be set in case of high latencies
# 最大下载延迟
# AUTOTHROTTLE_MAX_DELAY = 10
# The average number of requests Scrapy should be sending in parallel to each remote server
# 平均每秒并发数
# AUTOTHROTTLE_TARGET_CONCURRENCY = 1.0

# Enable showing throttling stats for every response received:
# 是否显示
# AUTOTHROTTLE_DEBUG = True

# Enable and configure HTTP caching (disabled by default)
# See http://scrapy.readthedocs.org/en/latest/topics/downloader-middleware.html#httpcache-middleware-settings


"""
18. 启用缓存
    目的用于将已经发送的请求或相应缓存下来,以便以后使用

    from scrapy.downloadermiddlewares.httpcache import HttpCacheMiddleware
    from scrapy.extensions.httpcache import DummyPolicy
    from scrapy.extensions.httpcache import FilesystemCacheStorage
"""
# 是否启用缓存策略
# HTTPCACHE_ENABLED = True

# 缓存策略:所有请求均缓存,下次在请求直接访问原来的缓存即可
# HTTPCACHE_POLICY = "scrapy.extensions.httpcache.DummyPolicy"
# 缓存策略:根据Http响应头:Cache-Control、Last-Modified 等进行缓存的策略
# HTTPCACHE_POLICY = "scrapy.extensions.httpcache.RFC2616Policy"

# 缓存超时时间
# HTTPCACHE_EXPIRATION_SECS = 0

# 缓存保存路径
# HTTPCACHE_DIR = 'httpcache'

# 缓存忽略的Http状态码
# HTTPCACHE_IGNORE_HTTP_CODES = []

# 缓存存储的插件
# HTTPCACHE_STORAGE = 'scrapy.extensions.httpcache.FilesystemCacheStorage'
11.自定义命令
- 在spiders同级创建任意目录,如:commands
- 在其中创建 crawlall.py 文件 (此处文件名就是自定义的命令)
-
- 在settings.py 中添加配置 COMMANDS_MODULE = '项目名称.目录名称'
- 在项目目录执行命令:scrapy crawlall
5. 自定义命令
#         from scrapy.commands import ScrapyCommand
#         from scrapy.utils.project import get_project_settings
#
#
#         class Command(ScrapyCommand):
#             requires_project = True
#
#             def syntax(self):
#                 return '[options]'
#
#             def short_desc(self):
#                 return 'Runs all of the spiders'
#
#             def run(self, args, opts):
#                 spider_list = self.crawler_process.spiders.list()
#                 for name in spider_list:
#                     self.crawler_process.crawl(name, **opts.__dict__)
#                 self.crawler_process.start()
#
#
#             PS:源码
#                 def run(self, args, opts):
#                     from scrapy.crawler import CrawlerProcess
#                     CrawlerProcess.crawl
#                     CrawlerProcess.start
#                     """
#                     self.crawler_process对象中含有:_active = {d,}
#                     """
#                     self.crawler_process.crawl('chouti',**opts.__dict__)
#                     self.crawler_process.crawl('cnblogs',**opts.__dict__)
#                     #
#                     self.crawler_process.start()
参考:http://www.cnblogs.com/wupeiqi/articles/6229292.html