十年河东,十年河西
莫欺少年穷
NetCore中依赖注入无处不在,关于依赖注入的好处,想必大家都能想到二个字:解耦
但依赖注入是如何做到解耦的呢?
下面以具体实例来描述,如下:
首先,在项目中创建一个发送消息的接口及实现类


    public interface IMessage
    {
        string SendMessage();
    }

    /// <summary>
    /// 传真发送消息类
    /// </summary>
    public class MessageService_ChuanZhen:IMessage
    {
        public string SendMessage()
        {
            return "90年代的我使用传真发送消息";
        }
    }
传统的方式是这样调用此方法的
    public class MessageController : Controller
    {
        IMessage service = new MessageService_ChuanZhen();
        public ViewResult Index()
        {
            var result = service.SendMessage();
            return View();
        }
    }
代码上没有任何问题,但随着时代的发展,传真发送消息过时了,现在需要使用邮件的方式发送消息,那么我们的实现如下:
增加邮件发送类、
    /// <summary>
    /// 邮箱发送消息类
    /// </summary>
    public class MessageService_Email : IMessage
    {
        public string SendMessage()
        {
            return "21世纪我使用邮件发送消息";
        }
    }
修改控制器代码,如下:
    public class MessageController : Controller
    {
        IMessage service = new MessageService_Email();
        public ViewResult Index()
        {
            var result = service.SendMessage();
            return View();
        }
    }
从上述代码可以看出,我们要向发送消息,就必须完全依赖创建的Service对象,
首先在startpUP.cs中注册服务,如下:
        public void ConfigureServices(IServiceCollection services)
        {
            services.AddSingleton<IMessage, MessageService_ChuanZhen>();


            services.Configure<CookiePolicyOptions>(options =>
            {
                // This lambda determines whether user consent for non-essential cookies is needed for a given request.
                options.CheckConsentNeeded = context => true;
                options.MinimumSameSitePolicy = SameSiteMode.None;
            });


            services.AddMvc().SetCompatibilityVersion(CompatibilityVersion.Version_2_1);
        }
然后在控制器中注入服务对象,如下:
    public class MessageController : Controller
    {
        private readonly IMessage _messageService;
        public MessageController(IMessage MessageService)
        {
            _messageService = MessageService;
        }

        public ViewResult Index()
        {
            var result = _messageService.SendMessage();
            return View();
        }
    }
根据上述代码,无论你将来增加多少中通信方式,我的控制器都不依赖于具体的service对象,我要要做的就是扩展我们的接口实现类及在startUP.cs中的ConfigureServices方法中重新注册服务即可,在这里,我们可以将ConfigureServices方法看做一个注接口对应册服务类的大容器,你需要什么服务,你就去注册好了,客户端无需修改任何代码
譬如,现在我们需要将传真方式修改为邮件方式,只需修改下我们注册的服务
将
services.AddSingleton<IMessage, MessageService_ChuanZhen>();
修改为:
services.AddSingleton<IMessage, MessageService_Email>();
这样就做到了完美解耦,我们的控制器也就不再依赖于bou某个具体的对象了。
我们书写这样的代码,也符合设计模式中的:继承原则,单一职责原则,开放封闭原则,依赖倒转原则。
上述说的设计模式原则简单介绍下:
关于继承无需多说
所谓单一职责原则是指:就一个类而言,应该仅有一个引起它变化的原因
所谓开闭原则是指:对于扩展是开放的,对于修改是封闭的(ASD原则)
依赖倒转原则是指:高层不应该依赖底层模块(强内聚,松耦合),就想上述代码中的控制器属于高层模块,接口及其实现类,服务注册类/方法(startup.cs中的ConfigureServices)属于底层模块。
截止到这儿,我们就把依赖注入的好处说完了,下面介绍下本文的重点,NetCore的三种不同类型的对象
netcore提供了三种不同类型的对象,分别为:全局单例对象(AddSingleton),作用域单例对象(AddScoped)、临时对象(AddTransient)。
具体还是结合代码来说明:
首先创建接口,如下:
    /// <summary>
    /// 全局的
    /// </summary>
    public interface ITestService_Singleton
    {
        Guid MyProperty { get; }
    }

    /// <summary>
    /// 作用域内的
    /// </summary>
    public interface ITestService_Scoped
    {
        Guid MyProperty { get; }
    }

    /// <summary>
    /// 临时的
    /// </summary>
    public interface ITestService_Transient
    {
        Guid MyProperty { get; }
    }
其次,创建接口的实现类,如下:
    public class TestService_Singleton : ITestService_Singleton
    {
        public TestService_Singleton()
        {
            MyProperty = Guid.NewGuid();
        }
        public Guid MyProperty { get; set; }
    }
    public class TestService_Scoped : ITestService_Scoped
    {
        public TestService_Scoped()
        {
            MyProperty = Guid.NewGuid();
        }
        public Guid MyProperty { get; set; }
    }
    public class TestService_Transient : ITestService_Transient
    {
        public TestService_Transient()
        {
            MyProperty = Guid.NewGuid();
        }
        public Guid MyProperty { get; set; }
    }
然后,将接口与实现类注册在startUp类中,如下:
        public void ConfigureServices(IServiceCollection services)
        {
            services.Configure<MyOptions>(Configuration);
            //全局单例对象  全局单例
            services.AddSingleton<ITestService_Singleton, TestService_Singleton>();
            //作用域内单例对象 作用域内不会重新创建
            services.AddScoped<ITestService_Scoped, TestService_Scoped>();
            //临时对象,每次都回重新创建
            services.AddTransient<ITestService_Transient, TestService_Transient>();
            //
            services.AddSingleton<IMessage, MessageService_Email>();


            services.Configure<CookiePolicyOptions>(options =>
            {
                // This lambda determines whether user consent for non-essential cookies is needed for a given request.
                options.CheckConsentNeeded = context => true;
                options.MinimumSameSitePolicy = SameSiteMode.None;
            });


            services.AddMvc().SetCompatibilityVersion(CompatibilityVersion.Version_2_1);
        }
最后,我们书写控制器代码,如下:
    public class HomeController : Controller
    {
        /// <summary>
        /// 全局的
        /// </summary>
        private ITestService_Singleton _singletonService;
        /// <summary>
        /// 作用域内的
        /// </summary>
        private ITestService_Scoped _scopedService;
        /// <summary>
        /// 临时的
        /// </summary>
        private ITestService_Transient _transientService;
        public HomeController(ITestService_Singleton SingletonService
            , ITestService_Scoped ScopedService
            , ITestService_Transient TransientService)
        {
            _singletonService = SingletonService;
            _scopedService = ScopedService;
            _transientService = TransientService;
        }

        /// <summary>
        ///  //这里采用了Action注入的方法
        /// </summary>
        /// <param name="singletonService_2"></param>
        /// <param name="ScopedService_2">保证和_scopedService在同一个作用域</param>
        /// <param name="TransientService_3"></param>
        /// <returns></returns>
        public IActionResult Index([FromServices]ITestService_Singleton singletonService_2, [FromServices]ITestService_Scoped ScopedService_2,[FromServices]ITestService_Transient TransientService_2)
        {
            ViewData["Message_1"] = "全局对象生成的GUID:" + _singletonService.MyProperty;
            ViewData["Message_12"] = "全局对象生成的GUID:" + singletonService_2.MyProperty;

            ViewData["Message_2"] = "作用域内对象生成的GUID:" + _scopedService.MyProperty;
            ViewData["Message_22"] = "作用域内对象生成的GUID:" + ScopedService_2.MyProperty;

            ViewData["Message_3"] = "临时对象生成的GUID:" + _transientService.MyProperty;
            ViewData["Message_32"] = "临时对象生成的GUID:" + TransientService_2.MyProperty;
            return View();
        }

    }
执行程序,通过结果,我们来分析:
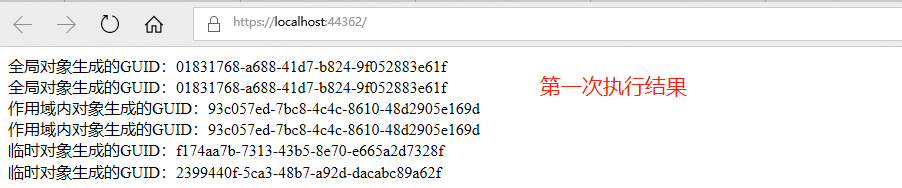
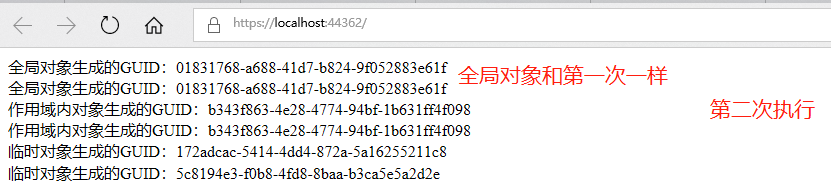
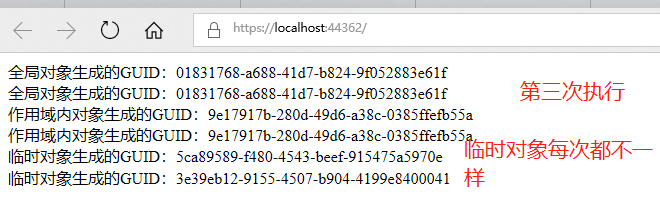
由上图可以看出,全局单例的对象生成的GUID每次都是同一个结果。
作用域生成的结果,只有在同一作用域时才会一样
临时对象每次都不一样。
参考博客:
https://www.cnblogs.com/zhangzhiping35/p/11058761.html
https://www.cnblogs.com/GuZhenYin/p/8297145.html
https://www.cnblogs.com/chenwolong/p/yz.html
@天才卧龙的博客