API: application programming interface
在Ruby中特指调用某个对象的信息,如hash的方法库library中的方法,参数,回传值等。
视频:如何用Rails 建立api系列
https://gorails.com/series/how-to-build-apis-with-rails
教程1:
app文件的位置:自我练习/weather
Readme.rb
before_action :set_default_format
def set_default_format
end
views/ ../show.json.jbuilder
json.id @location.id
在controller的locations_controller.rb中,可以指定action渲染json格式的数据对象:
也可以在view中写。
https://github.com/rails/jbuilder
Jbuilder(3300✨)
Jbuilder gives you a simple DSL for declaring JSON structures that beats manipulating giant hash structures. This is particularly helpful when the generation process is fraught with conditionals and loops. Here's a simple example:
定义一个属性和结构的名字(动态的),使用 set! 方法
json.set! :author do
json.set! :name, 'David'
end
#=> {"author": {"name": "David"}}
合并一个已存在的hash,或者array到当前的content, 使用merge! 方法
hash = { author: { name: "David"} }
json.post do
json.title "Merge HOWTO"
json.merge! hash
end
# => "post": { "title": "Merge HOWTO", "author": { "name": "David" } }
可以使用ruby 语法, each, 比如案例中的:
也可以使用array! , 同样是针对一对多的关联,只要是数组集合就行。
方便的写法写:提取指定的属性:
json.array! @location.recordings, :temp, :status
使用array!,可以输出array类型的资料
Jbuilder对象可以直接互相被嵌套到:
比如建立1对多关联的表。
company = Company.new("Dell", Person.new("John", 36))
company.to_builder.target!
把对象变成jbuilder对象。
# => {"name": "Dell", "president":{"name":"John", "age":58}}
可以用于ActionView template language。 如show.json.jbuilder.
也可以用partials。 如views/comments/_comments.json.jbuilder, 然后设定一个局部变量comments :
json.partial! 'comments/comments', comments: @message.comments
可以渲染partials集合:
json.array! @posts, partial: 'posts/post', as: :post
或者
json.partials! partial: 'posts/post', collection: @posts, as: :post
《绿色框内的可以不写。》
写法有多种
可以使用:local选项传入任意对象到局部模版:
json.partials! "sub_template", locals: {user: :user}
支持碎片缓存fragment caching: Rails.cache
json.cache! ['v1', @person], expires_in: 10.minutes do
  json.extract! @person, :name, :age
end
Web API (第2个视频)
JSON Web Tokens(JWT) vs Rails Session Cookies (新知识点)
https://jwt.io/
Encode编码,Decode解码, payload载何
使用JWT 来为你的API做验证authentication。
JWT必须手动加入每个request。你自己必须把它们放到你的headers,这意味者它们不会自动的发送。
所以服务器总是认为你是登出的状态。
如何做token验证的讨论:
https://ruby-china.org/topics/34317
用JWT做验证(基础的理解, 有rails建设步骤step to step)
https://www.jianshu.com/p/56467f890516
ruby-jwt(2100✨) 一个gem.
实做: ~/自我练习/jwt_api (已上传git)
https://github.com/chentianwei411/JsonWebToken-API
gem 'bcrypt', '~> 3.1.7'
'用于严格化Rails密码验证,在model中使用password_digest属性,配合has_secure_password。
因为5.2已经放弃使用secrets, 改用credentials。所以需要在Token类中,改用crendentials。(替换掉secrets)
更多案例见git和转化模版见jwt.io)
description:
一个把数据转化到服务器,或从服务器转化下来的工具。用于没有用户交互界面的时候,直接输入命令。
curl offers useful tricks like proxy support, user authentication, FTP upload, HTTP post, SSL connections, cookies, file transfer resume, Metalink, and more.
基本用法:
curl [options/ URLs]
curl -X POST -d username="json" -d password="12345" http://localhost:3000/authentication解释:
-X/--require <command> 指定什么命令
-d/--data <data> 是POST方式下传输数据。
curl -v --header "Authorization: Bearer eyJhbGciOiJIUzI1NiJ9.eyJ1c2VyX2lkIjoxLCJleHAiOjE1MzE2NTYzMTR9.bk6_4kCdMzXO1K-BX6I6XDWjGHRarXT0tUixklrSVkw " http://localhost:3000/users
--header 传递客制化header给server
-v 显示连接的更多信息。
(方便的方法使用chrome插件:postman)
httpie 36000✨
https://github.com/jakubroztocil/httpie#linux
介绍:
一个类似cURL的工具。一个命令行HTTP client。和web server交互更友好。
提供了简单的http命令,允许使用简单自然的syntax来发送HTTP requests,并显示彩色的输出。
用处:
测试,debug, 和服务器交互。
安装 brew install httpie
命令:
http -v url #显示request和全部response,和curl类似。
http --help #帮助
rails routes | grep auth
抓取auth, 显示相关routes。
status:HTTP status code.
https://zh.wikipedia.org/wiki/HTTP%E7%8A%B6%E6%80%81%E7%A0%81
JWT
由Header, Payload, Signature三个部分组成。xxxxx.yyyyy.zzzzz
Header:
由token的类型"JWT"和算法algorithm hash类型组成。
Payload:
第二部分的token 。 声明:一个主体和附加的数据。由三种格式: registered, public, private
- Registered claims: 这些是一组预制的声明,非强制但推荐。这些声明提供了有用的,内操作的声明。比如: iss(issuer), exp(expiration time), sub(subject), aud(audience), 等等(文档)
- Public claims:注意名字不要和预制的重复。或者定义一个URL 包括a collision resistant namespace.
- Private Claims: 自定义的声明。用来在parties间分享数据
⚠️不要在Payload上写敏感信息。
Signature
使用指定的algorithm标记,包含编码的header, 编码的payload, 和密匙secret。如:
HMACSHA256(
base64UrlEncode(header) + "." +
base64UrlEncode(payload),
)
JSON Web Tokens如何工作的?
无论何时,一个用户想要进入/取出 一个受到保护的route/resource, 这个用户必须提供JWT,
在Authorizaton header中使用the Bearer schema。
header的内容应该是这个格式:
Authorization: Bearer <token>
服务器的受到保护的routes会在这个Authorization header中核查JWT,如果JWT存在于服务器,用户就可以用受到保护的resources.
如果JWT包括了必须的data, 就需要查询数据库。
流程flow:
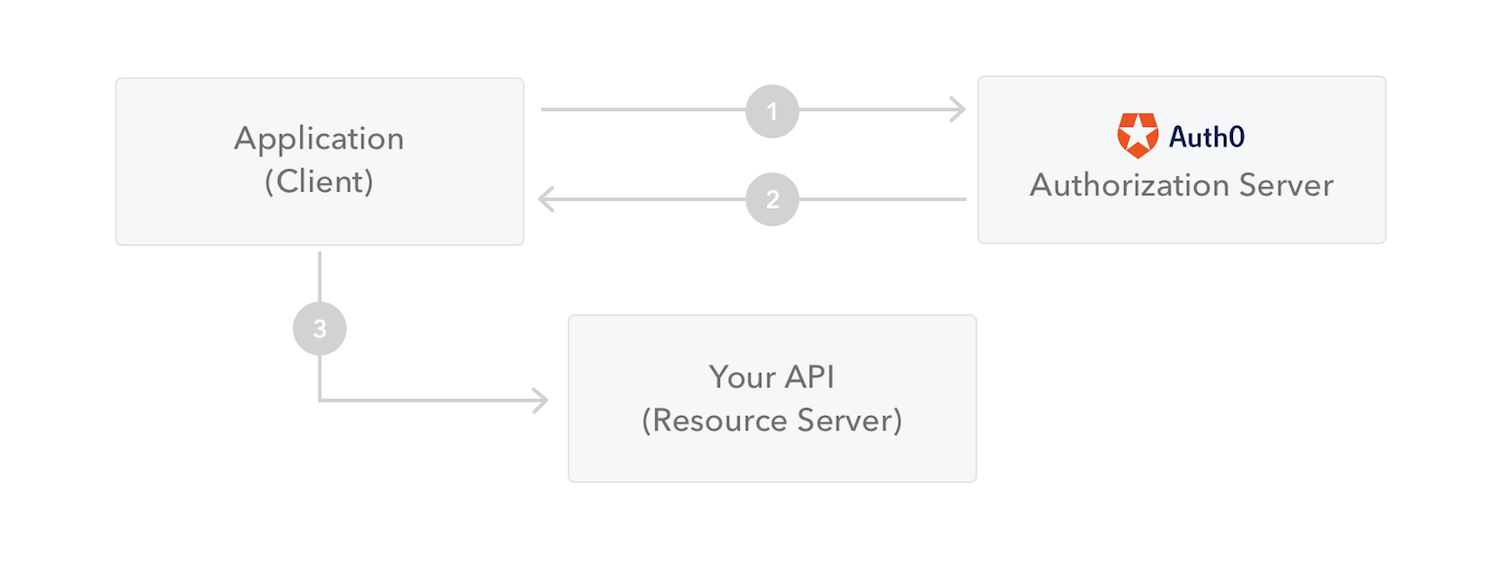
- 客户或程序请求authorizations到授权服务器。
- 当authorization is granted,授权服务器返回一个access token给app
- App使用这个token来存取一个受到保护的resource(如an API)
Rails使用https://github.com/jwt/ruby-jwt, 这个gem。
方法案例:
HMAC的编码,包括HS256等:
token = JWT.encode(payload, 密匙,"HS256") #payload是hash,见上⬆️。
JWT.decode(token, 密匙, true, {algorithm: 'HS256'})
hmac_secret = 'my$ecretK3y'

token = JWT.encode payload, hmac_secret, 'HS256'

# eyJhbGciOiJIUzI1NiJ9.eyJkYXRhIjoidGVzdCJ9.pNIWIL34Jo13LViZAJACzK6Yf0qnvT_BuwOxiMCPE-Y
puts token

decoded_token = JWT.decode token, hmac_secret, true, { algorithm: 'HS256' }

# Array
# [
#   {"data"=>"test"}, # payload
#   {"alg"=>"HS256"} # header
# ]
puts decoded_token
标准格式:
token = JWT.encode payload, key, algorithm='HS256', header_fields={ }
Payload中的exp到期声明:
exp = Time.now.to_i + 4 * 3600
exp_payload = { data: 'data', exp: exp }

token = JWT.encode exp_payload, hmac_secret, 'HS256'

begin
  decoded_token = JWT.decode token, hmac_secret, true, { algorithm: 'HS256' }
rescue JWT::ExpiredSignature
  # Handle expired token, e.g. logout user or deny access
end
⚠️可以在decode()中增加一个误差{leeway: 30} 30秒
其他声明如iss, aud, iat(Issued At)等
都是可以验证的,{verify_XXX: true,}不符合的会❌,具体见git