下面要执行的是HAProxy部分
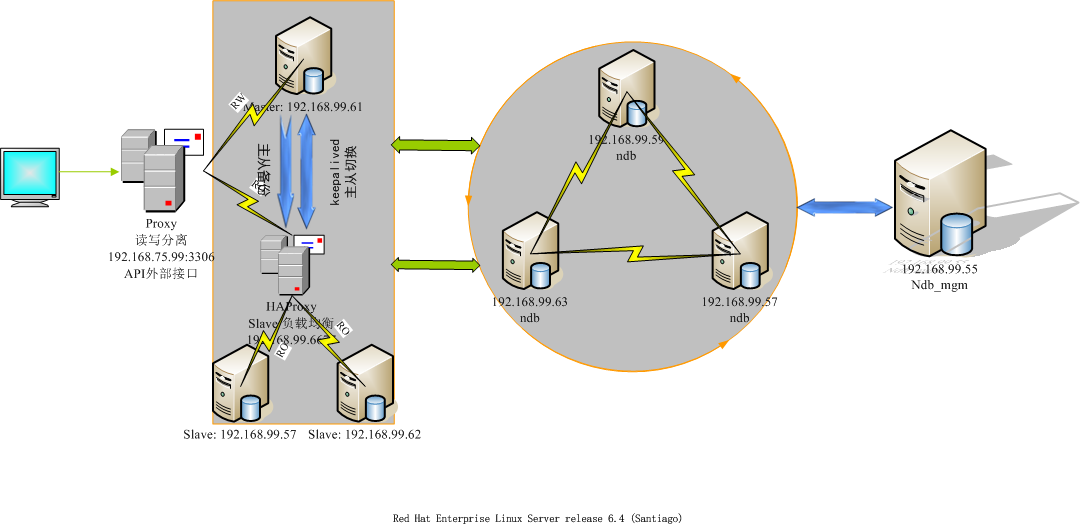
这是一个集群,其他的部分在:
mysql-slave负载均衡[高可用]

1.安装haproxy
tar zxvf haproxy-1.4.13.tar.gz

cd haproxy-1.4.13/

mkdir -p /usr/local/haproxy

make TARGET=linux26 PREFIX=/usr/local/haproxy  ##我的系统内核为2.6,所以target=linux26

make install PREFIX=/usr/local/haproxy
2.配置文件
mkdir /etc/haproxy

touch /etc/haproxy/haproxy.cfg

vim /etc/haproxy/haproxy.cfg
haproxy.cfg
global

    log         127.0.0.1 local2
    chroot      /var/lib/haproxy
    pidfile     /var/run/haproxy.pid
    maxconn     4000
    user        haproxy
    group       haproxy
    daemon
    stats socket /var/lib/haproxy/stats

defaults
    mode                    tcp
    log                     global
    option                  dontlognull
    option                  redispatch
    retries                 3
    timeout http-request    10s
    timeout queue           1m
    timeout connect         10s
    timeout client          1m
    timeout server          1m
    timeout http-keep-alive 10s
    timeout check           10s
    maxconn                 600

listen stats
    mode http
    bind :6677
    stats enable
    stats hide-version
    stats uri     /haproxyadmin?stats
    stats realm   Haproxy Statistics
    stats auth    admin:admin
    stats admin if TRUE

frontend  main 192.168.99.55:9090
    default_backend             mysql

backend mysql
    balance     leastconn
    server slave75.57 192.168.99.57:3306 check port 3306 maxconn 300
    server slave75.62 192.168.99.62:3306 check port 3306 maxconn 300
haproxy服务脚本
#!/bin/sh
#
# haproxy
#
# chkconfig:   - 85 15
# description:  HAProxy is a free, very fast and reliable solution
#               offering high availability, load balancing, and
#               proxying for TCP and  HTTP-based applications
# processname: haproxy
# config:      /etc/haproxy/haproxy.cfg
# pidfile:     /var/run/haproxy.pid

# Source function library.
. /etc/rc.d/init.d/functions

# Source networking configuration.
. /etc/sysconfig/network

# Check that networking is up.
[ "$NETWORKING" = "no" ] && exit 0

exec="/usr/sbin/haproxy"
prog=$(basename $exec)

[ -e /etc/sysconfig/$prog ] && . /etc/sysconfig/$prog

cfgfile=/etc/haproxy/haproxy.cfg
pidfile=/var/run/haproxy.pid
lockfile=/var/lock/subsys/haproxy

check() {
    $exec -c -V -f $cfgfile $OPTIONS
}

start() {
    $exec -c -q -f $cfgfile $OPTIONS
    if [ $? -ne 0 ]; then
        echo "Errors in configuration file, check with $prog check."
        return 1
    fi

    echo -n $"Starting $prog: "
    # start it up here, usually something like "daemon $exec"
    daemon $exec -D -f $cfgfile -p $pidfile $OPTIONS
    retval=$?
    echo
    [ $retval -eq 0 ] && touch $lockfile
    return $retval
}

stop() {
    echo -n $"Stopping $prog: "
    # stop it here, often "killproc $prog"
    killproc $prog
    retval=$?
    echo
    [ $retval -eq 0 ] && rm -f $lockfile
    return $retval
}

restart() {
    $exec -c -q -f $cfgfile $OPTIONS
    if [ $? -ne 0 ]; then
        echo "Errors in configuration file, check with $prog check."
        return 1
    fi
    stop
    start
}

reload() {
    $exec -c -q -f $cfgfile $OPTIONS
    if [ $? -ne 0 ]; then
        echo "Errors in configuration file, check with $prog check."
        return 1
    fi
    echo -n $"Reloading $prog: "
    $exec -D -f $cfgfile -p $pidfile $OPTIONS -sf $(cat $pidfile)
    retval=$?
    echo
    return $retval
}

force_reload() {
    restart
}

fdr_status() {
    status $prog
}

case "$1" in
    start|stop|restart|reload)
        $1
        ;;
    force-reload)
        force_reload
        ;;
    check)
        check
        ;;
    status)
        fdr_status
        ;;
    condrestart|try-restart)
        [ ! -f $lockfile ] || restart
        ;;
    *)
        echo $"Usage: $0 {start|stop|status|restart|try-restart|reload|force-reload}"
        exit 2
esac
3.启动
service haproxy start

netstat -tlnp | grep haproxy

tcp        0      0 0.0.0.0:6677                0.0.0.0:*                   LISTEN      32360/haproxy
tcp        0      0 192.168.75.55:9090          0.0.0.0:*                   LISTEN      32360/haproxy


ps aux | grep haproxy

haproxy  32360  0.0  0.0  14416  1524 ?        Ss   15:12   0:00 /usr/sbin/haproxy -D -f /etc/haproxy/haproxy.cfg -p /var/run/haproxy.pid
root     32685  0.0  0.0 103244   840 pts/1    S+   15:32   0:00 grep haproxy
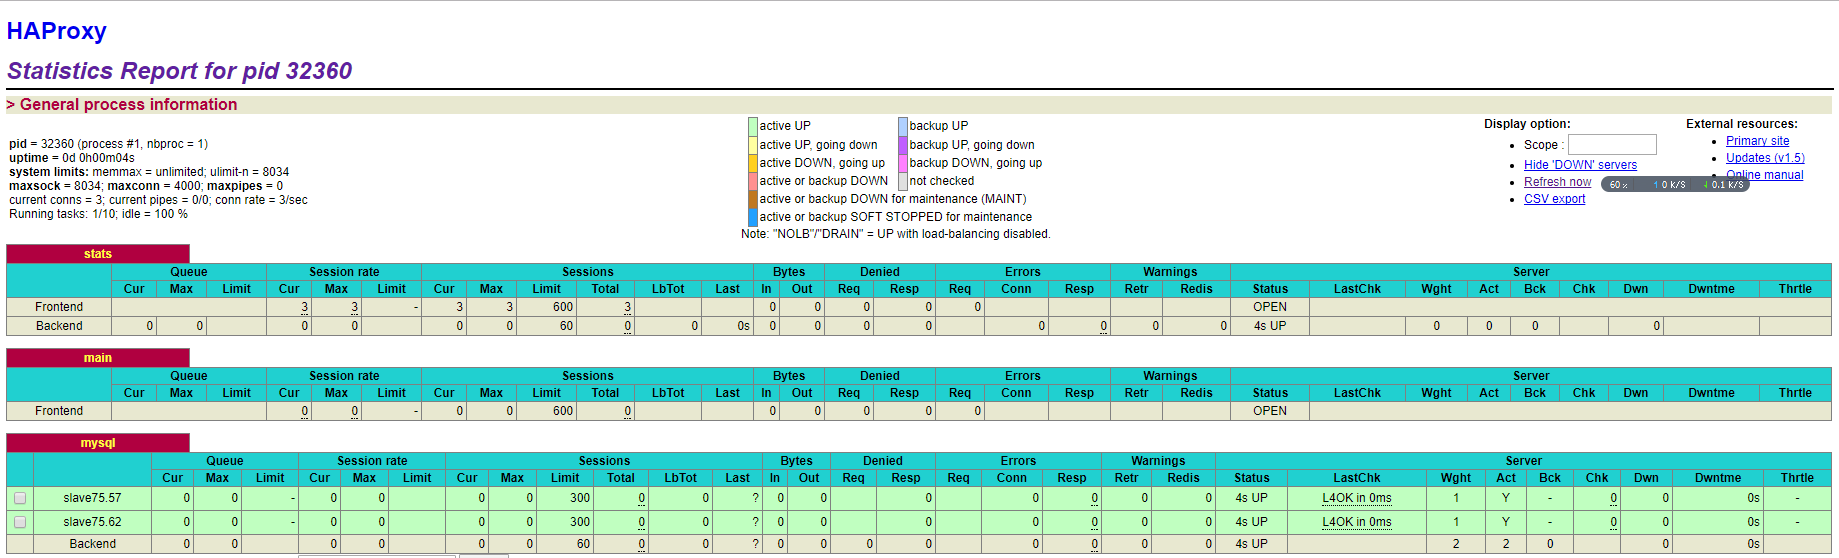
4.检测
4.1浏览器
浏览器地址栏: http://192.168.99.55:6677/haproxyadmin?stats
上面的这个配置在haproxy.cfg里面
4.2navicat
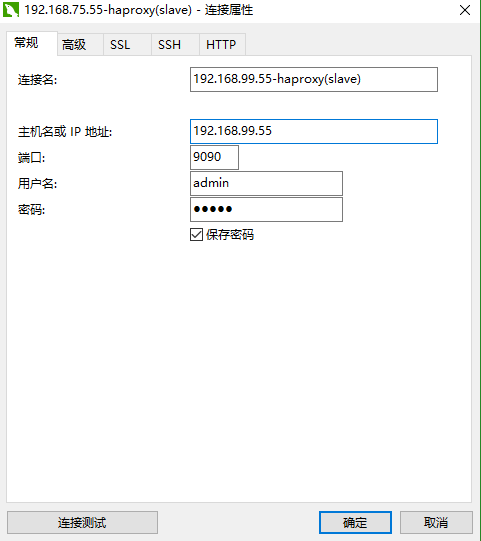 第一次连接连的是62
 关闭, 重新连接
 这次连的是57
看数据库不同从而分析, 成功!
完毕!