1. 先使用 Vue 的脚手架。 初始化一个项目 就叫 education_project
$ vue init webpack education_project
又是这一堆问题。
? Project name education_project
? Project description 一个教育平台的开发
? Author chengege
? Vue build standalone
? Install vue-router? Yes
? Use ESLint to lint your code? No
? Set up unit tests No
? Setup e2e tests with Nightwatch? No
? Should we run `npm install` for you after the project has been created? (recommended) npm
然后 把他原来的, 关于 router 里面的东西,删掉。 HelloWorld 这个vue文件删掉。 用不到。
router/index.js:
import Vue from 'vue'
import Router from 'vue-router'
/*import HelloWorld from '@/components/HelloWorld' 没用删掉*/

// 如果 Router 要当作局部模块使用 一定要 Vue.use(Router);
// 他就相当于  Vue.prototype.$router=router  为Vue父类添加了一个$router 属性

// 在所有组件中就可以使用  this.$router 拿到当前的这个 Router 对象
// this 就是Vue的实例化对象。 $router 就是挂载到 Vue 父类的一个属性(这个属性就是一个 Router 对象)。
Vue.use(Router);


export default new Router({
  routes: [  // 配置路由规则
    // {path:'/', name:'Home', component:'Home'}
  ]
})
main.js:
// The Vue build version to load with the `import` command
// (runtime-only or standalone) has been set in webpack.base.conf with an alias.
import Vue from 'vue'
import App from './App'
import router from './router/index'  // z这里 ‘./router’ 只写这个也没问题, 因为在webpack.base.conf.js 给做个配置,

Vue.config.productionTip = false;  // 这个没啥用

/* eslint-disable no-new */
new Vue({
  el: '#app',
  router,  // 挂载路由
  template: '<App/>',
  components: { App },
});
App.vue: 我们的 入口组件。
<template>
  <div id="app">
    <h1>教学系统</h1>
<router-view/>
  </div>
</template>

<script>
export default {
  name: 'App'
}
</script>

<style scoped>
h1{text-align: center}
</style>
ok! 准备工作,也就这样了。开始搞起:
第一步肯定是先 划分一下。 页面, 随便找个 图实例一下: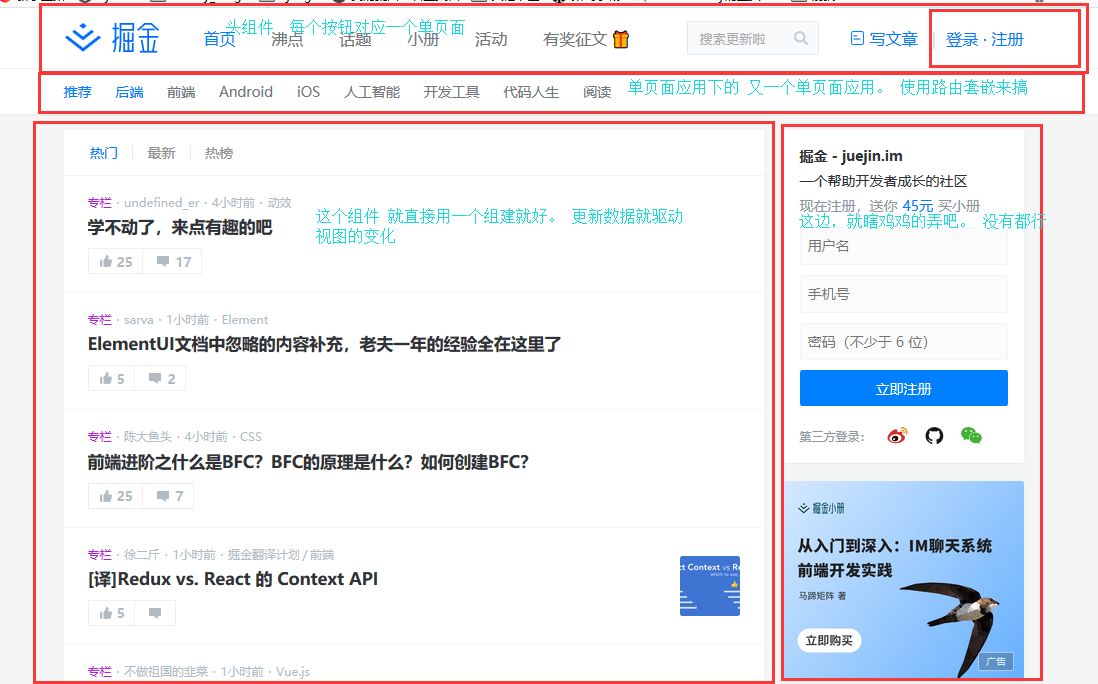
然后 先搞个, 头部的组件。
https://element.eleme.cn/2.0/#/zh-CN 先到介个地方。搞一点 ElementUI框架 。 有写好的,复制粘贴。
当然这个要先 下载安装才行。 官方教程 详细的很:
下载完:
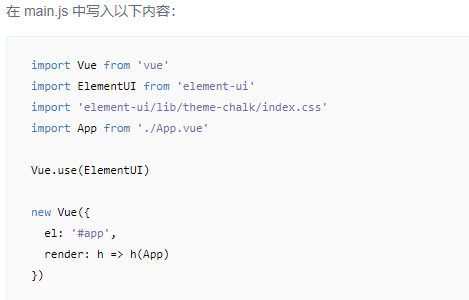
这就相当于 将这个 ElementUI 挂载到了。 Vue 的 prototype(这个原型类好像就是 Vue 的父类,我的js 不好,姑且这么理解吧)上。
然后你就可以去 https://element.eleme.cn/2.0/#/zh-CN 这个网站, 看上什么就拿什么。 文档很详细的。
使用 router 这个插件;来做这个 导航条上的,标签。
/// 路径 :router/index.js
import Vue from 'vue'
import Router from 'vue-router'

// 如果 Router 要当作局部模块使用 一定要 Vue.use(Router);
// 他就相当于  Vue.prototype.$router=router  为Vue父类添加了一个$router 属性

// 在所有组件中就可以使用  this.$router 拿到当前的这个 Router 对象
// this 就是Vue的实例化对象。 $router 就是挂载到 Vue 父类的一个属性(这个属性就是一个 Router 对象)。

Vue.use(Router);  // 一定要让Vue使用上Router 这个组件。 这样

import Home from '@/components/Home/Home'
import FreeCourse from '@/components/FreeCourse/FreeCourse'
import LightCourse from '@/components/LightCourse/LightCourse'
import Micro from '@/components/Micro/Micro'


export default new Router({
  // 给选中的标签,添加一个类名 is-active 然后用这个类名。去css里面定义一下样式
  linkActiveClass:'is-active',

  mode: 'history',
  routes: [  // 配置路由规则
    {path:'/',redirect:'/home'},
    {path:'/home', name:'Home', component:Home},
    {path:'/freecourse', name:'FreeCourse', component:FreeCourse},
    {path:'/home/lightcourst', name:'LightCourse', component:LightCourse},
    {path:'/micro', name:'Micro', component:Micro}
  ]
})
里面用到的组建, 随便先写一下就行。 然后就是 routr 这个东西要放到哪里。
在那用放在那(你在说废话)。 这是给导航组件写的 路由。 肯定要用到, 导航条这个组件里面。
这里面又很多内容的,为了简单, 就只放 点,关键的:
<template>
  <!-- element-ui -->
  <el-container>
    <el-header height='80px'>
        <div class="nav-center">
          <ul>
            <li v-for='(list,index) in headerList' :key='list.id'>
              <router-link :to='{name:list.name}'>  // 用v-bind的方式,绑定 name 对应的url。 或者也可以 to='/' 这样的。
因为 这个 router对象 是直接挂载到。main.js 里面Vue实例化对象上的。 所以在这里就可以通过 name 直接拿到对应的 url . 也就是 上面写的  path。
                {{list.title}}
              </router-link>
            </li>
          </ul>
        </div>
    </el-header>
  </el-container>
</template>

<script>
  export default {
    name: 'EducationHeader',
    data() {
      return {
        headerList: [  // 直接写死了的,当然也可向后端请求。   这里的name  一定要跟 router 里面起的名字要对应上。
          {id: '1', name: 'Home', title: '首页'},
          {id: '2', name: 'FreeCourse', title: '免费课程'},
          {id: '3', name: 'LightCourse', title: '轻课'},
          {id: '4', name: 'Micro', title: '学位课程'}
        ],
        isShow: false
      }
    },</script>

<style lang="css" scoped></style>
导航差不多就这样。 样式啥的,我他的不会 -。-
大概给 Home 组件,搞一个轮播图:


<template>
  <div class="free">
    <el-carousel indicator-position="outside" height="500px">
      <el-carousel-item v-for="item in lunboImgs" :key="item.id">
        <img :src="item.imgSrc" alt="">
      </el-carousel-item>
    </el-carousel>
  </div>
</template>

<script>
  export default {
    name: "Home",
    data() {
      return {
        lunboImgs: [
          {
            id: 1,
            imgSrc: 'http://ossweb-img.qq.com/upload/adw/image/20190529/915fce0004de4de2bc19854778dcd8c8.jpeg'
          },
          {
            id: 2,
            imgSrc: 'https://ossweb-img.qq.com/upload/adw/image/20190517/227840453a3e50624647aefb3b033d8e.jpeg'
          },
          {
            id: 3,
            imgSrc: 'https://ossweb-img.qq.com/upload/adw/image/20190529/72deb1506525ac22fcf65d7027fbe9fd.jpeg'
          },
          {
            id: 4,
            imgSrc: 'https://ossweb-img.qq.com/upload/adw/image/20190529/57cb4313d3813c9af4c495936bfaae28.jpeg'
          }
        ]
      }
    }
  }
</script>

<style scoped>
.free img{
   100%;
}
</style>
这个图片随你喜欢,瞎鸡儿搞。 当然这东西都是可以通过,后端获取的。 后端不提供,你有什么法,没有法。
具体怎么用,一句话 看官方文档, 中文教程。 美滋滋。
试一下像后端请求数据的方式:
就从路飞学城请求数据: 因为 alex 长得太猥琐了:

https://www.luffycity.com/api/v1/course_sub/category/list/ 这个是获取,免费课程的一个地址,返回的是 JSON 的字符串。
用Vue的 Axios 这个工具,来办事。 这个东西去请求下来直接就是 对象。 都不需要 解析-。-
1. 首先是下载 npm install axios -S 目录不要搞错了,一定要在项目目录下面。
2. 然后首先 让 main.js 这里, 把这个东西 挂载到 Vue。 并且设置公共的 url.
import Vue from 'vue'
import App from './App'
import router from './router/index'
import ElementUI from 'element-ui'  // element-ui 导入
import 'element-ui/lib/theme-chalk/index.css' // 导入element-ui的样式
import '../static/globle/globle.css'  // 导入自己写的样式
import Axios from 'axios' // 导入axios    下载npm install axios -S

Vue.config.productionTip = false;  // 这个没啥用
Vue.use(ElementUI);  // 挂载 element-ui

Vue.prototype.$axios = Axios; // 挂载 axios  这里不能使用 use 的挂载方式
Axios.defaults.baseURL = 'https://www.luffycity.com/api/v1/'; // 设置公共URL
/* eslint-disable no-new */
new Vue({
  el: '#app',
  router,  // 挂载路由
  template: '<App/>',
  components: { App },
});
然后就是 发请求啦:这是在 '@/components/FreeCourse/FreeCourse.vue' 这个路径下面。 在那个组件搞东西,就在那个组件干活。
<template>
    <div class="container clearfix">
      <ul class="coursebox">
        <li v-for='(category, index) in categoryList' :key="category.id">
          {{category.name}}
        </li>
      </ul>
    </div>
</template>

<script>
  export default {
    name: 'FreeCourse',
    data() {
      return {
        categoryList: [],// 分类列表
      }
    },// 生命周期  在created方法发起ajax请求
    created() {
      this.$axios.get('course_sub/category/list/')  //因为设置的 公共的 URL 这里的这串东西会自动拼接的。
        .then(res=>{  // 一定要使用 => 函数。 要不然。this 的指向,会跑到 window 对象。 我们需要 Vue的实例化对象。
          if (!res.data.error_no){
            this.categoryList = res.data.data;
            console.log(this.categoryList)
          }
        })
        .error(err=>{})
    }
  };
</script>

<style lang="css" scoped>

</style>