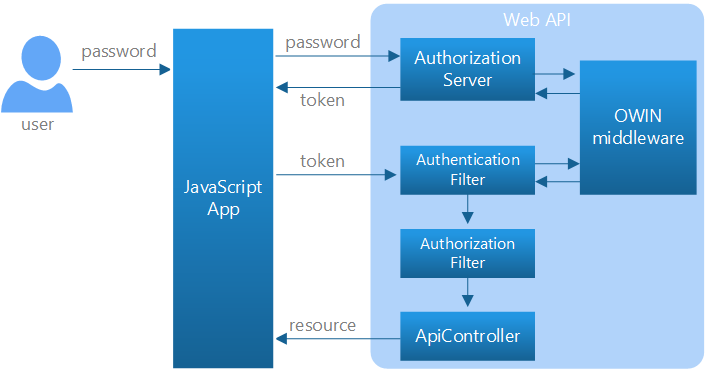
原理
1、注册账号 http://localhost:59345/api/Account/Register
{
"Email": "XXX@qq.com",
"Password": "***",
"ConfirmPassword": "***"
}
2、获取Token http://localhost:59345/Token
Content-Type:application/x-www-form-urlencoded
grant_type:password
username:XXX@qq.com
password:***
工具

代码
private string GetToken(string host)
{

        var client = new RestClient(host);

        var request = new RestRequest("/token", Method.POST);

        request.AddParameter("grant_type", "password");

        request.AddParameter("userName", "用户名");

        request.AddParameter("password", "密码");

        //request.AddHeader("Authorization", Convert.ToBase64String(Encoding.ASCII.GetBytes(clientId + ":" + clientSecret)));

        var response = client.Execute(request);

        var s = JObject.Parse(response.Content)["access_token"].Value<string>();

        return s;

}
3、传入Token
// If we already have a bearer token, set the Authorization header.
var token = sessionStorage.getItem(tokenKey);
var headers = {};
if (token) {
    headers.Authorization = 'Bearer ' + token;
}

$.ajax({
    type: 'GET',
    url: 'api/values/1',
    headers: headers
}).done(function (data) {
    self.result(data);
}).fail(showError);
参考资料:
http://www.codes51.com/itwd/3700437.html
https://docs.microsoft.com/en-us/aspnet/web-api/overview/security/individual-accounts-in-web-api