一、Flume概念
- Flume是什么?
- 由Cloudera公司开源;
- 分布式、可靠、高可用的海量日志采集系统;
- 数据源可定制,可扩展;
- 数据存储系统可定制,可扩展。
- 中间件:屏蔽了数据源和数据存储系统的异构性
- Flume特点
- 可靠性
- 保证数据不丢失
- 可扩展性高性能
- 各组件数目可扩展
- 吞吐率很高,能满足海量数据收集需求- 可管理性
- 可动态增加和删除组件 - 文档丰富,社区活跃
- 已成为Hadoop生态系统标配
- 可靠性
- Flume OG和NG两个版本
- Flume OG
- OG:“Original Generation”
- 0.9.x或cdh3以及更早版本
- 由agent、collector、master等组件构成
- Flume NG
- NG:“Next/New Generation”
- 1.x或cdh4以及之后的版本
- 由Agent、Client等组件构成
- 为什么要推出NG版本
- 精简代码
- 架构简化
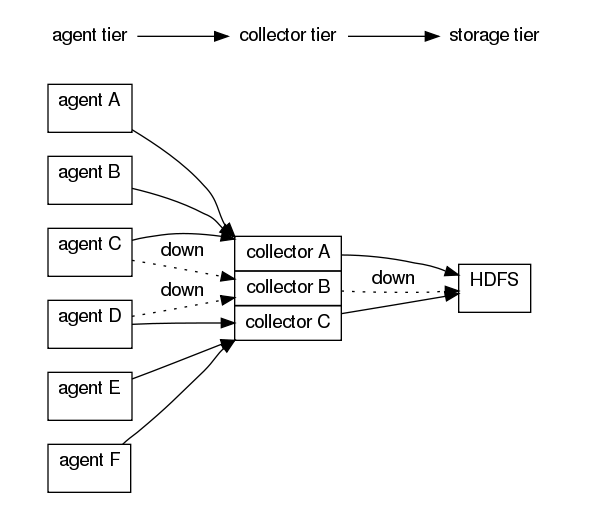
- Flume OG
1 Flume OG基本架构

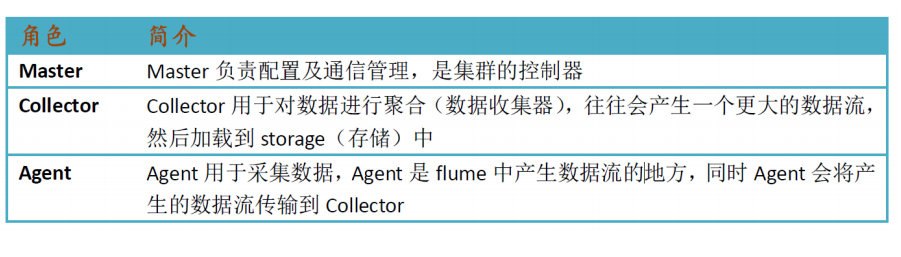
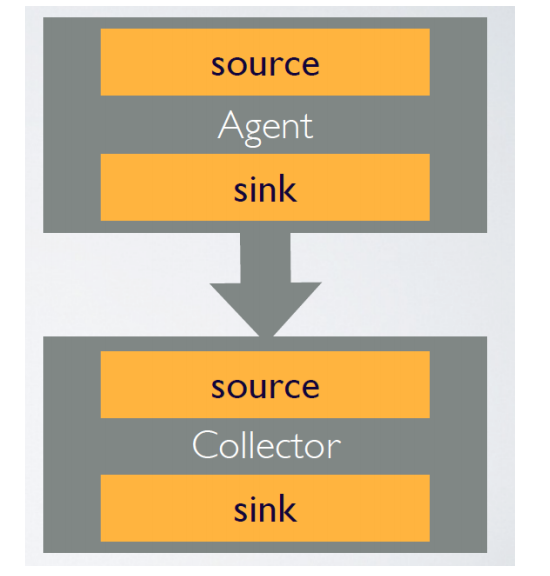
- agent
- 用于采集数据
- 数据流产生的地方
- 通常由source和sink两部分组成
- Source用于获取数据,可从文本文件,syslog,HTTP等获取数据;
- Sink将Source获得的数据进一步传输给后面的Collector。
- Flume自带了很多source和sink实现
- syslogTcp(5140) | agentSink("localhost",35853)
- tail("/etc/services") | agentSink("localhost",35853)
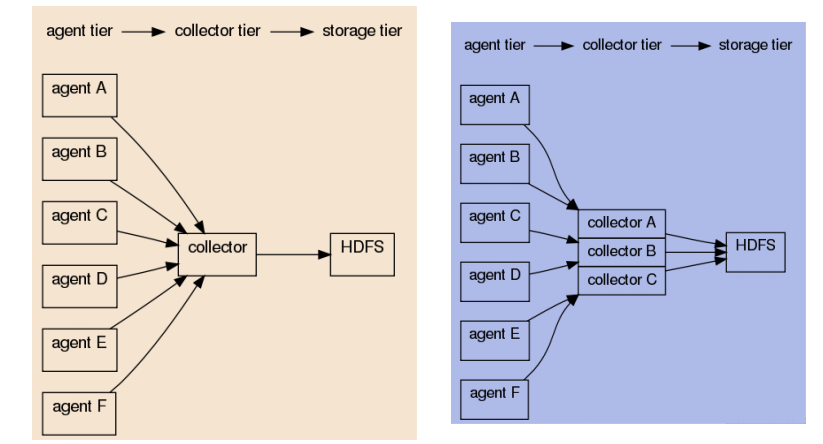
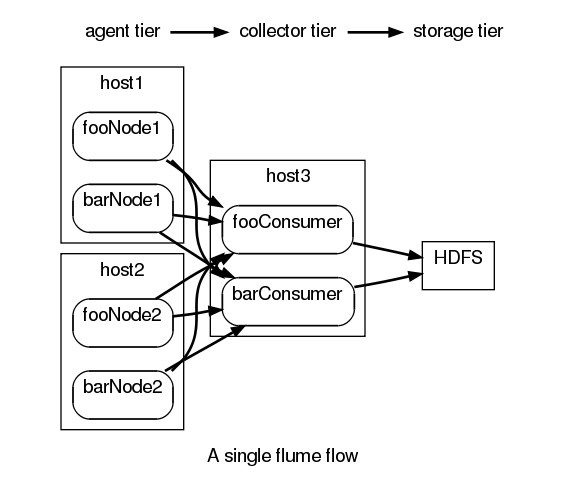
- CollectorAgent与Collector对应关系
- 汇总多个Agent结果
- 将汇总结果导入后端存储系统,比如HDFS,HBase
- Flume自带了很多collector实现
- collectorSource(35853) | console
- collectorSource(35853) | collectorSink("file:///tmp/flume/collected", "syslog");
- collectorSource(35853) | collectorSink("hdfs://namenode/user/flume/ ","syslog");
- 可手动指定,也可自动匹配
- 自动匹配的情况下,master会平衡collector之间的负载
- Master容错机制设计
- 管理协调 agent 和collector的配置信息;
- Flume集群的控制器;
- 跟踪数据流的最后确认信息,并通知agent;
- 通常需配置多个master以防止单点故障;
- 借助zookeeper管理管理多Master。
2 Flume NG基本架构
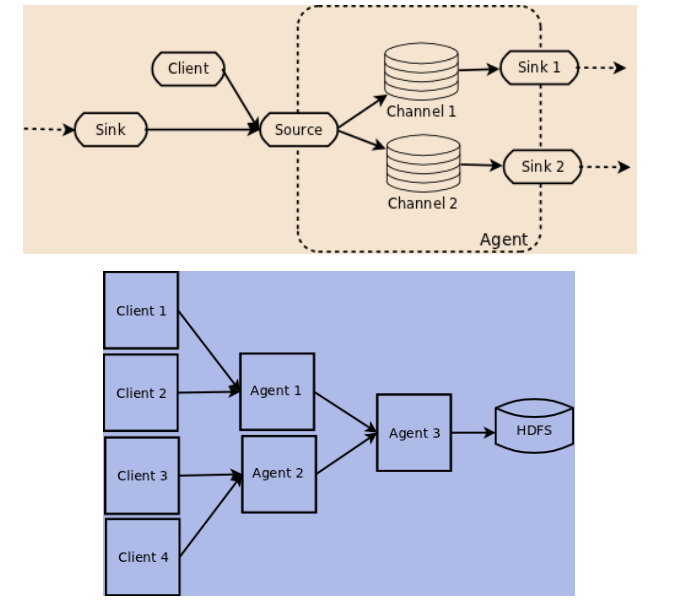
- Flume NG核心概念
- Event
- Client
- Agent
- Source
- Channel
- Sink
- 其他组件:Interceptor、Channel Selector、Sink、Processor
- Event
- Event是Flume数据传输的基本单元
- Flume以事件的形式将数据从源头传送到最终的目的
- Event由可选的header和载有数据的一个byte array构成。
- 载有的数据对flume是不透明的
- Header是容纳了key-value字符串对的无序集合,key在集合内是唯一的。
- Header可以在上下文路由中使用扩展
- Client
- Client是一个将原始log包装成events并且发送它们到一个或多个agent的实体。
- 目的是从数据源系统中解耦Flume
- 在flume的拓扑结构中不是必须的
- Client实例
- Flume log4j Appender
- 可以使用Client SDK (org.apache.flume.api)定制特定的Client
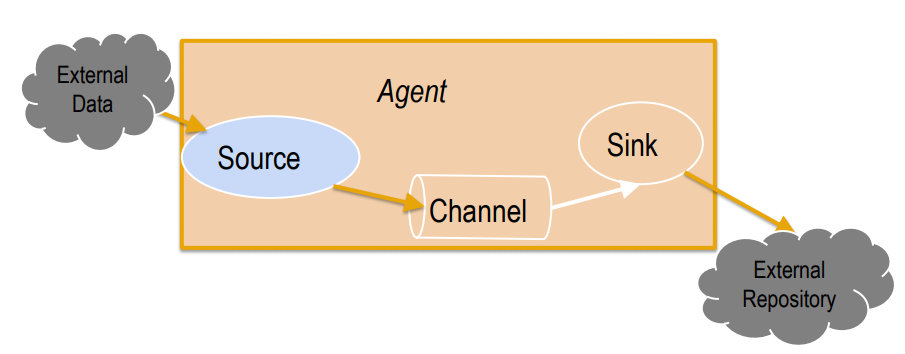
- AgentAgent之Source
- 一个Agent包含Source, Channel, Sink和其他组件;
- 它利用这些组件将events从一个节点传输到另一个节点或最终目的;
- agent是flume流的基础部分;
- flume为这些组件提供了配置、生命周期管理、监控支持。
-
- Source负责接收event或通过特殊机制产生event,并将events批量的放到一个或多个Channel。
- 包含event驱动和轮询2种类型
- 不同类型的Source:Source必须至少和一个channel关联
- 与系统集成的Source: Syslog, Netcat
- 自动生成事件的Source: Exec
- 用于Agent和Agent之间通信的IPC Source: Avro、Thrift
- Agent之Channel与Sink
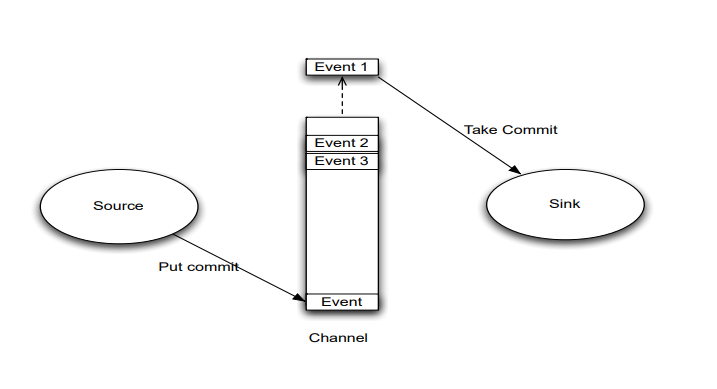
- Agent之Channel
- Channel位于Source和Sink之间,用于缓存进来的event;
- 当Sink成功的将event发送到下一跳的channel或最终目的,event从Channel移除。
- 不同的Channel提供的持久化水平也是不一样的:Channel支持事务,提供较弱的顺序保证
- Memory Channel: volatile
- File Channel: 基于WAL(预写式日志Write-Ahead Logging)实现
- JDBC Channel: 基于嵌入Database实现
- 可以和任何数量的Source和Sink工作
- Agent之sink
- Sink负责将event传输到下一跳或最终目的,成功完成后将event从channel移除。
- 不同类型的Sink:
- 存储event到最终目的的终端Sink. 比如: HDFS, HBase
- 自动消耗的Sink. 比如: Null Sink
- 用于Agent间通信的IPC sink:
- 必须作用于一个确切的channel
- 其他几个组件
- Interceptor
- 作用于Source,按照预设的顺序在必要地方装饰和过滤events。
- Channel Selector
- 允许Source基于预设的标准,从所有Channel中,选择一个或多个Channel。
- Sink Processor:
- 多个Sink可以构成一个Sink Group。Sink Processor可以通过组中所有Sink实现负载均衡;也可以在一个Sink失败时转移到另一个。
- Interceptor
二、Flume环境安装
1. 软件版本下载
http://mirror.bit.edu.cn/apache/flume/
2. 下载软件包
- Master
wget http://mirror.bit.edu.cn/apache/flume/1.6.0/apache-flume-1.6.0-bin.tar.gz
tar zxvf apache-flume-1.6.0-bin.tar.gz- 修改conf下配置文件
cp flume-env.sh.template flume-env.sh
vim flume-env.sh
- 分发
scp -r /usr/local/src/apache-flume-1.6.0-bin root@slave1:/usr/local/src/apache-flume-1.6.0-bin
scp -r /usr/local/src/apache-flume-1.6.0-bin root@slave2:/usr/local/src/apache-flume-1.6.0-bin- 配置源
vim ~/.bashrc

#flume
export FLUME_HOME=/usr/local/src/apache-flume-1.6.0-bin
export PATH=$FLUME_HOME/bin:$PATH- 更新源
source ~/.bashrc
3.1 修改Flume配置(注意ip端口)
vim conf/flume-netcat.conf(没有需新建)
# Name the components on this agent
agent.sources = r1
agent.sinks = k1
agent.channels = c1

# Describe/configuration the source
agent.sources.r1.type = netcat
agent.sources.r1.bind = 192.168.74.10
agent.sources.r1.port = 44444

# Describe the sink
agent.sinks.k1.type = logger

# Use a channel which buffers events in memory
agent.channels.c1.type = memory
agent.channels.c1.capacity = 1000
agent.channels.c1.transactionCapacity = 100

# Bind the source and sink to the channel
agent.sources.r1.channels = c1
agent.sinks.k1.channel = c1
3.2 启动测试(netcat方式)
bin/flume-ng agent --conf conf --conf-file conf/flume-netcat.conf --name=agent -Dflume.root.logger=INFO,console
另外一个端口发送数据测试(需要telnetyum -y install telnet)telnet master 44444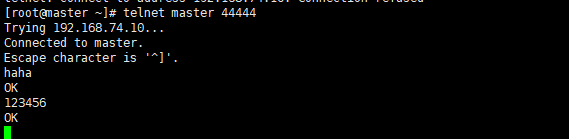

4.1 修改Flume配置(监控某台机器的log日志)
vim conf/flume-exec.conf(没有需新建)
# Name the components on this agent
agent.sources = r1
agent.sinks = k1
agent.channels = c1

# Describe/configuration the source
agent.sources.r1.type = exec
agent.sources.r1.command = tail -f /root/test_code/flume/1.log

# Describe the sink
agent.sinks.k1.type = logger

# Use a channel which buffers events in memory
agent.channels.c1.type = memory
agent.channels.c1.capacity = 1000
agent.channels.c1.transactionCapacity = 100

# Bind the source and sink to the channel
agent.sources.r1.channels = c1
agent.sinks.k1.channel = c1
4.2 启动测试(exec方式)
建立上面指定的日志文件
bin/flume-ng agent --conf conf --conf-file conf/flume-exec.conf --name=agent -Dflume.root.logger=INFO,console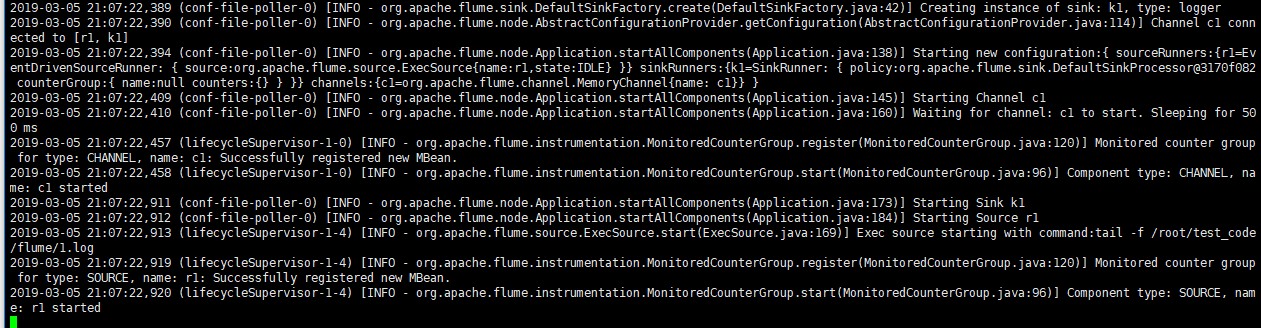
另一个端口往指定文件里加入数据echo 'abc' >> /root/test_code/flume/1.log
5.1 修改Flume配置(储存hdfs方式)
vim conf/flume.conf(没有需新建)
# Name the components on this agent
agent.sources = r1
agent.sinks = k1
agent.channels = c1

# Describe/configure the source
## exec表示flume回去调用给的命令,然后从给的命令的结果中去拿数据
agent.sources.r1.type = exec
agent.sources.r1.command = tail -F /root/test_code/flume/2.log
agent.sources.r1.channels = c1

# Describe the sink
## 表示下沉到hdfs,类型决定了下面的参数
agent.sinks.k1.type = hdfs
agent.sinks.k1.channel = c1
## 下面的配置告诉用hdfs去写文件的时候写到什么位置,下面的表示不是写死的,而是可以动态的变化的。表示输出的目录名称是可变的
agent.sinks.k1.hdfs.path = /flume/%y-%m-%d/%H%M/
##表示最后的文件的前缀
agent.sinks.k1.hdfs.filePrefix = events-
## 表示到了需要触发的时间时,是否要更新文件夹,true:表示要
agent.sinks.k1.hdfs.round = true
## 表示每隔1分钟改变一次
agent.sinks.k1.hdfs.roundValue = 1
## 切换文件的时候的时间单位是分钟
agent.sinks.k1.hdfs.roundUnit = minute
## 表示只要过了3秒钟,就切换生成一个新的文件
agent.sinks.k1.hdfs.rollInterval = 3
## 如果记录的文件大于20字节时切换一次
agent.sinks.k1.hdfs.rollSize = 20
## 当写了5个事件时触发
agent.sinks.k1.hdfs.rollCount = 5
## 收到了多少条消息往dfs中追加内容
agent.sinks.k1.hdfs.batchSize = 10
## 使用本地时间戳
agent.sinks.k1.hdfs.useLocalTimeStamp = true
#生成的文件类型,默认是Sequencefile,可用DataStream:为普通文本
agent.sinks.k1.hdfs.fileType = DataStream

# Use a channel which buffers events in memory
##使用内存的方式
agent.channels.c1.type = memory
agent.channels.c1.capacity = 1000
agent.channels.c1.transactionCapacity = 100

# Bind the source and sink to the channel
agent.sources.r1.channels = c1
agent.sinks.k1.channel = c1
5.2 启动测试(文件储存hdfs)
启动hadoop在hdfs上新建一个flume文件夹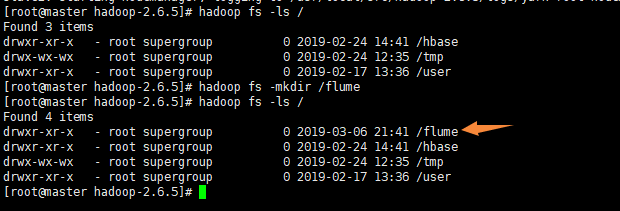
相应文件夹创建2.log文件
启动flumebin/flume-ng agent --conf conf --conf-file conf/flume.conf --name=agent -Dflume.root.logger=INFO,console
写数据到日志文件echo 'abcabcabcabcabcabc' >> /root/test_code/flume/2.log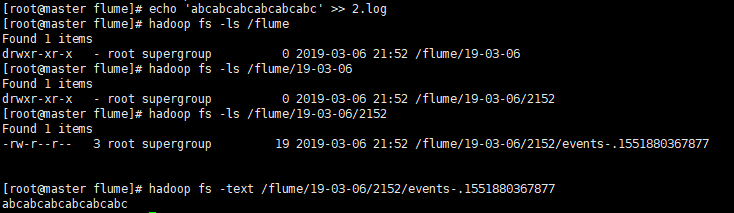
写数据到日志文件echo '哈哈哈,见到你真好' >> /root/test_code/flume/2.log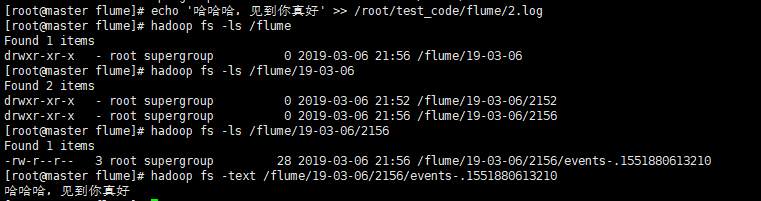
写大量数据到日志文件(因为设置了大于20字节换一次,但是不会真的把一句话给切开)
6.1 修改Flume配置(集群版failover故障转移)

- master
- 进入conf目录
mkdir agent_agent_collector_base - 进入agent_agent_collector_base目录
vim flume-client.properties - 内容:
- 进入conf目录
# agent1 name
agent1.channels = c1
agent1.sources = r1
agent1.sinks = k1 k2

#set group
agent1.sinkgroups = g1

#set channel
agent1.channels.c1.type = memory
agent1.channels.c1.capacity = 1000
agent1.channels.c1.transactionCapacity = 100

agent1.sources.r1.channels = c1
agent1.sources.r1.type = exec
agent1.sources.r1.command = tail -F /root/test_code/flume/2.log

# set sink1
agent1.sinks.k1.channel = c1
agent1.sinks.k1.type = avro
agent1.sinks.k1.hostname = slave1
agent1.sinks.k1.port = 52020

# set sink2
agent1.sinks.k2.channel = c1
agent1.sinks.k2.type = avro
agent1.sinks.k2.hostname = slave2
agent1.sinks.k2.port = 52020

# set sink group
agent1.sinkgroups.g1.sinks = k1 k2

# set failover
agent1.sinkgroups.g1.processor.type = failover
agent1.sinkgroups.g1.processor.k1 = 10
agent1.sinkgroups.g1.processor.k2 = 1
agent1.sinkgroups.g1.processor.maxpenalty = 10000- slave1
- 进入conf目录
mkdir agent_agent_collector_base - 进入agent_agent_collector_base目录
vim flume-server.properties - 内容:
- 进入conf目录
# agent1 name
a1.channels = c1
a1.sources = r1
a1.sinks = k1

#set channel
a1.channels.c1.type = memory
a1.channels.c1.capacity = 1000
a1.channels.c1.transactionCapacity = 100

# other node, slave to master
a1.sources.r1.type = avro
a1.sources.r1.bind = slave1
a1.sources.r1.port = 52020

# set sink to hdfs
a1.sinks.k1.type = logger
# a1.sinks.k1.type = hdfs
# a1.sinks.k1.hdfs.path=/flume_data_pool
# a1.sinks.k1.hdfs.fileType=DataStream
# a1.sinks.k1.hdfs.writeFormat=TEXT
# a1.sinks.k1.hdfs.rollInterval=1
# a1.sinks.k1.hdfs.filePrefix = %Y-%m-%d

a1.sources.r1.channels = c1
a1.sinks.k1.channel=c1- slave2
- 进入conf目录
mkdir agent_agent_collector_base - 进入agent_agent_collector_base目录
vim flume-server.properties - 内容:
- 进入conf目录
# agent1 name
a1.channels = c1
a1.sources = r1
a1.sinks = k1

#set channel
a1.channels.c1.type = memory
a1.channels.c1.capacity = 1000
a1.channels.c1.transactionCapacity = 100

# other node, slave to master
a1.sources.r1.type = avro
a1.sources.r1.bind = slave2
a1.sources.r1.port = 52020

# set sink to hdfs
a1.sinks.k1.type = logger
# a1.sinks.k1.type = hdfs
# a1.sinks.k1.hdfs.path=/flume_data_pool
# a1.sinks.k1.hdfs.fileType=DataStream
# a1.sinks.k1.hdfs.writeFormat=TEXT
# a1.sinks.k1.hdfs.rollInterval=1
# a1.sinks.k1.hdfs.filePrefix = %Y-%m-%d

a1.sources.r1.channels = c1
a1.sinks.k1.channel=c1
6.2 启动测试(Avro方式-基于RPC的网络传输-用在机器间的传输)
-
slave1,slave2
bin/flume-ng agent --conf conf --conf-file conf/agent_agent_collector_base/flume-server.properties --name=a1 -Dflume.root.logger=INFO,console -
master
bin/flume-ng agent --conf conf --conf-file conf/agent_agent_collector_base/flume-client.properties --name=agent1 -Dflume.root.logger=INFO,console
开始写数据echo 'abcabcabcabcabcabc' >> /root/test_code/flume/2.log
发现slave1接受到了消息,这是因为我们的优先级是slave1是10,而slave2是1的权重,观察slave1挂掉了后,数据就可以写到slave2上了。
而且如果2个都挂了,重启后,数据会被重新接收到。
7.1 修改Flume配置(集群版load_balance负载均衡版)
针对上面只修改master上的配置文件
cp flume-client.properties flume-client-loadbalance.properties
vim  flume-client-loadbalance.properties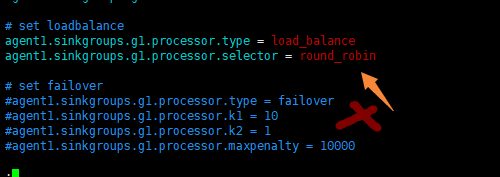
agent1.channels.c1.type = memory
agent1.channels.c1.capacity = 1000
agent1.channels.c1.transactionCapacity = 100

agent1.sources.r1.channels = c1
agent1.sources.r1.type = exec
agent1.sources.r1.command = tail -F /root/test_code/flume/2.log

# set sink1
agent1.sinks.k1.channel = c1
agent1.sinks.k1.type = avro
agent1.sinks.k1.hostname = slave1
agent1.sinks.k1.port = 52020

# set sink2
agent1.sinks.k2.channel = c1
agent1.sinks.k2.type = avro
agent1.sinks.k2.hostname = slave2
agent1.sinks.k2.port = 52020

# set sink group
agent1.sinkgroups.g1.sinks = k1 k2

# set loadbalance
agent1.sinkgroups.g1.processor.type = load_balance
agent1.sinkgroups.g1.processor.selector = round_robin

# set failover
#agent1.sinkgroups.g1.processor.type = failover
#agent1.sinkgroups.g1.processor.k1 = 10
#agent1.sinkgroups.g1.processor.k2 = 1
#agent1.sinkgroups.g1.processor.maxpenalty = 10000
7.2 启动测试
-
slave1,slave2
bin/flume-ng agent --conf conf --conf-file conf/agent_agent_collector_base/flume-server.properties --name=a1 -Dflume.root.logger=INFO,console - master
bin/flume-ng agent --conf conf --conf-file conf/agent_agent_collector_base/flume-client-loadbalance.properties --name=agent1 -Dflume.root.logger=INFO,console
开始写数据
[root@master flume]# echo 'abcabc1001' >>   /root/test_code/flume/2.log
[root@master flume]# echo 'abcabc1002' >>  /root/test_code/flume/2.log
[root@master flume]# echo 'abcabc1003' >>  /root/test_code/flume/2.log
[root@master flume]# echo 'abcabc1004' >>  /root/test_code/flume/2.log
发现两台slave是均衡的接收数据
