Spring Security的登录主要是由一系列的过滤器组成,我们如果需要修改登录的校验逻辑,只需要在过滤器链路上添加修改相关的逻辑即可。这里主要通过Spring Security的源码来了解相关的认证登录的逻辑。
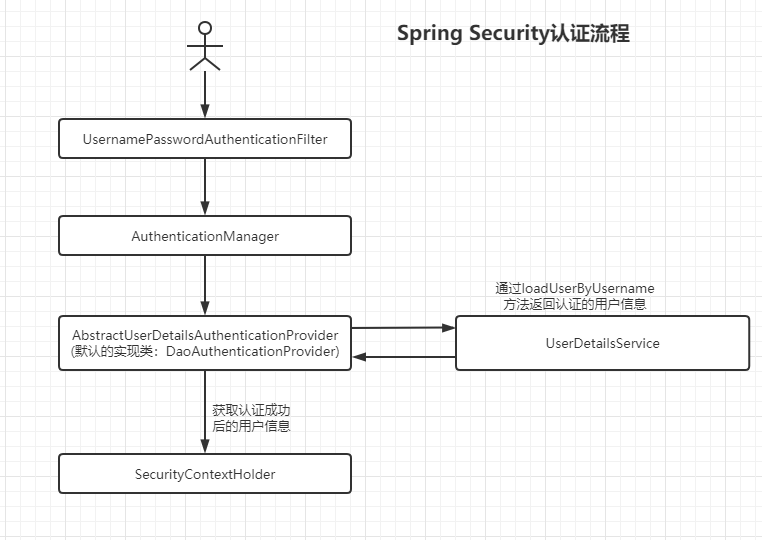
1.Spring Security的认证流程
主要分析:
- 认证用户的流程
- 如何进行认证校验
- 认证成功后怎么获取用户信息
具体的过滤器链路如下所示:

Spring Security的认证流程图如下,认证的主要过程有:
- 用户提交用户名和密码,然后通过UsernamePasswordAuthenticationFilter对其进行封装成为UsernamePasswordAuthenticationToken对象,这个是AbstractAuthenticationToken的子类,而AbstractAuthenticationToken又是Authentication的一个实现,所以可以看到后续获取的都是Authentication类型的对象实例;
- 将第一步的UsernamePasswordAuthenticationToken对象传递给AuthenticationManager;
- 通过AbstractUserDetailsAuthenticationProvider的默认实现类DaoAuthenticationProvider的retrieveUser方法,这个方法会调用UserDetailsService的loadUserByUsername方法来进行用户名和密码的判断,使用的默认的逻辑进行处理;
- 将成功认证后的用户信息放入到SecurityContextHolder中,之后可以通过SecurityContext获取用户的相关信息。
spring-security源码下载地址:
https://github.com/spring-projects/spring-security
2.Spring Security的认证源码分析
2.1 搭建项目并访问
首先我们搭建一个Spring Security的项目,使用Spring Boot可以很方便的进行集成开发,主要引入如下的依赖即可(当然也可以查看官网,选择合适的版本):
<dependency>
  <groupId>org.springframework.boot</groupId>
  <artifactId>spring-boot-starter-security</artifactId>
</dependency>
启动项目后会随机生成一个密码串,这里需要复制保存以便登录的时候使用:

访问登录地址:
http://localhost:8080/login

默认的账户名和密码:
账户名: user
密码:   项目启动时生成的密码串
2.2 进行源码分析
-
进行断点后会发现首先进入的是UsernamePasswordAuthenticationFilter的attemptAuthentication(HttpServletRequest request, HttpServletResponse response)方法,会对用户名和密码进行封装成UsernamePasswordAuthenticationToken对象,然后调用this.getAuthenticationManager().authenticate(authRequest)方法进入到AuthenticationManager中。
attemptAuthentication方法源码如下所示:
@Override
	public Authentication attemptAuthentication(HttpServletRequest request, HttpServletResponse response)
			throws AuthenticationException {
		if (this.postOnly && !request.getMethod().equals("POST")) {
			throw new AuthenticationServiceException("Authentication method not supported: " + request.getMethod());
		}
		String username = obtainUsername(request);
		username = (username != null) ? username : "";
		username = username.trim();
		String password = obtainPassword(request);
		password = (password != null) ? password : "";
		UsernamePasswordAuthenticationToken authRequest = new UsernamePasswordAuthenticationToken(username, password);
		// Allow subclasses to set the "details" property
		setDetails(request, authRequest);
		return this.getAuthenticationManager().authenticate(authRequest);
	}
-
随后请求进入到WebSecurityConfigurerAdapter的AuthenticationManagerDelegator中,AuthenticationManagerDelegator是AuthenticationManager的一个子类,最后封装成为UsernamePasswordAuthenticationToken对象,供DaoAuthenticationProvider使用。
AuthenticationManagerDelegator的源码如下:
static final class AuthenticationManagerDelegator implements AuthenticationManager {
        private AuthenticationManagerBuilder delegateBuilder;
        private AuthenticationManager delegate;
        private final Object delegateMonitor = new Object();
        private Set<String> beanNames;

        AuthenticationManagerDelegator(AuthenticationManagerBuilder delegateBuilder, ApplicationContext context) {
            Assert.notNull(delegateBuilder, "delegateBuilder cannot be null");
            Field parentAuthMgrField = ReflectionUtils.findField(AuthenticationManagerBuilder.class, "parentAuthenticationManager");
            ReflectionUtils.makeAccessible(parentAuthMgrField);
            this.beanNames = getAuthenticationManagerBeanNames(context);
            validateBeanCycle(ReflectionUtils.getField(parentAuthMgrField, delegateBuilder), this.beanNames);
            this.delegateBuilder = delegateBuilder;
        }

        public Authentication authenticate(Authentication authentication) throws AuthenticationException {
            if (this.delegate != null) {
                return this.delegate.authenticate(authentication);
            } else {
                synchronized(this.delegateMonitor) {
                    if (this.delegate == null) {
                        this.delegate = (AuthenticationManager)this.delegateBuilder.getObject();
                        this.delegateBuilder = null;
                    }
                }

                return this.delegate.authenticate(authentication);
            }
        }

        private static Set<String> getAuthenticationManagerBeanNames(ApplicationContext applicationContext) {
            String[] beanNamesForType = BeanFactoryUtils.beanNamesForTypeIncludingAncestors(applicationContext, AuthenticationManager.class);
            return new HashSet(Arrays.asList(beanNamesForType));
        }

        private static void validateBeanCycle(Object auth, Set<String> beanNames) {
            if (auth != null && !beanNames.isEmpty() && auth instanceof Advised) {
                TargetSource targetSource = ((Advised)auth).getTargetSource();
                if (targetSource instanceof LazyInitTargetSource) {
                    LazyInitTargetSource lits = (LazyInitTargetSource)targetSource;
                    if (beanNames.contains(lits.getTargetBeanName())) {
                        throw new FatalBeanException("A dependency cycle was detected when trying to resolve the AuthenticationManager. Please ensure you have configured authentication.");
                    }
                }
            }
        }
    }
org.springframework.security.config.annotation.authentication.configuration.AuthenticationConfiguration.AuthenticationManagerDelegator#authenticate
@Override public Authentication authenticate(Authentication authentication) throws AuthenticationException { if (this.delegate != null) { return this.delegate.authenticate(authentication); } synchronized (this.delegateMonitor) { if (this.delegate == null) { this.delegate = this.delegateBuilder.getObject(); this.delegateBuilder = null; } } return this.delegate.authenticate(authentication); } -
进入到DaoAuthenticationProvider的retrieveUser(String username, UsernamePasswordAuthenticationToken authentication)方法进行用户的认证,这里的认证主要会调用默认的UserDetailsService对用户名和密码进行校验,如果是使用的类似于Mysql的数据源,其默认的实现是JdbcDaoImpl。
org.springframework.security.authentication.dao.DaoAuthenticationProvider#retrieveUser
@Override protected final UserDetails retrieveUser(String username, UsernamePasswordAuthenticationToken authentication) throws AuthenticationException { prepareTimingAttackProtection(); try { UserDetails loadedUser = this.getUserDetailsService().loadUserByUsername(username); if (loadedUser == null) { throw new InternalAuthenticationServiceException( "UserDetailsService returned null, which is an interface contract violation"); } return loadedUser; } catch (UsernameNotFoundException ex) { mitigateAgainstTimingAttack(authentication); throw ex; } catch (InternalAuthenticationServiceException ex) { throw ex; } catch (Exception ex) { throw new InternalAuthenticationServiceException(ex.getMessage(), ex); } } -
将上一步认证后的用户实例放入SecurityContextHolder中,至此我们可以很方便的从SecurityContextHolder中获取用户信息,方法如下:
Authentication authentication = SecurityContextHolder.getContext().getAuthentication();