201871010104-陈园园 《面向对象程序设计(java)》第十五周学习总结
| 项目 | 内容 |
| 这个作业属于哪个课程 | https://www.cnblogs.com/nwnu-daizh/ |
| 这个作业要求在哪里 | https://www.cnblogs.com/lily-2018/p/11441372.html |
| 作业学习目标 |
(1) 掌握菜单组件用途及常用API; (2) 掌握对话框组件用途及常用API; (3) 学习设计简单应用程序的GUI。 |
第一部分:总结理论知识
菜单
创建菜单是一#非常容易的事情。首先要创建一个菜单栏:
JMenuBar menuBar = newJMenuBar(); 菜单栏是一个可以添加到任何位置的组件。通常放置 图 12-19 带有子菜单的菜单在框架的顶部。可以调用setJMenuBar方法将菜单栏添加到框架上:
frame.setJMenuBar(menuBar);需要为每个菜单建立一个菜单对象:
JMenu editMenu = new JMenu("Edit");然后将顶层菜单添加到菜单栏中:
menuBar.add(editMenu);向菜单对象中添加菜单项、分隔符和子菜单:
-
JMenuItem pasteltem = new JMenuItem("Paste"); -
editMenu.add(pasteltem); -
editMenu.addSeparator(); -
JMenu optionsMenu = ...; -
editMenu.add(optionsMenu);
可以看到图12-19中分隔符位于Paste和Read-only菜单项之间。当用户选择菜单时,将触发一个动作事件。这里需要为每个菜单项安装一个动作监听器。
-
ActionListener listener = ...; -
pastelteiaddActionListener(listener);
可以使用JMenu.add(Striiigs)方法将菜单项插入到菜单的尾部,例如:
editMenu.add("Paste");Add方法返回创建的子菜单项。可以采用下列方式获取它,并添加监听器:
-
JMenuItem pasteltem = editMenu.add("Paste"); -
pasteltem.addActionListener(listener);
在通常情况下,菜单项触发的命令也可以通过其他用户界面元素(如工具栏上的按钮) 激活。在第11章中,已经看到了如何通过 Action对象来指定命令。通常,采用扩展抽象类 AbstractAction来定义一个实现 Action 接口的类。这里需要在AbstractAction对象的构造器中 指定菜单项标签并且覆盖 actionPerformed方法来获得菜单动作处理器。例如:
-
Action exitAction = new AbstractAction("Exit") -
{ -
public void actionPerformed(ActionEvent event) -
{ -
System.exit(0); -
} -
};
然后将动作添加到菜单中:
JMenuItem exitltem = fileMenu.add(exitAction);这个命令利用动作名将一个菜单项添加到菜单中。这个动作对象将作为它的监听器。上面这条语句是下面两条语句的快捷形式:
-
JMenuItem exitltem = new JMenuItem(exitAction); -
fileMenu.add(exitltem);弹出菜单(pop-up menu) 是不固定在菜单栏中随处浮动的菜单。
创建一个弹出菜单与创建一个常规菜单的方法类似,但是弹出菜单没有标题。
JPopupMenu popup = new JPopupMenu();然后用常规的方法添加菜单项:
-
JMenuItem item = new JMenuItem("Cut"); -
item.addActionListener(listener); -
popup.add(item);弹出菜单并不像常规菜单栏那样总是显示在框架的顶部,必须调用show方法菜单才能显示出来。调用时需要给出父组件以及相对父组件坐标的显示位置。例如:
popup.show(panel, x, y);通常,当用户点击某个鼠标键时弹出菜单。 这就是所谓的弹出式触发器(pop-up trigger)。在Windows或者Linux中,弹出式触发器是鼠标右键。要想在用户点击某一个组件时弹出菜单, 需要按照下列方式调用方法:
component.setComponentPopupMenu(popup);偶尔会遇到在一个含有弹出菜单的组件中放置一个组件的情况。这个子组件可以调用下 列方法继承父组件的弹出菜单。调用:
child.setlnheritsPopupMenu(true);对于有经验的用户来说,通过快捷键来选择菜单项会感觉更加便捷。可以通过在菜单项的构造器中指定一个快捷字母来为菜单项设置快捷键:
JMenuItem aboutltem = new JMenuItem("About", 'A');快捷键会自动地显示在菜单项中,并带有一条下划线 。例如,在上面的例子中,菜单项中的标签为“About”,字母A带有一个下划线。当显示菜单时,用户只需要按下“ A” 键就可以这个选择菜单项(如果快捷 字母没有出现在菜单项标签字符串中, 同样可以按下快捷键选择菜单项,只是快捷键没有显示出来。很自然,这种不可见的快捷键没有提示效果)。
有时候不希望在菜单项的第一个快捷键字母下面加下划线。例如,如果在菜单项“Save As”中使用快捷键“A”,则在第二个“A” (Save As) 下面加下划线更为合理。可以调用 setDisplayedMnemonicIndex方法指定希望加下划线的字符。
如果有一个Action对象,就可以把快捷键作为Action.MNEMONIC_KEY的键值添加到对象中。如:
cutAction.putValue(Action,MNEMONIC_KEY, new Integer('A'));只能在菜单项的构造器中设定快捷键字母,而不是在菜单构造器中。如果想为菜单设置快捷键,需要调用setMnemonic方法:
-
JMenu helpMenu = new JMenu("Help"); -
helpMenu.setMnemonic('H');
可以同时按下ALT键和菜单的快捷键来实现在菜单栏中选择一个顶层菜单的操作。例如:按下ALT+H可以从菜单中选择Help菜单项。
可以使用快捷键从当前打开的菜单中选择一个子菜单或者菜单项。而加速器是在不打开 菜单的情况下选择菜单项的快捷键。例如: 很多程序把加速器CTRL+O和CTRL+S关联到File菜单中的Open和Save菜单项。可以使用setAccelerator将加速器键关联到一个菜单项上。这个方法使用 Keystroke类型的对象作为参数。例如:下面的调用将加速器CTRL+O关联到Openltem菜单项。
openItem.setAccelerator(KeyStroke.getKeyStroke("ctrl 0"));当用户按下加速器组合键时,就会自动地选择相应的菜单项,同时激活一个动作事件,这与手工地选择这个菜单项一样。
加速器只能关联到菜单项上,不能关联到菜单上。加速器键并不实际打开菜单。它将直接地激活菜单关联的动作事件。
从概念上讲,把加速器添加到菜单项与把加速器添加到Swing组件上所使用的技术十分类似(在第 11 章中讨论了这个技术)。但是,当加速器添加到菜单项时,对应的组合键就会自动地显示在相应的菜单上。
启用或禁用菜单项需要调用setEnabled方法:
saveltem.setEnabled(false);启用和禁用菜单项有两种策略。每次环境发生变化就对相关的菜单项或动作调用setEnabled。例如: 只要当文档以只读方式打开,就禁用Save和Save As菜单项。另一种 方法是在显示菜单之前禁用这些菜单项。这里必须为“菜单选中” 事件注册监听器。javax.swing.event包定义了MenuListener接口,它包含三个方法:
-
void menuSelected(MenuEvent event) -
void menuDeselected(MenuEvent event) -
void menuCanceled(MenuEvent event)
由于在菜单显示之前调用menuSelected方法,所以可以在这个方法中禁用或启用菜单项。
工具栏
工具栏是在程序中提供的快速访问常用命令的按钮栏。
工具栏的特殊之处在于可以将它随处移动。可以将它拖拽到框架的四个边框上。释放鼠标按钮后,工具栏将会停靠在新的位置上。
工具栏可以完全脱离框架。 这样的工具栏将包含在自己的框架中。当 关闭包含工具栏的框架时, 它会冋到原始的框架中。
编写创建工具栏的代码非常容易,并且可以将组件添加到工具栏中:
-
JToolBar bar = new JToolBar(); -
bar.add(blueButton);
JToolBar类还有一个用来添加Action对象的方法,可以用Action对象填充工具栏:
bar.add(blueAction);这个动作的小图标将会出现在工具栏中。可以用分隔符将按钮分组:
bar.addSeparator();当工具栏没有停靠时,可以指定工具栏的标题:
bar = new JToolBar(titleString);在默认情况下,工具栏最初为水平的。如果想要将工具栏垂直放置,可以使用下列代码:
bar = new JToolBar(SwingConstants.VERTICAL)或者
bar = new JToolBar(titleString, SwingConstants.VERTICAL)按钮是工具栏中最常见的组件类型。然而工具栏中的组件并不仅限如此。例如,可以往工具栏中加入组合框。
对话框
与大多数的窗口系统一样,AWT也分为模式对话框和无模式对话框。所谓模式对话框是指在结束对它的处理之前,不允许用户与应用程序的其余窗口进行交互。模式对话框主要用于在程序继续运行之前获取用户提供的信息。例如,当用户想要读取文件时,就会弹出一个模式对话框。用户必须给定一个文件名,然后程序才能够开始读操作。只有用户关闭(模式) 对话框之后, 应用程序才能够继续执行。
所谓无模式对话框是指允许用户同时在对话框和应用程序的其他窗口中输入信息。使用无模式对话框的最好例子就是工具栏。工具栏可以停靠在任何地方,并且用户可以在需要的时候,同时与应用程序窗口和工具栏进行交互。
本节从最简单的对话框开始个简单信息的模式对话框。Swing有一个很容易使用的类JOptionPane,它可以弹出一个简单的对话框,而不必编写任何对话框的相关代码。随后,将看到如何通过实现自己的对话框窗口来编写一个复杂的对话框。最后,介绍在应用程序与对话框之间如何传递数据。
本节用两个标准的对话框结束:文件对话框和颜色对话框。文件对话框比较复杂,为此需要熟悉Swing中的JFileChooser自已编写文件对话框是一项颇有挑战性的任务。JColorChooser对话框可用来让用户选取颜色。
选项对话框
Swing有一套简单的对话框,用于获取用户的一些简单信息。JOptionPane有4个用于显示这些对话框的静态方法:
-
showMessageDialog: 显示一条消息并等待用户点击OK
-
showConfirmDialog: 显示一条消息并等待用户确认(与 OK/Cancel类似)
-
showOptionDialog: 显示一条消息并获得用户在一组选项中的选择
-
showInputDialog: 显示一条消息并获得用户输入的一行文本
可以看到,对话框有下列组件:
- 一个图标
- 一条消息
- 一个或多个按钮
输入对话框有一个用于接收用户输入的额外组件。它既可能是用于输入任何字符串的文本域,也可能是允许用户从中选择的组合框。
这些对话框的确切布局和为标准消息类型选择的图标都取决于具体的观感。
PLAIN_MESSAGE类型没有图标。每个对话框类型都有一个方法,可以用来提供自己的图标,以替代原来的图标。
可以为每个对话框类型指定一条消息。这里的消息既可以是字符串、图标、用户界面组件,也可以是其他类型的对象。下面是显示消息对象的基本方式:
-
String: 绘制字符串
-
Icon:显示图标
-
Component: 显示组件
-
Object[]: 显示数组中的所有对象,依次叠加
-
任何其他对象: 调用 toString 方法来显示结果字符串
当调用showMessageDialog和showInputDialog时,只能看到一组标准按钮(分别是OK/Cancel)。当调用showConfirmDialog时,可以选择下面四种选项类型之一:
-
DEFAUL_OPTI0N
-
YES_NO_OPTION
-
YES_N0_CANCEL_OPTI0N
-
OK_CANCEL_OPTION
使用showOptionDialog可以指定任意的选项。这里需要为选项提供一个对象数组。每个数组元素可以是下列类型之一:
-
String: 使用字符串标签创建一个按钮
-
Icon: 使用图标创建一个按钮
-
Component: 显示这个组件
其他类型的对象:使用toString方法,然后用结果字符串作为标签创建按钮。
创建对话框
要想实现一个对话框,需要从JDialog派生一个类。这与应用程序窗口派生于JFrame的过程完全一样。具体过程如下:
- 1 ) 在对话框构造器中,调用超类JDialog的构造器。
- 2 ) 添加对话框的用户界面组件。
- 3 ) 添加事件处理器。
- 4 ) 设置对话框的大小。
在调用超类构造器时,需要提供拥有者框架(ownerframe)、对话框标题及模式特征。
拥有者框架控制对话框的显示位置,如果将拥有者标识为null, 那么对话框将由一个隐藏框架所拥有。
模式特征将指定对话框处于显示状态时,应用程序中其他窗口是否被锁住。无模式对话框不会锁住其他窗口,而有模式对话框将锁住应用程序中的所有其他窗口(除对话框的子窗口外)。用户经常使用的工具栏就是无模式对话框,另一方面,如果想强迫用户在继续操作之前提供一些必要的信息就应该使用模式对话框。
要想显示对话框,需要建立一个新的对话框对象, 并让它可见:
-
JDialog dialog = new AboutDialog(this); -
dialog.setVisible(true);
实际上,在下面的示例代码中,只建立了一次对话框,无论何时用户点击About按钮,都可以重复使用它。
-
if (dialog == null) -
dialog = new AboutDialog(this); -
dialog.setVisible(true);
当用户点击OK按钮时,该对话框将被关闭。下面是在OK按钮的事件处理器中的处理代码:
ok.addActionListener(event -> setVisible(false));当用户点击Close按钮关闭对话框时,对话框就被隐藏起来。与JFrame—样,可以覆盖 setDefaultCloseOperation方法来改变这个行为。
数据交换
使用对话框最通常的目的是获取用户的输入信息。在前面已经看到,构造对话框对象非常简单:首先初始化数据,然后调用setViSible(true)就会在屏幕上显示对话框。现在,看看如何将数据传入传出对话框。
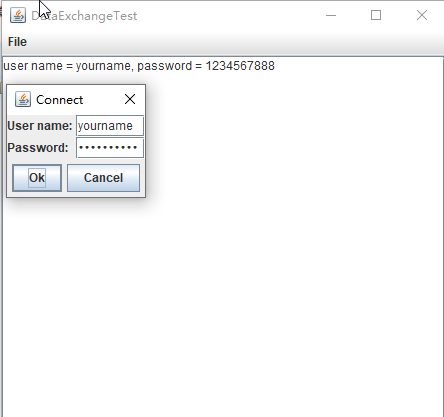
看一下如图12-39所示的对话框,可以用来获得用户名和用户密码以便连接某些在线服务。
对话框应该提供设置默认数据的方法。例如,示例程序中的PasswordChooser类提供了一个setUser方法,用来将默认值放到下面的字段中:
-
public void setUser(User u) { -
username.setText(u.getName()); -
}
一旦设置了默认值(如果需要),就可以调用setViSible(true)让对话框显示在屏幕上。
然后用户输入信息,点击OK或者Cancel按钮。这两个按钮的事件处理器都会调用SetVisible(false)终止对 setVisible(true) 的调用。另外,用户也可以选择关闭对话框。如果没有为对话框安装窗口监听器,就会执行默认的窗口结束操作,即对话框变为不可见,这也中止了对setVisible(true)的调用。
重要的问题是在用户解除这个对话框之前,一直调用setVisible(true)阻塞。这样易于实现模式对话框。
希望知道用户是接收对话框,还是取消对话框。在示例代码中设置了OK标志,在对话框显示之前是false。只有OK按钮的事件处理器可以将它设置为true。这样,就可以获得对话框中的用户输入。
示例程序中还包含另外一个很有用的改进。在构造一个JDialog对象时,需要指定拥有者框架。但是,在很多情况下,一个对话框可能会有多个拥有者框架,所以最好在准备显示对话框时再确定拥有者框架,而不是在构造PasswordChooser对象时。
很多对话框都有默认按钮。 如果用户按下一个触发器键(在大多数“观感” 实现中是ENTER) 就自动地选择了它。默认按钮通常用加粗的轮廓给予特别标识。
可以在对话框的根窗格(root pane) 中设置默认按钮:
dialog.getRootPane().setDefaultButton(okButton);文件对话框
下面是建立文件对话框并且获取用户选择信息的步骤:
- 1 ) 建立一个JFileChooser对象。与JDialog类的构造器不同,它不需要指定父组件。允许在多个框架中重用一个文件选择器。例如:
JFileChooser chooser = new JFileChooser();- 2 ) 调用setCurrentDirectory方法设置当前目录。例如,使用当前的工作目录:
chooser.setCurrentDirectory(new File("."));需要提供一个File对象。File对象将在卷II的第2章中详细地介绍。这里只需要知道构造器File (String fileName) 能够将一个文件或目录名转化为一个File对象即可。
- 3 ) 如果有一个想要作为用户选择的默认文件名,可以使用setSelectedFile方法进行指定:
chooser.setSelectedFile(new File(filename));- 4 ) 如果允许用户在对话框中选择多个文件,需要调用setMultiSelectionEnabled方法。
chooser.setMultiSelectionEnabled(true);-
5 ) 如果想让对话框仅显示某一种类型的文件(如,所有扩展名为.gif 的文件),需要设置文件过滤器,稍后将会进行讨论。
-
6 ) 在默认情况下,用户在文件选择器中只能选择文件。如果希望选择目录,需要调用 setFileSelectionMode方法。参数值为:JFileChooser.FILES_ONLY (默认值),JFileChooser.DIRECTORIES_ONLY或者JFileChooser.FILES_AND_DIRECTORIES
-
7 ) 调用 showOpenDialog或者showSaveDialog方法显示对话框。必须为这些调用提供父组件:
int result = chooser.showOpenDialog(parent);或者
int result = chooser.showSaveDialog(parent);这些调用的区别是“确认按钮”的标签不同。点击“确认按钮”将完成文件选择。也可以调用showDialog方法,并将一个显式的文本传递给确认按钮:
int result = chooser.showDialog(parent, "Select");仅当用户确认、取消或者离开对话框时才返回调用。返回值可以是JFileChooser.APPROVE_OPTION、JFileChooser.CANCEL_OPTION或者 JFileChooser.ERROR_OPTION。
- 8 ) 调用
getSelectedFile()或者getSelectedFiles()方法获取用户选择的一个或多个文件。这些方法将返回一个文件对象或者一组文件对象。如果需要知道文件对象名时,可以调用getPath方法。例如:
String filename = chooser.getSelectedFile().getPath(); -
第二部分:实验部分
实验1: 导入第12章示例程序,测试程序并进行组内讨论。
测试程序1
1) 在elipse IDE中调试运行教材512页程序12-8,结合运行结果理解程序;
2)掌握菜单的创建、菜单事件监听器、复选框和单选按钮菜单项、弹出菜单以及快捷键和加速器的用法。
3)记录示例代码阅读理解中存在的问题与疑惑。
package menu;

import java.awt.*;
import javax.swing.*;

/**
 * @version 1.25 2018-04-10
 * @author Cay Horstmann
 */
public class MenuTest
{
   public static void main(String[] args)
   {
      EventQueue.invokeLater(() -> {//lambda表达式,事件分派线程
         var frame = new MenuFrame();//创建一个新的菜单对象
         frame.setTitle("MenuTest");//设置菜单标题
         frame.setDefaultCloseOperation(JFrame.EXIT_ON_CLOSE);//设置关闭操作
         frame.setVisible(true);//设置可见性
      });
   }
}
package menu;

import java.awt.event.*;
import javax.swing.*;

/**
 * A frame with a sample menu bar.
 */
public class MenuFrame extends JFrame//继承
{
   private static final int DEFAULT_WIDTH = 300;
   private static final int DEFAULT_HEIGHT = 200;
   private Action saveAction;
   private Action saveAsAction;
   private JCheckBoxMenuItem readonlyItem;
   private JPopupMenu popup;

   /**
    * A sample action that prints the action name to System.out.
    */
   class TestAction extends AbstractAction
   {
      public TestAction(String name)
      {
         super(name);
      }

      public void actionPerformed(ActionEvent event)
      {
         System.out.println(getValue(Action.NAME) + " selected.");
      }
   }

   public MenuFrame()//构造器,构造一个菜单框架
   {
      setSize(DEFAULT_WIDTH, DEFAULT_HEIGHT);//设置宽度和高度

      var fileMenu = new JMenu("File");
      fileMenu.add(new TestAction("New"));

      // demonstrate accelerators

      var openItem = fileMenu.add(new TestAction("Open"));
      openItem.setAccelerator(KeyStroke.getKeyStroke("ctrl O"));

      fileMenu.addSeparator();

      saveAction = new TestAction("Save");
      JMenuItem saveItem = fileMenu.add(saveAction);
      saveItem.setAccelerator(KeyStroke.getKeyStroke("ctrl S"));

      saveAsAction = new TestAction("Save As");
      fileMenu.add(saveAsAction);
      fileMenu.addSeparator();

      fileMenu.add(new AbstractAction("Exit")
         {
            public void actionPerformed(ActionEvent event)
            {
               System.exit(0);
            }
         });

      // demonstrate checkbox and radio button menus

      readonlyItem = new JCheckBoxMenuItem("Read-only");
      readonlyItem.addActionListener(new ActionListener()
         {
            public void actionPerformed(ActionEvent event)
            {
               boolean saveOk = !readonlyItem.isSelected();
               saveAction.setEnabled(saveOk);
               saveAsAction.setEnabled(saveOk);
            }
         });

      var group = new ButtonGroup();

      var insertItem = new JRadioButtonMenuItem("Insert");
      insertItem.setSelected(true);
      var overtypeItem = new JRadioButtonMenuItem("Overtype");

      group.add(insertItem);
      group.add(overtypeItem);

      // demonstrate icons

      var cutAction = new TestAction("Cut");
      cutAction.putValue(Action.SMALL_ICON, new ImageIcon("cut.gif"));
      var copyAction = new TestAction("Copy");
      copyAction.putValue(Action.SMALL_ICON, new ImageIcon("copy.gif"));
      var pasteAction = new TestAction("Paste");
      pasteAction.putValue(Action.SMALL_ICON, new ImageIcon("paste.gif"));

      var editMenu = new JMenu("Edit");
      editMenu.add(cutAction);
      editMenu.add(copyAction);
      editMenu.add(pasteAction);

      // demonstrate nested menus

      var optionMenu = new JMenu("Options");

      optionMenu.add(readonlyItem);
      optionMenu.addSeparator();
      optionMenu.add(insertItem);
      optionMenu.add(overtypeItem);

      editMenu.addSeparator();//调用addSeparator()方法
      editMenu.add(optionMenu);

      // demonstrate mnemonics

      var helpMenu = new JMenu("Help");
      helpMenu.setMnemonic('H');

      var indexItem = new JMenuItem("Index");
      indexItem.setMnemonic('I');
      helpMenu.add(indexItem);

      // you can also add the mnemonic key to an action
      var aboutAction = new TestAction("About");
      aboutAction.putValue(Action.MNEMONIC_KEY, new Integer('A'));
      helpMenu.add(aboutAction);

      // add all top-level menus to menu bar

      var menuBar = new JMenuBar();//创建一个菜单栏
      setJMenuBar(menuBar);

      menuBar.add(fileMenu);
      menuBar.add(editMenu);
      menuBar.add(helpMenu);

      // demonstrate pop-ups

      popup = new JPopupMenu();
      popup.add(cutAction);
      popup.add(copyAction);
      popup.add(pasteAction);

      var panel = new JPanel();
      panel.setComponentPopupMenu(popup);
      add(panel);
   }
}
运行结果:

测试程序2
1) 在elipse IDE中调试运行教材517页程序12-9,结合运行结果理解程序;
2)掌握工具栏和工具提示的用法;
3) 记录示例代码阅读理解中存在的问题与疑惑。
package toolBar;

import java.awt.*;
import javax.swing.*;

/**
 * @version 1.15 2018-04-10
 * @author Cay Horstmann
 */
public class ToolBarTest
{
   public static void main(String[] args)
   {
      EventQueue.invokeLater(() -> {
         var frame = new ToolBarFrame();
         frame.setTitle("ToolBarTest");
         frame.setDefaultCloseOperation(JFrame.EXIT_ON_CLOSE);
         frame.setVisible(true);
      });
   }
}
package toolBar;
import java.awt.*;
import java.awt.event.*;
import javax.swing.*;
/**
* A frame with a toolbar and menu for color changes.
*/
public class ToolBarFrame extends JFrame
{
private static final int DEFAULT_WIDTH = 300;
private static final int DEFAULT_HEIGHT = 200;
private JPanel panel;
public ToolBarFrame()
{
setSize(DEFAULT_WIDTH, DEFAULT_HEIGHT);
// add a panel for color change
panel = new JPanel();
add(panel, BorderLayout.CENTER);
// set up actions
var blueAction = new ColorAction("Blue", new ImageIcon("blue-ball.gif"), Color.BLUE);
var yellowAction = new ColorAction("Yellow", new ImageIcon("yellow-ball.gif"),
Color.YELLOW);
var redAction = new ColorAction("Red", new ImageIcon("red-ball.gif"), Color.RED);
var exitAction = new AbstractAction("Exit", new ImageIcon("exit.gif"))
{
public void actionPerformed(ActionEvent event)
{
System.exit(0);
}
};
exitAction.putValue(Action.SHORT_DESCRIPTION, "Exit");
// populate toolbar
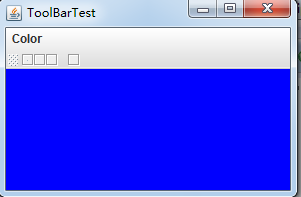
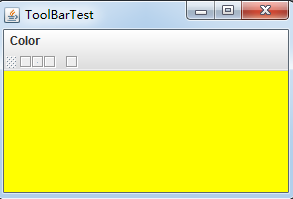
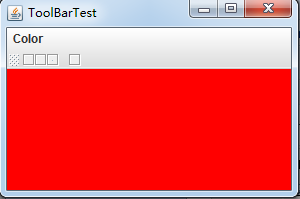
var bar = new JToolBar();
bar.add(blueAction);
bar.add(yellowAction);
bar.add(redAction);
bar.addSeparator();
bar.add(exitAction);
add(bar, BorderLayout.NORTH);
// populate menu
var menu = new JMenu("Color");
menu.add(yellowAction);
menu.add(blueAction);
menu.add(redAction);
menu.add(exitAction);
var menuBar = new JMenuBar();
menuBar.add(menu);
setJMenuBar(menuBar);
}
/**
* The color action sets the background of the frame to a given color.
*/
class ColorAction extends AbstractAction
{
public ColorAction(String name, Icon icon, Color c)
{
putValue(Action.NAME, name);
putValue(Action.SMALL_ICON, icon);
putValue(Action.SHORT_DESCRIPTION, name + " background");
putValue("Color", c);
}
public void actionPerformed(ActionEvent event)
{
Color c = (Color) getValue("Color");
panel.setBackground(c);
}
}
}
运行结果:
测试程序3
1) 在elipse IDE中调试运行教材544页程序12-15、12-16,结合运行结果理解程序;
2) 掌握选项对话框的用法。
3) 记录示例代码阅读理解中存在的问题与疑惑。
package optionDialog;

import javax.swing.*;

/**
 * A panel with radio buttons inside a titled border.
 */
public class ButtonPanel extends JPanel
{
   private ButtonGroup group;

   /**
    * Constructs a button panel.
    * @param title the title shown in the border
    * @param options an array of radio button labels
    */
   public ButtonPanel(String title, String... options)
   {
      setBorder(BorderFactory.createTitledBorder(BorderFactory.createEtchedBorder(), title));
      setLayout(new BoxLayout(this, BoxLayout.Y_AXIS));
      group = new ButtonGroup();

      // make one radio button for each option
      for (String option : options)
      {
         var button = new JRadioButton(option);
         button.setActionCommand(option);
         add(button);
         group.add(button);
         button.setSelected(option == options[0]);
      }
   }

   /**
    * Gets the currently selected option.
    * @return the label of the currently selected radio button.
    */
   public String getSelection()
   {
      return group.getSelection().getActionCommand();
   }
}
package optionDialog;

import java.awt.*;
import javax.swing.*;

/**
 * @version 1.35 2018-04-10
 * @author Cay Horstmann
 */
public class OptionDialogTest
{
   public static void main(String[] args)
   {
      EventQueue.invokeLater(() -> {
         var frame = new OptionDialogFrame();
         frame.setTitle("OptionDialogTest");
         frame.setDefaultCloseOperation(JFrame.EXIT_ON_CLOSE);
         frame.setVisible(true);
      });
   }
}
package optionDialog;

import java.awt.*;
import java.awt.event.*;
import java.awt.geom.*;
import java.util.*;
import javax.swing.*;

/**
 * A frame that contains settings for selecting various option dialogs.
 */
public class OptionDialogFrame extends JFrame
{
   private ButtonPanel typePanel;
   private ButtonPanel messagePanel;
   private ButtonPanel messageTypePanel;
   private ButtonPanel optionTypePanel;
   private ButtonPanel optionsPanel;
   private ButtonPanel inputPanel;
   private String messageString = "Message";
   private Icon messageIcon = new ImageIcon("blue-ball.gif");
   private Object messageObject = new Date();
   private Component messageComponent = new SampleComponent();

   public OptionDialogFrame()
   {
      var gridPanel = new JPanel();
      gridPanel.setLayout(new GridLayout(2, 3));

      typePanel = new ButtonPanel("Type", "Message", "Confirm", "Option", "Input");
      messageTypePanel = new ButtonPanel("Message Type", "ERROR_MESSAGE", "INFORMATION_MESSAGE",
            "WARNING_MESSAGE", "QUESTION_MESSAGE", "PLAIN_MESSAGE");
      messagePanel = new ButtonPanel("Message", "String", "Icon", "Component", "Other",
            "Object[]");
      optionTypePanel = new ButtonPanel("Confirm", "DEFAULT_OPTION", "YES_NO_OPTION",
            "YES_NO_CANCEL_OPTION", "OK_CANCEL_OPTION");
      optionsPanel = new ButtonPanel("Option", "String[]", "Icon[]", "Object[]");
      inputPanel = new ButtonPanel("Input", "Text field", "Combo box");

      gridPanel.add(typePanel);
      gridPanel.add(messageTypePanel);
      gridPanel.add(messagePanel);
      gridPanel.add(optionTypePanel);
      gridPanel.add(optionsPanel);
      gridPanel.add(inputPanel);

      // add a panel with a Show button

      var showPanel = new JPanel();
      var showButton = new JButton("Show");
      showButton.addActionListener(new ShowAction());
      showPanel.add(showButton);

      add(gridPanel, BorderLayout.CENTER);
      add(showPanel, BorderLayout.SOUTH);
      pack();
   }

   /**
    * Gets the currently selected message.
    * @return a string, icon, component, or object array, depending on the Message panel selection
    */
   public Object getMessage()
   {
      String s = messagePanel.getSelection();
      if (s.equals("String")) return messageString;
      else if (s.equals("Icon")) return messageIcon;
      else if (s.equals("Component")) return messageComponent;
      else if (s.equals("Object[]")) return new Object[] { messageString, messageIcon,
            messageComponent, messageObject };
      else if (s.equals("Other")) return messageObject;
      else return null;
   }

   /**
    * Gets the currently selected options.
    * @return an array of strings, icons, or objects, depending on the Option panel selection
    */
   public Object[] getOptions()
   {
      String s = optionsPanel.getSelection();
      if (s.equals("String[]")) return new String[] { "Yellow", "Blue", "Red" };
      else if (s.equals("Icon[]")) return new Icon[] { new ImageIcon("yellow-ball.gif"),
            new ImageIcon("blue-ball.gif"), new ImageIcon("red-ball.gif") };
      else if (s.equals("Object[]")) return new Object[] { messageString, messageIcon,
            messageComponent, messageObject };
      else return null;
   }

   /**
    * Gets the selected message or option type
    * @param panel the Message Type or Confirm panel
    * @return the selected XXX_MESSAGE or XXX_OPTION constant from the JOptionPane class
    */
   public int getType(ButtonPanel panel)
   {
      String s = panel.getSelection();
      try
      {
         return JOptionPane.class.getField(s).getInt(null);
      }
      catch (Exception e)
      {
         return -1;
      }
   }

   /**
    * The action listener for the Show button shows a Confirm, Input, Message, or Option dialog
    * depending on the Type panel selection.
    */
   private class ShowAction implements ActionListener
   {
      public void actionPerformed(ActionEvent event)
      {
         if (typePanel.getSelection().equals("Confirm")) JOptionPane.showConfirmDialog(
               OptionDialogFrame.this, getMessage(), "Title", getType(optionTypePanel),
               getType(messageTypePanel));
         else if (typePanel.getSelection().equals("Input"))
         {
            if (inputPanel.getSelection().equals("Text field")) JOptionPane.showInputDialog(
                  OptionDialogFrame.this, getMessage(), "Title", getType(messageTypePanel));
            else JOptionPane.showInputDialog(OptionDialogFrame.this, getMessage(), "Title",
                  getType(messageTypePanel), null, new String[] { "Yellow", "Blue", "Red" },
                  "Blue");
         }
         else if (typePanel.getSelection().equals("Message")) JOptionPane.showMessageDialog(
               OptionDialogFrame.this, getMessage(), "Title", getType(messageTypePanel));
         else if (typePanel.getSelection().equals("Option")) JOptionPane.showOptionDialog(
               OptionDialogFrame.this, getMessage(), "Title", getType(optionTypePanel),
               getType(messageTypePanel), null, getOptions(), getOptions()[0]);
      }
   }
}

/**
 * A component with a painted surface
 */

class SampleComponent extends JComponent
{
   public void paintComponent(Graphics g)
   {
      var g2 = (Graphics2D) g;
      var rect = new Rectangle2D.Double(0, 0, getWidth() - 1, getHeight() - 1);
      g2.setPaint(Color.YELLOW);
      g2.fill(rect);
      g2.setPaint(Color.BLUE);
      g2.draw(rect);
   }

   public Dimension getPreferredSize()
   {
      return new Dimension(10, 10);
   }
}
运行结果:

测试程序4
1) 在elipse IDE中调试运行教材552页程序12-17、12-18,结合运行结果理解程序;
2) 掌握对话框的创建方法;
3)记录示例代码阅读理解中存在的问题与疑惑。
package dialog;
import java.awt.BorderLayout;
import javax.swing.JButton;
import javax.swing.JDialog;
import javax.swing.JFrame;
import javax.swing.JLabel;
import javax.swing.JPanel;
/**
* A sample modal dialog that displays a message and waits for the user to click
* the OK button.
*/
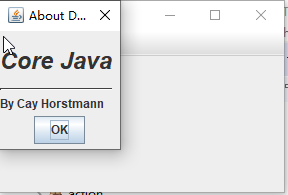
public class AboutDialog extends JDialog
{
public AboutDialog(JFrame owner)//设置构造器,添加了用户界面组件,添加了标签和按钮,并为按钮设置了处理器,然后设置了对话框的大小。
{
super(owner, "About DialogTest", true);
// add HTML label to center
add(
new JLabel(
"<html><h1><i>Core Java</i></h1><hr>By Cay Horstmann</html>"),
BorderLayout.CENTER);
// OK button closes the dialog
var ok = new JButton("OK");
ok.addActionListener(event -> setVisible(false));
// add OK button to southern border
var panel = new JPanel();
panel.add(ok);
add(panel, BorderLayout.SOUTH);
pack();
}
}
package dialog;

import java.awt.*;
import javax.swing.*;

/**
 * @version 1.35 2018-04-10
 * @author Cay Horstmann
 */
public class DialogTest
{
   public static void main(String[] args)
   {
      EventQueue.invokeLater(() -> {//lambda表达式,事件分派线程
         var frame = new DialogFrame();//定义了DialogFrame()对象
         frame.setTitle("DialogTest");//设置标题
         frame.setDefaultCloseOperation(JFrame.EXIT_ON_CLOSE);//设置关闭操作
         frame.setVisible(true);//设置可见性
      });
   }
}
package dialog;

import javax.swing.JFrame;
import javax.swing.JMenu;
import javax.swing.JMenuBar;
import javax.swing.JMenuItem;

/**
 * A frame with a menu whose File->About action shows a dialog.
 */
public class DialogFrame extends JFrame
{
   private static final int DEFAULT_WIDTH = 300;
   private static final int DEFAULT_HEIGHT = 200;
   private AboutDialog dialog;

   public DialogFrame()
   {
      setSize(DEFAULT_WIDTH, DEFAULT_HEIGHT);

      // construct a File menu

      var menuBar = new JMenuBar();
      setJMenuBar(menuBar);
      var fileMenu = new JMenu("File");
      menuBar.add(fileMenu);

      // add About and Exit menu items

      // the About item shows the About dialog

      var aboutItem = new JMenuItem("About");
      aboutItem.addActionListener(event -> {//只建立一次对话框,无论用户何时点击about按钮,都可以重复使用它。
         if (dialog == null) // first time
            dialog = new AboutDialog(DialogFrame.this);
         dialog.setVisible(true); // pop up dialog
      });
      fileMenu.add(aboutItem);

      // the Exit item exits the program

      var exitItem = new JMenuItem("Exit");
      exitItem.addActionListener(event -> System.exit(0));//exit按钮的事件处理器中的处理代码。
      fileMenu.add(exitItem);
   }
}
运行结果:
测试程序5
1)在elipse IDE中调试运行教材556页程序12-19、12-20,结合运行结果理解程序;
2) 掌握对话框的数据交换用法;
3)记录示例代码阅读理解中存在的问题与疑惑。
package dataExchange;

import java.awt.*;
import javax.swing.*;

/**
 * @version 1.35 2018-04-10
 * @author Cay Horstmann
 */
public class DataExchangeTest
{
   public static void main(String[] args)
   {
      EventQueue.invokeLater(() -> {
         var frame = new DataExchangeFrame();
         frame.setTitle("DataExchangeTest");
         frame.setDefaultCloseOperation(JFrame.EXIT_ON_CLOSE);
         frame.setVisible(true);
      });
   }
}
package dataExchange;

import java.awt.*;
import java.awt.event.*;
import javax.swing.*;

/**
 * A frame with a menu whose File->Connect action shows a password dialog.
 */
public class DataExchangeFrame extends JFrame
{
   public static final int TEXT_ROWS = 20;
   public static final int TEXT_COLUMNS = 40;
   private PasswordChooser dialog = null;
   private JTextArea textArea;

   public DataExchangeFrame()
   {
      // construct a File menu

      var mbar = new JMenuBar();
      setJMenuBar(mbar);
      var fileMenu = new JMenu("File");
      mbar.add(fileMenu);

      // add Connect and Exit menu items

      var connectItem = new JMenuItem("Connect");
      connectItem.addActionListener(new ConnectAction());
      fileMenu.add(connectItem);

      // the Exit item exits the program

      var exitItem = new JMenuItem("Exit");
      exitItem.addActionListener(event -> System.exit(0));
      fileMenu.add(exitItem);

      textArea = new JTextArea(TEXT_ROWS, TEXT_COLUMNS);
      add(new JScrollPane(textArea), BorderLayout.CENTER);
      pack();
   }

   /**
    * The Connect action pops up the password dialog.
    */
   private class ConnectAction implements ActionListener
   {
      public void actionPerformed(ActionEvent event)
      {
         // if first time, construct dialog

         if (dialog == null) dialog = new PasswordChooser();

         // set default values
         dialog.setUser(new User("yourname", null));

         // pop up dialog
         if (dialog.showDialog(DataExchangeFrame.this, "Connect"))
         {
            // if accepted, retrieve user input
            User u = dialog.getUser();
            textArea.append("user name = " + u.getName() + ", password = "
               + (new String(u.getPassword())) + "
");
         }
      }
   }
}
package dataExchange;

import java.awt.BorderLayout;
import java.awt.Component;
import java.awt.Frame;
import java.awt.GridLayout;

import javax.swing.JButton;
import javax.swing.JDialog;
import javax.swing.JLabel;
import javax.swing.JPanel;
import javax.swing.JPasswordField;
import javax.swing.JTextField;
import javax.swing.SwingUtilities;

/**
 * A password chooser that is shown inside a dialog.
 */
public class PasswordChooser extends JPanel
{
   private JTextField username;
   private JPasswordField password;
   private JButton okButton;
   private boolean ok;
   private JDialog dialog;

   public PasswordChooser()//构造器
   {
      setLayout(new BorderLayout());

      // construct a panel with user name and password fields

      var panel = new JPanel();
      panel.setLayout(new GridLayout(2, 2));
      panel.add(new JLabel("User name:"));
      panel.add(username = new JTextField(""));
      panel.add(new JLabel("Password:"));
      panel.add(password = new JPasswordField(""));
      add(panel, BorderLayout.CENTER);

      // create Ok and Cancel buttons that terminate the dialog

      okButton = new JButton("Ok");
      okButton.addActionListener(event -> {
         ok = true;
         dialog.setVisible(false);
      });

      var cancelButton = new JButton("Cancel");
      cancelButton.addActionListener(event -> dialog.setVisible(false));

      // add buttons to southern border

      var buttonPanel = new JPanel();
      buttonPanel.add(okButton);
      buttonPanel.add(cancelButton);
      add(buttonPanel, BorderLayout.SOUTH);
   }

   /**
    * Sets the dialog defaults.
    * @param u the default user information
    */
   public void setUser(User u)
   {
      username.setText(u.getName());
   }

   /**
    * Gets the dialog entries.
    * @return a User object whose state represents the dialog entries
    */
   public User getUser()
   {
      return new User(username.getText(), password.getPassword());
   }

   /**
    * Show the chooser panel in a dialog.
    * @param parent a component in the owner frame or null
    * @param title the dialog window title
    */
   public boolean showDialog(Component parent, String title)
   {
      ok = false;

      // locate the owner frame

      Frame owner = null;
      if (parent instanceof Frame)
         owner = (Frame) parent;
      else
         owner = (Frame) SwingUtilities.getAncestorOfClass(Frame.class, parent);

      // if first time, or if owner has changed, make new dialog

      if (dialog == null || dialog.getOwner() != owner)
      {
         dialog = new JDialog(owner, true);
         dialog.add(this);
         dialog.getRootPane().setDefaultButton(okButton);
         dialog.pack();
      }

      // set title and show dialog

      dialog.setTitle(title);
      dialog.setVisible(true);
      return ok;
   }
}
package dataExchange;

/**
 * A user has a name and password. For security reasons, the password is stored as a char[], not a
 * String.
 */
public class User
{
   private String name;
   private char[] password;

   public User(String aName, char[] aPassword)
   {
      name = aName;
      password = aPassword;
   }

   public String getName()
   {
      return name;
   }

   public char[] getPassword()
   {
      return password;
   }

   public void setName(String aName)
   {
      name = aName;
   }

   public void setPassword(char[] aPassword)
   {
      password = aPassword;
   }
}
运行结果:
测试程序6
1) 在elipse IDE中调试运行教材556页程序12-21、12-2212-23,结合程序运行结果理解程序;
2) 掌握文件对话框的用法;
3) 记录示例代码阅读理解中存在的问题与疑惑。
package fileChooser;

import java.awt.*;
import javax.swing.*;

/**
 * @version 1.26 2018-04-10
 * @author Cay Horstmann
 */
public class FileChooserTest
{
   public static void main(String[] args)
   {
      EventQueue.invokeLater(() -> {
         var frame = new ImageViewerFrame();
         frame.setTitle("FileChooserTest");
         frame.setDefaultCloseOperation(JFrame.EXIT_ON_CLOSE);
         frame.setVisible(true);
      });
   }
}
package fileChooser;

import java.io.*;
import javax.swing.*;
import javax.swing.filechooser.*;
import javax.swing.filechooser.FileFilter;

/**
 * A file view that displays an icon for all files that match a file filter.
 */
public class FileIconView extends FileView
{
   private FileFilter filter;
   private Icon icon;

   /**
    * Constructs a FileIconView.
    * @param aFilter a file filter--all files that this filter accepts will be shown
    * with the icon.
    * @param anIcon--the icon shown with all accepted files.
    */
   public FileIconView(FileFilter aFilter, Icon anIcon)
   {
      filter = aFilter;
      icon = anIcon;
   }

   public Icon getIcon(File f)
   {
      if (!f.isDirectory() && filter.accept(f)) return icon;
      else return null;
   }
}
package fileChooser;

import java.awt.*;
import java.io.*;

import javax.swing.*;

/**
 * A file chooser accessory that previews images.
 */
public class ImagePreviewer extends JLabel
{
   /**
    * Constructs an ImagePreviewer.
    * @param chooser the file chooser whose property changes trigger an image
    *        change in this previewer
    */
   public ImagePreviewer(JFileChooser chooser)
   {
      setPreferredSize(new Dimension(100, 100));
      setBorder(BorderFactory.createEtchedBorder());

      chooser.addPropertyChangeListener(event -> {
         if (event.getPropertyName() == JFileChooser.SELECTED_FILE_CHANGED_PROPERTY)
         {
            // the user has selected a new file
            File f = (File) event.getNewValue();
            if (f == null)
            {
               setIcon(null);
               return;
            }

            // read the image into an icon
            var icon = new ImageIcon(f.getPath());

            // if the icon is too large to fit, scale it
            if (icon.getIconWidth() > getWidth())
               icon = new ImageIcon(icon.getImage().getScaledInstance(
                     getWidth(), -1, Image.SCALE_DEFAULT));

            setIcon(icon);
         }
      });
   }
}
package fileChooser;
import java.io.*;
import javax.swing.*;
import javax.swing.filechooser.*;
import javax.swing.filechooser.FileFilter;
/**
* A frame that has a menu for loading an image and a display area for the
* loaded image.
*/
public class ImageViewerFrame extends JFrame
{
private static final int DEFAULT_WIDTH = 300;
private static final int DEFAULT_HEIGHT = 400;
private JLabel label;
private JFileChooser chooser;
public ImageViewerFrame()
{
setSize(DEFAULT_WIDTH, DEFAULT_HEIGHT);
// set up menu bar
var menuBar = new JMenuBar();
setJMenuBar(menuBar);
var menu = new JMenu("File");
menuBar.add(menu);
var openItem = new JMenuItem("Open");
menu.add(openItem);
openItem.addActionListener(event -> {
chooser.setCurrentDirectory(new File("."));
// show file chooser dialog
int result = chooser.showOpenDialog(ImageViewerFrame.this);
// if image file accepted, set it as icon of the label
if (result == JFileChooser.APPROVE_OPTION)
{
String name = chooser.getSelectedFile().getPath();
label.setIcon(new ImageIcon(name));
pack();
}
});
var exitItem = new JMenuItem("Exit");
menu.add(exitItem);
exitItem.addActionListener(event -> System.exit(0));
// use a label to display the images
label = new JLabel();
add(label);
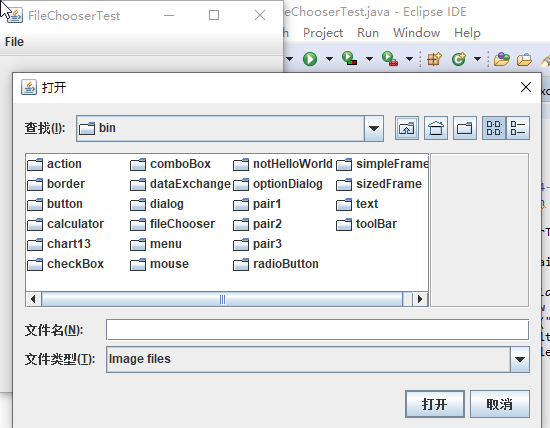
// set up file chooser
chooser = new JFileChooser();
// accept all image files ending with .jpg, .jpeg, .gif
var filter = new FileNameExtensionFilter(
"Image files", "jpg", "jpeg", "gif");
chooser.setFileFilter(filter);
chooser.setAccessory(new ImagePreviewer(chooser));
chooser.setFileView(new FileIconView(filter, new ImageIcon("palette.gif")));
}
}
运行结果:
测试程序7
1) 在elipse IDE中调试运行教材570页程序12-24,结合运行结果理解程序;
2) 了解颜色选择器的用法。
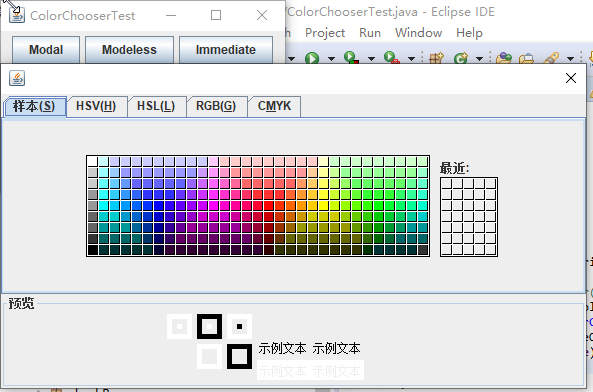
3)记录示例代码阅读理解中存在的问题与疑惑。
package colorChooser;

import java.awt.*;
import javax.swing.*;

/**
 * @version 1.04 2015-06-12
 * @author Cay Horstmann
 */
public class ColorChooserTest
{
   public static void main(String[] args)
   {
      //EventQueue.invokeLater(() -> {
         JFrame frame = new ColorChooserFrame();
         frame.setTitle("ColorChooserTest");
         frame.setDefaultCloseOperation(JFrame.EXIT_ON_CLOSE);
         frame.setVisible(true);
      };
   }
package colorChooser;

import javax.swing.*;

/**
 * A frame with a color chooser panel
 */
public class ColorChooserFrame extends JFrame
{
   private static final int DEFAULT_WIDTH = 300;
   private static final int DEFAULT_HEIGHT = 200;

   public ColorChooserFrame()
   {
      setSize(DEFAULT_WIDTH, DEFAULT_HEIGHT);

      // 添加颜色选择器面板到框架

      ColorChooserPanel panel = new ColorChooserPanel();
      add(panel);
   }
}
package colorChooser;

import java.awt.Color;
import java.awt.Frame;
import java.awt.event.ActionEvent;
import java.awt.event.ActionListener;

import javax.swing.JButton;
import javax.swing.JColorChooser;
import javax.swing.JDialog;
import javax.swing.JPanel;

/**
 * A panel with buttons to pop up three types of color choosers
 */
public class ColorChooserPanel extends JPanel
{
   public ColorChooserPanel()
   {
      JButton modalButton = new JButton("Modal");
      modalButton.addActionListener(new ModalListener());
      add(modalButton);

      JButton modelessButton = new JButton("Modeless");
      modelessButton.addActionListener(new ModelessListener());
      add(modelessButton);

      JButton immediateButton = new JButton("Immediate");
      immediateButton.addActionListener(new ImmediateListener());
      add(immediateButton);
   }

   /**
    * This listener pops up a modal color chooser
    */
   private class ModalListener implements ActionListener
   {
      public void actionPerformed(ActionEvent event)
      {
         Color defaultColor = getBackground();
         Color selected = JColorChooser.showDialog(ColorChooserPanel.this, "Set background",
               defaultColor);
         if (selected != null) setBackground(selected);
      }
   }

   /**
    * This listener pops up a modeless color chooser. The panel color is changed when the user
    * clicks the OK button.
    */
   private class ModelessListener implements ActionListener
   {
      private JDialog dialog;
      private JColorChooser chooser;

      public ModelessListener()
      {
         chooser = new JColorChooser();
         dialog = JColorChooser.createDialog(ColorChooserPanel.this, "Background Color",
               false /* not modal */, chooser,
               event -> setBackground(chooser.getColor()),
               null /* no Cancel button listener */);
      }

      public void actionPerformed(ActionEvent event)
      {
         chooser.setColor(getBackground());
         dialog.setVisible(true);
      }
   }

   /**
    * This listener pops up a modeless color chooser. The panel color is changed immediately when
    * the user picks a new color.
    */
   private class ImmediateListener implements ActionListener
   {
      private JDialog dialog;
      private JColorChooser chooser;

      public ImmediateListener()
      {
         chooser = new JColorChooser();
         chooser.getSelectionModel().addChangeListener(
               event -> setBackground(chooser.getColor()));

         dialog = new JDialog((Frame) null, false /* not modal */);
         dialog.add(chooser);
         dialog.pack();
      }

      public void actionPerformed(ActionEvent event)
      {
         chooser.setColor(getBackground());
         dialog.setVisible(true);
      }
   }
}
运行结果:
实验总结:
本节课学习了swing用户界面的另一些基本组件,在上节课的基础之上,又了解了一些新的知识,除了之前了解的一些基础代码之外,又学会了很多其他新的代码知识以及所表示的不同含义与用法。就是太多了有点记不住,基本能看懂。相信慢慢理解应该是会有用的。