1.阿里云购买ubuntu服务器;
2.xshell链接,root默认登录;
3.adduser xxx 创建使用帐号,并添加sudo权限;
sudo usermod -a -G adm lixiaofeng
sudo usermod -a -G sudo lixiaofeng
编辑/etc/sudoers,增加 lixiaofeng      all=(ALL:all) ALL  强制保存并退出;
4.修改默认python版本
sudo update-alternatives --install /usr/bin/python python /usr/bin/python2 100
sudo update-alternatives --install /usr/bin/python python /usr/bin/python3 150
5.安装pip
sudo apt-get install pip
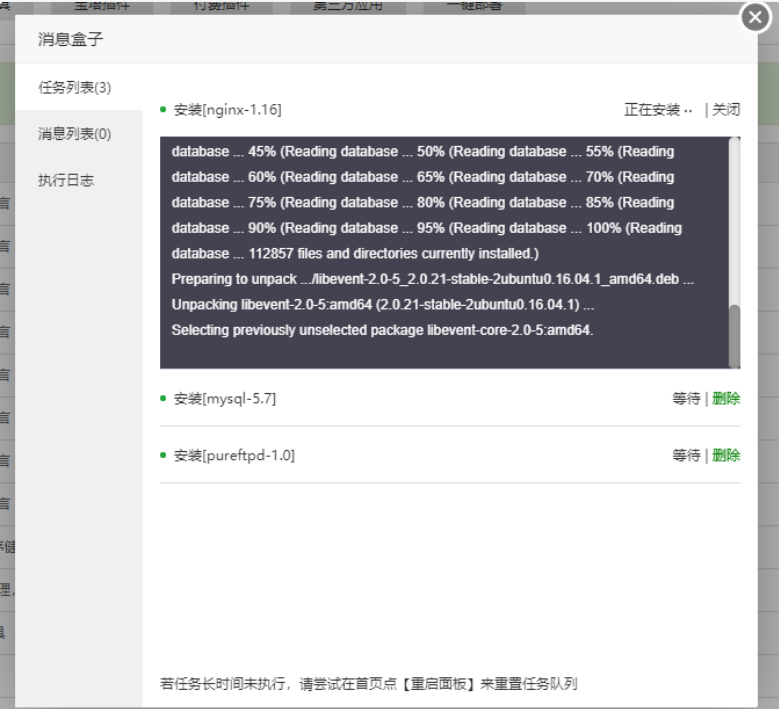
6.安装宝塔
# 安装 gcc    sudo apt-get  build-dep  gcc
# 安装 psutil     sudo pip3 install psutil
wget -O install.sh http://download.bt.cn/install/install-ubuntu_6.0.sh && sudo bash install.sh


面板设置 

安装nginx、mysql、ftp,配置网站; 
7.安装虚拟环境
sudo pip install virtualenv
sudo pip install virtualenvwrapper
mkdir ~/.virtualenvs
vim ~/.bashrc
# 末尾添加
export WORKON_HOME=$HOME/.virtualenvs
source /usr/local/bin/virtualenvwrapper.sh
source .bashrc
# 创建虚拟环境
mkvirtualenv --python=/usr/bin/python3 py
8.安装redis
sudo apt-get install tcl
tar -xvzf redis-3.0.4.tar.gz
sudo mkdir /usr/local/redis
sudo mv redis-3.0.4/* /usr/local/redis/
cd /usr/local/redis/
sudo make
sudo make test
sudo make install
sudo mkdir /etc/redis
sudo mkdir /var/lib/redis
cd /usr/local/redis/utils/
sudo ./install_server.sh  回车即可
sudo vim /etc/redis/6379.conf
62行    bind 0.0.0.0
481行   requirepass sunck
ps ajx | grep redis
sudo kill -9  6555
sudo redis-server /etc/redis/6379.conf
sudo vim /etc/init.d/redis
----------start
#!/bin/sh

# chkconfig: 2345 10 90
# description: Start and Stop redis
### BEGIN INIT INFO
# Provides: OSSEC HIDS
# Required-Start: $network $remote_fs $syslog $time
# Required-Stop:
# Default-Start: 2 3 4 5
# Default-Stop: 0 1 6
# Short-Description: OSSEC HIDS
### END INIT INFO


PATH=/usr/local/bin
REDISPORT=6379
EXEC=/usr/local/bin/redis-server
REDIS_CLI=/usr/local/bin/redis-cli
PIDFILE=/var/run/redis.pid
CONF="/etc/redis/6379.conf"

case "$1" in
    start)
        if [ ?f $PIDFILE ]
    then
        echo "$PIDFILE exists, process is already running or crashed."
    else
        echo "Starting Redis server..."
        $EXEC $CONF
    fi
    if ["$?"="0"]
    then
        echo "Redis is running..."
    fi
    ;;
    stop)
    if [! -f $PIDFILE]
    then
        echo "$PIDFILE exists,process is not running."
    else
        PID=$(cat $PIDFILE)
        echo "Stopping..."
        $REDIS_CLI -p $REDISPORT SHUTDOWN
        while [-x $PIDFILE]
        do
        echo "Waiting for Redis to shutdown..."
        sleep 1
        done
        echo "Redis stopped"
    fi
    ;;
    restart|force-reload)
    ${0} stop
    ${0} start
    ;;
    *)
    echo "Usage: /etc/init.d/redis {start|stop|restart|fore-reload}"
    exit 1
esac
---------end
sudo chmod +x /etc/init.d/redis 增加可执行权限
sudo update-rc.d -f redis defaults   设置开机启动
9.安装memcached; django默认缓存;
sudo apt-get install memcached
sudo apt-get install libevent-dev
10.安装mysqlclient失败
sudo apt install libmysqlclient-dev
pip install mysqlclient
11.安装jenkins
sudo apt-get install openjdk-8-jdk
wget -q -O - https://pkg.jenkins.io/debian/jenkins.io.key | sudo apt-key add -
sudo sh -c 'echo deb https://pkg.jenkins.io/debian-stable binary/ > /etc/apt/sources.list.d/jenkins.list'
sudo apt-get update
sudo apt-get install jenkins


等待安装完成,设置登录用户
安装插件 git、GitHub、python
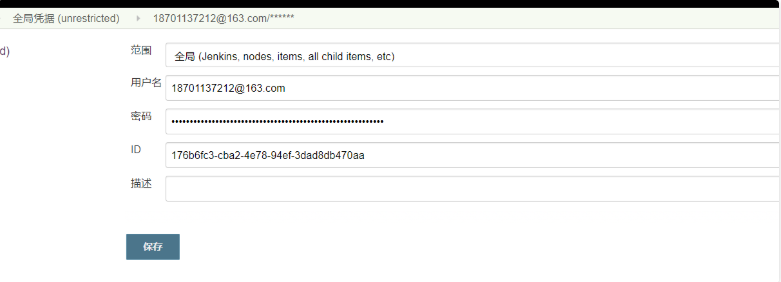
配置凭据 设置Secret text

设置 username whit password 凭证 
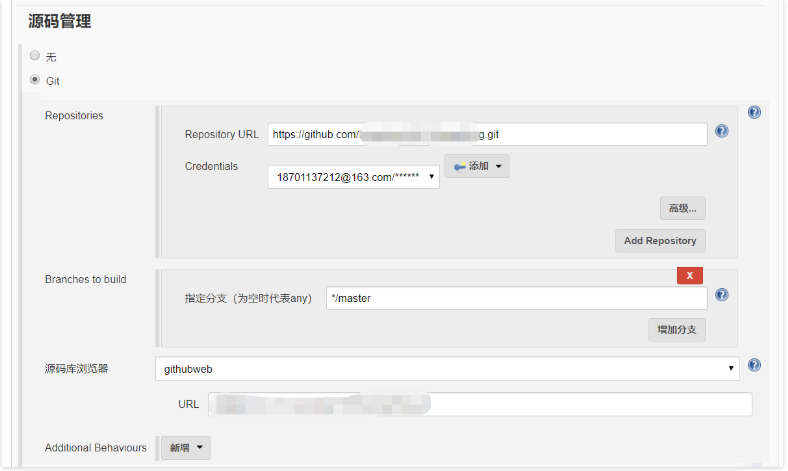
在全局工具配置 中 配置git 

在系统管理-系统配置 中配置github server 

创建任务,设置构建后要执行的shell和python 代码;
12.拉下来代码后,使用 Gunicorn 启动 django 服务; gunicorn -b 0.0.0.:9000 -D -w 3 DjangoBlog.wsgi
13.配置宝塔 nginx配置
# user  www www;
worker_processes 4;
#error_log  /www/wwwlogs/nginx_error.log  crit;
pid        /www/server/nginx/logs/nginx.pid;
worker_rlimit_nofile 51200;

events
    {
        use epoll;
        worker_connections 51200;
        multi_accept on;
    }

http
    {
        include       mime.types;
        #include luawaf.conf;

        include proxy.conf;

        default_type  application/octet-stream;

        server_names_hash_bucket_size 512;
        client_header_buffer_size 32k;
        large_client_header_buffers 4 32k;
        client_max_body_size 50m;

        sendfile   on;
        tcp_nopush on;

        keepalive_timeout 60;

        tcp_nodelay on;

        fastcgi_connect_timeout 300;
        fastcgi_send_timeout 300;
        fastcgi_read_timeout 300;
        fastcgi_buffer_size 64k;
        fastcgi_buffers 4 64k;
        fastcgi_busy_buffers_size 128k;
        fastcgi_temp_file_write_size 256k;
        fastcgi_intercept_errors on;

        gzip on;
        gzip_min_length  1k;
        gzip_buffers     4 16k;
        gzip_http_version 1.1;
        gzip_comp_level 2;
        gzip_types     text/plain application/javascript application/x-javascript text/javascript text/css application/xml;
        gzip_vary on;
        gzip_proxied   expired no-cache no-store private auth;
        # gzip_disable   "MSIE [1-6].";
        gzip_disable "msie6";

        limit_conn_zone $binary_remote_addr zone=perip:10m;
        limit_conn_zone $server_name zone=perserver:10m;

        # server_tokens off;
        # access_log off;

        upstream myApp {
        server 127.0.0.1:9000;
        server 127.0.0.1:9001;
    }

server
    {
        listen 80;
        server_name 129.28.187.64;
        index index.html index.htm index.php;
        # root  /www/server/phpmyadmin;

        charset utf-8;

        #error_page   404   /404.html;
        include enable-php.conf;

        access_log  /www/wwwlogs/access.log;
        error_log   /www/wwwlogs/error.log;

        location = /favicon.ico  {
                empty_gif;
                access_log off;
            }

            location /media/ {
                root   /www/wwwroot/server/DjangoBlog/;
                expires 30d;
                access_log off;
            }

            location /static/ {
                alias    /www/static/static/;
            }
            location / {
            root html;
            index index.html index.htm;
                proxy_set_header X-Forwarded-For $proxy_add_x_forwarded_for;
                proxy_connect_timeout 300s;
                proxy_send_timeout 300s;
                proxy_read_timeout 300s;
                proxy_redirect off;
                proxy_pass http://myApp;
            }
    }
include /www/server/panel/vhost/nginx/*.conf;
}
网站配置<同nginx>
创建数据库
完成~~~