在Spark中,对于网络调用的底层封装(粘包拆包,编解码,链路管理等)都是在common/network-common包中实现的(详见【common/network-common】)。在common/network-common包分析的时候我们提到了,来自网络的消息最终是通过调用上层代码的RpcHandler实现类,将消息发送给了上层代码。在Spark中,负责网络调用的上层代码是在rpc包中实现的。rpc包可以看做是对网络调用的高级封装(增加了消息队列,节点注册&发现,失败处理,生命周期管理等功能)。在Spark中,所有需要调用网络发送和接收消息的类只需要实现rpc包中提供的接口,来根据自身需要定制在网络调用不同阶段的功能(如处理节点注册,节点启动,节点收到消息时的逻辑等),而无需关心底层的实现。我们首先来看一下rpc包的结构:
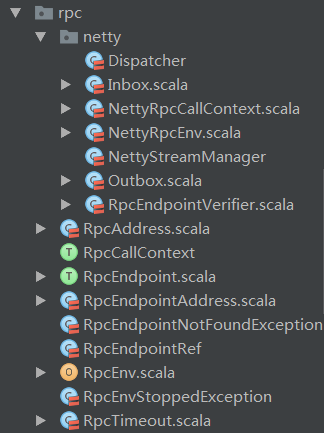
可见rpc的包结构还是比较简单的。在rpc根目录上是Spark定义的统一的rpc接口和实现类,其中的接口和抽象类可以有不同种的实现(如netty,mina等)。而netty包中,则是Spark中对于rpc的netty实现版本。
节点注册&发现
在粗略介绍完rpc包结构和作用后,读者一定想知道Spark究竟是如何使用rpc包实现节点之间的通信的。下面我们就先抛开源码,先直接介绍Spark节点间的注册和发现。
上文我们提到,Spark中所有需要进行网络通信的类只要实现rpc包中暴露的接口就可以了,这个接口就是`RpcEndpoint`。我们来看一下这个接口究竟是怎样的(由于Spark rpc的代码是使用scala开发的,scala中类似java中接口的类型称为特征(trait),当然scala的特征要比java的接口强大很多,但这里我们为了方便都称为接口):
private[spark] trait RpcEndpoint {
val rpcEnv: RpcEnv
final def self: RpcEndpointRef = {
require(rpcEnv != null, "rpcEnv has not been initialized")
rpcEnv.endpointRef(this)
}
def receive: PartialFunction[Any, Unit] = {
case _ => throw new SparkException(self + " does not implement 'receive'")
}
def receiveAndReply(context: RpcCallContext): PartialFunction[Any, Unit] = {
case _ => context.sendFailure(new SparkException(self + " won't reply anything"))
}
def onError(cause: Throwable): Unit = {
throw cause
}
def onConnected(remoteAddress: RpcAddress): Unit = {}
def onDisconnected(remoteAddress: RpcAddress): Unit = {}
def onNetworkError(cause: Throwable, remoteAddress: RpcAddress): Unit = {}
def onStart(): Unit = {}
def onStop(): Unit = {}
final def stop(): Unit = {
val _self = self
if (_self != null) {
rpcEnv.stop(_self)
}
}
}
可见正如我们之前所说,`RpcEndpoint`中定义了一套网络通信时的生命周期(如onError,receive等)。在进行网络通信时,来自Spark common/network-common包和core/rpc包中的代码最终会在对应的阶段调用`RpcEndpoint`中的这些方法(比如在建立网络连接后,会调用`RpcEndpoint.onConnected`方法)。所以应用程序只要实现`RpcEndpoint`中对应的方法,就能实现网络调用的全生命周期的处理逻辑。
好了,现在假设我们创建了两个类分别实现了`RpcEndpoint`的方法,那Spark是如何做到让这两个类实现通信的呢?先别急,在介绍Spark如何实现节点间注册&发现通信之前,我们还要介绍另一个重要的类`RpcEndpointRef`。这个类看名字就知道是与`RpcEndpoint`相对应的,这是一个抽象类,Spark中提供了一个默认的实现`NettyRpcEndpointRef`。这个类不需要应用程序去单独实现。这个类可以看做是`RpcEndpoint`的句柄。比如我们在服务端创建并注册了`RpcEndpoint`后,当客户端想要向服务端的这个`RpcEndpoint`发送请求时,首先要从服务端获得一个`RpcEndpoint`的句柄,即`RpcEndpointRef`并保存到客户端本地。之后直接使用`RpcEndpointRef`提供的方法向服务端发送请求。我们看一下`RpcEndpointRef`提供的方法:
private[spark] abstract class RpcEndpointRef(conf: SparkConf)
  extends Serializable with Logging {
  // 省略非关键代码

  def address: RpcAddress

  def name: String

  def send(message: Any): Unit

  def ask[T: ClassTag](message: Any, timeout: RpcTimeout): Future[T]

  def ask[T: ClassTag](message: Any): Future[T] = ask(message, defaultAskTimeout)

  def askWithRetry[T: ClassTag](message: Any): T = askWithRetry(message, defaultAskTimeout)

  def askWithRetry[T: ClassTag](message: Any, timeout: RpcTimeout): T = {
    ...
  }
}
可见正如我们所说`RpcEndpointRef`为请求方提供了发送请求的所有方法。接下来就让我们看一下Spark是如何使用`RpcEndpointRef`和`RpcEndpoint`实现节点间通信的。
在实现并创建了`RpcEndpoint`后,要将创建的`RpcEndpoint`注册到`Dispatcher`中,在`Dispatcher`中维护了一个endpointName到`RpcEndpoint`实例的映射关系(关于`Dispatcher`的详细分析见下文)。由于一个节点中可能有多个`RpcEndpoint`,Spark使用endpointName来唯一标识一个节点中的`RpcEndpoint`,当其他节点需要与`RpcEndpoint`通信时,不光要指定要通信的节点地址,还要指定要通信的`RpcEndpoint`的endpointName。在Spark中的注册方法为`NettyRpcEnv.setupEndpoint`:
override def setupEndpoint(name: String, endpoint: RpcEndpoint): RpcEndpointRef = {
  dispatcher.registerRpcEndpoint(name, endpoint)
}
最终会调用`Dispatcher.registerRpcEndpoint`方法:
def registerRpcEndpoint(name: String, endpoint: RpcEndpoint): NettyRpcEndpointRef = {
  // 省略非关键代码和异常检查
  val addr = RpcEndpointAddress(nettyEnv.address, name)
  val endpointRef = new NettyRpcEndpointRef(nettyEnv.conf, addr, nettyEnv
  endpoints.putIfAbsent(name, new EndpointData(name, endpoint, endpointRef))
  val data = endpoints.get(name)
  endpointRefs.put(data.endpoint, data.ref)
  receivers.offer(data)  // for the OnStart message
  endpointRef
}
可见`RpcEndpoint`注册到`Dispatcher`时,会将endpointName和`RpcEndpoint`的映射关系保存到endpoints中,同时`Dispatcher`会为`RpcEndpoint`创建对应的`NettyRpcEndpointRef`实例,并保存到endpointRefs中。这样就完成了`RpcEndpoint`的注册。
还需要注意的是在`RpcEndpoint`所在的server启动时,会向`Dispatcher`注册一个名为endpoint-verifier的`RpcEndpoint`,启动server的为NettyRpcEnv.startServer方法:
def startServer(port: Int): Unit = {
  ...
  server = transportContext.createServer(host, port, bootstraps)
  dispatcher.registerRpcEndpoint(RpcEndpointVerifier.NAME, new RpcEndpointVerifier(this, dispatcher))
}
这个`RpcEndpoint`的作用是什么呢?我们知道由于`RpcEndpoint`都是用户自己实现的,endpointName也是自定义的,那么在客户端在最开始如何向服务端请求来获取endpointName的`RpcEndpoint`的呢?答案就是构造一个`RpcEndpointVerifier`对应的`RpcEndpointRef`,并将需要请求的`RpcEndpoint`对应的endpointName封装在`RpcEndpointVerifier.CheckExistence`中发送给服务端,服务端在收到消息后,会调用`RpcEndpointVerifier.receiveAndReply`方法,而这个方法中会调用`dispatcher.verify`方法,来判断名为endpointName的`RpcEndpoint`是否已经注册到`Dispatcher`中的endpoints中,并将注册结果(true/false)返回给客户端。`RpcEndpointVerifier`和`CheckExistence`消息如下:
private[netty] class RpcEndpointVerifier(override val rpcEnv: RpcEnv, dispatcher: Dispatcher)
  extends RpcEndpoint {

  override def receiveAndReply(context: RpcCallContext): PartialFunction[Any, Unit] = {
    case RpcEndpointVerifier.CheckExistence(name) => context.reply(dispatcher.verify(name))
  }
}

private[netty] object RpcEndpointVerifier {
  val NAME = "endpoint-verifier"

  /** A message used to ask the remote [[RpcEndpointVerifier]] if an [[RpcEndpoint]] exists. */
  case class CheckExistence(name: String)
}
也就是说`RpcEndpointVerifier`是一个在服务端和客户端提前协商好了的`RpcEndpoint`,主要用来校验客户端请求的`RpcEndpoint`在服务端是否存在,如果存在则客户端就可以在本地创建这个`RpcEndpoint`的句柄`RpcEndpointRef`,之后使用这个句柄与服务端的`RpcEndpoint`进行通信。
在阐述完上述信息后,我们就可以来详细介绍一下节点注册/发现的流程了。当其他节点需要与我们注册了`RpcEndpoint`节点的这个endpoint通信时(这里为了便于阐述,我们将其他节点称为客户端,他们请求的节点称为服务端),首先会向服务端申请获取需要通信的`RpcEndpoint`的`RpcEndpointRef`。客户端会调用`RpcEnv`中的方法来获取`RpcEndpointRef`,其中`RpcEnv`提供了三种调用方法,即asyncSetupEndpointRefByURI,setupEndpointRefByURI,setupEndpointRef这三个方法最终会调用`NettyRpcEnv.asyncSetupEndpointRefByURI`方法:
def asyncSetupEndpointRefByURI(uri: String): Future[RpcEndpointRef] = {
  val addr = RpcEndpointAddress(uri)
  val endpointRef = new NettyRpcEndpointRef(conf, addr, this)
  val verifier = new NettyRpcEndpointRef(conf, RpcEndpointAddress(addr.rpcAddress, RpcEndpointVerifier.NAME), this)
  verifier.ask[Boolean](RpcEndpointVerifier.CheckExistence(endpointRef.name)).flatMap { find =>
  if (find) {
      Future.successful(endpointRef)
  } else {
    Future.failed(new RpcEndpointNotFoundException(uri))
  }(ThreadUtils.sameThread)
}
其中传入的参数uri的格式如下:`spark://$name@$host:$port`,即服务端的地址,端口以及请求的`RpcEndpoint`的name。之后在客户端会构造`RpcEndpointVerifier`对应的`NettyRpcEndpointRef`,并发送给服务端,询问请求的endpoint是否已经注册。如果服务端返回true,则将endpoint对应的`NettyRpcEndpointRef`返回给调用者。这个`NettyRpcEndpointRef`最终会保存到客户端本地,之后都用它与服务端对应的`RpcEndpoint`进行通信。最后用一张图来描述Spark中节点通信的流程:
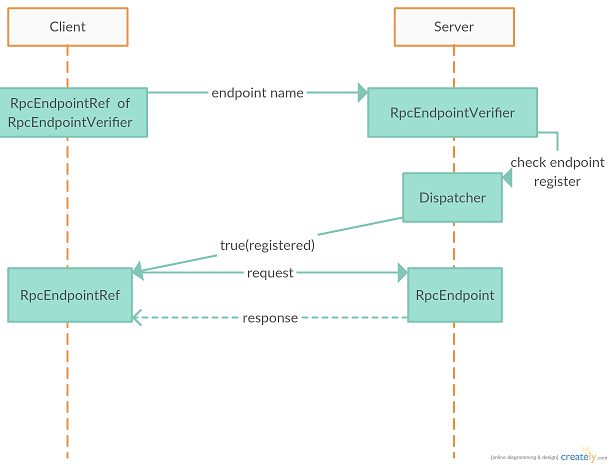
总结一下Spark中节点注册&发现的流程:Spark在rpc层是通过`RpcEndpoint`和`RpcEndpointRef`来实现对网络调用的抽象的,服务端只需要实现`RpcEndpoint`,客户端只需要创建服务端`RpcEndpoint`对应的`RpcEndpointRef`句柄就可以实现消息的接收和发送处理。在Spark中,存在一个预先约定好的`RpcEndpoint`:`RpcEndpointVerifier`。这个`RpcEndpointVerifier`用来验证客户端请求的`RpcEndpoint`是否在服务端已经注册。当客户端需要与服务端对应的`RpcEndpoint`建立通信时,首先使用`RpcEndpointVerifier`对应的`RpcEndpointRef`句柄,向服务端发送连接请求(host, port, endpointName)。服务端在接收到连接请求后,会调用`RpcEndpointVerifier`的方法验证客户端请求的endpointName的`RpcEndpoint`是否已经在服务端注册,如果注册则返回true给客户端。客户端在收到服务端的响应后,会在本地建立服务端`RpcEndpoint`对应的句柄`RpcEndpointRef`,之后会直接使用这个句柄来向服务端发送消息。
接收消息
在介绍完Spark节点的注册和发现后,就让我们来看一下Spark是如何使用rpc包来完成消息的发送和接收的。还记得我们在【Spark network-common】这篇文章讲到,Spark中接收到的来自网络的消息在经过network包的处理后,最终会调用`RpcHandler`来处理,而`RpcHandler`在rpc包中的实现为`NettyRpcHandler`。`NettyRpcHandler`中的两个receive方法如下:
override def receive(
  client: TransportClient,
  message: ByteBuffer,
  callback: RpcResponseCallback): Unit = {
  val messageToDispatch = internalReceive(client, message)
  dispatcher.postRemoteMessage(messageToDispatch, callback)
}

override def receive(
  client: TransportClient,
  message: ByteBuffer): Unit = {
  val messageToDispatch = internalReceive(client, message)
  dispatcher.postOneWayMessage(messageToDispatch)
}
这两个receive方法分别接受RPC消息和OneWayMessage消息,在这两个方法中都是首先调用internalReceive方法反序列化消息,然后调用`Dispatcher`的对应方法,将反序列化后的消息发送给`Dispatcher`进一步处理。我们看一下`NettyRpcHandler.internalReceive`方法:
private def internalReceive(client: TransportClient, message: ByteBuffer): RequestMessage = {
  val addr = client.getChannel().remoteAddress().asInstanceOf[InetSocketAddress]
  assert(addr != null)
  val clientAddr = RpcAddress(addr.getHostString, addr.getPort)
  val requestMessage = nettyEnv.deserialize[RequestMessage](client, message)
  if (requestMessage.senderAddress == null) {
    RequestMessage(clientAddr, requestMessage.receiver, requestMessage.content)
  } else {
    val remoteEnvAddress = requestMessage.senderAddress
    if (remoteAddresses.putIfAbsent(clientAddr, remoteEnvAddress) == null) {
      dispatcher.postToAll(RemoteProcessConnected(remoteEnvAddress))
    }
    requestMessage
  }
}
这个方法对消息反序列化,然后如果发送消息的地址首次收到,则说明这是当前节点与发送消息的节点连接的首次通信,这时会调用`Dispatcher.postToAll`方法,向本节点广播`RemoteProcessConnected`事件。值得注意的是remoteAddresses这个map。这个map中的key为保存远端节点client的host和port的RpcAddress实例,value为保存远端节点server的host和port的RpcAddress实例。这里提到了client和server两个概念。在Spark中一个节点同时会即为客户端又为服务端,两个节点之间的相互通信如下图所示:
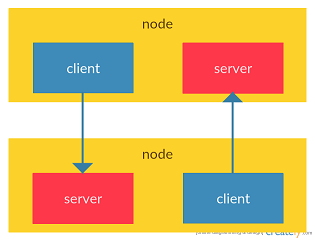
所以在一个节点中,会将对端client的host和port作为key,对端server的host和value作为value保存到remoteAddresses这个map中。Spark这么做的目的是为了当对端不在连接到本节点时(上图左侧的client -> server的连接),本节点也同时断开与对端的连接(上图右侧的server <- client的连接)。这个功能的实现在`NettyRpcHandler.channelInactive`方法中:
override def channelInactive(client: TransportClient): Unit = {
  // 省略非关键代码
  val addr = client.getChannel.remoteAddress().asInstanceOf[InetSocketAddress]
  val clientAddr = RpcAddress(addr.getHostString, addr.getPort)
  nettyEnv.removeOutbox(clientAddr)
  dispatcher.postToAll(RemoteProcessDisconnected(clientAddr))
  val remoteEnvAddress = remoteAddresses.remove(clientAddr)
  if (remoteEnvAddress != null) {
    dispatcher.postToAll(RemoteProcessDisconnected(remoteEnvAddress))
  }
}
可见当对端到当前节点的连接(上图左侧的client -> server)断掉时,Spark除了要移除这个连接之外,还会从remoteAddresses这个map中找到client的server,也移除当前节点到对端server的连接(上图右侧的server <- client)。
Dispatcher
看到这里我们不得不介绍一下`Dispatcher`了,这个类中维护了一个`EndpointData`类型的队列,`EndpointData`类如下:
private class EndpointData(
  val name: String,
  val endpoint: RpcEndpoint,
  val ref: NettyRpcEndpointRef) {
  val inbox = new Inbox(ref, endpoint)
}
每当有新的`RpcEndpoint`注册到`Dispatcher`时,就会创建一个`EndpointData`,并保存到队列中。其中name为`RpcEndpoint`的endpointName,endpoint就是注册的`RpcEndpoint`,ref为endpoint对应的`RpcEndpointRef`。同时还会为每个endpoint实例化一个对应的`Inbox`收件箱。每当收到新的消息时,都会找到消息所属的endpoint的`EndpointData`,并将`EndpointData`再次放入队列。而`Inbox`为Spark中从网络收到消息的收件箱,收到的消息实际是保存到`Inbox`中的。在上文中我们的消息已经到达了`NettyRpcHandler`并进行了反序列化,由于收到的RPC和OneWayMessage类型消息的处理方法类似,我们这里以RPC消息为例,反序列化的RPC消息之后会传到`Dispatcher.postRemoteMessage`方法,最终会调用`Dispatcher.postMessage`方法:
private def postMessage(
  endpointName: String,
  message: InboxMessage,
  callbackIfStopped: (Exception) => Unit): Unit = {
  // 省略异常检查代码
  val error = synchronized {
    // 根据endpointName找到注册的endpoint
    val data = endpoints.get(endpointName)
    // 将消息添加到data的inbox队列
    data.inbox.post(message)
    // 将data添加到dispatcher的保存消息的队列
    receivers.offer(data)
    None
  }
  error.foreach(callbackIfStopped)
}
现在我们成功将消息保存到队列中了,那么Spark是如何读取这些消息的呢?`Dispatcher`在初始化时会启动线程循环读取`EndpointData`队列中的数据,并调用`Inbox`中的方法执行。我们看一下`Dispatcher`中用来读取消息队列的线程的实现:
private val threadpool: ThreadPoolExecutor = {
  val numThreads = nettyEnv.conf.getInt("spark.rpc.netty.dispatcher.numThreads",math.max(2, Runtime.getRuntime.availableProcessors()))
  val pool = ThreadUtils.newDaemonFixedThreadPool(numThreads, "dispatcher-event-loop")
  for (i <- 0 until numThreads) {
    pool.execute(new MessageLoop)
  }
  pool
}

private class MessageLoop extends Runnable {
  override def run(): Unit = {
  // 省略try-catch代码
  while (true) {
    val data = receivers.take()
    if (data == PoisonPill) {
      receivers.offer(PoisonPill)
      return
    }
    data.inbox.process(Dispatcher.this)
  }
}
可见读取`EndpointData`队列的是一个线程池,Spark可以通过`spark.rpc.netty.dispatcher.numThreads`参数来配置线程池中有多少个线程,如果没有配置,则默认启动jvm有效核数的线程(最多2个)。接下来的`MessageLoop`类是每个线程的实际执行方法。可以看到通过一个while(true)循环来不断从消息队列中读取消息,并发送给`Inbox.process`方法执行。如果消息队列中的消息是`PoisonPill`的话,当前的线程就会吃掉这个小毒丸,然后直接退出循环。
Inbox
在`Inbox`中维护了一个消息队列,用来保存收到的消息。`Inbox`中除了`OneWayMessage`,`RpcMessage`这种消息之外,还定义了在`RpcEndpoint`生命周期中相关事件的消息,如`OnStart`,`OnStop`,`RemoteProcessConnected`等。在`Dispatcher`处理`EndpointData`队列的线程中,最终会调用`Inbox.process`方法,来实际处理消息:
def process(dispatcher: Dispatcher): Unit = {
  // 省略非关键代码和异常检查
  var message: InboxMessage = null
  message = messages.poll()
  while (true) {
    // 使用借贷模式实现安全调用endpoint方法,并捕获异常
    safelyCall(endpoint) {
      // 根据消息类型调用endpoint不同的方法
      message match {
        case RpcMessage(_sender, content, context) =>
          endpoint.receiveAndReply(context).applyOrElse[Any, Unit](content, { msg =>
          throw new SparkException(s"Unsupported message $message from ${_sender}")

        case OneWayMessage(_sender, content) =>
          endpoint.receive.applyOrElse[Any, Unit](content, { msg =>
          throw new SparkException(s"Unsupported message $message from ${_sender}")})

        case OnStart => endpoint.onStart()

        case OnStop =>
          val activeThreads = inbox.synchronized { inbox.numActiveThreads }
          dispatcher.removeRpcEndpointRef(endpoint)
          endpoint.onStop()
          assert(isEmpty, "OnStop should be the last message")

        case RemoteProcessConnected(remoteAddress) =>
          endpoint.onConnected(remoteAddress)

        case RemoteProcessDisconnected(remoteAddress) =>
          endpoint.onDisconnected(remoteAddress)

        case RemoteProcessConnectionError(cause, remoteAddress) =>
          endpoint.onNetworkError(cause, remoteAddress)
      }
    }
    message = messages.poll()
    if (message == null) {
      return
    }
  }
}
可见`Inbox`会根据消息类型的不同,调用`Inbox`对应的`RpcEndpoint`中的方法,实现最终将来自网络的消息传递给应用程序自定义的`RpcEndpoint`对应的方法执行。
总结一下Spark接收消息的流程:来自网络的消息经过common/network-common层的处理(粘包拆包,解码等),最终会传递到rpc包的`NettyRpcHandler`处理。`NettyRpcHandler`首先会反序列化消息,然后将消息传递给`Dispatcher`中。`Dispatcher`会将消息保存到`Inbox`的消息队列中,之后会由`Dispatcher`创建时启动的线程不断读取队列中的消息,并调用`RpcEndpoint`中对应的方法来处理。即从应用层面看,消息通过`RpcEndpointRef`方法发送出去后,最终传递到对端的`RpcEndpoint`中的方法进行处理。
发送消息
在介绍完Spark是如何处理从网络接收到的消息后,接下来我们就要看一下Spark是如何向网络发送消息的。在前文介绍`RpcEndpoint`和`RpcEndpointRef`时,我们提到了客户端是通过创建服务端`RpcEndpoint`的句柄`RpcEndpointRef`来实现与服务端的`RpcEndpoint`进行通信的。所以在Spark中,发送消息就是调用`RpcEndpointRef`中的方法。而我们知道Spark存在Rpc和OneWayMessage两种消息类型,这两种消息类型分别对应`RpcEndpointRef`中的ask和send方法。而在Spark中,`RpcEndpointRef`的实现为`NettyRpcEndpointRef`。由于send和ask方法类似,在这里我们以ask方法为例,看一下Spark发送消息的流程。我们看一下`NettyRpcEndpointRef.ask`方法:
override def ask[T: ClassTag](message: Any, timeout: RpcTimeout): Future[T] = {
    nettyEnv.ask(RequestMessage(nettyEnv.address, this, message), timeout)
}
可见在`NettyRpcEndpointRef.ask`中只是将消息封装为`RequestMessage`,并调用`NettyRpcEnv.ask`,由于`NettyRpcEnv.ask`代码比较复杂,我们这里就列出最关键的部分:
private[netty] def ask[T: ClassTag](message: RequestMessage, timeout: RpcTimeout): Future[T] = {
  // 省略非关键代码和异常检查
  val promise = Promise[Any]()
  val remoteAddr = message.receiver.address
  def onFailure(e: Throwable): Unit = {...}
  def onSuccess(reply: Any): Unit = reply match {...}

  if (remoteAddr == address) {
    val p = Promise[Any]()
    p.future.onComplete {...}(ThreadUtils.sameThread)
    dispatcher.postLocalMessage(message, p)
  } else {
    val rpcMessage = RpcOutboxMessage(serialize(message), onFailure,
                    (client, response) => onSuccess(deserialize[Any](client, response)))
    postToOutbox(message.receiver, rpcMessage)
    promise.future.onFailure {...}(ThreadUtils.sameThread)
  }

  val timeoutCancelable = timeoutScheduler.schedule(new Runnable {...}, timeout.duration.toNanos, TimeUnit.NANOSECONDS)
  promise.future.onComplete {...}(ThreadUtils.sameThread)
  promise.future.mapTo[T].recover(timeout.addMessageIfTimeout)(ThreadUtils.sameThread)
}
可见Spark在发送消息时,会判断消息的接收地址(remoteAddr)是否是当前节点地址。如果是当前节点地址,则直接调用`Dispatcher.postLocalMessage`方法。如果消息接收地址不是当前节点地址,则首先对消息进行序列化,然后将序列化后的消息封装为`RpcOutboxMessage`,并调用`NettyRpcEnv.postToOutbox`方法。发送消息的回调都封装在scala的类型`Promise`中,并返回。`Dispatcher.postLocalMessage`方法与接收消息时介绍的`Dispatcher`中的方法类似,最终都是调用`Dispatcher.postMessage`方法,这里就不再赘述了。我们主要看一下将消息发送到远端的这段逻辑。
Spark在将消息发送到远端时,首先会序列化消息,在`NettyRpcEnv`中是使用Java序列化方法来序列化消息。之后会调用`NettyRpcEnv.postToOutbox`方法:
private def postToOutbox(receiver: NettyRpcEndpointRef, message: OutboxMessage): Unit = {
  // 省略非关键代码
  // 如果已经建立了client,则直接发送
  if (receiver.client != null) {
    message.sendWith(receiver.client)
  } else {
    // 否则通过outbox发送消息(outbox.send方法封装了与远端建立连接的逻辑)
    val targetOutbox = {
      val outbox = outboxes.get(receiver.address)
      if (outbox == null) {
        val newOutbox = new Outbox(this, receiver.address)
        val oldOutbox = outboxes.putIfAbsent(receiver.address, newOutbox)
        if (oldOutbox == null) {
          newOutbox
        } else {
          oldOutbox
        }
      } else {
        outbox
      }
    }
    if (stopped.get) {
      outboxes.remove(receiver.address)
      targetOutbox.stop()
    } else {
      // 使用outbox发送消息
      targetOutbox.send(message)
    }
  }
}
我们看到`RpcEndpointRef`被封装到消息中传递到了`NettyRpcEnv.postToOutbox`方法。如果`RpcEndpointRef`中包含了与远端的链接(`TransportClient`),则直接调用`TransportClient`中的方法发送消息。否则,Spark使用发件箱(Outbox)来发送消息。在接收消息时,我们提到Spark会为每一个`RpcEndpoint`建立一个收件箱(Inbox)。而在发送消息时,Spark会为每一个接收消息的地址(host+port)创建一个发件箱。最终会调用`Outbox.send`方法来发送消息。
Outbox
在发件箱中,Spark维护了一个待发送消息的消息队列。每次在调用`Outbox.send`方法发送消息时,消息首先会被放入队列中,然后调用`Outbox.drainOutbox`方法来循环读取队列,将队列中的消息都发送出去。我们首先看一下`Outbox.send`方法:
def send(message: OutboxMessage): Unit = {
  // 省略非关键代码
  messages.add(message)
  drainOutbox()
}
接下来我们看一下`Outbox.drainOutbox`方法:
private def drainOutbox(): Unit = {
  // 省略异常检查
  var message: OutboxMessage = null
  synchronized {
    if (stopped) {
      return
    }
    // 如果connectFuture不为空说明正在建立链接,直接返回
    if (connectFuture != null) {
      return
    }
    // 这说明没有线程在建立链接,但是当前又没有可用链接,则当前线程主动建立链接并返回
    if (client == null) {
      launchConnectTask()
      return
    }
    // 说明有其他线程在调用此方法发送消息,当前线程可以直接返回
    if (draining) {
      return
    }
    message = messages.poll()
    if (message == null) {
      return
    }
    draining = true
  }
  // 将messages中的消息都发送出去
  while (true) {
    val _client = synchronized { client }
    // 发送消息
    message.sendWith(_client)
    synchronized {
      if (stopped) {
        return
      }
      message = messages.poll()
      if (message == null) {
        draining = false
        return
      }
    }
  }
}
可以看到,在`Outbox.drainOutbox`方法中,通过同步锁的方式,保证只有一个线程在读取待发送消息队列,线程循环读取队列中的消息,并调用`message.sendWith`方法发送消息。这里可以看出,Spark中,第一个向某个远端地址发送消息的线程会直接被拉来做苦力,不断的发送消息队列中的消息(队列中的消息可能是由其他线程放入的),直到队列为空为止。所以在Spark中调用`RpcEndpointRef.ask`或`RpcEndpointRef.send`方法的线程是有可能一直阻塞不返回的,所以在调用时要注意。
总结一下Spark发送消息的流程:在发送端调用`RpcEndpointRef`中的方法发送消息。如果接收端是本节点,则直接调用`Dispatcher`中的方法,将消息传入本节点的`Inbox`中。如果接收端是远端节点,则会将消息保存到`Outbox`的发送队列中。如果没有线程处理发送队列,则当前发送消息的线程会用来发送队列中的所有消息,直到发送队列为空才退出。发送消息是调用common/network-common包中的`TransportClient`相关方法发送的。