Spring
Spring是一个轻量级控制反转(IoC)和面向切面(AOP)的容器框架。
DI 依赖注入
◆目的:解决企业应用开发的复杂性
◆功能:使用基本的JavaBean代替EJB,并提供了更多的企业应用功能
◆范围:任何Java应用
普通对象的创建:
方式一:
User user=new User();
方式二反射(可以达到解耦):
Object object = Class.forName("com.testfan.ioc.User").newInstance();
Spring对象的创建:
第一种方式:
通过xml维护bean对象
调用
//spring ioc
//spring.xml是bean的配置文件
ApplicationContext context = new ClassPathXmlApplicationContext("spring.xml");
User user2= (User) context.getBean("user");
xml的创建方法:
配置填写:
<?xml version="1.0" encoding="UTF-8"?>
<beans xmlns="http://www.springframework.org/schema/beans"
	xmlns:xsi="http://www.w3.org/2001/XMLSchema-instance"
	xsi:schemaLocation="http://www.springframework.org/schema/beans http://www.springframework.org/schema/beans/spring-beans.xsd">

	<bean class="com.testfan.ioc.User" id="user" scope="singleton"></bean>
</beans>
第二种方式:
注解加包扫描
@Component //注解
public class Car {

	private Car() {
		System.out.println("create Car ");
	}

}
xml配置中添加包扫描
	  <!-- 对象第二种管理方式包扫描  -->
    <context:component-scan
		base-package="com.testfan.ioc" />
注意会爆红:
补全xml的表头
<?xml version="1.0" encoding="UTF-8"?>
<beans xmlns="http://www.springframework.org/schema/beans"
	xmlns:xsi="http://www.w3.org/2001/XMLSchema-instance"
	xmlns:context="http://www.springframework.org/schema/context"
	xsi:schemaLocation="http://www.springframework.org/schema/beans
	http://www.springframework.org/schema/beans/spring-beans.xsd
	http://www.springframework.org/schema/context
	http://www.springframework.org/schema/context/spring-context.xsd">
调用
Car car = (Car) context.getBean("car"); //by name
User user =(User) context.getBean(Car.class);//by type
System.out.println(car);
注意:
@Component 如果默认没有添加名字的话使用默认的类名小写context.getBean("car")
@Component(cartest)  默认的时候要用context.getBean("cartest")
单例模式:
spring的单例模式:
xml:
//scope="singleton"单例模式  scope="prototype"非单例模式,每次创建一个新的对象
<bean class="com.testfan.ioc.User" id="user" scope="singleton"></bean>
注解:
@Scope("prototype") 默认不添加注解就是非单例模式添加的时候就是单例模式
手写单例模式
口诀:构造方法私有化
//手写单例
public class Singleton {
	private static Singleton singleton;


	public static synchronized Singleton getSingleton() {
		if(singleton==null) {
			singleton =new Singleton();
		}
		return singleton;
	}


	private Singleton() {
		System.out.println("create Singleton ");
	}

	public static void main(String[] args) {
		Singleton singleton =new Singleton();
		Singleton singleton2 =new Singleton();
	}
}
DI:
依赖注入
第一种方法xml:
注意需要写set方法,不然会报错
	<bean class="com.testfan.ioc.User" id="user" scope="singleton">
	<property name="car" ref="cartest"></property> //配置需要注入的类名car ,ref是获取时候的名称
	</bean>
调用:
ApplicationContext context = new ClassPathXmlApplicationContext("spring1.xml");
User user =(User) context.getBean("user");
System.out.println(user.getCar());
第二种注解:
	@Autowired//注意需要写get方法,不需要set方法 by name
	@Autowired(required=flase) //如果添加了required,不检查这个类是不是存在
	private User user;

	@Resource(name="user") by type
	private User user;

	public User getUser() {
		return user;
	}
调用:
Car car = (Car) context.getBean("car");
System.out.println("user1"+car.getUser());

输出结果:
user1User [name=null, sex=null, age=0]
javabean中值的定义:
第一种:
普通值的定义
xml中添加:
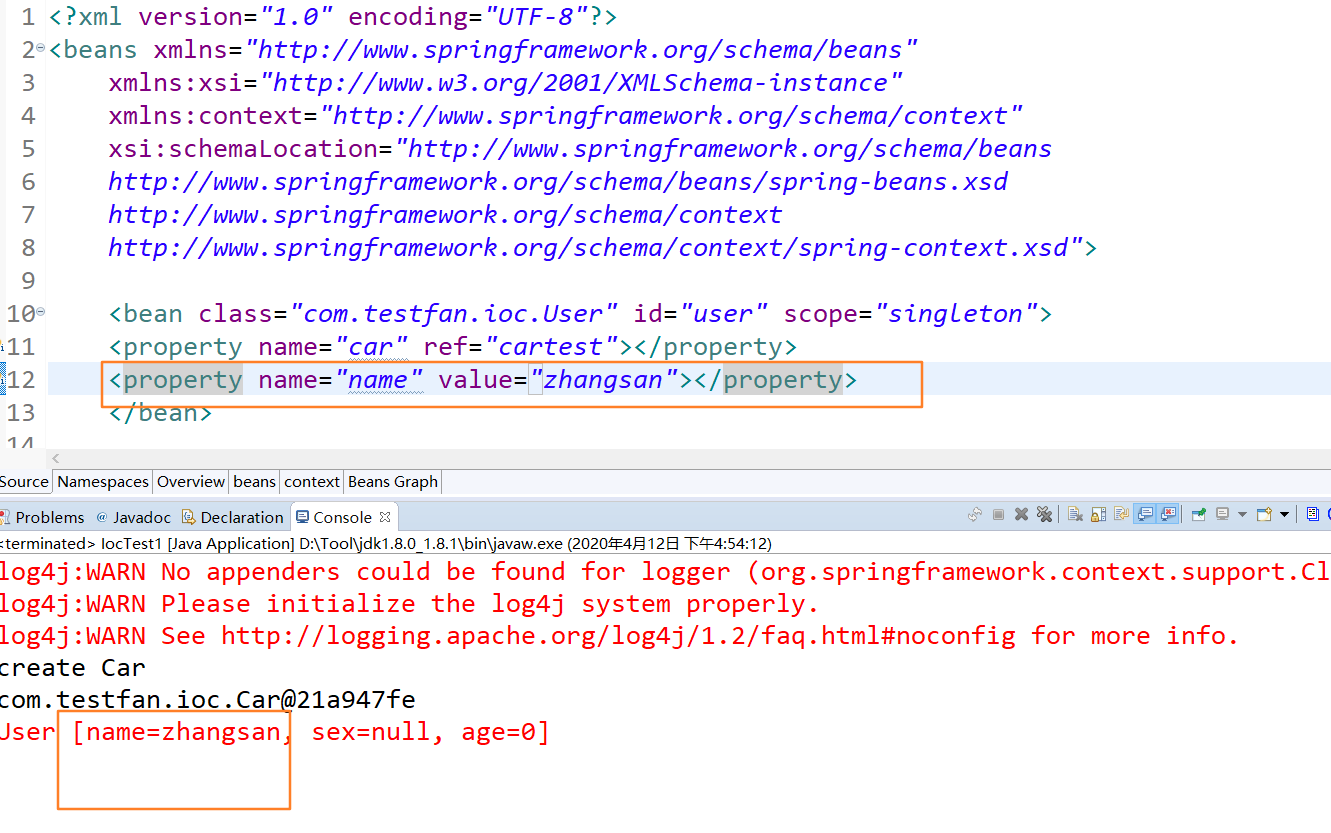
<bean class="com.testfan.ioc.User" id="user" scope="singleton">
<property name="car" ref="cartest"></property>
<property name="name" value="zhangsan"></property> //赋值给name
</bean>
list类型值添加
		<property name="carList">
			<list>
			<ref bean="cartest"/>
			<ref bean="cartest"/>
			</list>
		</property>
set类型值添加
		<property name="carSet">
			<set>
			<ref bean="cartest"/>
			<ref bean="cartest"/>
			</set>
		</property>
第二种读取properties
properties
name=u5f20u4e09u0089
num=101
xml中添加如下,用来解析properties
	<context:property-placeholder
		location="classpath*:test.properties" />
user对象
注解方式获取
@Component("cartest")
public class Car {
	@Value("${name}")
	private String name;
	@Value("${num}")
	private double price;

	public String getName() {
		return name;
	}
	public void setName(String name) {
		this.name = name;
	}
	public double getPrice() {
		return price;
	}
	public void setPrice(double price) {
		this.price = price;
	}

	@Override
	public String toString() {
		return "Car [name=" + name + ", price=" + price + "]";
	}
}
xml中的获取
<bean class="com.testfan.ioc.User" id="user" scope="singleton">
		<property name="car" ref="cartest"></property>
		<property name="name" value="${name}"></property>//通过$获取到properties中的name值
	</bean>
m(业务)v(试图jsp)c(控制)
junit集成
	<dependency>
		<groupId>junit</groupId>
		<artifactId>junit</artifactId>
		<version>4.12</version>
		<scope>test</scope>
	</dependency>
	<dependency>
        <groupId>org.springframework</groupId>
        <artifactId>spring-test</artifactId>
        <version>${org.springframework-version}</version>
        <scope>provided</scope>
    </dependency>
添加对应的注解
@RunWith(SpringJUnit4ClassRunner.class)//junit整合spring的
测试//立马开启了spring的注解
@ContextConfiguration(locations= {"classpath:spring1.xml"})//
加载核心配置文件
public class JunitTest {

	@Autowired
	User user;

	@Test
	public void test() {
		System.err.println(user);
		assertTrue("成功",true);
	}

}
testng的集成
mvn依赖
		<dependency>
            <groupId>org.springframework</groupId>
            <artifactId>spring-test</artifactId>
            <version>${org.springframework-version}</version>
            <scope>provided</scope>
        </dependency>
              <dependency>
            <groupId>org.testng</groupId>
            <artifactId>testng</artifactId>
			<version>${testng.version}</version>
            <scope>test</scope>
        </dependency>
代码实列:
@ContextConfiguration(locations = { "classpath:spring1.xml" })//添加对应的注解
public class NewTest {
//	@Autowired
//	Car car;

	@Test
	public void f() {
		ApplicationContext context = new ClassPathXmlApplicationContext("spring1.xml");
		Car car = (Car) context.getBean("cartest");
		System.out.println("user"+car.getUser());
	}

}
spring_jdbctemplate(数据库)
mvn依赖包
<dependency>
<groupId>org.springframework</groupId>
<artifactId>spring-jdbc</artifactId>
<version> 当前系统版本 </version>
<scope>provided</scope>
</dependency>
	</dependency>
			<dependency>
			<groupId>com.mchange</groupId>
			<artifactId>c3p0</artifactId>
			<version>0.9.5.4</version>
		</dependency>
		<dependency>
			<groupId>mysql</groupId>
			<artifactId>mysql-connector-java</artifactId>
			<version>8.0.18</version>
		</dependency>
当前版本一般是指spring的版本号:
${org.springframework-version}
jdbc.properties配置文件配置
jdbc.driverClass=com.mysql.cj.jdbc.Driver
jdbc.url=jdbc:mysql://118.24.13.38:3308/goods?characterEncoding=utf-8&useSSL=false
jdbc.username=zhangsan
jdbc.password=123123
jdbc.initPoolSize=5
jdbc.maxPoolSize=10
spring-db.xml文件配置
<?xml version="1.0" encoding="UTF-8"?>
<beans xmlns="http://www.springframework.org/schema/beans"
	xmlns:xsi="http://www.w3.org/2001/XMLSchema-instance"
	xmlns:context="http://www.springframework.org/schema/context"
	xsi:schemaLocation="http://www.springframework.org/schema/beans
	http://www.springframework.org/schema/beans/spring-beans.xsd
	http://www.springframework.org/schema/context http://www.springframework.org/schema/context/spring-context.xsd">
	<!-- 导入资源文件 -->
	<context:property-placeholder location="classpath:jdbc.properties"/>

	<!-- 配置 c3p0 数据源 -->
	<bean id="dataSource"
		class="com.mchange.v2.c3p0.ComboPooledDataSource">
		<property name="user" value="${jdbc.username}"></property>
		<property name="password" value="${jdbc.password}"></property>
		<property name="jdbcUrl" value="${jdbc.url}"></property>
		<property name="driverClass" value="${jdbc.driverClass}"></property>
		<property name="initialPoolSize" value="${jdbc.initPoolSize}"></property>
		<property name="maxPoolSize" value="${jdbc.maxPoolSize}"></property>
	</bean>

	<!-- 配置 spring 的 JdbcTemplate -->
	<bean id="jdbcTemplate"
		class="org.springframework.jdbc.core.JdbcTemplate">
		<property name="dataSource" ref="dataSource"></property>
	</bean>


</beans>
代码:
TestUserd对象
package com.testfan.jdbc;


/**
 * @author pc
 *
 */
public class TestUser {
	private String uid;
	private String loginname;
	private String loginpass;
	public String getUid() {
		return uid;
	}
	public void setUid(String uid) {
		this.uid = uid;
	}
	public String getLoginname() {
		return loginname;
	}
	public void setLoginname(String loginname) {
		this.loginname = loginname;
	}
	public String getLoginpass() {
		return loginpass;
	}
	public void setLoginpass(String loginpass) {
		this.loginpass = loginpass;
	}
	@Override
	public String toString() {
		return "TestUser [uid=" + uid + ", loginname=" + loginname + ", loginpass=" + loginpass + "]";
	}
}
jdbc代码实现
import java.util.List;
import java.util.Map;

import org.junit.Test;
import org.junit.runner.RunWith;
import org.springframework.beans.factory.annotation.Autowired;
import org.springframework.jdbc.core.BeanPropertyRowMapper;
import org.springframework.jdbc.core.JdbcTemplate;
import org.springframework.jdbc.core.RowMapper;
import org.springframework.test.context.ContextConfiguration;
import org.springframework.test.context.junit4.SpringJUnit4ClassRunner;

@RunWith(SpringJUnit4ClassRunner.class)
@ContextConfiguration(locations = {"classpath:spring-db.xml"})
public class SpringJdbcTest {

	@Autowired
	JdbcTemplate jdbcTemplate;

	@Test
	public void testUpdate() {
		String sql = "UPDATE t_user_test SET loginname = ? WHERE uid = ?";
		jdbcTemplate.update(sql, "test1","1");
	}

	@Test
	public void testQueryOne() {
		String sql = "select * from t_user_test where uid =?";
		RowMapper<TestUser> rowMapper = new BeanPropertyRowMapper<>(TestUser.class);
		TestUser user = jdbcTemplate.queryForObject(sql, rowMapper,"1");
		System.out.println(user);
	}

	@Test
	public void testQueryForList() {
		String sql = "select * from t_user_test";
		RowMapper<TestUser> rowMapper = new BeanPropertyRowMapper<>(TestUser.class);
		List<TestUser> user = jdbcTemplate.query(sql, rowMapper);
		System.out.println(user.size());
	}

	@Test
	public  void testQueryMap() {
		String sql = "select * from t_user_test";
		List<Map<String, Object>> user = jdbcTemplate.queryForList(sql);
		System.out.println(user);
	}


}
