Requests
Requests 是使用 Apache2 Licensed 许可证的 基于Python开发的HTTP 库,其在Python内置模块的基础上进行了高度的封装,从而使得Pythoner进行网络请求时,变得美好了许多,使用Requests可以轻而易举的完成浏览器可有的任何操作。
功能特性:
- Keep-Alive & 连接池
- 国际化域名和 URL
- 带持久 Cookie 的会话
- 浏览器式的 SSL 认证
- 自动内容解码
- 基本/摘要式的身份认证
- 优雅的 key/value Cookie
- 自动解压
- Unicode 响应体
- HTTP(S) 代理支持
- 文件分块上传
- 流下载
- 连接超时
- 分块请求
- 支持
.netrc


 1 from . import sessions
 2
 3 # 方法
 4 def request(method, url, **kwargs):
 5    “”很长的一段注释“”
 6     with sessions.Session() as session:
 7         return session.request(method=method, url=url, **kwargs)
 8
 9 # 下面的方法都基于request实现
10 def get(url, params=None, **kwargs):
11     pass
12
13 def options(url, **kwargs):
14     pass
15
16 def head(url, **kwargs):
17     pass
18
19 def post(url, data=None, json=None, **kwargs):
20     pass
21
22 def put(url, data=None, **kwargs):
23     pass
24
25 def patch(url, data=None, **kwargs):
26     pass
27
28 def delete(url, **kwargs):
29     pass
 1 def request(method, url, **kwargs):
 2     """Constructs and sends a :class:`Request <Request>`.
 3
 4     :param method: method for the new :class:`Request` object.
 5     :param url: URL for the new :class:`Request` object.
 6     :param params: (optional) Dictionary, list of tuples or bytes to send
 7         in the body of the :class:`Request`.
 8     :param data: (optional) Dictionary, list of tuples, bytes, or file-like
 9         object to send in the body of the :class:`Request`.
10     :param json: (optional) A JSON serializable Python object to send in the body of the :class:`Request`.
11     :param headers: (optional) Dictionary of HTTP Headers to send with the :class:`Request`.
12     :param cookies: (optional) Dict or CookieJar object to send with the :class:`Request`.
13     :param files: (optional) Dictionary of ``'name': file-like-objects`` (or ``{'name': file-tuple}``) for multipart encoding upload.
14         ``file-tuple`` can be a 2-tuple ``('filename', fileobj)``, 3-tuple ``('filename', fileobj, 'content_type')``
15         or a 4-tuple ``('filename', fileobj, 'content_type', custom_headers)``, where ``'content-type'`` is a string
16         defining the content type of the given file and ``custom_headers`` a dict-like object containing additional headers
17         to add for the file.
18     :param auth: (optional) Auth tuple to enable Basic/Digest/Custom HTTP Auth.
19     :param timeout: (optional) How many seconds to wait for the server to send data
20         before giving up, as a float, or a :ref:`(connect timeout, read
21         timeout) <timeouts>` tuple.
22     :type timeout: float or tuple
23     :param allow_redirects: (optional) Boolean. Enable/disable GET/OPTIONS/POST/PUT/PATCH/DELETE/HEAD redirection. Defaults to ``True``.
24     :type allow_redirects: bool
25     :param proxies: (optional) Dictionary mapping protocol to the URL of the proxy.
26     :param verify: (optional) Either a boolean, in which case it controls whether we verify
27             the server's TLS certificate, or a string, in which case it must be a path
28             to a CA bundle to use. Defaults to ``True``.
29     :param stream: (optional) if ``False``, the response content will be immediately downloaded.
30     :param cert: (optional) if String, path to ssl client cert file (.pem). If Tuple, ('cert', 'key') pair.
31     :return: :class:`Response <Response>` object
32     :rtype: requests.Response
33
34     Usage::
35
36       >>> import requests
37       >>> req = requests.request('GET', 'https://httpbin.org/get')
38       <Response [200]>
39     """
40
41     # By using the 'with' statement we are sure the session is closed, thus we
42     # avoid leaving sockets open which can trigger a ResourceWarning in some
43     # cases, and look like a memory leak in others.
44     with sessions.Session() as session:
45         return session.request(method=method, url=url, **kwargs)
  1 def param_method_url():
  2     # requests.request(method='get', url='http://127.0.0.1:8000/test/')
  3     # requests.request(method='post', url='http://127.0.0.1:8000/test/')
  4     pass
  5
  6
  7 def param_param():
  8     # - 可以是字典
  9     # - 可以是字符串
 10     # - 可以是字节(ascii编码以内)
 11
 12     # requests.request(method='get',
 13     # url='http://127.0.0.1:8000/test/',
 14     # params={'k1': 'v1', 'k2': '水电费'})
 15
 16     # requests.request(method='get',
 17     # url='http://127.0.0.1:8000/test/',
 18     # params="k1=v1&k2=水电费&k3=v3&k3=vv3")
 19
 20     # requests.request(method='get',
 21     # url='http://127.0.0.1:8000/test/',
 22     # params=bytes("k1=v1&k2=k2&k3=v3&k3=vv3", encoding='utf8'))
 23
 24     # 错误
 25     # requests.request(method='get',
 26     # url='http://127.0.0.1:8000/test/',
 27     # params=bytes("k1=v1&k2=水电费&k3=v3&k3=vv3", encoding='utf8'))
 28     pass
 29
 30
 31 def param_data():
 32     # 可以是字典
 33     # 可以是字符串
 34     # 可以是字节
 35     # 可以是文件对象
 36
 37     # requests.request(method='POST',
 38     # url='http://127.0.0.1:8000/test/',
 39     # data={'k1': 'v1', 'k2': '水电费'})
 40
 41     # requests.request(method='POST',
 42     # url='http://127.0.0.1:8000/test/',
 43     # data="k1=v1; k2=v2; k3=v3; k3=v4"
 44     # )
 45
 46     # requests.request(method='POST',
 47     # url='http://127.0.0.1:8000/test/',
 48     # data="k1=v1;k2=v2;k3=v3;k3=v4",
 49     # headers={'Content-Type': 'application/x-www-form-urlencoded'}
 50     # )
 51
 52     # requests.request(method='POST',
 53     # url='http://127.0.0.1:8000/test/',
 54     # data=open('data_file.py', mode='r', encoding='utf-8'), # 文件内容是:k1=v1;k2=v2;k3=v3;k3=v4
 55     # headers={'Content-Type': 'application/x-www-form-urlencoded'}
 56     # )
 57     pass
 58
 59
 60 def param_json():
 61     # 将json中对应的数据进行序列化成一个字符串,json.dumps(...)
 62     # 然后发送到服务器端的body中,并且Content-Type是 {'Content-Type': 'application/json'}
 63     requests.request(method='POST',
 64                      url='http://127.0.0.1:8000/test/',
 65                      json={'k1': 'v1', 'k2': '水电费'})
 66
 67
 68 def param_headers():
 69     # 发送请求头到服务器端
 70     requests.request(method='POST',
 71                      url='http://127.0.0.1:8000/test/',
 72                      json={'k1': 'v1', 'k2': '水电费'},
 73                      headers={'Content-Type': 'application/x-www-form-urlencoded'}
 74                      )
 75
 76
 77 def param_cookies():
 78     # 发送Cookie到服务器端
 79     requests.request(method='POST',
 80                      url='http://127.0.0.1:8000/test/',
 81                      data={'k1': 'v1', 'k2': 'v2'},
 82                      cookies={'cook1': 'value1'},
 83                      )
 84     # 也可以使用CookieJar(字典形式就是在此基础上封装)
 85     from http.cookiejar import CookieJar
 86     from http.cookiejar import Cookie
 87
 88     obj = CookieJar()
 89     obj.set_cookie(Cookie(version=0, name='c1', value='v1', port=None, domain='', path='/', secure=False, expires=None,
 90                           discard=True, comment=None, comment_url=None, rest={'HttpOnly': None}, rfc2109=False,
 91                           port_specified=False, domain_specified=False, domain_initial_dot=False, path_specified=False)
 92                    )
 93     requests.request(method='POST',
 94                      url='http://127.0.0.1:8000/test/',
 95                      data={'k1': 'v1', 'k2': 'v2'},
 96                      cookies=obj)
 97
 98
 99 def param_files():
100     # 发送文件
101     # file_dict = {
102     # 'f1': open('readme', 'rb')
103     # }
104     # requests.request(method='POST',
105     # url='http://127.0.0.1:8000/test/',
106     # files=file_dict)
107
108     # 发送文件,定制文件名
109     # file_dict = {
110     # 'f1': ('test.txt', open('readme', 'rb'))
111     # }
112     # requests.request(method='POST',
113     # url='http://127.0.0.1:8000/test/',
114     # files=file_dict)
115
116     # 发送文件,定制文件名
117     # file_dict = {
118     # 'f1': ('test.txt', "hahsfaksfa9kasdjflaksdjf")
119     # }
120     # requests.request(method='POST',
121     # url='http://127.0.0.1:8000/test/',
122     # files=file_dict)
123
124     # 发送文件,定制文件名
125     # file_dict = {
126     #     'f1': ('test.txt', "hahsfaksfa9kasdjflaksdjf", 'application/text', {'k1': '0'})
127     # }
128     # requests.request(method='POST',
129     #                  url='http://127.0.0.1:8000/test/',
130     #                  files=file_dict)
131
132     pass
133
134
135 def param_auth():
136     from requests.auth import HTTPBasicAuth, HTTPDigestAuth
137
138     ret = requests.get('https://api.github.com/user', auth=HTTPBasicAuth('wupeiqi', 'sdfasdfasdf'))
139     print(ret.text)
140
141     # ret = requests.get('http://192.168.1.1',
142     # auth=HTTPBasicAuth('admin', 'admin'))
143     # ret.encoding = 'gbk'
144     # print(ret.text)
145
146     # ret = requests.get('http://httpbin.org/digest-auth/auth/user/pass', auth=HTTPDigestAuth('user', 'pass'))
147     # print(ret)
148     #
149
150
151 def param_timeout():
152     # ret = requests.get('http://google.com/', timeout=1)
153     # print(ret)
154
155     # ret = requests.get('http://google.com/', timeout=(5, 1))
156     # print(ret)
157     pass
158
159
160 def param_allow_redirects():
161     ret = requests.get('http://127.0.0.1:8000/test/', allow_redirects=False)
162     print(ret.text)
163
164
165 def param_proxies():
166     # proxies = {
167     # "http": "61.172.249.96:80",
168     # "https": "http://61.185.219.126:3128",
169     # }
170
171     # proxies = {'http://10.20.1.128': 'http://10.10.1.10:5323'}
172
173     # ret = requests.get("http://www.proxy360.cn/Proxy", proxies=proxies)
174     # print(ret.headers)
175
176
177     # from requests.auth import HTTPProxyAuth
178     #
179     # proxyDict = {
180     # 'http': '77.75.105.165',
181     # 'https': '77.75.105.165'
182     # }
183     # auth = HTTPProxyAuth('username', 'mypassword')
184     #
185     # r = requests.get("http://www.google.com", proxies=proxyDict, auth=auth)
186     # print(r.text)
187
188     pass
189
190
191 def param_stream():
192     ret = requests.get('http://127.0.0.1:8000/test/', stream=True)
193     print(ret.content)
194     ret.close()
195
196     # from contextlib import closing
197     # with closing(requests.get('http://httpbin.org/get', stream=True)) as r:
198     # # 在此处理响应。
199     # for i in r.iter_content():
200     # print(i)
201
202
203 def requests_session():
204     import requests
205
206     session = requests.Session()
207
208     ### 1、首先登陆任何页面,获取cookie
209
210     i1 = session.get(url="http://dig.chouti.com/help/service")
211
212     ### 2、用户登陆,携带上一次的cookie,后台对cookie中的 gpsd 进行授权
213     i2 = session.post(
214         url="http://dig.chouti.com/login",
215         data={
216             'phone': "8615131255089",
217             'password': "xxxxxx",
218             'oneMonth': ""
219         }
220     )
221
222     i3 = session.post(
223         url="http://dig.chouti.com/link/vote?linksId=8589623",
224     )
225     print(i3.text)
使用注意:
# post中的参数json会自动序列化,但是转成字节的时候会使用Latin编码,造成中文无法显示,可以自己序列化转成字节,通过data参数,传参,json参数处理好后也是传给data参数
rep = requests.post(url_send_msged,data=bytes(json.dumps(data_dict,ensure_ascii=False),encoding='utf8'))
response.text
类型:str
解码类型: 根据HTTP 头部对响应的编码作出有根据的推测,推测的文本编码
如何修改编码方式:response.encoding=”gbk”

response.content
类型:bytes
解码类型: 没有指定
如何修改编码方式:response.content.deocde(“utf8”)
 1 #data:
 2     request.post(
 3         url='xx',
 4         data={'k1':'v1,'k2':'v2'}
 5     )
 6     #数据:POST /  http1.1
Content-type:urlencode-form.......

k1=v1&k2=v2
 7
 8
 9     request.post(
10         url='xx',
11         data=json.dumps({'k1':'v1,'k2':'v2'})
12     )
13     #数据: POST /  http1.1
....

{'k1':'v1,'k2':'v2'}
14
15     request.post(
16         url='xx',
17         data=b'asdfasdf'
18     )
19     #数据: POST /  http1.1
....

'asdfasdf'
20 # json:
21     request.post(
22         url='xx',
23         json={'k1':'v1,'k2':'v2'} # 只接受字典
24     )
25     #数据: POST /  http1.1
Content-type:application/json....

{'k1':'v1,'k2':'v2'}
26
27 post请求data,json不同的传参请求协议
 1 #方式一:
 2     request.post(
 3         url='xx',
 4         data={'k1':'v1,'k2':'v2'}
 5     )
 6     #数据:  POST /  http1.1
Content-type:urlencode-form.......

k1=v1&k2=v2
 7
 8
 9     request.POST必然可以获取到值。
10         - content-type: urlencode-form
11         - 数据格式:k1=v1&k2=v2
12
13 #方式二:
14     request.post(
15         url='xx',
16         json={'k1':'v1,'k2':'v2'}
17     )
18     #数据:  POST /  http1.1
Content-type:application/json....

{'k1':'v1,'k2':'v2'}
19     request.body
20         字节 = {'k1':'v1,'k2':'v2'}
21         字节转换字符串
22         反序列化字符串 -> 字典
23
BeautifulSoup
Beautiful Soup 是一个可以从HTML或XML文件中提取数据的Python库.它能够通过你喜欢的转换器实现惯用的文档导航,查找,修改文档的方式.Beautiful Soup会帮你节省数小时甚至数天的工作时间.
pip3 install beautifulsoup4 # 注意不要安装错了
 1 from bs4 import BeautifulSoup
 2
 3 html_doc = """
 4 <html><head><title>The Dormouse's story</title></head>
 5 <body>
 6 asdf
 7     <div class="title">
 8         <b>The Dormouse's story总共</b>
 9         <h1>f</h1>
10     </div>
11 <div class="story">Once upon a time there were three little sisters; and their names were
12     <a  class="sister0" id="link1">Els<span>f</span>ie</a>,
13     <a href="http://example.com/lacie" class="sister" id="link2">Lacie</a> and
14     <a href="http://example.com/tillie" class="sister" id="link3">Tillie</a>;
15 and they lived at the bottom of a well.</div>
16 ad<br/>sf
17 <p class="story">...</p>
18 </body>
19 </html>
20 """
21
22 soup = BeautifulSoup(html_doc, features="lxml")
23 # 找到第一个a标签
24 tag1 = soup.find(name='a')
25 # 找到所有的a标签
26 tag2 = soup.find_all(name='a')
27 # 找到id=link2的标签
28 tag3 = soup.select('#link2')
 1 # 遍历文档树:即直接通过标签名字选择,特点是选择速度快,但如果存在多个相同的标签则只返回第一个
 2 html_doc = """
 3 <html><head><title>The Dormouse's story</title></head>
 4 <body>
 5 <p id="my p" class="title"><b id="bbb" class="boldest">The Dormouse's story</b></p>
 6
 7 <p class="story">Once upon a time there were three little sisters; and their names were
 8 <a href="http://example.com/elsie" class="sister" id="link1">Elsie</a>,
 9 <a href="http://example.com/lacie" class="sister" id="link2">Lacie</a> and
10 <a href="http://example.com/tillie" class="sister" id="link3">Tillie</a>;
11 and they lived at the bottom of a well.
12 </p>
13
14 <p class="story">...</p>
15 """
16
17 # 1、用法
18 from bs4 import BeautifulSoup
19
20 soup = BeautifulSoup(html_doc, 'lxml')
21 # soup=BeautifulSoup(open('a.html'),'lxml')
22
23 print(soup.p)  # 存在多个相同的标签则只返回第一个 <p class="title" id="my p"><b class="boldest" id="bbb">The Dormouse's story</b></p>
24
25
26 # 2、获取标签的名称
27 print(soup.p.name,type(soup.p.name))   # p <class 'str'>
28
29 # 3、获取标签的属性
30 print(soup.p.attrs)  # {'id': 'my p', 'class': ['title']}
31
32 # 4、获取标签的内容
33 print(soup.p.string)  # p下的文本只有一个时,取到,否则为None           The Dormouse's story
34 print(soup.p.strings)  # 拿到一个生成器对象, 取到p下所有的文本内容     <generator object _all_strings at 0x000001DE2DBA83B8>
35 print(soup.p.text)  # 取到p下所有的文本内容                            The Dormouse's story
36 for line in soup.stripped_strings:  # 取标签中的内容并去掉空白,全部是空格的行会被忽略掉,段首和段末的空白会被删除
37     print(line)
38
39 '''
40 如果tag包含了多个子节点,tag就无法确定 .string 方法应该调用哪个子节点的内容, .string 的输出结果是 None,如果只有一个子节点那么就输出该子节点的文本,比如下面的这种结构,soup.p.string 返回为None,但soup.p.strings就可以找到所有文本
41 <p id='list-1'>
42     哈哈哈哈
43     <a class='sss'>
44         <span>
45             <h1>aaaa</h1>
46         </span>
47     </a>
48     <b>bbbbb</b>
49 </p>
50 '''
51
52 # 5、嵌套选择
53 print(soup.head.title.string)   # The Dormouse's story
54 print(soup.body.a.string)  # Elsie
55
56 # 6、子节点、子孙节点
57 print(soup.p.contents)  # p下所有子节点   [<b class="boldest" id="bbb">The Dormouse's story</b>]
58 print(soup.p.children)  # 得到一个迭代器,包含p下所有子节点 <list_iterator object at 0x000001E9AE8F2DD8>
59
60 for i, child in enumerate(soup.p.children):
61     print(i, child)
62
63 print(soup.p.descendants)  # 获取子孙节点,p下所有的标签都会选择出来  <generator object descendants at 0x0000015EDA4F82B0>
64 for i, child in enumerate(soup.p.descendants):
65     print(i, child)
66
67 # 7、父节点、祖先节点
68 print(soup.a.parent)  # 获取a标签的父节点  <p class="story">Once upon a tie... <a ...</a>, <a class="ser...nk2">Lacie</a> and .....</p>
69 print(soup.a.parents)  # 找到a标签所有的祖先节点,父亲的父亲,父亲的父亲的父亲...  <generator object parents at 0x00000250B4CB82B0>
70
71 # 8、兄弟节点
72 print('=====>')
73 print(soup.a.next_sibling)  # 下一个兄弟       ,
74 print(soup.a.previous_sibling)  # 上一个兄弟   Once upon a time there were three little sisters; and their names were
75
76 print(soup.a.next_siblings)  # 下面的兄弟们=>生成器对象      <generator object next_siblings at 0x000002653C5282B0>
77 print(soup.a.previous_siblings)  # 上面的兄弟们=>生成器对象  <generator object previous_siblings at 0x000002A2537F82B0>
搜索文档树
 1 # 搜索文档树:BeautifulSoup定义了很多搜索方法,这里着重介绍2个: find() 和 find_all() .其它方法的参数和用法类似
 2 html_doc = """
 3 <html><head><title>The Dormouse's story</title></head>
 4 <body>
 5 <p id="my p" class="title"><b id="bbb" class="boldest">The Dormouse's story</b>
 6 </p>
 7
 8 <p class="story">Once upon a time there were three little sisters; and their names were
 9 <a href="http://example.com/elsie" class="sister" id="link1">Elsie</a>,
10 <a href="http://example.com/lacie" class="sister" id="link2">Lacie</a> and
11 <a href="http://example.com/tillie" class="sister" id="link3">Tillie</a>;
12 and they lived at the bottom of a well.</p>
13
14 <p class="story">...</p>
15 """
16
17 from bs4 import BeautifulSoup
18 soup=BeautifulSoup(html_doc,'lxml')
19
20 #1.1、字符串:即标签名
21 print(soup.find_all('b'))  # [<b class="boldest" id="bbb">The Dormouse's story</b>]
22
23 #1.2、正则表达式
24 import re
25 print(soup.find_all(re.compile('^b'))) #找出b开头的标签,结果有body和b标签  [<body>...</body>,<b clas ... </b>]
26
27 #1.3、列表:如果传入列表参数,Beautiful Soup会将与列表中任一元素匹配的内容返回.下面代码找到文档中所有<a>标签和<b>标签:
28 print(soup.find_all(['a','b']))
29
30 #1.4、True:可以匹配任何值,下面代码查找到所有的tag,但是不会返回字符串节点
31 print(soup.find_all(True))
32 for tag in soup.find_all(True):
33     print(tag.name)
34
35 #1.5、方法:如果没有合适过滤器,那么还可以定义一个方法,方法只接受一个元素参数 ,
36 # 如果这个方法返回 True 表示当前元素匹配并且被找到,如果不是则反回 False
37 def has_class_but_no_id(tag):
38     return tag.has_attr('class') and not tag.has_attr('id')
39
40 print(soup.find_all(has_class_but_no_id))
# 搜索文档树:BeautifulSoup定义了很多搜索方法,这里着重介绍2个: find() 和 find_all() .其它方法的参数和用法类似
html_doc = """
<html><head><title>The Dormouse's story</title></head>
<body>
<p id="my p" class="title"><b id="bbb" class="boldest">The Dormouse's story</b>
</p>

<p class="story">Once upon a time there were three little sisters; and their names were
<a href="http://example.com/elsie" class="sister" id="link1">Elsie</a>,
<a href="http://example.com/lacie" class="sister" id="link2">Lacie</a> and
<a href="http://example.com/tillie" class="sister" id="link3">Tillie</a>;
and they lived at the bottom of a well.</p>

<p class="story">...</p>
"""

from bs4 import BeautifulSoup
import re
soup = BeautifulSoup(html_doc, 'lxml')

# 2、find_all( name , attrs , recursive , text , **kwargs )  name 参数可以查找所有名字为 name 的tag,字符串对象会被自动忽略掉.
# 2.1、name: 搜索name参数的值可以使任一类型的 过滤器 ,字符串,正则表达式,列表,方法或是 True .
print(soup.find_all(name=re.compile('^t')))

# 2.2、keyword: key=value的形式,value可以是过滤器:字符串 , 正则表达式 , 列表, True .
print(soup.find_all(id=re.compile('my')))
print(soup.find_all(href=re.compile('lacie'), id=re.compile('d')))  # 注意类要用class_
print(soup.find_all(id=True))  # 查找有id属性的标签

# 有些tag属性在搜索不能使用,比如HTML5中的 data-* 属性:
data_soup = BeautifulSoup('<div data-foo="value">foo!</div>', 'lxml')
# data_soup.find_all(data-foo="value") #报错:SyntaxError: keyword can't be an expression
# 但是可以通过 find_all() 方法的 attrs 参数定义一个字典参数来搜索包含特殊属性的tag:
print(data_soup.find_all(attrs={"data-foo": "value"})) # [<div data-foo="value">foo!</div>]


# 2.3、按照类名查找,注意关键字是class_,class_=value,value可以是五种选择器之一
print(soup.find_all('a', class_='sister'))  # 查找类为sister的a标签
print(soup.find_all('a', class_='sister ssss'))  # 查找类为sister和sss的a标签,顺序错误也匹配不成功  []
print(soup.find_all(class_=re.compile('^sis')))  # 查找类为sister的所有标签

# 2.4、attrs
print(soup.find_all('p', attrs={'class': 'story'}))

# 2.5、text: 值可以是:字符,列表,True,正则
print(soup.find_all(text='Elsie'))
print(soup.find_all('a', text='Elsie'))

# 2.6、limit参数:如果文档树很大那么搜索会很慢.如果我们不需要全部结果,可以使用 limit 参数限制返回结果的数量.效果与SQL中的limit关键字类似,当搜索到的结果数量达到 limit 的限制时,就停止搜索返回结果
print(soup.find_all('a', limit=2))

# 2.7、recursive:调用tag的 find_all() 方法时,Beautiful Soup会检索当前tag的所有子孙节点,如果只想搜索tag的直接子节点,可以使用参数 recursive=False .
print(soup.html.find_all('a'))
print(soup.html.find_all('a', recursive=False))    # []

'''
像调用 find_all() 一样调用tag
find_all() 几乎是Beautiful Soup中最常用的搜索方法,所以我们定义了它的简写方法. BeautifulSoup 对象和 tag 对象可以被当作一个方法来使用,这个方法的执行结果与调用这个对象的 find_all() 方法相同,下面两行代码是等价的:
soup.find_all("a")
soup("a")
这两行代码也是等价的:
soup.title.find_all(text=True)     ["The Dormouse's story"]
soup.title(text=True)              ["The Dormouse's story"]
'''
 1 # 搜索文档树:BeautifulSoup定义了很多搜索方法,这里着重介绍2个: find() 和 find_all() .其它方法的参数和用法类似
 2 html_doc = """
 3 <html><head><title>The Dormouse's story</title></head>
 4 <body>
 5 <p id="my p" class="title"><b id="bbb" class="boldest">The Dormouse's story</b>
 6 </p>
 7
 8 <p class="story">Once upon a time there were three little sisters; and their names were
 9 <a href="http://example.com/elsie" class="sister" id="link1">Elsie</a>,
10 <a href="http://example.com/lacie" class="sister" id="link2">Lacie</a> and
11 <a href="http://example.com/tillie" class="sister" id="link3">Tillie</a>;
12 and they lived at the bottom of a well.</p>
13
14 <p class="story">...</p>
15 """
16
17 from bs4 import BeautifulSoup
18 import re
19 soup = BeautifulSoup(html_doc, 'lxml')
20
21 #3、find( name , attrs , recursive , text , **kwargs )
22 # find_all() 方法将返回文档中符合条件的所有tag,尽管有时候我们只想得到一个结果.比如文档中只有一个<body>标签,
23 # 那么使用 find_all() 方法来查找<body>标签就不太合适, 使用 find_all 方法并设置 limit=1 参数不如直接使用 find() 方法.下面两行代码是等价的:
24
25 soup.find_all('title', limit=1) # [<title>The Dormouse's story</title>]
26 soup.find('title')  # <title>The Dormouse's story</title>
27
28 # 唯一的区别是 find_all() 方法的返回结果是值包含一个元素的列表,而 find() 方法直接返回结果.
29 # find_all() 方法没有找到目标是返回空列表, find() 方法找不到目标时,返回 None .
30 print(soup.find("nosuchtag")) # None
31
32 # soup.head.title 是 tag的名字 方法的简写.这个简写的原理就是多次调用当前tag的 find() 方法:
33
34 soup.head.title                     # <title>The Dormouse's story</title>
35 soup.find("head").find("title")     # <title>The Dormouse's story</title>
36 soup.a.text                         #  Elsie
 1 # 该模块提供了select方法来支持css,详见官网:https://www.crummy.com/software/BeautifulSoup/bs4/doc/index.zh.html#id37
 2 html_doc = """
 3 <html><head><title>The Dormouse's story</title></head>
 4 <body>
 5 <p class="title">
 6     <b>The Dormouse's story</b>
 7     Once upon a time there were three little sisters; and their names were
 8     <a href="http://example.com/elsie" class="sister" id="link1">
 9         <span>Elsie</span>
10     </a>
11     <a href="http://example.com/lacie" class="sister" id="link2">Lacie</a> and
12     <a href="http://example.com/tillie" class="sister" id="link3">Tillie</a>;
13     <div class='panel-1'>
14         <ul class='list' id='list-1'>
15             <li class='element'>Foo</li>
16             <li class='element'>Bar</li>
17             <li class='element'>Jay</li>
18         </ul>
19         <ul class='list list-small' id='list-2'>
20             <li class='element'><h1 class='yyyy'>Foo</h1></li>
21             <li class='element xxx'>Bar</li>
22             <li class='element'>Jay</li>
23         </ul>
24     </div>
25     and they lived at the bottom of a well.
26 </p>
27 <p class="story">...</p>
28 """
29 from bs4 import BeautifulSoup
30 soup=BeautifulSoup(html_doc,'lxml')
31
32 #1、CSS选择器
33 print(soup.p.select('.sister'))
34 print(soup.select('.sister span'))
35
36 print(soup.select('#link1'))
37 print(soup.select('#link1 span'))
38
39 print(soup.select('#list-2 .element.xxx'))
40
41 print(soup.select('#list-2')[0].select('.element')) #可以一直select,但其实没必要,一条select就可以了
42
43 # 2、获取属性
44 print(soup.select('#list-2 h1')[0].attrs)   # {'class': ['yyyy']}
45
46 # 3、获取内容
47 print(soup.select('#list-2 h1')[0].get_text())
修改文档树
https://www.crummy.com/software/BeautifulSoup/bs4/doc/index.zh.html#id40
bs总结:
1、推荐使用lxml解析库
2、讲了三种选择器:标签选择器,find与find_all,css选择器
    1、标签选择器筛选功能弱,但是速度快
    2、建议使用find,find_all查询匹配单个结果或者多个结果
    3、如果对css选择器非常熟悉建议使用select
3、记住常用的获取属性attrs和文本值get_text()的方法
selenium
selenium是一个浏览器自动化测试工具,它直接运行在浏览器中,就像真正的用户在操作浏览器一样,可以在各大操作系统平台,以及各大主流浏览器上运行。
它的本质是通过驱动浏览器,完全模拟浏览器的操作,比如跳转、输入、点击、下拉等,来拿到网页渲染之后的结果
爬虫中使用它主要是为了解决其它模块无法直接执行JavaScript代码的问题
文档:https://selenium-python.readthedocs.io/
 1 import time
 2 from selenium import webdriver
 3 driver=webdriver.Chrome() # 弹出浏览器
 4 try:
 5     driver.get('https://www.baidu.com')
 6     # 隐示等待 所有找标签的操作的时候,没有加载就等5秒(常用)     相应的还有显示等待 元素没加载出来,就等几秒(少用)
 7     driver.implicitly_wait(5)
 8     # input = driver.find_element_by_id('kw')
 9     # input.send_keys('python')
10     # input.clear()
11     time.sleep(10)
12     input = driver.find_element_by_id('kw')
13
14     login_tag = driver.find_element_by_link_text('登录') # 带链接的登录元素
15     login_tag.click()
16     # find_element_by_partial_link_text 模糊查找
17     # login_tag = driver.find_element_by_partial_link_text('录')
18
19     user_login = driver.find_element_by_id('TANGRAM__PSP_10__footerULoginBtn')
20     user_login.click()
21
22     user_input = driver.find_element_by_id('TANGRAM__PSP_10__userName')
23     pwd_input=driver.find_element_by_name('password')
24     user_input.send_keys('cpp')
25     pwd_input.send_keys('123')
26
27     submit_btn=driver.find_element_by_id('TANGRAM__PSP_10__submit')
28     submit_btn.click()
29     time.sleep(3)
30
31 except Exception as e:
32     print(e)
33 finally:
34     driver.close()
 1 import time
 2 from selenium import webdriver
 3 from selenium.webdriver.common.keys import Keys  # 键盘按键操作
 4
 5
 6 def get_goods(driver):
 7     # find_elements_by_class_name 拿到的是列表,注意跟find_element_by_class_name
 8     goods_list = driver.find_elements_by_class_name('gl-item')
 9     for good in goods_list:
10         # 根据css选择器
11         price = good.find_element_by_css_selector('.p-price i').text
12         comment = good.find_element_by_css_selector('.p-commit a').text
13         name = good.find_element_by_css_selector('.p-name a').get_attribute('title')
14         url = good.find_element_by_css_selector('.p-img a').get_attribute('href')
15         img = good.find_element_by_css_selector('.p-img img').get_attribute('src')
16         if not img:
17             img = good.find_element_by_css_selector('.p-img img').get_attribute('data-lazy-img') # 懒加载的图片src放在data-lazy-img属性中
18         if not img.startswith('https:'):
19             img = 'https:' + img
20         print(img)
21         print('''
22         商品价格:%s
23         商品名称:%s
24         商品评论:%s
25         商品图片地址:%s
26         商品详情地址:%s
27         ''' % (price, name, comment, img, url))
28
29     next_page = driver.find_element_by_partial_link_text('下一页')
30     next_page.click()
31     time.sleep(3)  # 等待下一页加载完成
32
33     get_goods(driver)
34
35
36 driver = webdriver.Chrome() # driver就是浏览器
37 # 一定不要忘了隐示等待
38 driver.implicitly_wait(5)
39 try:
40     driver.get('https://www.jd.com/')
41     #     取出输入框,填入内容
42     input_tag = driver.find_element_by_id('key')
43     #     写文字
44     #     search=input('请输入要搜索的商品:')
45     input_tag.send_keys('iphone')
46     # 相当于敲回车
47     input_tag.send_keys(Keys.ENTER)
48     get_goods(driver)
49
50 except Exception as e:
51     print(e)
52
53 finally:
54     driver.close()
 1 from selenium import webdriver
 2 from selenium.webdriver import ActionChains
 3 from selenium.webdriver.common.by import By  # 按照什么方式查找,By.ID,By.CSS_SELECTOR
 4 from selenium.webdriver.common.keys import Keys  # 键盘按键操作
 5 from selenium.webdriver.support import expected_conditions as EC
 6 from selenium.webdriver.support.wait import WebDriverWait  # 等待页面加载某些元素
 7 import time
 8
 9 driver = webdriver.Chrome()
10 driver.get('http://www.runoob.com/try/try.php?filename=jqueryui-api-droppable')
11 driver.implicitly_wait(3)  # 使用隐式等待
12
13 try:
14     # 先切换到id 为iframeResult 的frame上
15     driver.switch_to.frame('iframeResult')      # 切换到iframeResult
16     sourse=driver.find_element_by_id('draggable')
17     target=driver.find_element_by_id('droppable')
18
19
20     #方式二:不同的动作链,每次移动的位移都不同
21     # 相当于鼠标点击了sourse,并且hold住了,鼠标没有松
22     ActionChains(driver).click_and_hold(sourse).perform()
23     # 要拖动的距离
24     distance=target.location['x']-sourse.location['x']
25
26     track=0
27     while track < distance:
28         # x轴每次移动2
29         ActionChains(driver).move_by_offset(xoffset=2,yoffset=0).perform()
30         track+=2
31
32     # 松开鼠标
33     ActionChains(driver).release().perform()
34
35     time.sleep(6)
36
37 finally:
38     driver.close()
 1 import requests
 2 from selenium import webdriver
 3 from selenium.webdriver.chrome.options import Options
 4 chrome_options = Options()
 5 chrome_options.add_argument('--headless') # 浏览器不提供可视化页面. linux下如果系统不支持可视化不加这条会启动失败
 6 driver=webdriver.Chrome(chrome_options=chrome_options)
 7 """
 8 selenium 可以获取到cookie,处理成的字典,配合使用requests,给其请求其他url传递cookie
 9 """
10 url = 'https://www.baidu.com/s?ie=UTF-8&wd=python'
11 driver.get(url)
12 # for i in driver.get_cookies():
13 #     print(i)
14 co = {cookie['name']: cookie['value'] for cookie in driver.get_cookies()}
15
16 resp = requests.get(url,headers={
17     "User-Agent":"Mozilla/5.0 (Windows NT 10.0; Win64; x64) AppleWebKit/537.36 (KHTML, like Gecko) Chrome/73.0.3683.86 Safari/537.36"
18 })
19 print(resp.cookies.get_dict())
20 print(co)
21
22 driver.quit()
1.find_element 和find_elements的区别:返回一个和返回一个列表
    find_element 获取不到的时候或报错,find_elements 获取不到,则返回空列表,eg: 获取 下一页 标签 适合使用 find_elements
2.by_link_text和by_partial_link_text的区别:全部文本和包含某个文本
3.by_css_selector的用法: #food span.dairy.aged
4.by_xpath中获取属性和文本需要使用get_attribute() 和.text
5.如果页面中含有iframe、frame,需要先调用driver.switch_to.frame的方法切换到frame中才能定位元素
6.selenium中find_element_by_class_name 只能接收一个class对应的一个值,不能传入多个 # Compound class names not permitted
XPath
XPath 是一门在 XML 文档中查找信息的语言。XPath 可用来在 XML 文档中对元素和属性进行遍历。
XPath 是 W3C XSLT 标准的主要元素,并且 XQuery 和 XPointer 都构建于 XPath 表达之上。
因此,对 XPath 的理解是很多高级 XML 应用的基础。
文档:http://www.w3school.com.cn/xpath/index.asp
 XML
XML
xpath学习重点(能解决日常80%的需求了)

- 获取文本
  1. `a/text()` 获取a下的文本
  2. `a//text()` 获取a下的所有标签的文本
  3. `//a[text()='下一页']` 选择文本为下一页三个字的a标签
- `@符号`
  1. `a/@href`
  2. `//ul[@id="detail-list"]`
- `//`
  1. 在xpath最前面表示从当前html中任意位置开始选择
  2. `li//a` 表示的是li下任何一个标签

注意:使用xpath helper或者是chrome中的copy xpath都是从element中提取的数据,但是爬虫获取的是url对应的响应,往往和elements不一样
节点选择语法
| 通配符 | 描述 |
|---|---|
| * | 匹配任何元素节点。 |
| @* | 匹配任何属性节点。 |
| node() | 匹配任何类型的节点。 |
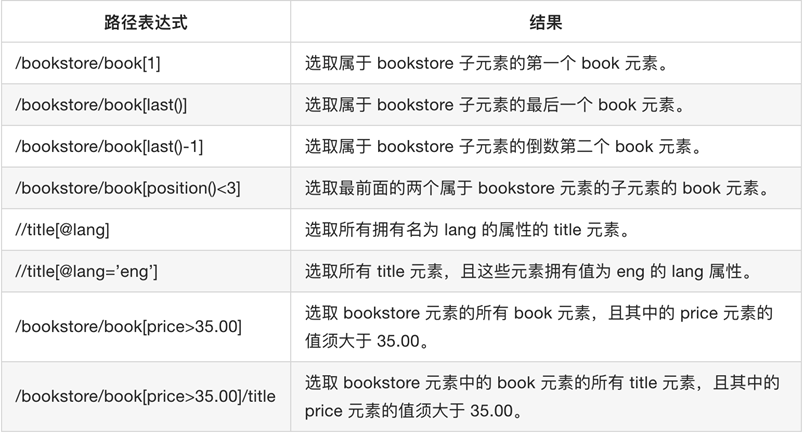
| 路径表达式 | 结果 |
|---|---|
| /bookstore/* | 选取 bookstore 元素的所有子元素。 |
| //* | 选取文档中的所有元素。 |
| //title[@*] | 选取所有带有属性的 title 元素。 |
补充:较常用xpath写法
1.包含: `//div[contains(@class,'i')]`   类名包含 i 的div
lxml
The lxml XML toolkit is a Pythonic binding for the C libraries libxml2 and libxslt.
It is unique in that it combines the speed and XML feature completeness of these libraries with
the simplicity of a native Python API, mostly compatible but superior to the well-known ElementTree API.
The latest release works with all CPython versions from 2.7 to 3.7. See the introduction for more information about background
and goals of the lxml project. Some common questions are answered in the FAQ.
官网文档:https://lxml.de/
 1 # coding=utf-8
 2 from lxml import etree
 3
 4 text = ''' <div> <ul>
 5         <li class="item-1"><a>first item</a></li>
 6         <li class="item-1"><a href="link2.html">second item</a></li>
 7         <li class="item-inactive"><a href="link3.html">third item</a></li>
 8         <li class="item-1"><a href="link4.html">fourth item</a></li>
 9         <li class="item-0"><a href="link5.html">fifth item</a>
10         </ul> </div> '''
11
12 html = etree.HTML(text)
13 print(html, type(html))  # <Element html at 0x1e7e52faf08>  <class 'lxml.etree._Element'>
14 # 查看element对象中包含的字符串
15 print(etree.tostring(html).decode())
16
17 # 获取class为item-1 li下的a的herf
18 ret1 = html.xpath("//li[@class='item-1']/a/@href")
19 print(ret1, type(ret1[0]))  # ['link2.html', 'link4.html']   <class 'lxml.etree._ElementUnicodeResult'>
20
21 # 获取class为item-1 li下的a的文本,a需要有href
22 ret2 = html.xpath("//li[@class='item-1']/a[@href]/text()")
23 print(ret2)  # ['second item', 'fourth item']
24
25 # 每个li是一条新闻,把url和文本组成字典
26 news_dict = dict(zip(ret2, ret1))
27 print(news_dict)  # {'second item': 'link2.html', 'fourth item': 'link4.html'}
28
29 for href in ret1:
30     item = {}
31     item["href"] = href
32     item["title"] = ret2[ret1.index(href)]
33     print(item)
34
35 # 分组,根据li标签进行分组,对每一组继续写xpath,  常用写法
36 ret3 = html.xpath("//li[@class='item-1']")
37 print(ret3, type(ret3[1]))
38 for i in ret3:
39     item = {}
40     item["title"] = i.xpath("a/text()")[0] if len(i.xpath("./a/text()")) > 0 else None
41     item["href"] = i.xpath("./a/@href")[0] if len(i.xpath("./a/@href")) > 0 else None
42     print(item)
1. lxml能够修正HTML代码,但是可能会改错了
  - 使用etree.tostring观察修改之后的html的样子,根据修改之后的html字符串写xpath

2. lxml 能够接受bytes和str的字符串

3. 提取页面数据的思路
  1. 先分组,取到一个包含分组标签的列表
  2. 遍历,取其中每一组进行数据的提取,确保不会造成数据的对应错乱
     - xpath方法 返回的是一个列表,注意取[0] 如: item["href"] = i.xpath("./a/@href")[0] if len(i.xpath("./a/@href")) > 0 else None
	item["href"] = i.xpath("//a/@href")[0] # 不能这么写,会从分组前的etree._Element中把所有分组都取到
 1 from lxml import etree
 2 # text中的注释会把注释以下代码的全部抹去,造成丢失
 3 text = ''' <div> <ul>
 4         <li class="item-1"><a>first item</a></li>
 5         <!-- <li class="item-1"><a href="link2.html">second item</a></li> --!>
 6         <li class="item-inactive"><a href="link3.html">third item</a></li>
 7         <li class="item-1"><a href="link4.html">fourth item</a></li>
 8         <li class="item-0"><a href="link5.html">fifth item</a>
 9         </ul> </div> '''
10
11 html = etree.HTML(text)
12 # # 查看element对象中包含的字符串
13 print(etree.tostring(html).decode())
14 """
15 <html><body><div> <ul>
16         <li class="item-1"><a>first item</a></li>
17         </ul></div></body></html>
18 """
retrying
介绍:retrying是一个python的重试包,可以用来自动重试一些可能运行失败的程序段,retrying提供一个装饰器函数retry,被装饰的函数就会在运行失败的情况下重新执行,默认只要一直报错就会不断重试。
1. stop_max_attempt_number:用来设定最大的尝试次数,超过该次数就会停止

2.stop_max_delay:从被装饰的函数开始执行的时间点开始到函数成功运行结束或失败报错中止的时间点。单位:毫秒

3.wait_fixed:设置在两次retrying之间的停留时间

4.retry_on_exception:指定出现哪些异常的时候再去retry 例:* retry_on_exception(retry_if_io_error)

5.retry_on_result:指定要在得到哪些结果再去retry
retrying是一个python的重试包,可以用来自动重试一些可能运行失败的程序段,retrying提供一个装饰器函数retry,被装饰的函数就会在运行失败的情况下重新执行,默认只要一直报错就会不断重试。

6.stop_max_attempt_number:用来设定最大的尝试次数,超过该次数就会停止

7.stop_max_delay:从被装饰的函数开始执行的时间点开始到函数成功运行结束或失败报错中止的时间点。单位:毫秒

8.wait_fixed:设置在两次retrying之间的停留时间

9.retry_on_exception:指定出现哪些异常的时候再去retry
例:retry_on_exception(retry_if_io_error)

10.retry_on_result:指定要在得到哪些结果再去retry
例:retry_on_result(retry_if_result_none)
1 一般装饰器api
2 特定的停止条件(限制尝试次数)
3 特定的等待条件(每次尝试之间的指数增长的时间等待)
4 自定义的异常进行尝试
5 自定义的异常进行尝试返回结果
6 最简单的一个使用方法是无论有任何异常出现,都会一直重新调用一个函数、方法,直到返回一个值
 1 import random
 2 from retrying import retry
 3
 4 @retry(stop_max_attempt_number=3)  # 最多尝试2次,第三次如果还抛出异常,则不再尝试,也抛出异常
 5 def do_something_unreliable():
 6     if random.randint(0, 10) > 1:
 7         print( "just have a test")
 8         raise IOError("Broken sauce, everything is hosed!!!111one")
 9     else:
10         return "Awesome sauce!"
11
12 print( do_something_unreliable())
Tesseract
Tesseract是一个开源的ocr引擎,可以开箱即用。
安装:https://blog.csdn.net/u010454030/article/details/80515501
爬虫中使用的不是很多,对验证码识别,为了准确率,一般使用 打码平台 如:云打码 http://www.yundama.com/apidoc/
参考:
1.http://docs.python-requests.org/zh_CN/latest/index.html
2.https://www.cnblogs.com/wupeiqi/articles/6283017.html
3.http://docs.python-requests.org/en/master/
4.https://www.crummy.com/software/BeautifulSoup/bs4/doc/
5.https://www.cnblogs.com/liuqingzheng/articles/10261331.html
6.https://www.cnblogs.com/liuqingzheng/articles/9146902.html