接上一节。上一节费了很大的力气终于搭完了QQ的第二个界面(联系人列表),今天讲一下如何实现QQ聊天界面。这里首先有个好消息:QQ项目的Demo我已经上传到网上啦,欢迎大家下载~网址:http://ishare.iask.sina.com.cn/f/67099260.html
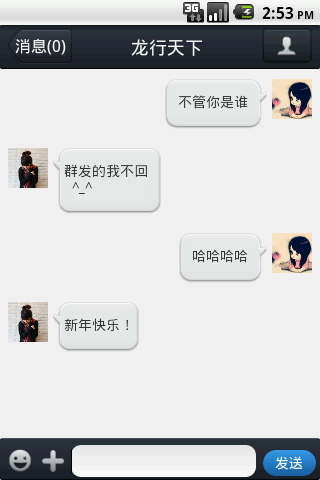
本来以为这一个Activity的实现应该相当简单,不料过程依旧十分曲折。不多说,先上最终效果图:
大体的构造思路是这样:整个界面采用RelativeLayout布局,标题栏自己是一个LinearLayout子布局,下面文本编辑框也是一个LinearLayout子布局,中间是一个自定义的ListView,关于自定义的ListView的使用方法见系列(六),这里唯一特殊的地方时ListView中的子条目有两种布局文件,“我”发出的信息对应一个布局文件,而对方发来的信息对应另一个布局文件。我们发出的信息存放在一个ArrayList<HashMap<>>中,在自定义的适配器的getView()方法中根据是谁发出的信息选择相应的ListItem的布局文件即可。
这个Activity分析起来其实挺简单,但有一个难点耗费了我一天的时间,不过先不着急吐槽,先上传这次Activity的代码:
activity_chat 布局文件:
<?xml version="1.0" encoding="utf-8"?>
<RelativeLayout xmlns:android="http://schemas.android.com/apk/res/android"
    android:layout_width="match_parent"
    android:layout_height="match_parent"
    >

    <LinearLayout
        android:layout_width="match_parent"
        android:layout_height="44dip"
        android:id="@+id/chat_title"
        android:layout_alignParentTop="true"
        android:background="@drawable/chat_title_layer">
        <Button
            android:id="@+id/chat_msg_button"
            android:layout_width="match_parent"
            android:layout_height="36dip"
            android:layout_weight="1.9"
            android:layout_marginLeft="8dip"
            android:layout_marginTop="3dip"
            android:text="消息(0)"
            android:textColor="@android:color/white"
            android:textSize="7pt"
            android:background="@drawable/msg_button_back"/>
        <TextView
            android:id="@+id/chat_contact_name"
            android:layout_width="match_parent"
            android:layout_height="wrap_content"
            android:layout_weight="1"
            android:text="龙行天下"
            android:textSize="8pt"
            android:textColor="@android:color/white"
            android:gravity="center"
            android:layout_gravity="center_vertical"/>
        <ImageButton
            android:id="@+id/chat_contact_button"
            android:layout_width="match_parent"
            android:layout_height="36dip"
            android:layout_weight="2"
            android:layout_marginRight="8dip"
            android:layout_marginTop="3dip"
            android:background="@drawable/chat_contact_back"/>

    </LinearLayout>

    <LinearLayout
        android:id="@+id/chat_bottom_linear"
        android:layout_width="match_parent"
        android:layout_height="42dip"
        android:background="@drawable/chat_title_layer"
        android:orientation="horizontal"
        android:layout_alignParentBottom="true"
        android:paddingTop="7dip"
        android:paddingBottom="3dip">

        <ImageButton
            android:id="@+id/chat_bottom_look"
            android:layout_width="match_parent"
            android:layout_height="26dip"
            android:layout_weight="3.5"
            android:layout_marginLeft="7dip"
            android:layout_marginTop="3dip"
            android:background="@drawable/chat_bottom_look"/>
        <ImageButton
            android:id="@+id/chat_bottom_add"
            android:layout_width="match_parent"
            android:layout_height="26dip"
            android:layout_weight="3.5"
            android:layout_marginLeft="7dip"
            android:layout_marginTop="3dip"
            android:background="@drawable/chat_bottom_add"/>
        <EditText
            android:id="@+id/chat_bottom_edittext"
            android:layout_width="match_parent"
            android:layout_height="32dip"
            android:layout_marginLeft="5dip"
            android:layout_marginRight="7dip"
            android:layout_weight="1.5"
            android:background="@drawable/edit_fillet_shape"/>
        <Button
            android:id="@+id/chat_bottom_sendbutton"
            android:layout_width="match_parent"
            android:layout_height="26dip"
            android:layout_weight="3.2"
            android:layout_marginRight="4dip"
            android:layout_marginBottom="3dip"
            android:background="@drawable/chat_button_fillet_shape"
            android:text="发送"
            android:textColor="@android:color/white"/>"


    </LinearLayout>
    <ListView
        android:id="@+id/chat_list"
        android:layout_width="match_parent"
        android:layout_height="wrap_content"
        android:layout_below="@id/chat_title"
        android:layout_above="@id/chat_bottom_linear"
        android:fadingEdge="none"
        android:background="#f0f0f0"
        android:divider="#aaaaaa"
        android:dividerHeight="0px">
    </ListView>


</RelativeLayout>
“我”发出的信息对应的子条目的布局文件:
<?xml version="1.0" encoding="utf-8"?>
<RelativeLayout xmlns:android="http://schemas.android.com/apk/res/android"
    android:layout_width="wrap_content"
    android:layout_height="wrap_content"
    android:background="#f0f0f0"
    android:paddingLeft="80dip"
    android:paddingRight="8dip"
    android:paddingBottom="10dip"
    android:paddingTop="10dip">

    <ImageView
        android:id="@+id/chatlist_image_me"
        android:layout_width="40dip"
        android:layout_height="40dip"
        android:layout_marginLeft="5dip"
        android:layout_alignParentRight="true"
        android:background="@drawable/contact_3"/>
    <TextView
        android:id="@+id/chatlist_text_me"
        android:layout_width="wrap_content"
        android:layout_height="wrap_content"
        android:layout_toLeftOf="@id/chatlist_image_me"
        android:layout_alignTop="@id/chatlist_image_me"
        android:text="会忽悠了gyughiulhlluihui过"
        android:background="@drawable/balloon_back_right"
        android:paddingTop="13dip"
        android:paddingBottom="18dip"      />


</RelativeLayout>
“对方”发出的信息对应的布局文件:
<?xml version="1.0" encoding="utf-8"?>
<RelativeLayout xmlns:android="http://schemas.android.com/apk/res/android"
    android:layout_width="match_parent"
    android:layout_height="wrap_content"
    android:background="#f0f0f0"
    android:paddingRight="80dip"
    android:paddingLeft="8dip"
    android:paddingBottom="10dip"
    android:paddingTop="10dip">

    <ImageView
        android:id="@+id/chatlist_image_other"
        android:layout_width="40dip"
        android:layout_height="40dip"
        android:layout_marginRight="5dip"
        android:layout_alignParentLeft="true"
        android:background="@drawable/contact_3"/>
    <TextView
        android:id="@+id/chatlist_text_other"
        android:layout_width="wrap_content"
        android:layout_height="wrap_content"
        android:layout_toRightOf="@id/chatlist_image_other"
        android:layout_alignTop="@id/chatlist_image_other"
        android:text="hewdfb"
        android:background="@drawable/balloon_back_left"
        android:paddingTop="13dip"
        android:paddingBottom="18dip"      />


</RelativeLayout>
这里遇到了一个问题:即两个布局文件中的空间能不能共用同一个id?答案是不能,因为ListView在绘制的过程中会反复调用findViewById()方法,共用ID会导致显示混乱,即对应错位。
然后就是ChatActivity了
package com.example.android_qqfix;

import android.app.Activity;
import android.content.Context;
import android.os.Bundle;
import android.view.LayoutInflater;
import android.view.View;
import android.view.View.OnClickListener;
import android.view.ViewGroup;
import android.view.Window;
import android.widget.*;

import java.util.*;

public class ChatActivity extends Activity{

    ArrayList<HashMap<String,Object>> chatList=null;
    String[] from={"image","text"};
    int[] to={R.id.chatlist_image_me,R.id.chatlist_text_me,R.id.chatlist_image_other,R.id.chatlist_text_other};
    int[] layout={R.layout.chat_listitem_me,R.layout.chat_listitem_other};
    String userQQ=null;
    /**
     * 这里两个布局文件使用了同一个id,测试一下是否管用
     * TT事实证明这回产生id的匹配异常!所以还是要分开。。
     *
     * userQQ用于接收Intent传递的qq号,进而用来调用数据库中的相关的联系人信息,这里先不讲
     * 先暂时使用一个头像
     */

    public final static int OTHER=1;
    public final static int ME=0;


    protected ListView chatListView=null;
    protected Button chatSendButton=null;
    protected EditText editText=null;

    protected MyChatAdapter adapter=null;
    @Override
    protected void onCreate(Bundle savedInstanceState) {
        // TODO Auto-generated method stub
        super.onCreate(savedInstanceState);
        requestWindowFeature(Window.FEATURE_NO_TITLE);
        setContentView(R.layout.activity_chat);
        chatList=new ArrayList<HashMap<String,Object>>();
        addTextToList("不管你是谁", ME);
        addTextToList("群发的我不回
  ^_^", OTHER);
        addTextToList("哈哈哈哈", ME);
        addTextToList("新年快乐!", OTHER);

        chatSendButton=(Button)findViewById(R.id.chat_bottom_sendbutton);
        editText=(EditText)findViewById(R.id.chat_bottom_edittext);
        chatListView=(ListView)findViewById(R.id.chat_list);

        adapter=new MyChatAdapter(this,chatList,layout,from,to);


        chatSendButton.setOnClickListener(new OnClickListener() {

            @Override
            public void onClick(View v) {
                // TODO Auto-generated method stub
                String myWord=null;

                /**
                 * 这是一个发送消息的监听器,注意如果文本框中没有内容,那么getText()的返回值可能为
                 * null,这时调用toString()会有异常!所以这里必须在后面加上一个""隐式转换成String实例
                 * ,并且不能发送空消息。
                 */

                myWord=(editText.getText()+"").toString();
                if(myWord.length()==0)
                    return;
                editText.setText("");
                addTextToList(myWord, ME);
                /**
                 * 更新数据列表,并且通过setSelection方法使ListView始终滚动在最底端
                 */
                adapter.notifyDataSetChanged();
                chatListView.setSelection(chatList.size()-1);

            }
        });

        chatListView.setAdapter(adapter);

    }


    protected void addTextToList(String text, int who){
        HashMap<String,Object> map=new HashMap<String,Object>();
        map.put("person",who );
        map.put("image", who==ME?R.drawable.contact_0:R.drawable.contact_1);
        map.put("text", text);
        chatList.add(map);
    }

    private class MyChatAdapter extends BaseAdapter{

        Context context=null;
        ArrayList<HashMap<String,Object>> chatList=null;
        int[] layout;
        String[] from;
        int[] to;


        public MyChatAdapter(Context context,
                ArrayList<HashMap<String, Object>> chatList, int[] layout,
                String[] from, int[] to) {
            super();
            this.context = context;
            this.chatList = chatList;
            this.layout = layout;
            this.from = from;
            this.to = to;
        }

        @Override
        public int getCount() {
            // TODO Auto-generated method stub
            return chatList.size();
        }

        @Override
        public Object getItem(int arg0) {
            // TODO Auto-generated method stub
            return null;
        }

        @Override
        public long getItemId(int position) {
            // TODO Auto-generated method stub
            return position;
        }

        class ViewHolder{
            public ImageView imageView=null;
            public TextView textView=null;

        }

        @Override
        public View getView(int position, View convertView, ViewGroup parent) {
            // TODO Auto-generated method stub
            ViewHolder holder=null;
            int who=(Integer)chatList.get(position).get("person");

                convertView= LayoutInflater.from(context).inflate(
                        layout[who==ME?0:1], null);
                holder=new ViewHolder();
                holder.imageView=(ImageView)convertView.findViewById(to[who*2+0]);
                holder.textView=(TextView)convertView.findViewById(to[who*2+1]);


            System.out.println(holder);
            System.out.println("WHYWHYWHYWHYW");
            System.out.println(holder.imageView);
            holder.imageView.setBackgroundResource((Integer)chatList.get(position).get(from[0]));
            holder.textView.setText(chatList.get(position).get(from[1]).toString());
            return convertView;
        }

    }


}
最后吐槽一下本节遇到的最大的问题: 聊天界面的气泡效果是如何实现的? 我之前尝试了使用layer-list实现,但是效果不太理想。经过查资料并解压了QQ的安装包,发现是通过E:androidsourceandroid-sdk-windowssdk ools文件夹下的draw9patch.bat程序将普通的 png图片转换成特殊处理的 .9.png格式的图片,这样的图片做背景便可以自动适应空间的大小,并且可以自定义图片拉伸的区域,这种图片做背景放大缩小时不会失真。最新版QQ中各式各样的气泡背景全部是通过9.png格式的图片实现的。关于如何制作9.png图片我不再赘述,附上一个链接:http://blog.csdn.net/pugongying1988/article/details/6938972,这里面讲的还可以,另外还有设置可拉伸区域与不可拉伸区域的一些技巧,需要在动手过程中摸索。
另外,若在编译本节的Activity时出现了 "appt.exe意外停止"的提示,很可能就是自己制作的9.png图片异常导致 R.java文件中的资源地址混乱,这时只能重建工程了。
至此,QQ界面开发可能要暂停一段时间了。假期也快要结束,需要转换状态,面对新的学期新的挑战了。当然我对Android开发的兴趣仍然在,以后有时间还会继续学习下去,博客也会不定期的更新。当然,仿别人的 程序只能算一种练习,我希望能够有机会做一些有商业价值或者实用价值的软件出来,也非常希望有共同爱好的朋友们能够来一起交流^^