一、AOP的基本概念
Spring 框架的一个关键组件是面向方面的编程(AOP)框架。面向切面的编程需要把程序逻辑分解成不同的部分称为所谓的关注点。跨一个应用程序的多个点的功能被称为横切关注点,这些横切关注点在概念上独立于应用程序的业务逻辑。有各种各样的常见的很好的方面的例子,如日志记录、审计、声明式事务、安全性和缓存等。
在 OOP 中,关键单元模块度是类,而在 AOP 中单元模块度是切面。依赖注入帮助你对应用程序对象相互解耦和 AOP 可以帮助你从它们所影响的对象中对横切关注点解耦。AOP 是像编程语言的触发物,如 Perl,.NET,Java 或者其他。
Spring AOP 模块提供拦截器来拦截一个应用程序,例如,当执行一个方法时,你可以在方法执行之前或之后添加额外的功能。
什么是AOP?
AOP即Aspect-Oriented Programming的缩写,中文意思是面向切面(或方面)编程。它是一种思想,可在不改变程序源码的情况下为程序添加额外的功能;
AOP的发展阶段?
- 静态AOP:Aspect形式,通过特定的编译器,将实现后的Aspect编译并织入到系统的静态类中;
- 动态AOP:AOP的织入过程在系统运行开始之后进行,而不是预先编译到系统中;
AOP的设计意图?
允许通过分离应用的业务逻辑与系统级服务进行内聚性的开发。应用对象只实现业务逻辑即可,并不负责其它的系统级关注点;
AOP的常见使用?
日志记录、跟踪、监控和优化,性能统计、优化,安全、权限控制,应用系统的异常捕捉及处理,事务处理,缓存,持久化,懒加载(Lazy loading),内容传递,调试,资源池,同步等等,都可以使用AOP来完成。
AOP的实现(简介)
- AspectJ: AspectJ是目前最完善的AOP语言,对Java编程语言的进行了扩展,定义了AOP语法,能够在编译期提供横切代码的织入。AspectJ提供了两种横切实现机制,一种称为动态横切(Dynamic Crosscutting),另一种称为静态横切(Static Crosscutting)。
- AspectWerkz: 基于Java的简单、动态和轻量级的AOP框架,支持运行期或类装载期织入横切代码,它拥有一个特殊的类装载器。它与AspectJ项目已经合并,第一个发布版本是AspectJ5:扩展AspectJ语言,以基于注解的方式支持类似AspectJ的代码风格。
- JBoss AOP: JBoss是一个开源的符合J2EE规范的应用服务器,作为J2EE规范的补充,JBoss中引入了AOP框架,为普通Java类提供了J2EE服务,而无需遵循EJB规范。JBoss通过类载入时,使用Javassist框架对字节码操作实现动态AOP框架。
- Spring AOP: Spring AOP使用纯Java实现,不需要专门的编译过程,不需要特殊的类装载器,它在运行期通过代理方式向目标类织入增强代码。Spring并不尝试提供最完整的AOP实现,主要侧重于提供一种和Spring IoC容器整合的AOP实现,以解决企业级开发中常见问题。
我们这里关注于Spring AOP
AOP中的常见概念
- 连接点(Join Point):程序执行的某个位置,比如类初始化前,类初始化后,方法调用前,方法调用后等等。
- 切点(Point cut): 通过切点来定位特定的连接点, 这是一组一个或多个连接点,通知应该被执行。你可以使用表达式或模式指定切入点正如我们将在 AOP 的例子中看到的。。
- 增强(Advice):织入到目标类连接点上的一段程序代码。
- 目标对象(Target Object): 增强逻辑的织入目标类。
- 引介(Introduction):引介是一种特殊的增强,它为类添加一些属性和方法。
- 织入(Weaving): 将增强添加对目标类的具体连接点上的过程。
- 代理:一个类被AOP织入增强后,会产生一个结果类,该类融合了原类和增强逻辑的代理类。
- 切面:由切点和增强组成,既包括了横切逻辑的定义,也包括了连接点的定义。
因此,AOP的一般过程就是:
向目标对象(Target Object)中
选取Pointcut(由一系列的Join Point组成)
织入Advice。
而切面就是Pointcut+Advice,这个Weaving(织入过程)中可能使用了引介,也可能生成了代理对象。
二、使用代理实现AOP
首先,我们使用jdk的原生api实现动态代理。
jdk的动态代理只能支持接口...,因此创建接口MyService
public interface MyService {
    public void hello();
}
创建切面接口MyAdvice,定义Pointcut为方法执行前,和方法调用后
public interface MyAdvice {

    void beforeMethod(Method method);

    void afterMethod(Method method);
}
演示如下:
public class ProxyUtils {

    // 适用jdk原生的方式
    public static <T> T createProxy(final T target, final MyAdvice advice) {
        @SuppressWarnings("unchecked") /*jdk返回的一定可以转换为这个类型*/
                T result = (T) Proxy.newProxyInstance(
                target.getClass().getClassLoader(),
                target.getClass().getInterfaces(),
                (Object proxy, Method method, Object[] args) -> {
                    advice.beforeMethod(method);
                    Object res = method.invoke(target, args);
                    advice.afterMethod(method);
                    return res;
                }
        );
        return result;
    }

    public static void main(String[] args) {
        //1. 创建原生对象
        MyService targetObject = () -> {
            System.out.println("hello....");
        };
        //2. 创建增强类,即Advice
        MyAdvice advice = new MyAdvice() {
            @Override
            public void beforeMethod(Method method) {
                System.out.println(String.format("before日志: 执行了%s方法...", method.getName()));
            }

            @Override
            public void afterMethod(Method method) {
                System.out.println(String.format("after日志:执行了%s方法...", method.getName()));
            }
        };
        //3. 创建代理Proxy
        MyService proxy = createProxy(targetObject, advice);
        //4. 执行方法
        proxy.hello();
    }

    //...

}
打印结果为:
before日志: 执行了hello方法...
hello
after日志:执行了hello方法...
同样,可以使用cglib的方式生成动态代理,cglib还支持继承类的方式生成代理,代码如下:
/**
     * <B>方法说明:</B>生成cglib代理类<BR>
     *
     * @param target 被代理对象
     * @param advice 切入逻辑
     * @return
     */
    public static <T> T createCglibProxy(final T target, final MyAdvice advice, final boolean extend) {
        Enhancer enhancer = new Enhancer();
        //使用接口或者使用父类
        enhancer.setCallback(new MethodInterceptor() {
            @Override
            public Object intercept(Object o, Method method, Object[] objects, MethodProxy methodProxy) throws Throwable {
                Object res = null;
                advice.beforeMethod(method);
                res = method.invoke(target, objects);
                advice.afterMethod(method);
                return res;
            }
        });
        //通过superClass或者interfaces来判断如何实现
        if (extend) {
            enhancer.setSuperclass(target.getClass());
        } else {
            enhancer.setInterfaces(target.getClass().getInterfaces());
        }
        @SuppressWarnings("unchecked") //jdk返回的一定可以转换为这个类型
                T result = (T) enhancer.create();
        return result;
    }
前面提到JBoss AOP是使用了javasist这个框架
 /**
     * javassist利用工厂创建动态代理
     */
    public static <T> T createJavassitProxy(final T target,final MyAdvice advice) {
        ProxyFactory proxyFactory = new ProxyFactory();
        proxyFactory.setSuperclass(target.getClass());
        Class<?> clz = proxyFactory.createClass();
        Object proxy = null;
        try {
            proxy= clz.newInstance();
            ((ProxyObject)proxy).setHandler(new MethodHandler() {
                @Override
                public Object invoke(Object o, Method method, Method method1, Object[] objects) throws Throwable {
                    advice.beforeMethod(method);
                    Object res = method.invoke(target, objects);
                    advice.afterMethod(method);
                    return res;
                }
            });
        } catch (Exception e) {
            e.printStackTrace();
        }
        return (T) proxy;
    }
三、Spring boot中使用AOP
spring boot应该会成为主流,因此这里不考虑使用xml的方式进行aop配置,而是使用注解的方式。
文件图:

pom文件:
<?xml version="1.0" encoding="UTF-8"?>
<project xmlns="http://maven.apache.org/POM/4.0.0" xmlns:xsi="http://www.w3.org/2001/XMLSchema-instance"
         xsi:schemaLocation="http://maven.apache.org/POM/4.0.0 http://maven.apache.org/xsd/maven-4.0.0.xsd">
    <modelVersion>4.0.0</modelVersion>

    <groupId>demo</groupId>
    <artifactId>demo.aop</artifactId>
    <version>0.0.1-SNAPSHOT</version>
    <packaging>jar</packaging>

    <name>aop</name>
    <description>aop</description>

    <parent>
        <groupId>org.springframework.boot</groupId>
        <artifactId>spring-boot-starter-parent</artifactId>
        <version>1.4.2.RELEASE</version>
        <relativePath/> <!-- lookup parent from repository -->
    </parent>

    <properties>
        <project.build.sourceEncoding>UTF-8</project.build.sourceEncoding>
        <project.reporting.outputEncoding>UTF-8</project.reporting.outputEncoding>
        <java.version>1.8</java.version>
    </properties>

    <dependencies>
        <dependency>
            <groupId>org.springframework.boot</groupId>
            <artifactId>spring-boot-starter-web</artifactId>
        </dependency>

        <dependency>
            <groupId>org.springframework.boot</groupId>
            <artifactId>spring-boot-starter-aop</artifactId>
        </dependency>

        <dependency>
            <groupId>org.springframework.boot</groupId>
            <artifactId>spring-boot-starter-test</artifactId>
            <scope>test</scope>
        </dependency>
    </dependencies>

    <build>
        <plugins>
            <plugin>
                <groupId>org.springframework.boot</groupId>
                <artifactId>spring-boot-maven-plugin</artifactId>
            </plugin>
        </plugins>
    </build>


</project>
切面类:
package demo.aop.advice;

import org.aspectj.lang.ProceedingJoinPoint;
import org.aspectj.lang.annotation.Around;
import org.aspectj.lang.annotation.Aspect;
import org.aspectj.lang.annotation.Pointcut;
import org.springframework.stereotype.Component;
import org.springframework.web.context.request.RequestContextHolder;
import org.springframework.web.context.request.ServletRequestAttributes;

import javax.servlet.http.HttpServletRequest;
import java.util.Arrays;

/**
 * Created by carl.yu on 2016/12/9.
 */
@Aspect
@Component
public class WebLogAspect {
    //1. demo.aop.controller..* 表示demo.aop.controller下任何子包中的任何类
    //2. demo.aop.controller..*后面的.* 表示任何方法名
    //3. (..)表示任何参数的方法
    //4. public * 表示public修饰的方,返回参数为任何
    @Pointcut("execution(public * demo.aop.controller..*.*(..))")
    public void webLog() {
    }

    //环绕切面配置
    @Around("webLog()")
    public Object printAroundAdvice(ProceedingJoinPoint joinPoint)
            throws Throwable {
        ServletRequestAttributes attributes = (ServletRequestAttributes) RequestContextHolder.getRequestAttributes();
        long start = System.currentTimeMillis();
        HttpServletRequest request = attributes.getRequest();
        System.out.println("-----------------------------");
        System.out.println("URL : " + request.getRequestURL().toString());
        System.out.println("HTTP_METHOD : " + request.getMethod());
        System.out.println("IP : " + request.getRemoteAddr());
        System.out.println("CLASS_METHOD : " + joinPoint.getSignature().getDeclaringTypeName() + "." + joinPoint.getSignature().getName());
        System.out.println("ARGS : " + Arrays.toString(joinPoint.getArgs()));
        Object result = joinPoint.proceed();
        System.out.println("Spend time:" + (System.currentTimeMillis() - start));
        return result;
    }
}
测试Controller
@RestController
public class HelloController {

    @RequestMapping(value = "/hello", method = RequestMethod.GET)
    public String hello() {
        return "Hello";
    }

    @RequestMapping(value = "/welcome", method = RequestMethod.GET)
    public String welcome() {
        return "welcome";
    }
}
访问请求,结果如下所示:
URL : http://localhost:8080/hello
HTTP_METHOD : GET
IP : 0:0:0:0:0:0:0:1
CLASS_METHOD : demo.aop.controller.HelloController.hello
ARGS : []
Spend time:6
-----------------------------
URL : http://localhost:8080/welcome
HTTP_METHOD : GET
IP : 0:0:0:0:0:0:0:1
CLASS_METHOD : demo.aop.controller.HelloController.welcome
ARGS : []
Spend time:0
上面使用了execution的表达式,spring aop支持表达式非常多,这里简单介绍几种:
-
execution - 匹配方法执行的连接点,这是你将会用到的Spring的最主要的切入点指定者。
-
within - 限定匹配特定类型的连接点(在使用Spring AOP的时候,在匹配的类型中定义的方法的执行)。
-
this - 限定匹配特定的连接点(使用Spring AOP的时候方法的执行),其中bean reference(Spring AOP 代理)是指定类型的实例。
-
target - 限定匹配特定的连接点(使用Spring AOP的时候方法的执行),其中目标对象(被代理的appolication object)是指定类型的实例。
-
args - 限定匹配特定的连接点(使用Spring AOP的时候方法的执行),其中参数是指定类型的实例。
-
@target - 限定匹配特定的连接点(使用Spring AOP的时候方法的执行),其中执行的对象的类已经有指定类型的注解。
-
@args - 限定匹配特定的连接点(使用Spring AOP的时候方法的执行),其中实际传入参数的运行时类型有指定类型的注解。
-
@within - 限定匹配特定的连接点,其中连接点所在类型已指定注解(在使用Spring AOP的时候,所执行的方法所在类型已指定注解)。
-
@annotation - 限定匹配特定的连接点(使用Spring AOP的时候方法的执行),其中连接点的主题有某种给定的注解。
具体使用方式请参照官方文档。
四、Spring aop中Advice类型以及顺序问题
AspectJ提供了五种定义通知的标注:
@Before:前置通知,在调用目标方法之前执行通知定义的任务@After:后置通知,在目标方法执行结束后,无论执行结果如何都执行通知定义的任务@After-returning:后置通知,在目标方法执行结束后,如果执行成功,则执行通知定义的任务@After-throwing:异常通知,如果目标方法执行过程中抛出异常,则执行通知定义的任务@Around:环绕通知,在目标方法执行前和执行后,都需要执行通知定义的任务
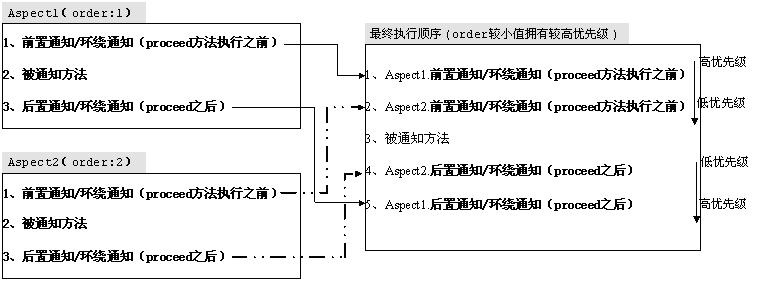
如果我们有多个通知想要在同一连接点执行,那执行顺序如何确定呢?Spring AOP使用AspectJ的优先级规则来确定通知执行顺序。总共有两种情况:同一切面中通知执行顺序、不同切面中的通知执行顺序。
在同一个切面中:
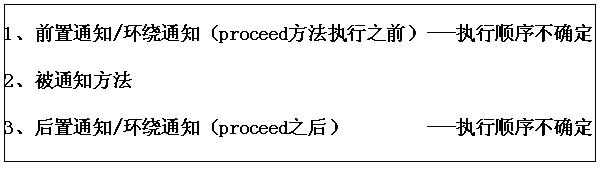
而如果在同一切面中定义两个相同类型通知(如同是前置通知或环绕通知(proceed之前))并在同一连接点执行时,其执行顺序是未知的,如果确实需要指定执行顺序需要将通知重构到两个切面,然后定义切面的执行顺序。
在不同的切面中的话则可以通过Order定义顺序,Order越小,则优先级越高。
定义方式:

五、Spring aop原理浅析
Spring的aop框架,一般而言有三种方式:
• Using ProxyFactoryBean: In Spring AOP, ProxyFactoryBean provides a declarative way for configuring Spring’s ApplicationContext (and hence the underlying BeanFactory) in creating AOP proxies based on defined Spring beans.
• Using the Spring aop namespace: Introduced in Spring 2.0, the aop namespace provides a simplified way (when compared to ProxyFactoryBean) for defining aspects and their DI requirements in Spring applications. However, the aop namespace also uses ProxyFactoryBean behind the scenes.
• Using @AspectJ-style annotations: Besides the XML-based aop namespace, you can use the @AspectJ-style annotations within your classes for configuring Spring AOP. Although the syntax it uses is based on AspectJ and you need to include some AspectJ libraries when using this option, Spring still uses the proxy mechanism (that is, creates proxied objects for the targets) when bootstrapping ApplicationContext
上面的例子中主要都是使用了第三种方式:AsepctJ风格的注解。因此,这里也主要介绍这种方式的实现。
首先,根据配置会调用AspectJAutoProxyRegistrar 根据@EnableAspectJAutoProxy或<aop:aspectj-autoproxy/>注册AnnotationAwareAspectJAutoProxyCreator.
@Override
    public void registerBeanDefinitions(
            AnnotationMetadata importingClassMetadata, BeanDefinitionRegistry registry) {

        AopConfigUtils.registerAspectJAnnotationAutoProxyCreatorIfNecessary(registry);

        AnnotationAttributes enableAspectJAutoProxy =
                AnnotationConfigUtils.attributesFor(importingClassMetadata, EnableAspectJAutoProxy.class);
        if (enableAspectJAutoProxy.getBoolean("proxyTargetClass")) {
            AopConfigUtils.forceAutoProxyCreatorToUseClassProxying(registry);
        }
        if (enableAspectJAutoProxy.getBoolean("exposeProxy")) {
            AopConfigUtils.forceAutoProxyCreatorToExposeProxy(registry);
        }
    }
该方法主要是根据配置或者注解来注册proxy代理创建的一些规则
而创建代理使用的是AnnotationAwareAspectJAutoProxyCreator
类图如下所示:

真正创建proxy的父类是AbstractAutoProxyCreator的createProxy方法..
protected Object createProxy(
            Class<?> beanClass, String beanName, Object[] specificInterceptors, TargetSource targetSource) {

        if (this.beanFactory instanceof ConfigurableListableBeanFactory) {
            AutoProxyUtils.exposeTargetClass((ConfigurableListableBeanFactory) this.beanFactory, beanName, beanClass);
        }

        ProxyFactory proxyFactory = new ProxyFactory();
        proxyFactory.copyFrom(this);

        if (!proxyFactory.isProxyTargetClass()) {
            if (shouldProxyTargetClass(beanClass, beanName)) {
                proxyFactory.setProxyTargetClass(true);
            }
            else {
                evaluateProxyInterfaces(beanClass, proxyFactory);
            }
        }

        Advisor[] advisors = buildAdvisors(beanName, specificInterceptors);
        for (Advisor advisor : advisors) {
            proxyFactory.addAdvisor(advisor);
        }

        proxyFactory.setTargetSource(targetSource);
        customizeProxyFactory(proxyFactory);

        proxyFactory.setFrozen(this.freezeProxy);
        if (advisorsPreFiltered()) {
            proxyFactory.setPreFiltered(true);
        }

        return proxyFactory.getProxy(getProxyClassLoader());
    }
可以发现,这里已经开始创建Advisor,你定义的Advice在这里会被创建并且加入, debug截图如下:

最后proxyFactory.getProxy()方法会调用DefaultAopProxyFactory的createAopProxy方法
@Override
    public AopProxy createAopProxy(AdvisedSupport config) throws AopConfigException {
        if (config.isOptimize() || config.isProxyTargetClass() || hasNoUserSuppliedProxyInterfaces(config)) {
            Class<?> targetClass = config.getTargetClass();
            if (targetClass == null) {
                throw new AopConfigException("TargetSource cannot determine target class: " +
                        "Either an interface or a target is required for proxy creation.");
            }
            if (targetClass.isInterface() || Proxy.isProxyClass(targetClass)) {
                return new JdkDynamicAopProxy(config);
            }
            return new ObjenesisCglibAopProxy(config);
        }
        else {
            return new JdkDynamicAopProxy(config);
        }
    }
从而生成代理对象...