Python3 错误和异常
- 异常处理try/except
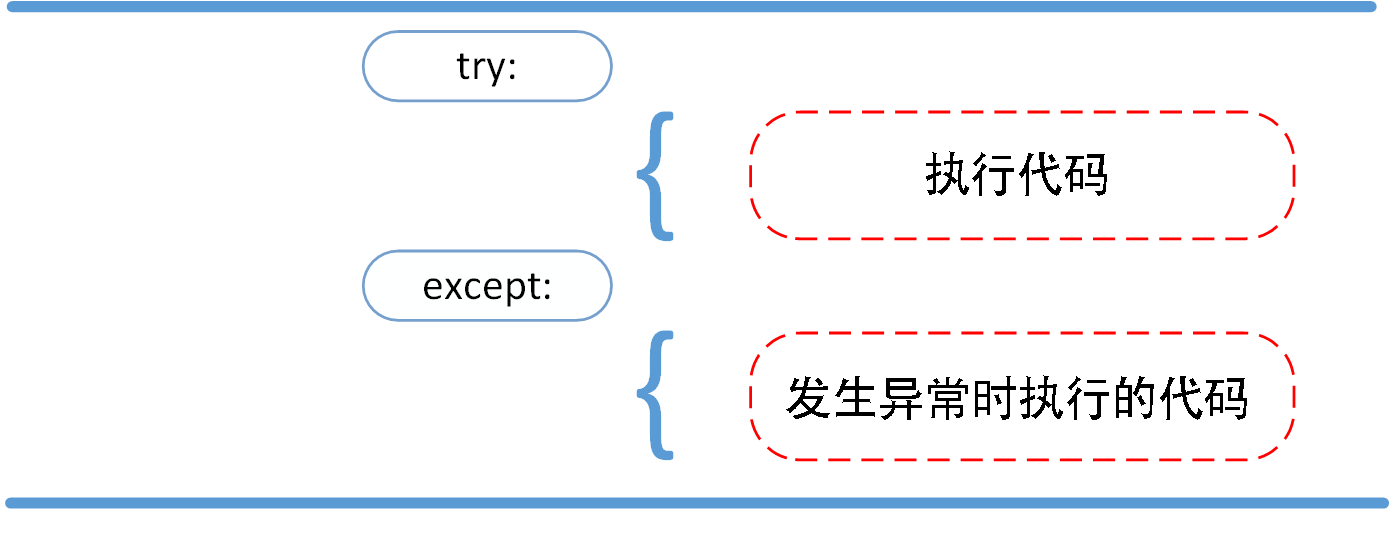
try 语句按照如下方式工作:
- 首先,执行 try 子句(在关键字 try 和关键字 except 之间的语句)。
- 如果没有异常发生,忽略 except 子句,try 子句执行后结束。
- 如果在执行 try 子句的过程中发生了异常,那么 try 子句余下的部分将被忽略。如果异常的类型和 except 之后的名称相符,那么对应的 except 子句将被执行。
- 如果一个异常没有与任何的 excep 匹配,那么这个异常将会传递给上层的 try 中。
最后一个except子句可以忽略异常的名称,它将被当作通配符使用。你可以使用这种方法打印一个错误信息,然后再次把异常抛出。
                import sys

                try:
                    f = open('myfile.txt')
                    s = f.readline()
                    i = int(s.strip())
                except OSError as err:
                    print("OS error: {0}".format(err))
                except ValueError:
                    print("Could not convert data to an integer.")
                except:
                    print("Unexpected error:", sys.exc_info()[0])
                    raise
- try/except...else
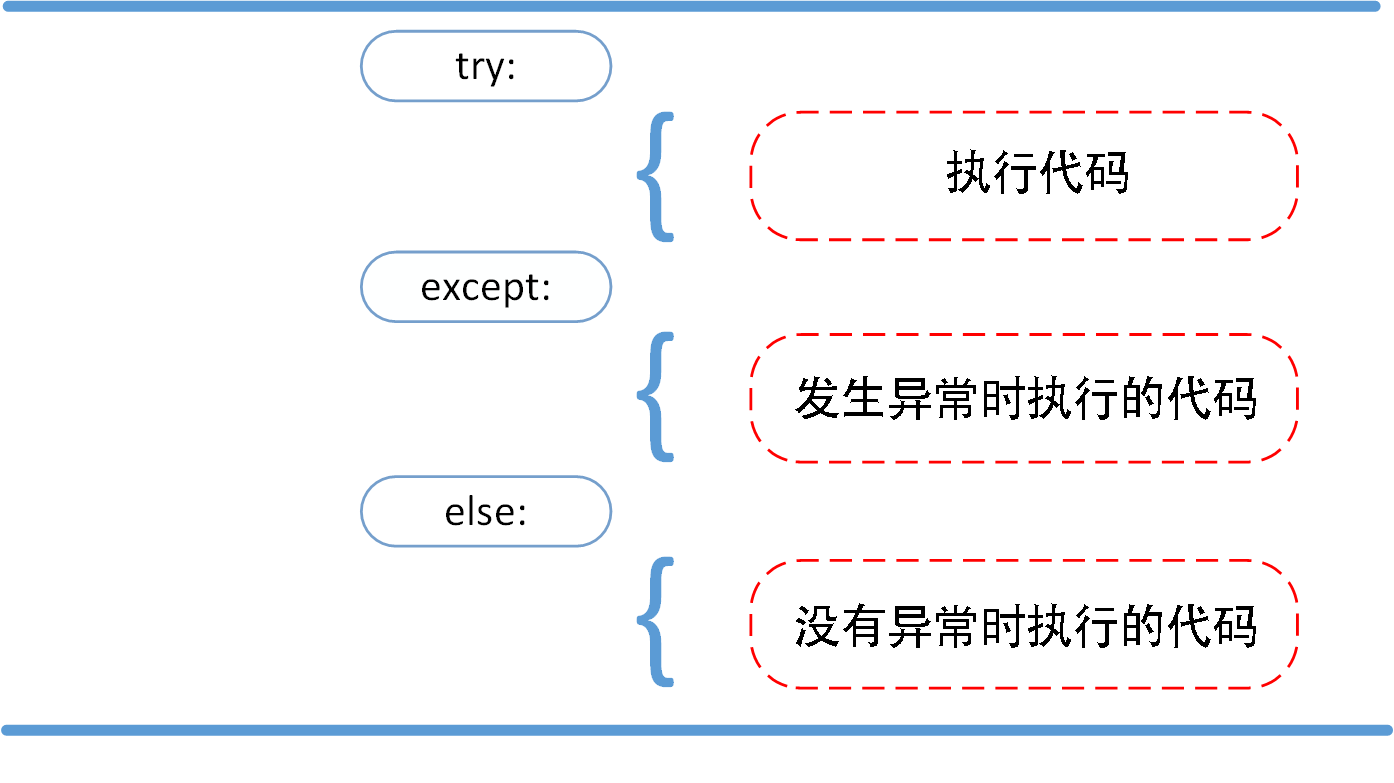
                for arg in sys.argv[1:]:
                    try:
                        f = open(arg, 'r')
                    except IOError:
                        print('cannot open', arg)
                    else:
                        print(arg, 'has', len(f.readlines()), 'lines')
                        f.close()
- try-finally 语句
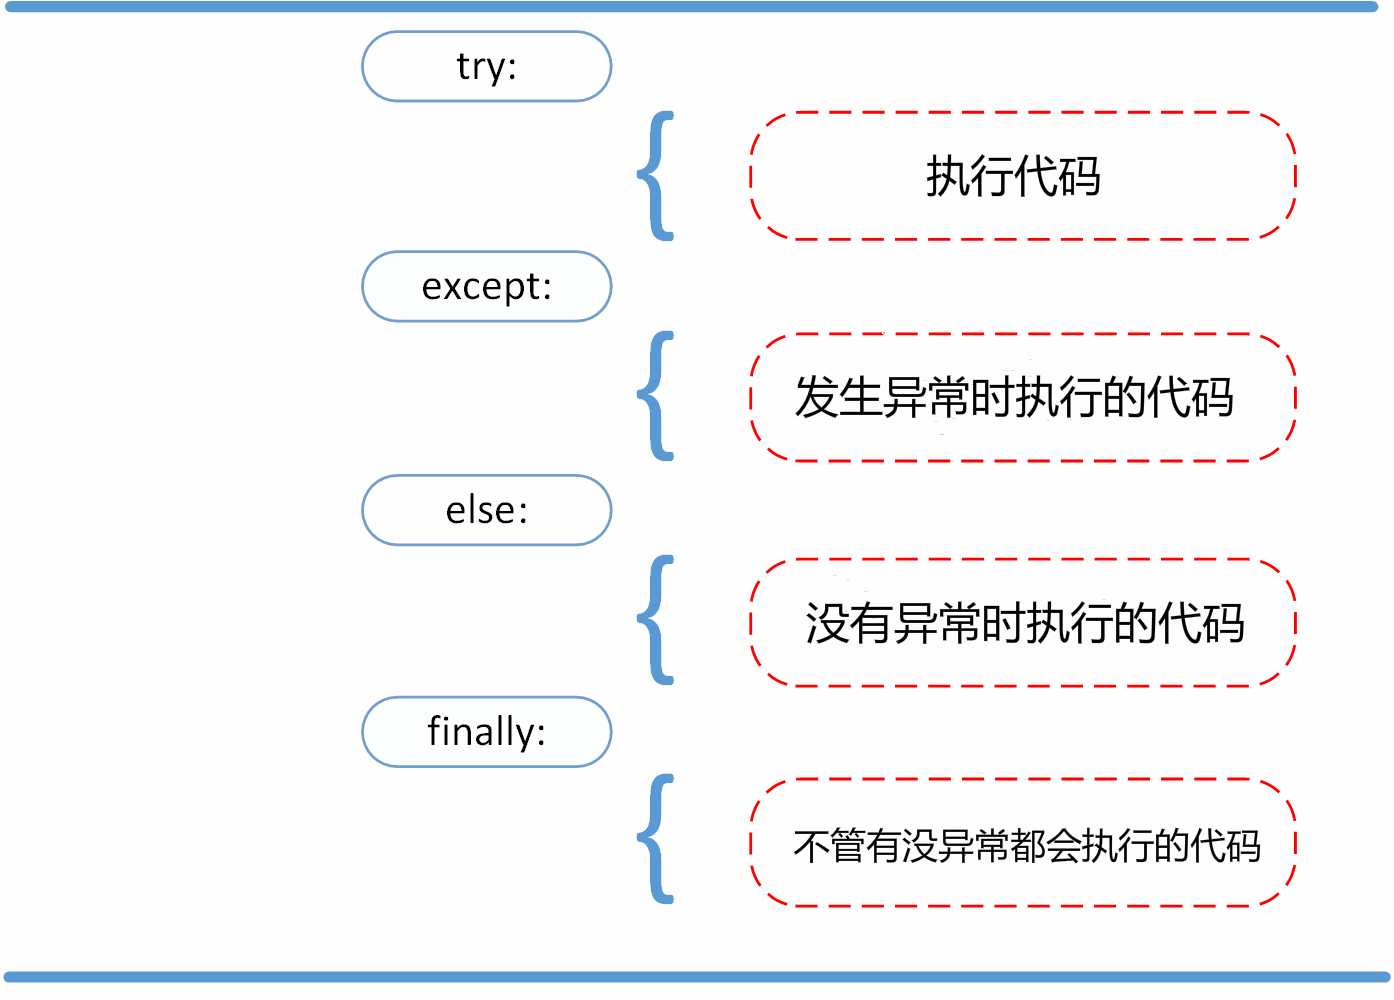
实例
                try:
                    runoob()
                except AssertionError as error:
                    print(error)
                else:
                    try:
                        with open('file.log') as file:
                            read_data = file.read()
                    except FileNotFoundError as fnf_error:
                        print(fnf_error)
                finally:
                    print('这句话,无论异常是否发生都会执行。')
- 抛出异常
                //Python 使用 raise 语句抛出一个指定的异常。
                raise [Exception [, args [, traceback]]]
Python3 面向对象
- 面向对象技术简介
- 类(Class): 用来描述具有相同的属性和方法的对象的集合。它定义了该集合中每个对象所共有的属性和方法。对象是类的实例。
- 方法:类中定义的函数。
- 类变量:类变量在整个实例化的对象中是公用的。类变量定义在类中且在函数体之外。类变量通常不作为实例变量使用。
- 数据成员:类变量或者实例变量用于处理类及其实例对象的相关的数据。
- 方法重写:如果从父类继承的方法不能满足子类的需求,可以对其进行改写,这个过程叫方法的覆盖(override),也称为方法的重写。
- 局部变量:定义在方法中的变量,只作用于当前实例的类。
- 实例变量:在类的声明中,属性是用变量来表示的,这种变量就称为实例变量,实例变量就是一个用 self 修饰的变量。
- 继承:即一个派生类(derived class)继承基类(base class)的字段和方法。继承也允许把一个派生类的对象作为一个基类对象对待。例如,有这样一个设计:一个Dog类型的对象派生自Animal类,这是模拟"是一个(is-a)"关系(例图,Dog是一个Animal)。
- 实例化:创建一个类的实例,类的具体对象。
- 对象:通过类定义的数据结构实例。对象包括两个数据成员(类变量和实例变量)和方法。
- 类对象
类对象支持两种操作:属性引用和实例化。 属性引用使用和 Python 中所有的属性引用一样的标准语法:obj.name。
                class MyClass:
                    """一个简单的类实例"""
                    i = 12345
                    def f(self):
                        return 'hello world'

                # 实例化类
                x = MyClass()

                # 访问类的属性和方法
                print("MyClass 类的属性 i 为:", x.i)
                print("MyClass 类的方法 f 输出为:", x.f())
- 构造方法
                //该方法在类实例化时会自动调用
                def __init__(self):
                    self.data = []
注:self代表类的实例,而非类
- 类的方法
                //在类的内部,使用 def 关键字来定义一个方法,与一般函数定义不同,类方法必须包含参数 self, 且为第一个参数,self 代表的是类的实例。


                #类定义
                class people:
                    #定义基本属性
                    name = ''
                    age = 0
                    #定义私有属性,私有属性在类外部无法直接进行访问
                    __weight = 0
                    #定义构造方法
                    def __init__(self,n,a,w):
                        self.name = n
                        self.age = a
                        self.__weight = w
                    def speak(self):
                        print("%s 说: 我 %d 岁。" %(self.name,self.age))

                # 实例化类
                p = people('runoob',10,30)
                p.speak()
- 继承
需要注意圆括号中基类的顺序,若是基类中有相同的方法名,而在子类使用时未指定,python从左至右搜索 即方法在子类中未找到时,从左到右查找基类中是否包含方法。 BaseClassName(示例中的基类名)必须与派生类定义在一个作用域内。除了类,还可以用表达式,基类定义在另一个模块中时这一点非常有用:
                #类定义
                class people:
                    #定义基本属性
                    name = ''
                    age = 0
                    #定义私有属性,私有属性在类外部无法直接进行访问
                    __weight = 0
                    #定义构造方法
                    def __init__(self,n,a,w):
                        self.name = n
                        self.age = a
                        self.__weight = w
                    def speak(self):
                        print("%s 说: 我 %d 岁。" %(self.name,self.age))

                #单继承示例
                class student(people):
                    grade = ''
                    def __init__(self,n,a,w,g):
                        #调用父类的构函
                        people.__init__(self,n,a,w)
                        self.grade = g
                    #覆写父类的方法
                    def speak(self):
                        print("%s 说: 我 %d 岁了,我在读 %d 年级"%(self.name,self.age,self.grade))


                s = student('ken',10,60,3)
                s.speak()
- 多继承
                class DerivedClassName(Base1, Base2, Base3):
                    <statement-1>
                    .
                    .
                    .
                    <statement-N>
需要注意圆括号中父类的顺序,若是父类中有相同的方法名,而在子类使用时未指定,python从左至右搜索 即方法在子类中未找到时,从左到右查找父类中是否包含方法。


#!/usr/bin/python3

#类定义
class people:
    #定义基本属性
    name = ''
    age = 0
    #定义私有属性,私有属性在类外部无法直接进行访问
    __weight = 0
    #定义构造方法
    def __init__(self,n,a,w):
        self.name = n
        self.age = a
        self.__weight = w
    def speak(self):
        print("%s 说: 我 %d 岁。" %(self.name,self.age))

#单继承示例
class student(people):
    grade = ''
    def __init__(self,n,a,w,g):
        #调用父类的构函
        people.__init__(self,n,a,w)
        self.grade = g
    #覆写父类的方法
    def speak(self):
        print("%s 说: 我 %d 岁了,我在读 %d 年级"%(self.name,self.age,self.grade))

#另一个类,多重继承之前的准备
class speaker():
    topic = ''
    name = ''
    def __init__(self,n,t):
        self.name = n
        self.topic = t
    def speak(self):
        print("我叫 %s,我是一个演说家,我演讲的主题是 %s"%(self.name,self.topic))

#多重继承
class sample(speaker,student):
    a =''
    def __init__(self,n,a,w,g,t):
        student.__init__(self,n,a,w,g)
        speaker.__init__(self,n,t)

test = sample("Tim",25,80,4,"Python")
test.speak()   #方法名同,默认调用的是在括号中排前地父类的方法
- 方法重写
如果你的父类方法的功能不能满足你的需求,你可以在子类重写你父类的方法,实例如下:
                class Parent:        # 定义父类
                   def myMethod(self):
                      print ('调用父类方法')

                class Child(Parent): # 定义子类
                   def myMethod(self):
                      print ('调用子类方法')

                c = Child()          # 子类实例
                c.myMethod()         # 子类调用重写方法
                super(Child,c).myMethod() #用子类对象调用父类已被覆盖的方法
- 类属性与方法
- __private_attrs:两个下划线开头,声明该属性为私有,不能在类的外部被使用或直接访问。在类内部的方法中使用时 self.__private_attrs。
- 类的方法: 在类的内部,使用 def 关键字来定义一个方法,与一般函数定义不同,类方法必须包含参数 self,且为第一个参数,self 代表的是类的实例。 self 的名字并不是规定死的,也可以使用 this,但是最好还是按照约定是用 self。
- 类的私有方法 __private_method:两个下划线开头,声明该方法为私有方法,只能在类的内部调用 ,不能在类的外部调用。self.__private_methods。
                //私有属性
                class JustCounter:
                    __secretCount = 0  # 私有变量
                    publicCount = 0    # 公开变量

                    def count(self):
                        self.__secretCount += 1
                        self.publicCount += 1
                        print (self.__secretCount)

                counter = JustCounter()
                counter.count()
                counter.count()
                print (counter.publicCount)
                print (counter.__secretCount)  # 报错,实例不能访问私有变量

                //私有方法
                class Site:
                        def __init__(self, name, url):
                                self.name = name       # public
                                self.__url = url   # private

                        def who(self):
                                print('name  : ', self.name)
                                print('url : ', self.__url)

                        def __foo(self):          # 私有方法
                                print('这是私有方法')

                        def foo(self):            # 公共方法
                                print('这是公共方法')
                                self.__foo()

                x = Site('菜鸟教程', 'www.runoob.com')
                x.who()        # 正常输出
                x.foo()        # 正常输出
                x.__foo()      # 报错
- 类的专有方法:
| 方法 | 描述 |
|---|---|
| __init__ | 构造函数,在生成对象时调用 |
| __del__ | 析构函数,释放对象时使用 |
| __repr__ | 打印,转换 |
| __setitem__ | 按照索引赋值 |
| __getitem__ | 按照索引获取值 |
| __len__ | 获得长度 |
| __cmp__ | 比较运算 |
| __call__ | 函数调用 |
| __add__ | 加运算 |
| __sub__ | 减运算 |
| __mul__ | 乘运算 |
| __truediv__ | 除运算 |
| __mod__ | 求余运算 |
| __pow__ | 乘方 |
Python3 命名空间和作用域
- 命名空间
命名空间(Namespace)是从名称到对象的映射,大部分的命名空间都是通过 Python 字典来实现的。 命名空间提供了在项目中避免名字冲突的一种方法。各个命名空间是独立的,没有任何关系的,所以一个命名空间中不能有重名,但不同的命名空间是可以重名而没有任何影响。
- 内置名称(built-in names), Python 语言内置的名称,比如函数名 abs、char 和异常名称 BaseException、Exception 等等。
- 全局名称(global names),模块中定义的名称,记录了模块的变量,包括函数、类、其它导入的模块、模块级的变量和常量。
- 局部名称(local names),函数中定义的名称,记录了函数的变量,包括函数的参数和局部定义的变量。(类中定义的也是)
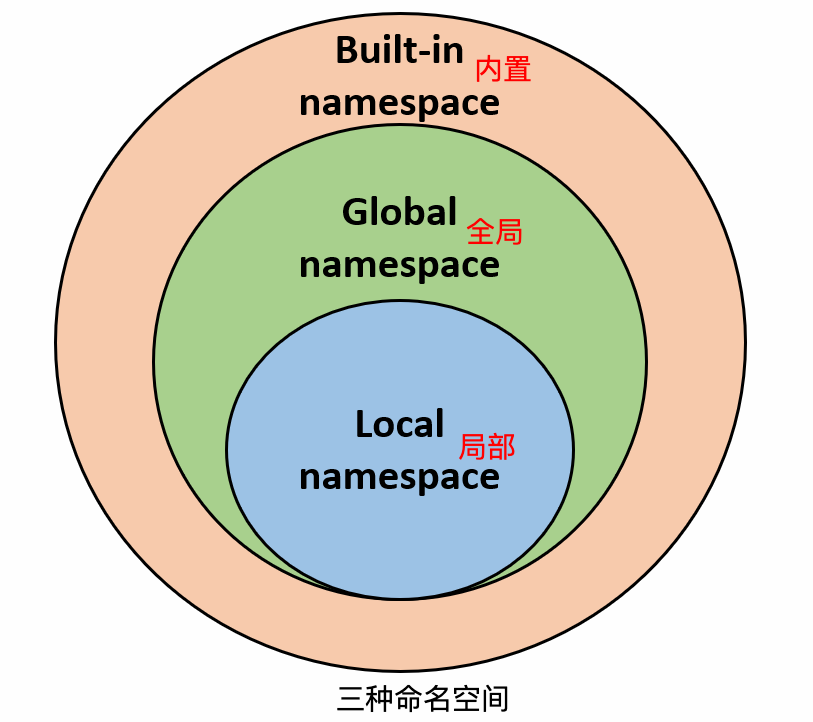
Python 的查找顺序为:局部的命名空间去 -> 全局命名空间 -> 内置命名空间。
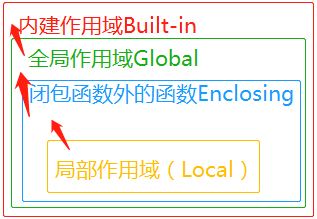
- 作用域
- L(Local):最内层,包含局部变量,比如一个函数/方法内部。
- E(Enclosing):包含了非局部(non-local)也非全局(non-global)的变量。比如两个嵌套函数,一个函数(或类) A 里面又包含了一个函数 B ,那么对于 B 中的名称来说 A 中的作用域就为 nonlocal。
- G(Global):当前脚本的最外层,比如当前模块的全局变量。
- B(Built-in): 包含了内建的变量/关键字等。,最后被搜索
注:规则顺序: L –> E –> G –>gt; B。
                g_count = 0  # 全局作用域
                def outer():
                    o_count = 1  # 闭包函数外的函数中
                    def inner():
                        i_count = 2  # 局部作用域
- 全局变量和局部变量
                total = 0 # 这是一个全局变量
                # 可写函数说明
                def sum( arg1, arg2 ):
                    #返回2个参数的和."
                    total = arg1 + arg2 # total在这里是局部变量.
                    print ("函数内是局部变量 : ", total)
                    return total

                #调用sum函数
                sum( 10, 20 )
                print ("函数外是全局变量 : ", total)
- global 和 nonlocal关键字
当内部作用域想修改外部作用域的变量时,就要用到global和nonlocal关键字了。
                num = 1
                def fun1():
                    global num  # 需要使用 global 关键字声明
                    print(num)
                    num = 123
                    print(num)
                fun1()
                print(num)
Python3 标准库概览
- 操作系统接口
                >>> import os
                >>> os.getcwd()      # 返回当前的工作目录
                'C:\Python34'
                >>> os.chdir('/server/accesslogs')   # 修改当前的工作目录
                >>> os.system('mkdir today')   # 执行系统命令 mkdir
                0

                //针对日常的文件和目录管理任务,:mod:shutil 模块提供了一个易于使用的高级接口:
                >>> import shutil
                >>> shutil.copyfile('data.db', 'archive.db')
                >>> shutil.move('/build/executables', 'installdir')
- 文件通配符
                //glob模块提供了一个函数用于从目录通配符搜索中生成文件列表:
                >>> import glob
                >>> glob.glob('*.py')
                ['primes.py', 'random.py', 'quote.py']
- 命令行参数
                //通用工具脚本经常调用命令行参数。这些命令行参数以链表形式存储于 sys 模块的 argv 变量。例如在命令行中执行 "python demo.py one two three" 后可以得到以下输出结果:
                >>> import sys
                >>> print(sys.argv)
                ['demo.py', 'one', 'two', 'three']
- 错误输出重定向和程序终止
                #sys 还有 stdin,stdout 和 stderr 属性,即使在 stdout 被重定向时,后者也可以用于显示警告和错误信息。
                >>> sys.stderr.write('Warning, log file not found starting a new one
')
                Warning, log file not found starting a new one
- 字符串正则匹配
                #re模块为高级字符串处理提供了正则表达式工具。对于复杂的匹配和处理,正则表达式提供了简洁、优化的解决方案:
                >>> import re
                >>> re.findall(r'f[a-z]*', 'which foot or hand fell fastest')
                ['foot', 'fell', 'fastest']
                >>> re.sub(r'([a-z]+) 1', r'1', 'cat in the the hat')
                'cat in the hat'
                >>> 'tea for too'.replace('too', 'two')
                'tea for two'
- 数学
math模块为浮点运算提供了对底层C函数库的访问:
                >>> import math
                >>> math.cos(math.pi / 4)
                0.70710678118654757
                >>> math.log(1024, 2)
                10.0
random提供了生成随机数的工具。
                >>> import random
                >>> random.choice(['apple', 'pear', 'banana'])
                'apple'
                >>> random.sample(range(100), 10)   # sampling without replacement
                [30, 83, 16, 4, 8, 81, 41, 50, 18, 33]
                >>> random.random()    # random float
                0.17970987693706186
                >>> random.randrange(6)    # random integer chosen from range(6)
                4
- 访问互联网
有几个模块用于访问互联网以及处理网络通信协议。其中最简单的两个是用于处理从 urls 接收的数据的 urllib.request 以及用于发送电子邮件的 smtplib:
                >>> from urllib.request import urlopen
                >>> for line in urlopen('http://tycho.usno.navy.mil/cgi-bin/timer.pl'):
                ...     line = line.decode('utf-8')  # Decoding the binary data to text.
                ...     if 'EST' in line or 'EDT' in line:  # look for Eastern Time
                ...         print(line)

                <BR>Nov. 25, 09:43:32 PM EST

                >>> import smtplib
                >>> server = smtplib.SMTP('localhost')
                >>> server.sendmail('soothsayer@example.org', 'jcaesar@example.org',
                ... """To: jcaesar@example.org
                ... From: soothsayer@example.org
                ...
                ... Beware the Ides of March.
                ... """)
                >>> server.quit()
- 日期和时间
datetime模块为日期和时间处理同时提供了简单和复杂的方法。 支持日期和时间算法的同时,实现的重点放在更有效的处理和格式化输出。 该模块还支持时区处理:
- 常用时间处理方法
- 今天 today = datetime.date.today()
- 昨天 yesterday = today - datetime.timedelta(days=1)
- 上个月 last_month = today.month - 1 if today.month - 1 else 12
- 当前时间戳 time_stamp = time.time()
- 时间戳转datetime datetime.datetime.fromtimestamp(time_stamp)
- datetime转时间戳 int(time.mktime(today.timetuple()))
- datetime转字符串 today_str = today.strftime("%Y-%m-%d")
- 字符串转datetime today = datetime.datetime.strptime(today_str, "%Y-%m-%d")
- 补时差 today + datetime.timedelta(hours=8)
                >>> # dates are easily constructed and formatted
                >>> from datetime import date
                >>> now = date.today()
                >>> now
                datetime.date(2003, 12, 2)
                >>> now.strftime("%m-%d-%y. %d %b %Y is a %A on the %d day of %B.")
                '12-02-03. 02 Dec 2003 is a Tuesday on the 02 day of December.'

                >>> # dates support calendar arithmetic
                >>> birthday = date(1964, 7, 31)
                >>> age = now - birthday
                >>> age.days
                14368
- 数据压缩
以下模块直接支持通用的数据打包和压缩格式:zlib,gzip,bz2,zipfile,以及 tarfile。
                >>> import zlib
                >>> s = b'witch which has which witches wrist watch'
                >>> len(s)
                41
                >>> t = zlib.compress(s)
                >>> len(t)
                37
                >>> zlib.decompress(t)
                b'witch which has which witches wrist watch'
                >>> zlib.crc32(s)
                226805979
- 性能度量
                >>> from timeit import Timer
                >>> Timer('t=a; a=b; b=t', 'a=1; b=2').timeit()
                0.57535828626024577
                >>> Timer('a,b = b,a', 'a=1; b=2').timeit()
                0.54962537085770791
- 测试模块
开发高质量软件的方法之一是为每一个函数开发测试代码,并且在开发过程中经常进行测试 doctest模块提供了一个工具,扫描模块并根据程序中内嵌的文档字符串执行测试。
                def average(values):
                    """Computes the arithmetic mean of a list of numbers.

                    >>> print(average([20, 30, 70]))
                    40.0
                    """
                    return sum(values) / len(values)

                import doctest
                doctest.testmod()   # 自动验证嵌入测试


                #unittest模块不像 doctest模块那么容易使用,不过它可以在一个独立的文件里提供一个更全面的测试集:
                import unittest

                class TestStatisticalFunctions(unittest.TestCase):

                    def test_average(self):
                        self.assertEqual(average([20, 30, 70]), 40.0)
                        self.assertEqual(round(average([1, 5, 7]), 1), 4.3)
                        self.assertRaises(ZeroDivisionError, average, [])
                        self.assertRaises(TypeError, average, 20, 30, 70)

                unittest.main() # Calling from the command line invokes all tests
- urlopen
                #处理get请求,不传data,则为get请求

                import urllib
                from urllib.request import urlopen
                from urllib.parse import urlencode

                url='http://www.xxx.com/login'
                data={"username":"admin","password":123456}
                req_data=urlencode(data)#将字典类型的请求数据转变为url编码
                res=urlopen(url+'?'+req_data)#通过urlopen方法访问拼接好的url
                res=res.read().decode()#read()方法是读取返回数据内容,decode是转换返回数据的bytes格式为str

                print(res)
                #处理post请求,如果传了data,则为post请求

                import urllib
                from urllib.request import Request
                from urllib.parse import urlencode

                url='http://www.xxx.com/login'
                data={"username":"admin","password":123456}
                data=urlencode(data)#将字典类型的请求数据转变为url编码
                data=data.encode('ascii')#将url编码类型的请求数据转变为bytes类型
                req_data=Request(url,data)#将url和请求数据处理为一个Request对象,供urlopen调用
                with urlopen(req_data) as res:
                    res=res.read().decode()#read()方法是读取返回数据内容,decode是转换返回数据的bytes格式为str

                print(res)