前言:
一直想要编译一下Android 源码,之前去google 看,下载要下载repo。
当时很懵逼,repo 是个什么?(repo 是一个python 脚本,因为Android 源码git 仓库太多,帮助管理git 仓库的,你不需要知道里面什么实现。会用就行。)
然后往下看,看到网上说,编译Android AOSP 只能用Ubuntu,当时自己的心也哇哇凉啊。
自己只有一个工作的电脑,自己的电脑配置太低。 看网上说,还要200G 的空间。(有一个拦路虎)
之前自己给自己的windos 安装过双系统,但是好像一直启动不了。现在想想,应该是因为当时没有设置引导盘的顺序吧。现在我用一个usb 连接了一个1T的硬盘,里面安装了Ubentu . 如果我插了这个硬盘,启动的就是ubuntu, 如果没有,就是工作的windows 。工作学习两不误。
不知道什么动力让我突破了所有上面的拦路虎,依然决然去编译源码。面试的时候,别人提到过,我说我想,但是没有做到,别人说,那么你为了编译源码,你第一步应该怎么做? 我说首先下载源码,安装Ubuntu。终于一步一步走过来了。感谢面试的那个人给我指点,让我思考。
一路走来,少些艰辛。下载代码用了两天,还是下载的清华镜像的,公司的网太慢了,43G 下载了两天,然后正好周末,编译成功花费了两天周末时间,但是还是很值得的。里面有很多坑,给大家分享下。
下载AOSP:
google 的AOSP 的话,因为翻墙和数据量太大,考虑国内的镜像。
https://mirrors.tuna.tsinghua.edu.cn/help/AOSP/ 这个网址是清华大学的镜像站。
由于首次同步需要下载约 30GB 数据,过程中任何网络故障都可能造成同步失败,我们强烈建议您使用初始化包进行初始化。也就是我们直接下载一个git仓库。这样的话,不会说,文件太大,git clone 的时候老是中断。
下载 https://mirrors.tuna.tsinghua.edu.cn/aosp-monthly/aosp-latest.tar,
下载完成后记得根据 checksum.txt 的内容校验一下。
当时我是用Windows 迅雷下载的文件。
当然如果你直接是Ubuntu 系统,也可以用下面的方法:
wget -c https://mirrors.tuna.tsinghua.edu.cn/aosp-monthly/aosp-latest.tar # 下载初始化包
tar xf aosp-latest.tar
cd AOSP   # 解压得到的 AOSP 工程目录
# 这时 ls 的话什么也看不到,因为只有一个隐藏的 .repo 目录
repo sync # 正常同步一遍即可得到完整目录
# 或 repo sync -l 仅checkout代码
安装Ubentu
一定要安装Ubentu ,这个可以让你少走一些坑。
之前我用迅雷下载了清华大学的AOSP,是tar 文件,我用Windows 解压之后,当时的想法很简单,就是只想简单的看下源码先。当时解压之后,执行python repo sync ,报了乱七八糟的错。我还调试了repo 的源码。花了不少时间。
后来发现config 文件,解压之后和压缩包里面的不一样,我就知道了,可能tar 文件,Windows 解压之后,会有问题。
果断去安装Ubuntu。
安装之后,把下载的文件copy 到 Ubentu 的/usr/lib/下面。(当然你可以随便copy 到任何地方)
由于太大,该过程大约十多分钟。
copy 完成之后,解压缩:
tar -xvf ***.tar -C /usr/lib/AOSP
这也是一个漫长的过程,大概半个多小时。毕竟40G的代码。
安装Python 2.7,git(如果有,请忽略)
因为repo 是python 脚本工具,你的Ubuntu需要Python 运行环境。Python 3.5 可能会有问题,最好安装python 2.7
sudo apt-install python
sudo add-apt-repository ppa:git-core/ppa       //添加源
sudo apt-get update                                          //更新
sudo apt-get install git                //自动安装git
git --version                                                       //确认git版本

//第一次使用前
git config --global user.name "your name"        //设置用户名,注意git config命令的--global参数,用了这个参数,表示你这台机器上所有的Git仓库都会使用这个配置,当然也可以对某个仓库指定不同的用户名和Email地址。
git config --global user.email "your email"        //设置电子邮箱
git config user.name                                           //查看用户名
git config user.email                                           //查看电子邮箱
初始化仓库:
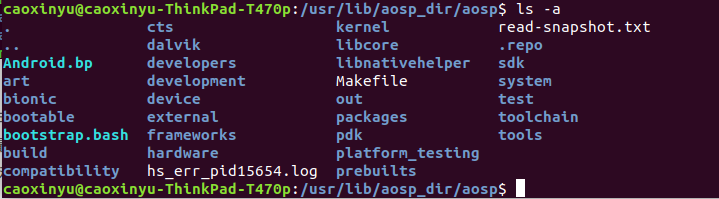
解压缩完成之后,因为.repo 是隐藏文件夹,所以,需要ls -a 才能看到:

执行以下命令,同步以下代码。
cd .repo
python repo sync

中间可能执行失败,注意,你的网络一定要ok。可以设置代理,但是要保证有代理的情况下,可以访问清华镜像的网站。
但是最好不要设置代理。我当时就浪费了很多时间。
如果执行python repo sync 失败了,那么在执行一次。多执行几次。同时排除网络原因。
成功之后,切换到AOSP 目录:
也就是.repo 父目录。
执行:
source build/envsetup.sh
注意:source 是 一个系统命令。
执行之后,可能没有任何的提示。那么就是成功了。
当然有的电脑可能会有其他提示。都一样。
如果出现source: not found错误
运行 ls -l /bin/sh 后显示/bin/sh -> dash
这说明是用dash来进行解析的。
解决方案:
命令行执行:dpkg-reconfigure dash(需要root权限)
在界面中选择no
再运行ls -l /bin/sh 后显示/bin/sh -> bash
执行source build/envsetup.sh 不报错,即OK。
补充一点 :
编译环境初始化(即执行source build/envsetup.sh)之后,我们可以得到一些有用的指令,除了上边用到的lunch,还有以下:
  - croot: Changes directory to the top of the tree.
  - m: Makes from the top of the tree.
  - mm: Builds all of the modules in the current directory.
  - mmm: Builds all of the modules in the supplied directories.
  - cgrep: Greps on all local C/C++ files.
  - jgrep: Greps on all local Java files.
  - resgrep: Greps on all local res/*.xml files.
  - godir: Go to the directory containing a file.
	其中mmm指令就是用来编译指定目录.通常来说,每个目录只包含一个模块.比如这里我们要编译Setting 模块,执行指令:
	mmm packages/apps/Settings/
接着执行lunch
lunch
选择编译的目标版本:

如果你的电脑是64位的话,选择27,因为x86版本的虚拟机运行比较快。不要编译arm 版本的了,我当时编译过,但是运行起来太慢,而且运行不起来。浪费了一晚上。
编译之前:
编译之前一定要保证一些库安装了,不然编译了几个小时之后报错,某个库没有安装,岂不是很难受?
//防止出现/bin/bash:m4:command not found
sudo apt-get install m4
///防止出现bin/bash: xmllint: command not found
sudo apt-get install libxml2-utils
编译
make -j8
如果遇到了下面的错误:
/usr/lib/aosp_dir/aosp/frameworks/base/media/java/android/media/MediaDrm.java:1207: warning: Returning unexpected constant SECURITY_LEVEL_MAX; is @SecurityLevel missing this constant? Expected one of SECURITY_LEVEL_UNKNOWN, SECURITY_LEVEL_SW_SECURE_CRYPTO, SECURITY_LEVEL_SW_SECURE_DECODE, SECURITY_LEVEL_HW_SECURE_CRYPTO, SECURITY_LEVEL_HW_SECURE_DECODE, SECURITY_LEVEL_HW_SECURE_ALL [ReturningUnexpectedConstant]
15:58:20 ninja failed with: exit status 1
在执行一次make -j8
如果遇到下面的错误:
如果你提示了no such file /…/.lunchrc 出现只能说明之前你没有执行source build/envsetup.sh :
最终编译成功:
Unsparsing /media/caoxinyu/TomasYu/out/target/product/generic_x86_64/system.img
[100% 8408/8408] Creating /media/caoxinyu/TomasYu/out/target/product/generic_x86_64/VerifiedBootParams.textproto

#### build completed successfully (37:36 (mm:ss)) ####
编译success 之后:
启动模拟器
emulator

如果遇到一下错误:
emulator: ERROR: x86_64 emulation currently requires hardware acceleration!
Please ensure KVM is properly installed and usable.

CPU acceleration status: KVM is not installed on this machine (/dev/kvm is missing).
检查你的电脑支不支持虚拟机
egrep -c '(vmx|svm)' /proc/cpuinfo
如果显示0表示不支持,如果是1,以以上,表示支持。

然后去boss 里面启用虚拟机。
Open Virtual machine setting.
Go to the processor.
Check the virtualize Intel VT-x/EPT or AMD-RVI option.
Click ok and run the Virtual machine, it should work fine with you.
之后执行下面命令:
sudo apt-get install qemu-kvm libvirt-bin ubuntu-vm-builder bridge-utils
sudo adduser `id -un` libvirtd
sudo adduser `id -un` kv
如果遇到这个错误:
emulator: ERROR: x86 emulation currently requires hardware acceleration!
	Please ensure KVM is properly installed and usable.
	CPU acceleration status: This user doesn't have permissions to use KVM (/dev/kvm).

	或者提示
	emulator: ERROR: x86 emulation currently requires hardware acceleration!
	Please ensure KVM is properly installed and usable.
	CPU acceleration status: Could not open /dev/kvm :Permission denied
使用 root 权限执行以下三条命令后注销当前用户或者直接重启电脑即可
	(本例子中当前登录图形界面的用户是 sman)

	groupadd kvm
	usermod -G kvm -a sman
	echo 'KERNEL=="kvm",GROUP="kvm",MODE="0660"' >> /etc/udev/rules.d/androidUseKVM.rules

	这三条命令的作用分别是:
	#创建用户组kvm
	#将用户sman添加到kvm用户组
	#开机时自动赋予用户组kvm拥有0660的权限
如果第三条执行错误,没有关系。
继续执行emulator
如果报错:
grant current user access to /dev/kvm 以及/dev/kvm devices: permission denies
解决方法:执行 sudo chown username -R /dev/kvm 注意username是你用的用户名
继续执行emulator
总结:
1.编译源码其实没有那么难,只是你要付出时间去做这件事情。
2.遇到问题,百度、google解决问题。毕竟代码都是别人上传的没有问题的,你只是编译。
可能遇到的错误:
OpenJDK 64-Bit Server VM warning: INFO: os::commit_memory(0x0000000090e00000, 283115520, 0) failed; error='Not enough space' (errno=12)
#
# There is insufficient memory for the Java Runtime Environment to continue.
# Native memory allocation (mmap) failed to map 283115520 bytes for committing reserved memory.
# An error report file with more information is saved as:
# /usr/lib/aosp_dir/aosp/hs_err_pid425.log
[ 98% 111020/112583] //frameworks/base/services:services d8 [common]
原因:内存不够,可能是你开的线程太多了。比如make -j20 这种。还有一种原因是可能没有设置交换区。
设置交换区参考:
https://blog.csdn.net/qq_35976351/article/details/79363760
感谢:
AOSP 编译
https://blog.csdn.net/fnhfire_7030/article/details/79074415
安装搜狗输入法
https://blog.csdn.net/fx_yzjy101/article/details/80243710
安装git
https://blog.csdn.net/m0_37950361/article/details/80138929
ubuntu系统shell 中source: not found错误
https://blog.csdn.net/buynow123/article/details/51774018
/bin/bash: m4: command not found
https://blog.csdn.net/yao2huan/article/details/78841683
CPU acceleration status: KVM is not installed on this machine (/dev/kvm is missing).
https://blog.csdn.net/fengxingzhe001/article/details/78060126
AOSP 编译
https://blog.csdn.net/wuxiaolongtongxue/article/details/85633344
CPU acceleration status: This user doesn’t have permissions to use KVM (/dev/kvm).
http://www.cnblogs.com/howdop/p/5347729.html
grant current user access to /dev/kvm 以及/dev/kvm devices: permission denies