前言
延迟队列使用场景:
- 未按时支付的订单,30分钟过期之后取消订单;
- 给活跃度比较低的用户间隔N天之后推送消息,提高活跃度;
- 过1分钟给新注册会员的用户,发送注册邮件等
延迟队列实现方式:
- 通过消息过期后进入死信交换器,再由交换器转发到延迟消费队列,实现延迟功能;
- 使用rabbitmq-delayed-message-exchange插件实现延迟功能;
注意: 延迟插件rabbitmq-delayed-message-exchange是在RabbitMQ 3.5.7及以上的版本才支持的,依赖Erlang/OPT 18.0及以上运行环境。
由于使用死信交换器相对曲折,本文重点介绍第二种方式,使用rabbitmq-delayed-message-exchange插件完成延迟队列的功能。
安装插件
插件安装到
rabbitmq的插件目录 (一般是/usr/lib/rabbitmq/plugins 或者 /usr/lib/rabbitmq/lib/rabbitmq_server-version/plugins 目录)然后在
rabbitmq-server运行的状态下,运行启动延迟队列命令:rabbitmq-plugins enable rabbitmq_delayed_message_exchange
禁用延迟队列:
rabbitmq-plugins disable rabbitmq_delayed_message_exchange
代码实现
-
配置队列
import com.example.rabbitmq.mq.DirectConfig; import org.springframework.amqp.core.*; import org.springframework.context.annotation.Bean; import org.springframework.context.annotation.Configuration; import java.util.HashMap; import java.util.Map; @Configuration public class DelayedConfig { final static String QUEUE_NAME = "delayed.goods.order"; final static String EXCHANGE_NAME = "delayedec";
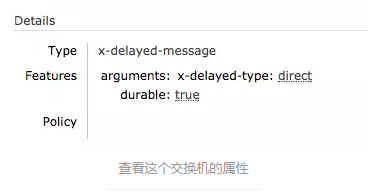
@Bean public Queue queue() { return new Queue(DelayedConfig.QUEUE_NAME); } // 配置默认的交换机 @Bean CustomExchange customExchange() { Map<String, Object> args = new HashMap<>(); args.put("x-delayed-type", "direct"); //参数二为类型:必须是x-delayed-message return new CustomExchange(DelayedConfig.EXCHANGE_NAME, "x-delayed-message", true, false, args); }
// 绑定队列到交换器 @Bean Binding binding(Queue queue, CustomExchange exchange) { return BindingBuilder.bind(queue).to(exchange).with(DelayedConfig.QUEUE_NAME).noargs(); } }
上面定义了一个x-delayed-message类型的交换机,由于Spring AMQP中没有这个类型的交换机,所以我们使用一个CustomExchange来定义这个插件构建的交换机。
- 发送消息
import org.springframework.amqp.AmqpException;
import org.springframework.amqp.core.AmqpTemplate;
import org.springframework.amqp.core.Message;
import org.springframework.amqp.core.MessagePostProcessor;
import org.springframework.beans.factory.annotation.Autowired;
import org.springframework.stereotype.Component;
import java.text.SimpleDateFormat;
import java.util.Date;

@Component
public class DelayedSender {
    @Autowired
    private AmqpTemplate rabbitTemplate;

    public void send(String msg) {
        SimpleDateFormat sf = new SimpleDateFormat("yyyy-MM-dd HH:mm:ss");
        System.out.println("发送时间:" + sf.format(new Date()));

        rabbitTemplate.convertAndSend(DelayedConfig.EXCHANGE_NAME, DelayedConfig.QUEUE_NAME, msg, new MessagePostProcessor() {
            @Override
            public Message postProcessMessage(Message message) throws AmqpException {
                message.getMessageProperties().setHeader("x-delay", 3000);
                return message;
            }
        });
    }
}
- 消费消息
import org.springframework.amqp.rabbit.annotation.RabbitHandler;
import org.springframework.amqp.rabbit.annotation.RabbitListener;
import org.springframework.stereotype.Component;
import java.text.SimpleDateFormat;
import java.util.Date;

@Component
@RabbitListener(queues = "delayed.goods.order")
public class DelayedReceiver {
    @RabbitHandler
    public void process(String msg) {
        SimpleDateFormat sdf = new SimpleDateFormat("yyyy-MM-dd HH:mm:ss");
        System.out.println("接收时间:" + sdf.format(new Date()));
        System.out.println("消息内容:" + msg);
    }
}
- 测试延迟队列
import com.example.rabbitmq.RabbitmqApplication;
import com.example.rabbitmq.mq.delayed.DelayedSender;
import org.junit.Test;
import org.junit.runner.RunWith;
import org.springframework.beans.factory.annotation.Autowired;
import org.springframework.boot.test.context.SpringBootTest;
import org.springframework.test.context.junit4.SpringRunner;

import java.text.SimpleDateFormat;
import java.util.Date;

@RunWith(SpringRunner.class)
@SpringBootTest
public class DelayedTest {

    @Autowired
    private DelayedSender sender;

    @Test
    public void Test() throws InterruptedException {
        SimpleDateFormat sf = new SimpleDateFormat("yyyy-MM-dd");
        sender.send("Hi Admin.");
        Thread.sleep(5 * 1000); //等待接收程序执行之后,再退出测试
    }
}
执行结果如下:
发送时间:2018-09-11 20:47:51
接收时间:2018-09-11 20:47:54
消息内容:Hi Admin.
引用: