实验前提:
1、本次实验是在Centos 7.4(64bit)系统上完成的。
2、实验前确保每台服务器时间同步
3、本次实验有3台主机,其中haproxy作为反向代理地址为192.168.31.43,后面2台的httpd服务器为web1-192.168.31.44和web2-192.168.31.45.(我这里在虚拟机上使用的是桥接的方式,也可以使用仅主机方式,不过使用仅主机方式haproxy上需要配置两块网卡)
4、测试时请关闭防火墙和selinux
安装配置步骤:
1、配置web1 IP地址:192.168.31.44
首先需要安装httpd服务(需要事先配置好yum源)
# yum -y install  httpd
然后修改httpd的根目录下的index.html文件,修改内容如下:
# echo  “WEB1,My ip is 192.168.31.44”  >  /var/www/html/index.html
启动httpd服务
# systemctl start httpd
httpd开机自启动
# systemctl enable httpd
2、配置web2 IP地址:192.168.31.45
首先需要安装httpd服务(需要事先配置好yum源)
# yum -y install  httpd
然后修改httpd的根目录下的index.html文件,修改内容如下:
# echo  “WEB2,My ip is 192.168.31.45”  >  /var/www/html/index.html
启动httpd服务
# systemctl start httpd
httpd开机自启动
# systemctl enable httpd
3、安装配置Haproxy IP地址:192.168.31.43
在Centos 7.4默认的yum源,有haproxy的软件包,因此这里为了方便直接选择使用yum的方式进行安装。
[root@haproxy ~]# yum -y install haproxy
配置完成之后,然后在编辑其配置文件为如下内容:
[root@haproxy ~]# vim /etc/haproxy/haproxy.cfg

    timeout http-request    10s
    timeout queue           1m
    timeout connect         10s
    timeout client          1m
    timeout server          1m
    timeout http-keep-alive 10s
    timeout check           10s
    maxconn                 3000

#---------------------------------------------------------------------
# main frontend which proxys to the backends
#---------------------------------------------------------------------

frontend front-cluster
    bind *:80
    mode http
    default_backend back-cluster

#---------------------------------------------------------------------
# static backend for serving up images, stylesheets and such
#---------------------------------------------------------------------

#---------------------------------------------------------------------
# round robin balancing between the various backends
#---------------------------------------------------------------------
backend back-cluster
    balance     roundrobin    (采用轮询调度算法)
    server      web1 192.168.31.44:80 check inter 1000 rise 1 fall 2 maxconn 2000
    server      web2 192.168.31.45:80 check inter 1000 rise 1 fall 2 maxconn 2000
    server      web3 127.0.0.1:8080 backup

listen stats

        mode http
        bind *:8081
        stats enable
        stats  hide-version
        stats uri /haproxyadmin?stats
        stats realm  "haproxy"
        stats auth  caoss:caoss
        stats admin if TRUE
修改完haproxy.cfg 配置文件,保存退出,并重启haproxy服务。
4、测试负载均衡功能是否生效
访问:http://192.168.31.43/ 查看显示结果
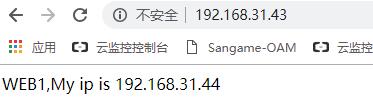
然后再刷新该页面,查看显示结果

由于采用的是加权轮询算法,因此,每个用户的请求都会均匀的分发至后端的服务器。
5、定义Backup服务器
定义备份服务器的好处在于,当后端的所有服务器都不可用时,将启动备份服务器,此时备份服务器通常不是用来提供服务的,而是返回一些提示信息给用户,比如“网站正在维护中,请您稍后访问...”等之类的信息。
在backend段中在添加一个server,并且在这个server后面加上参数backup即可。如:
 backend webserver
            server  web3 127.0.0.1:8080 backup
然后在本机上安装httpd,并启动该服务器。
# yum -y install httpd
echo "<h1>网站正在维护中,请您稍后访问...</h1>" > /var/www/html/index.html
编辑apache主配置文件:/etc/httpd/conf/httpd.conf 找到Listen 80 这一行将其修改为Listen 8080 保存退出
然后再启动httpd服务即可
# systemctl start httpd
此时,停止WEB1、WEB2上的http服务:
[root@web1 ~]# systemctl stop httpd
[root@web2 ~]# systemctl stop httpd
再次访问 http://192.168.31.43/

6、定制日志文件
Haproxy 在默认情况下不会记录日志,除在haproxy.conf 中global 段指定日志的输出外,还需配置系统日志rsyslog 服务。
[root@haproxy /]# vim /etc/haproxy/haproxy.cfg
defaults
    mode                    http
    log                     global
    option                  httplog
    log                     127.0.0.1 local3
#    option                  dontlognull
#    option http-server-close
#    option forwardfor       except 127.0.0.0/8
    option                  redispatch
    retries                 3
    timeout http-request    10s
    timeout queue           1m
    timeout connect         10s
    timeout client          1m
    timeout server          1m
    timeout http-keep-alive 10s
    timeout check           10s
    maxconn                 3000
编辑系统日志配置文件
[root@haproxy /]# vim /etc/rsyslog.conf
...............................省略...............................
# Include all config files in /etc/rsyslog.d/
$IncludeConfig /etc/rsyslog.d/*.conf
默认配置文件会读取/etc/rsyslog.d/*.conf目录下的配置文件
由此我们可以为haproxy 单独创建一个配置文件haproxy.conf
vim  /etc/rsyslog.d/haproxy.conf

$ModLoad imudp

$UDPServerRun 514

local3.*     /var/log/haproxy.log
修改rsyslog 的主配置文件,开启远程日志
[root@haproxy /]# vim /etc/sysconfig/rsyslog

# Options for rsyslogd
# Syslogd options are deprecated since rsyslog v3.
# If you want to use them, switch to compatibility mode 2 by "-c 2"
# See rsyslogd(8) for more details
SYSLOGD_OPTIONS="-c 2 -r -m 0"
参数说明:
-c 2 使用兼容模式,默认是 -c 5
-r 开启远程日志
-m 0 标记时间戳。单位是分钟,为0时,表示禁用该功能
重启haproxy和rsyslog服务
[root@haproxy /]# systemctl restart haproxy
[root@haproxy /]# systemctl restart rsyslog
验证是否生效
[root@haproxy /]# tail -f /var/log/haproxy.log
Apr 10 09:44:11 localhost haproxy[3997]: Proxy webproxy started.
Apr 10 09:44:11 localhost haproxy[3997]: Proxy static started.
Apr 10 09:44:11 localhost haproxy[3997]: Proxy dynamic started.
Apr 10 09:44:11 localhost haproxy[3997]: Proxy stats started.
Apr 10 10:20:56 localhost haproxy[4052]: Proxy webproxy started.
Apr 10 10:20:56 localhost haproxy[4052]: Proxy static started.
Apr 10 10:20:56 localhost haproxy[4052]: Proxy dynamic started.
Apr 10 10:20:56 localhost haproxy[4052]: Proxy stats started.
Apr 10 10:47:02 localhost haproxy[4053]: 192.168.10.35:61856 [10/Apr/2019:10:47:02.323] webproxy static/static 0/0/0/3/3 304 123 - - ---- 1/1/0/1/0 0/0 "GET / HTTP/1.1"
Apr 10 10:47:03 localhost haproxy[4053]: 192.168.10.35:61856 [10/Apr/2019:10:47:02.327] webproxy static/static 1541/0/0/1/1542 304 123 - - ---- 2/2/0/1/0 0/0 "GET / HTTP/1.1"
Apr 10 10:47:12 localhost haproxy[4053]: 192.168.10.35:61857 [10/Apr/2019:10:47:02.329] webproxy webproxy/<NOSRV> -1/-1/-1/-1/10002 408 212 - - cR-- 1/1/0/0/0 0/0 "<BADREQ>"
Apr 10 10:47:12 localhost haproxy[4053]: 192.168.10.35:61856 [10/Apr/2019:10:47:03.870] webproxy static/static 8545/0/0/2/8547 304 123 - - ---- 2/2/0/1/0 0/0 "GET / HTTP/1.1"
Apr 10 10:47:13 localhost haproxy[4053]: 192.168.10.35:61856 [10/Apr/2019:10:47:12.416] webproxy static/static 776/0/0/1/777 304 123 - - ---- 2/2/0/1/0 0/0 "GET / HTTP/1.1"
Apr 10 10:47:22 localhost haproxy[4053]: 192.168.10.35:61892 [10/Apr/2019:10:47:12.415] webproxy webproxy/<NOSRV> -1/-1/-1/-1/10001 408 212 - - cR-- 1/1/0/0/0 0/0 "<BADREQ>"
Apr 10 10:47:24 localhost haproxy[4053]: 192.168.10.35:61920 [10/Apr/2019:10:47:24.917] webproxy dynamic/dynamic 0/0/0/18/20 200 55068 - - ---- 2/2/0/1/0 0/0 "GET /index.php HTTP/1.1"
Apr 10 10:47:24 localhost haproxy[4053]: 192.168.10.35:61920 [10/Apr/2019:10:47:24.938] webproxy dynamic/dynamic 19/0/0/1/20 200 2695 - - ---- 2/2/1/2/0 0/0 "GET /index.php?=PHPE9568F34-D428-11d2-A769-00AA001ACF42 HTTP/1.1"
Apr 10 10:47:24 localhost haproxy[4053]: 192.168.10.35:61921 [10/Apr/2019:10:47:24.920] webproxy dynamic/dynamic 37/0/1/3/41 200 2317 - - ---- 2/2/0/1/0 0/0 "GET /index.php?=PHPE9568F35-D428-11d2-A769-00AA001ACF42 HTTP/1.1"
7、session会话保持机制
session保持方式一般说来有四种:
(1)、基于ip的绑定,这种方式不利用负载均衡,比如nat服务器后的所有用户将会被调度到后端的同一个服务器上。lvs、nginx、haproxy均提供了此功能。
(2)、基于cookie绑定,这种做法可以使得每个用户的请求被调度到不同的后端服务器,从而实现负载功能,而haproxy提供了此功能。
(3)、session集群或session复制,这种做法会使得服务器资源消耗太大,并且集群服务器之间的session信息相互复制,会增大网络io。
(4)、使用一台单独的服务器作为session服务器,当需要某个客户端的session信息时,直接从这台session服务器上获取即可。但是这种做法需要为session服务器提供高可用服务,否则session服务器故障,则所有的session信息不可用。
在这里只介绍如何使用cookie来实现会话保持功能
如在配置文件中添加如下内容:

backend back-cluster
    balance     roundrobin
    cookie      SERVERID insert nocache
    server  web1 192.168.31.44:80 cookie websession1 check inter 1000 rise 1 fall 2
    server  web2 192.168.31.45:80 cookie websession2 check inter 1000 rise 1 fall 2
    server  web3 127.0.0.1:8080 backup

然后重载haproxy服务
[root@haproxy ~]# systemctl reload haproxy
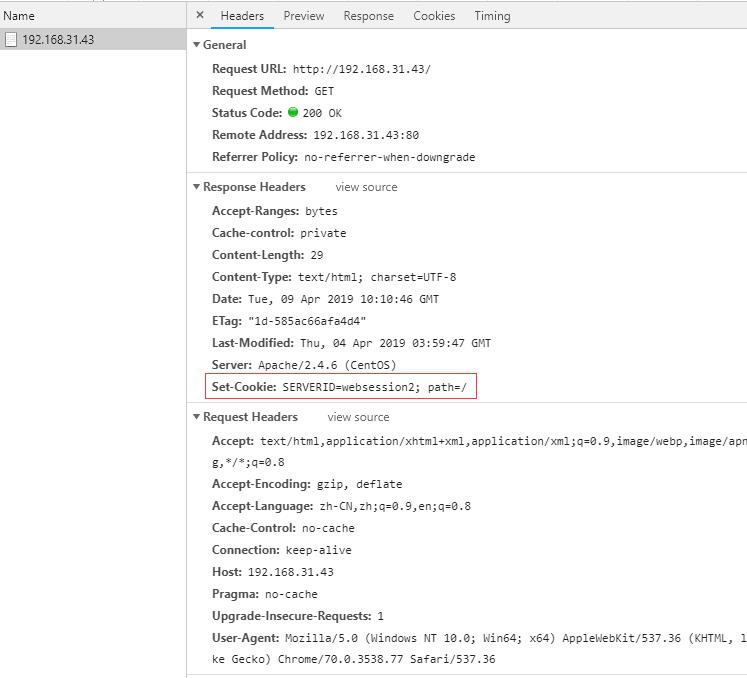
然后测试访问http://192.168.31.43,第一次访问时将会在响应报文中出现一个set-cookie的首部信息,其值为相应后端服务器返回的value,这里为websession2 ,如下图所示:
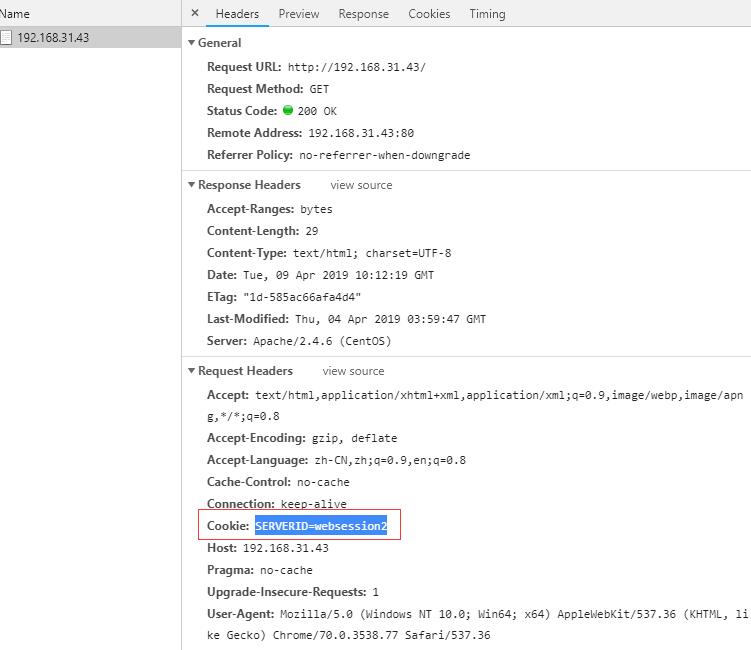
当用户下一次再请求时,请求报文中将会新增一个cookie首部,如下图所示:
8、启用统计报告功能,使用web界面来管理其haproxy的状态连接等信息
listen stats

        mode http
        bind *:8081
        stats enable
        stats  hide-version
        stats uri /haproxyadmin?stats
        stats realm  "haproxy"
        stats auth  caoss:caoss
        stats admin if TRUE   (表示只有认证通过后才可以管理其统计信息)
http://192.168.31.43:8081/haproxyadmin?stats 用户名caoss 密码caoss
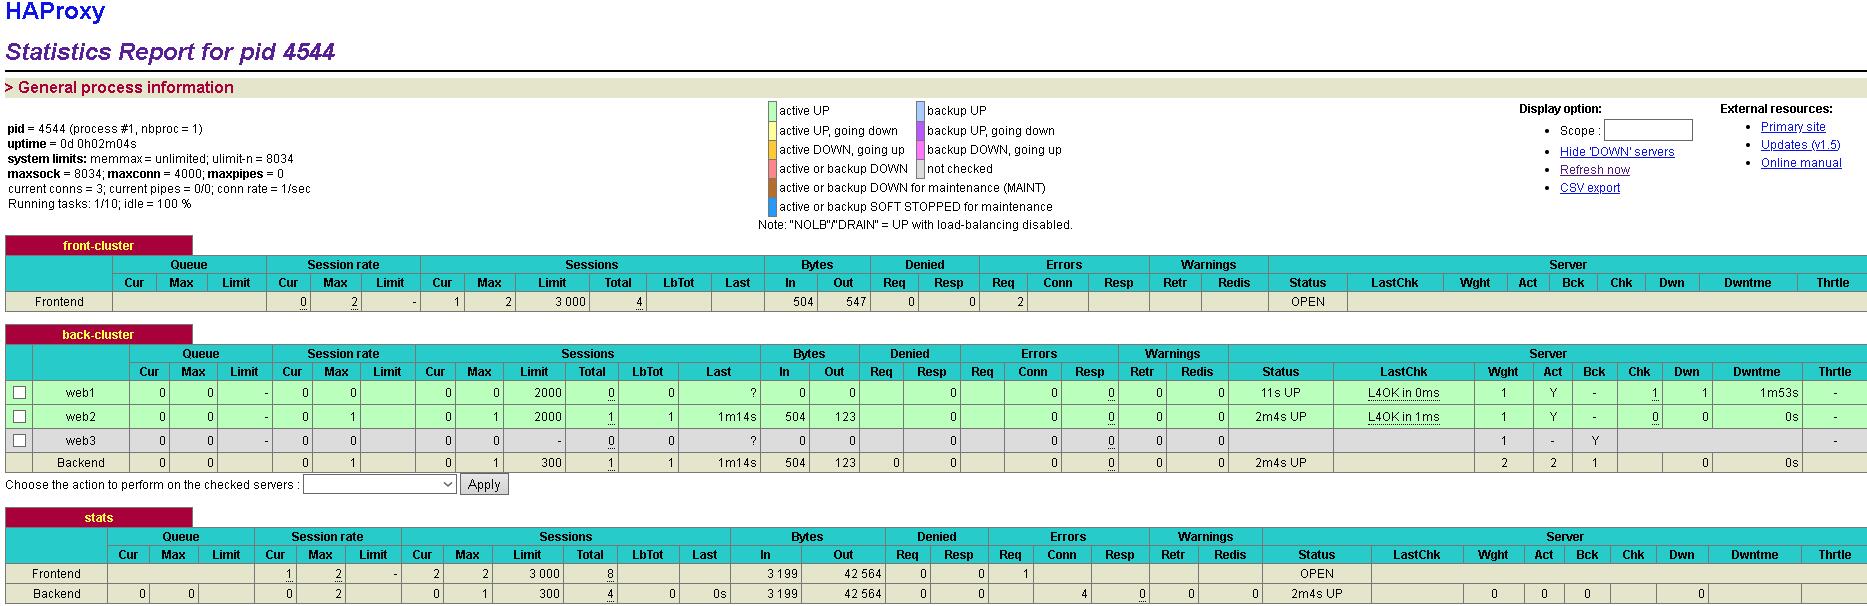
这个界面包含了各种haproxy的状态、连接、会话、宕机时长等信息。其中这些参数的意思如下:
Queue显示的是一些队列的参数
Cur:当前的队列数
Max:最大队列数
Limit:队列的限制数
Session rate显示的是与会话速率相关的参数
Cur:表示当前每秒的会话数,也是当前每秒的请求数。
Max:表示当前每秒最大的会话数。也是指的是最大并发数。
Limit:限制每秒的会话数。
Sessions显示的是与会话统计相关的参数
Cur:当前的会话数
Max:某一时刻的最大会话总数
Limit:会话限制数
Total:总的连接数或者总的session数
LbTot: total number of times a server was selected,从后端选择一台服务器所花的时间。
Last:表示上一次会话到现在所经过的时间。如果此参数太大了,表示该服务器一致处于空闲状态。
Bytes:显示的请求和响应的字节数
In:表示进来的字节数
Out:表示出去的字节数
Denied:拒绝的字节数
Req:表示请求被拒绝的字节数
Resp:响应被拒绝的字节数
Errors:表示与错误相关的参数
Req:表示错误的请求数
Conn:错误的连接数
Resp:错误的响应数
Warnings:与提示相关的参数
Retr:表示重新尝试连接的次数
Redis:重新发送的次数
server:与服务器状态相关的参数
status:显示的后端服务器的状态,及其由一种状态转换为另一种状态的时间。服务器状态只有up或down。
LastChk:表示是通过4层还是通过7层方式来检查后端服务器的健康状况。con表示连接被拒绝,因此,监测失败。ok表示检测成功。
Weight:后端服务器的权重
Act:是否是活动主机。Y表示yes。
Bct:是否是备份主机。
Chk:后端服务器的健康状况监测失败的次数。
Dwn:后端服务器宕过的次数。
Dwntme:宕机的总时间
9、Haproxy 实现请求的动静分离
通常,在一个中等或者中等以上规模的网站架构中,需要将静态资源和动态资源分开进行处理。即静态内容由一台或多台服务器进行处理;而动态内容由另外的一台或多台服务器进行处理。这样静态和动态内容实现分离响应。haproxy可以利用acl来完成请求资源的动静分离。
其架构设计如下:
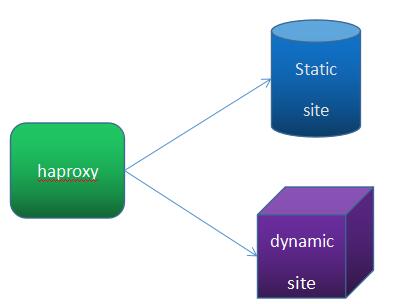
在这个图中,所有静态资源由static site处理,而所有的动态资源则由dynamic site处理。
其中:
haproxy ip:192.168.31.43
static site ip:192.168.31.44
dynamic site ip:192.168.31.45
Haproxy 配置
动静分离的配置如下:
frontend webproxy *:80
        acl url_static path_beg -i /static /img /p_w_picpaths /css
        acl url_static path_end -i .html .xml .css .txt .png .gif .js .gpg
        acl url_dynamic  path_end -i .php
        use_backend static  if url_static
        use_backend dynamic if url_dynamic
        default_backend static

#---------------------------------------------------------------------
# static backend for serving up images, stylesheets and such
#---------------------------------------------------------------------

#---------------------------------------------------------------------
# round robin balancing between the various backends
#---------------------------------------------------------------------
backend static
        balance roundrobin
        server static  192.168.31.44:80 check inter 5 fall 2 rise 1 weight 1 maxconn 2000

backend dynamic
        balance roundrobin
        server dynamic 192.168.31.45:80 check inter 5 fall 2 rise 1 weight 1 maxconn 1000
static site:
[root@web1 ~]# echo "<h1><center>Static site WEB1,My ip is 192.168.31.44</center></h1>" > /var/www/html/index.html
dynamic site:
[root@web2 ~]# echo "<h1> <center>Dynamic site WEB2,My ip is 192.168.31.45 </center> <?php phpinfo();?> </h1>" >/var/www/html/index.php
重新启动httpd服务
[root@web1 ~]# systemctl restart  httpd
[root@web2 ~]# systemctl restart  httpd
测试访问效果:
① 访问http://192.168.31.43/index.html

② 访问http://192.168.31.43/index.php
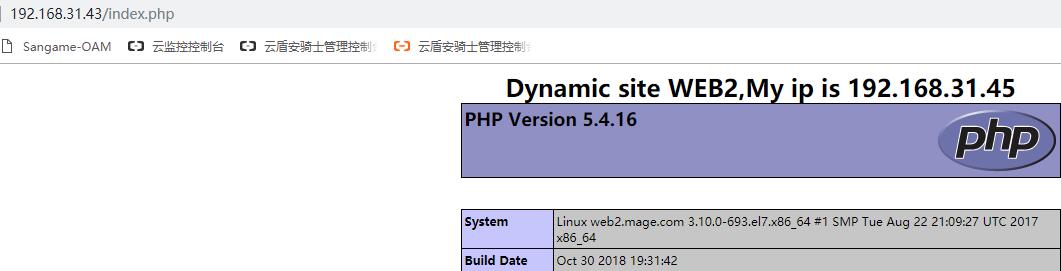
③ 默认不指定URI,则请求访问到的是静态资源

由此,不难看出,请求的动态资源和静态资源分离实现。