1.准备nginx文件,构建为镜像
1、创建目录
[root@docter ~]# mkdir /blog/{php,nginx,mysql}
[root@docter ~]# cd /blog/nginx/
2、编写nginx的dockerfile文件
[root@docter nginx]# cat Dockerfile
FROM nginx
ADD nginx.conf /etc/nginx/nginx.conf
ADD default.conf /etc/nginx/conf.d/default.conf
RUN groupadd www -g 666 &&
useradd www -u 666 -g 666 -M -r -s /sbin/nologin
ADD discuz /usr/share/nginx/html
RUN chown -R www.www /usr/share/nginx/html
WORKDIR /usr/shar/nginx/html
EXPOSE 80 443
CMD nginx -g "daemon off;"
3、编写nginx的default.conf 文件
[root@docter nginx]# cat default.conf
server {
listen 80;
listen [::]:80;
server_name localhost;
root /usr/share/nginx/html;
location / {
index index.php index.html index.htm;
}
location ~ .php$ {
root /usr/share/nginx/html;
fastcgi_pass php:9000;
fastcgi_index index.php;
fastcgi_param SCRIPT_FILENAME $document_root$fastcgi_script_name;
include fastcgi_params;
}
}
3、编辑nginx配置文件
[root@docker1 nginx]# vim nginx.conf
user www;
worker_processes auto;
error_log /var/log/nginx/error.log notice;
pid /var/run/nginx.pid;
events {
worker_connections 1024;
}
http {
include /etc/nginx/mime.types;
default_type application/octet-stream;
log_format main '$remote_addr - $remote_user [$time_local] "$request" '
'$status $body_bytes_sent "$http_referer" '
'"$http_user_agent" "$http_x_forwarded_for"';
access_log /var/log/nginx/access.log main;
sendfile on;
#tcp_nopush on;
keepalive_timeout 65;
gzip on;
include /etc/nginx/conf.d/*.conf;
4.上传discuz包
#上传,解压,只留upload,改名为discuz
[root@k8s-m-01 nginx]# ll
total 16
-rw-r--r-- 1 root root 449 Aug 14 14:38 default.conf
-rw-r--r-- 1 root root 325 Aug 14 14:38 Dockerfile
-rw-r--r-- 1 root root 607 Aug 14 14:39 nginx.conf
drwxr-xr-x 13 root root 4096 Mar 22 19:44 upload
5、构建镜像
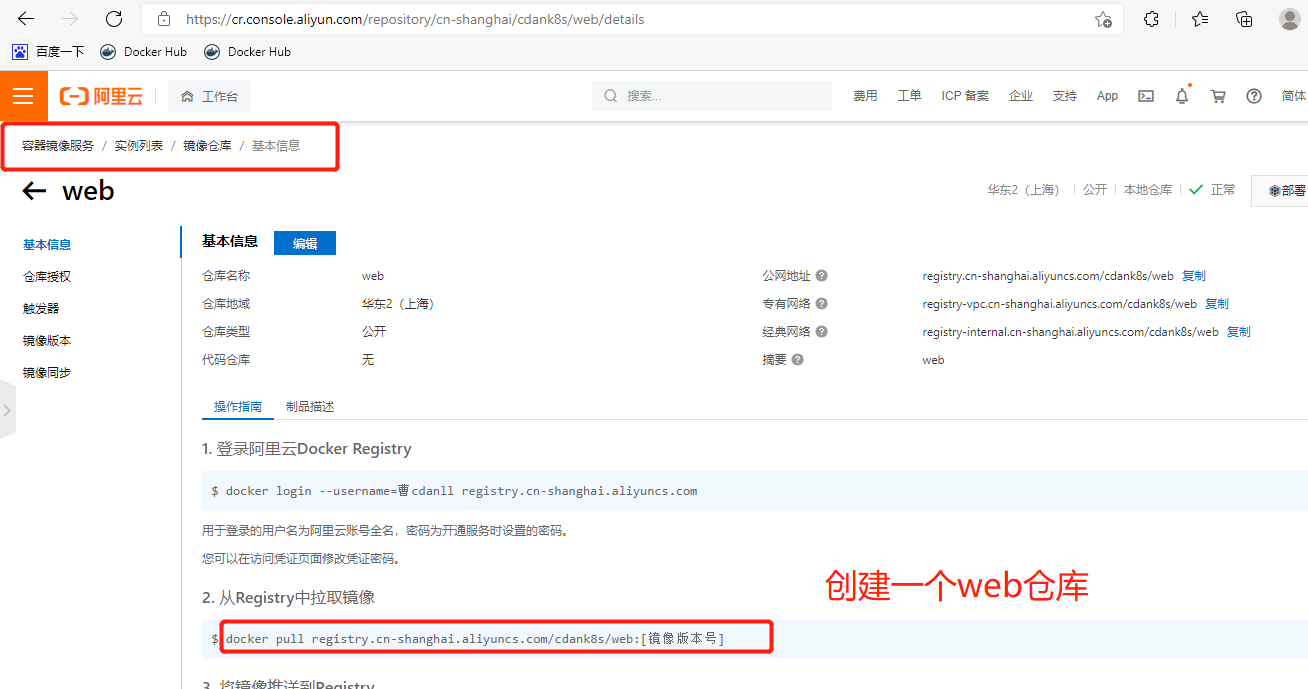
#在阿里云上面,先创建一个命名空间,再拉取镜像
[root@k8s-m-01 nginx]# docker build -t registry.cn-shanghai.aliyuncs.com/cdank8s/web:discuz-nginx-v1 .
#登录阿里云的本地仓库
[root@k8s-m-01 nginx]# docker login registry.cn-hangzhou.aliyuncs.com
Username: danlleee
Password:
WARNING! Your password will be stored unencrypted in /root/.docker/config.json.
Configure a credential helper to remove this warning. See
https://docs.docker.com/engine/reference/commandline/login/#credentials-store
Login Succeeded
#把镜像上传到阿里云
[root@k8s-m-01 nginx]# docker push registry.cn-hangzhou.aliyuncs.com/cdan-web/discuz:nginx-v1
The push refers to repository [registry.cn-hangzhou.aliyuncs.com/cdan-web/discuz]
c87af564398a: Pushed
34ef6b102470: Pushed
9300c38069e5: Pushed
733dccb30fd7: Pushed
314140127be1: Pushed
fea76014ff25: Pushed
e3135447ca3e: Pushed
b85734705991: Pushed
988d9a3509bb: Pushed
59b01b87c9e7: Pushed
7c0b223167b9: Pushed
814bff734324: Pushed
nginx-v1: digest: sha256:c3fbc64e02bbde6dfeed60316db15f0614b603c56637f3e2dbce6a2e8c83525c size: 2823
#测试启动
[root@k8s-m-01 nginx]# docker run -d --name nginx registry.cn-hangzhou.aliyuncs.com/cdan-web/discuz:nginx-v1
[root@k8s-m-01 nginx]# docker ps -a | grep nginx
11b38bc51294 registry.cn-shanghai.aliyuncs.com/cdank8s/web:discuz-v1 "/docker-entrypoint.…" 27 seconds ago Exited (1) 27 seconds ago nginx
[root@k8s-m-01 nginx]# docker exec -it 11b38bc51294 bash
Error response from daemon: Container 11b38bc51294484e5c1f86110e2b01c68a36db683e4cbb3c6190c5392269d9bd is not running
[root@k8s-m-01 nginx]# ls
default.conf discuz Dockerfile nginx.conf
2.构建php镜像
#上传php包
[root@k8s-m-01 php]# ll
total 19436
drwxr-xr-x 13 root root     4096 Mar 22 19:44 discuz
-rw-r--r--  1 root root      327 Aug 14 16:47 Dockerfile
-rw-r--r--  1 root root 19889622 Apr 28 10:39 php.tar.gz
-rw-r--r--  1 root root      463 Aug 14 16:39 www.conf

2、上传php.tar.gz
[rook8s-m-01 php]# wget http://www.mmin.xyz:81/package/lnmp/php.tar.gz

#编辑php Dockerfile
[root@docker php]# vim Dockerfile
FROM centos:7
RUN groupadd www -g 666 &&
    useradd www -u 666 -g 666 -M -r -s /sbin/nologin
ADD php.tar.gz /tmp
RUN yum -y localinstall /tmp/*.rpm
ADD www.conf /etc/php-fpm.d/
EXPOSE 9000
WORKDIR /usr/share/nginx/html
ADD discuz /usr/share/nginx/html
RUN chown -R www.www /usr/share/nginx/html
CMD php-fpm -F


 #discuze复制过来
[root@k8s-m-01 php]# cp ../nginx/discuz/ .

#创建PHP.repo
[root@k8s-m-01 php]# cat www.conf
[www]
user = www
group = www
listen = 9000
request_terminate_timeout = 0
pm = dynamic
pm.max_children = 50
pm.start_servers = 5
pm.min_spare_servers = 5
pm.max_spare_servers = 35
slowlog = /var/log/php-fpm/www-slow.log
php_admin_value[error_log] = /var/log/php-fpm/www-error.log
php_admin_flag[log_errors] = on
php_value[session.save_handler] = files
php_value[session.save_path]    = /var/lib/php/session
php_value[soap.wsdl_cache_dir]  = /var/lib/php/wsdlcache

#创建镜像
[root@k8s-m-01 php]# docker build -t registry.cn-hangzhou.aliyuncs.com/cdan-web/discuz:php-v1 .

#上传到本地
[root@k8s-m-01 php]# docker push registry.cn-hangzhou.aliyuncs.com/cdan-web/discuz:php-v1
3.pv和pvc环境准备
# 每个节点都安装nfs
yum install nfs-utils -y

# 创建存储目录
[root@m01 wordpress]# mkdir -p /nfs/v{1..9}
[root@m01 wordpress]# cd /nfs/
[root@m01 nfs]# ls
v1  v2  v3  v4  v5  v6  v7  v8  v9

vim /etc/exports
/nfs/v1 192.168.15.0/24(rw,sync,all_squash)
/nfs/v2 192.168.15.0/24(rw,sync,all_squash)
/nfs/v3 192.168.15.0/24(rw,sync,all_squash)
/nfs/v4 192.168.15.0/24(rw,sync,all_squash)
/nfs/v5 192.168.15.0/24(rw,sync,all_squash)
/nfs/v6 192.168.15.0/24(rw,sync,all_squash)
/nfs/v7 192.168.15.0/24(rw,sync,all_squash)
/nfs/v8 192.168.15.0/24(rw,sync,all_squash)
/nfs/v9 192.168.15.0/24(rw,sync,all_squash)

# 启动nfs
[root@m01 nfs]# systemctl enable --now rpcbind nfs
Created symlink from /etc/systemd/system/multi-user.target.wants/nfs-server.service to /usr/lib/systemd/system/nfs-server.service.

# 验证配置
[root@m01 nfs]# showmount -e
Export list for m01:
/nfs/v9 192.168.15.0/24
/nfs/v8 192.168.15.0/24
/nfs/v7 192.168.15.0/24
/nfs/v6 192.168.15.0/24
/nfs/v5 192.168.15.0/24
/nfs/v4 192.168.15.0/24
/nfs/v3 192.168.15.0/24
/nfs/v2 192.168.15.0/24
/nfs/v1 192.168.15.0/24
4.创建yaml配置文件
 # 1、编写mysql.yaml
[root@k8s-m-01 discuz]# vim mysql.yaml
kind: Namespace
apiVersion: v1
metadata:
  name: mysql
---
kind: Deployment
apiVersion: apps/v1
metadata:
  name: mysql
  namespace: mysql
spec:
  selector:
    matchLabels:
      app: mysql
  template:
    metadata:
      labels:
        app: mysql
    spec:
      containers:
        - name: mysql
          image: mysql:5.7
          env:
            - name: MYSQL_ROOT_PASSWORD
              value: "123"
            - name: MYSQL_DATABASE
              value: discuz
          livenessProbe:                    #存活性检查
            exec:
              command:
                - "/bin/sh"
                - "-c"
                - "cat /etc/mysql/my.cnf"
            initialDelaySeconds: 0
            periodSeconds: 3
            timeoutSeconds: 1
            successThreshold: 1
            failureThreshold: 3
          readinessProbe:
            tcpSocket:
              port: 3306
            initialDelaySeconds: 30
            periodSeconds: 1
            timeoutSeconds: 1
            successThreshold: 3
            failureThreshold: 1
---
kind: Service
apiVersion: v1
metadata:
  name: mysql
  namespace: mysql
spec:
  ports:
    - port: 3306
      targetPort: 3306
      protocol: TCP
      name: mysql
  selector:
    app: mysql


# 2、编写web.yaml
[root@k8s-m-01 discuz]# vim web.yaml
kind: Namespace
apiVersion: v1
metadata:
  name: web
---
kind: PersistentVolume  #创建pv集群性资源,不需要命名空间
apiVersion: v1
metadata:
  name: discuz
  labels:
    app: discuz
spec:
  persistentVolumeReclaimPolicy: Retain   #回收策略是默认
  nfs:
    path: /nfs/v5
    server: 192.168.15.11
  accessModes:      #访问模式
    - "ReadWriteMany"
  capacity:
    storage: 10Gi
---
kind: PersistentVolumeClaim   #创建pvc
apiVersion: v1
metadata:
  name: discuz
  namespace: web
spec:
  accessModes:
    - "ReadWriteMany"
  resources:
    requests:
      storage: "6Gi"
---
kind: Deployment
apiVersion: apps/v1
metadata:
  name: discuz
  namespace: web
spec:
  replicas: 5  #创建5个副本
  selector:
    matchLabels:
      app: discuz
  template:
    metadata:
      labels:
        app: discuz
    spec:
      containers:
        - name: php   #第一个必须启php
          image: registry.cn-hangzhou.aliyuncs.com/k8sos/web:discuz-php-v1
          imagePullPolicy: IfNotPresent   #拉取镜像策略
          volumeMounts:  #挂载存储卷
            - mountPath: /usr/share/nginx/html/
              name: discuz
        - name: nginx
          image: registry.cn-hangzhou.aliyuncs.com/k8sos/web:discuz-v1
          imagePullPolicy: IfNotPresent
          volumeMounts:
            - mountPath: /usr/share/nginx/html/
              name: discuz
      volumes:   #存储卷
        - name: discuz
          persistentVolumeClaim:
            claimName: discuz
---
kind: Service
apiVersion: v1
metadata:
  name: discuz
  namespace: web
spec:
  ports:
    - port: 80
      targetPort: 80   #容器内端口
      protocol: TCP
      name: http
      nodePort: 30080
  type: NodePort
  selector:
    app: discuz
5.生成yaml文件
# 1、生成yaml文件
[root@k8s-m-01 k8s]# kubectl apply -f web.yaml
namespace/web created
persistentvolume/discuz created
persistentvolumeclaim/discuz created
deployment.apps/discuz created
service/discuz created

[root@k8s-m-01 k8s]# kubectl apply -f mysql.yaml
namespace/mysql created
deployment.apps/mysql created
service/mysql created


# 2、查看
[root@k8s-m-01 k8s]# kubectl get pv
NAME     CAPACITY   ACCESS MODES   RECLAIM POLICY   STATUS   CLAIM        STORAGECLASS   REASON   AGE
discuz   10Gi       RWX            Retain           Bound    web/discuz                           16s
[root@k8s-m-01 k8s]# kubectl get pvc -n web
NAME     STATUS   VOLUME   CAPACITY   ACCESS MODES   STORAGECLASS   AGE
discuz   Bound    discuz   10Gi       RWX                           29s
[root@k8s-m-01 k8s]# kubectl get pod -n web
NAME                      READY   STATUS    RESTARTS   AGE
discuz-767fcfc577-7gqhd   2/2     Running   0          56s
discuz-767fcfc577-b86lm   2/2     Running   0          55s
discuz-767fcfc577-n29lm   2/2     Running   0          55s
discuz-767fcfc577-vqq2q   2/2     Running   0          56s
discuz-767fcfc577-x7x2w   2/2     Running   0          56s

[root@k8s-m-01 k8s]# kubectl get pod -n mysql
NAME                     READY   STATUS    RESTARTS   AGE
mysql-6f9b947c9f-bm4d6   1/1     Running   0          3m20s


# 3、IP访问
192.168.15.11:30080  此时是404,没内容
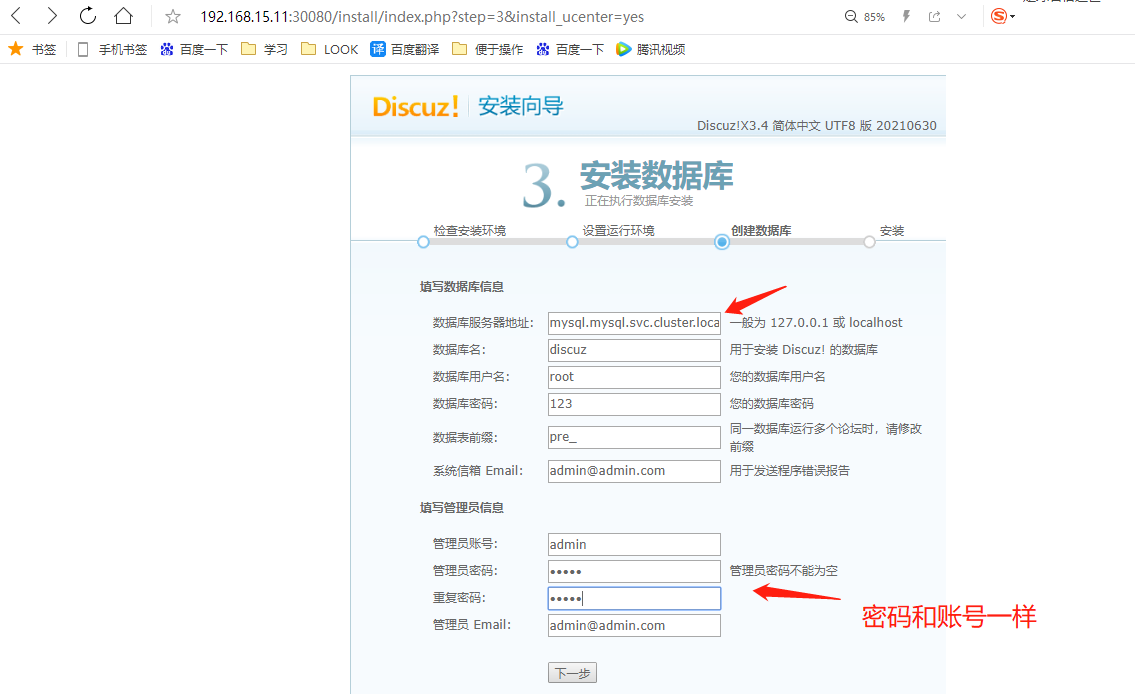
6. 安装数据库
[root@k8s-m-01 ~]# mkdir discuz
[root@k8s-m-01 ~]# cd discuz/
[root@k8s-m-01 discuz]# rz -E

[root@k8s-m-01 discuz]# ll
[root@k8s-m-01 discuz]# unzip Discuz_X3.4_SC_UTF8_20210630.zip

[root@k8s-m-01 discuz]# mv upload/* /nfs/v5/
[root@k8s-m-01 discuz]# ll /nfs/v5/
total 68
-rw-r--r--  1 root root 2848 Jul 10 20:26 admin.php
drwxr-xr-x  9 root root  135 Jul 10 20:26 api
-rw-r--r--  1 root root  727 Jul 10 20:26 api.php
drwxr-xr-x  2 root root   23 Jul 10 20:26 archiver
drwxr-xr-x  2 root root   90 Jul 10 20:26 config
-rw-r--r--  1 root root 1040 Jul 10 20:26 connect.php
-rw-r--r--  1 root root  106 Jul 10 20:26 crossdomain.xml
... ...
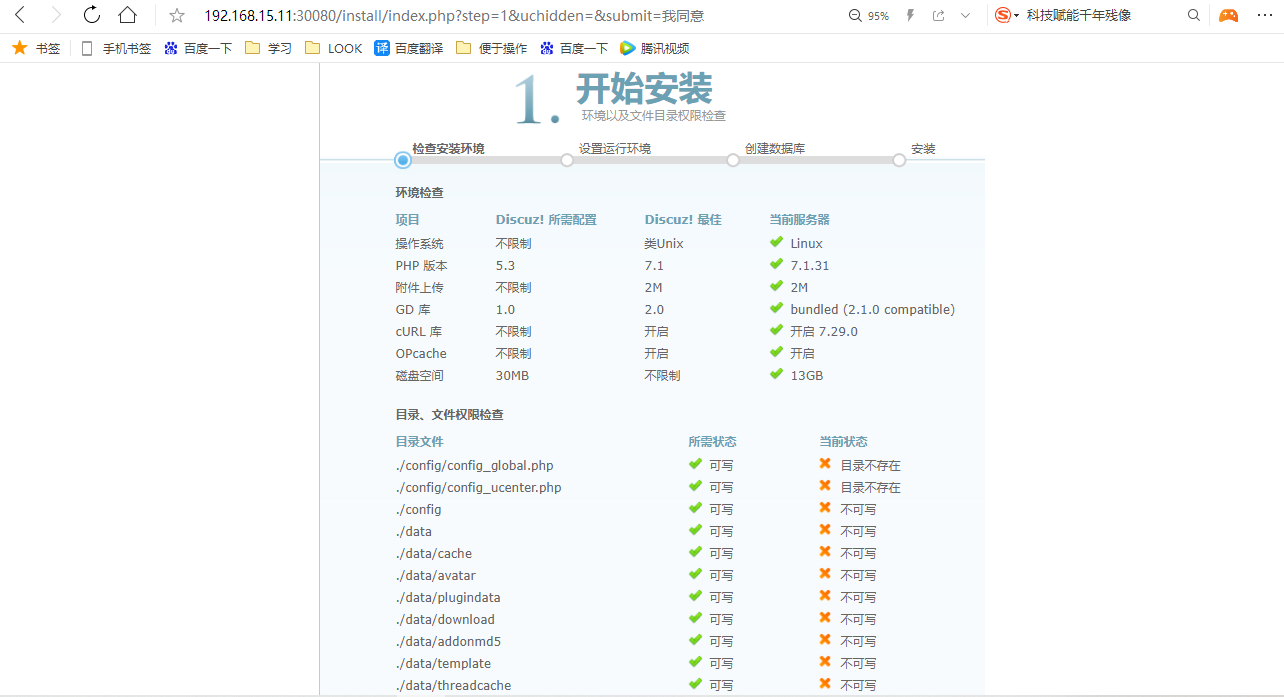
#授权
[root@k8s-m-01 ~]# cd /nfs/v5/
[root@k8s-m-01 v5]# chmod 777 -R config/*
[root@k8s-m-01 v5]# chmod 777 -R data/
[root@k8s-m-01 v5]# chmod 777 -R config/
[root@k8s-m-01 v5]# chmod 777 -R uc_server/*
[root@k8s-m-01 v5]# chmod 777 -R uc_client/*
ok了
#数据库
root@k8s-m-01 v5]# kubectl run test -it --rm --image=busybox:1.28.3
If you don't see a command prompt, try pressing enter.

/ # nslookup mysql.mysql
Server:    10.96.0.10
Address 1: 10.96.0.10 kube-dns.kube-system.svc.cluster.local

Name:      mysql.mysql
Address 1: 10.96.54.103 mysql.mysql.svc.cluster.local     #数据库服务器地址

#安装即可