基本命令
1.mkdir
-p 创建多层目录
2.ls list
-l 显示详细信息
3.cd
进入到目录中
4.pwd
print working directory 显示当前所在位置
5.touch
创建文件 修改文件的时间戳
6.vi编辑文件
1.vi /data/oldboy.txt
2.按i 进入到编辑模式
3.按esc退出编辑模式
4.:wq 保存退出
5.:q! 强制退出不保存
复制 yy
粘贴 p
删除、剪切 dd
撤销 u
把光标所在行到文件最后一行删除 dG
移动光标
把光标移动到文件的最后一行 G
把光标移动到文件的第一行 gg
批量删除

第1个里程碑-按ctrl + v 进入批量编辑模式

第2个里程碑-选择  按箭头

第3个里程碑-删除 d
vi/vim
nu==== number
:set nu 显示行号
:set nonu 取消显示行号
7.cat 显示文件内容
cat /data/oldboy.txt
8.cp copy 复制
cp /data/oldboy.txt /tmp/
9.man 查询命令的帮助
10. mv move 移动
把 /data 移动到 /root目录下面
mv /data/ /root/
11. rm remove 删除文件或目录
为了防止误删 ,可先将文件移动到tmp,以后再删
-f 强制删除不提示
rm -f data
-r 递归删除目录
rm -r data
结合
rm -rf data
12. find 查找
find /root/ -type f -name "oldboy.txt"
find /root/ -type f -name "*.txt"
13. grep 三剑客老三 擅长 过滤
在文件中过滤
显示出文件中 想要的
grep "oldboy" /data/test.txt
不想要的内容
grep -v "oldboy" /data/test.txt
-v 排除
14. sed 三剑客老二 擅长取行
sed默认输出文件的每一行
sed -n '20p' ett.txt
-n 取消默认输出
-n '20p'
-n '20,30p'
15. head
显示文件的前几行 默认显示文件的前10行
-n2 === -2 显示文件的前2行
16. tail
显示文件的最后几行 默认显示文件的后10行
-n1 === -1 显示文件的最后1行
-f 实时显示文件的更新
17. tar 创建解压查看压缩包
创建一个压缩包
tar zcf /tmp/etc.tar.gz /etc
z=== 通过gzip软件进行压缩
c=== create 创建
f=== file 指定压缩包
18.查看压缩包内容
tar tf /tmp/etc.tar.gz
t === list 显示压缩包内容
19.解压
# cd /tmp/
]# tar xf etc.tar.gz
20.解压到指定位置
# tar xf etc.tar.gz -C /mnt/
21.|(管道)与|xargs(管道xargs)的区别
find |xargs ls -ld##把前一个命令的结果,通过管道传递给后面的命令(ls -ld),传递的是文件名
find | 命令 ##把前一个命令的结果,通过管道传递给后面的命令,传递的是普通的文本,文字,字符串
参考:http://blog.51cto.com/lidao/1927347
特殊符号:
1. * 任何 所有 *.log *.txt
2. .. 当前目录的上一级目录
3. . 当前目录
4. | 管道
find + |xargs
5. > 重定向符号 先清空文件的内容 然后追加
6. >> 追加 把信息追加到文件的结尾
系统优化
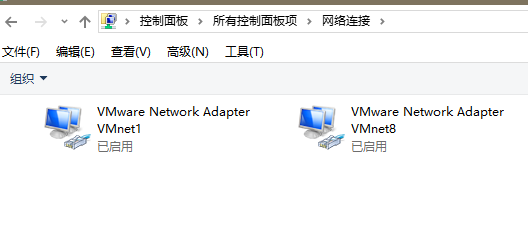
1.虚拟机可以联网
ping baidu.com
2.Linux无法上网排查过程
1、查看是否能上网
2、验证是否DNS 域名解析 域名--->ip地址
ping 233.5.5.5(公网ip)
3、网关-检验你的网络配置(网卡 虚拟机vmwarexxx)是否有问题
ip r
ping 10.0.0.2
4、检查网络连接
3、Linux下面安装软件
1、通过yum安装软件 (需要联网)
1)更改系统的yum源 (阿里云)
#https://opsx.alibaba.com/mirror 来源
mv /etc/yum.repos.d/CentOS-Base.repo /etc/yum.repos.d/CentOS-Base.repo.backup
curl -o /etc/yum.repos.d/CentOS-Base.repo http://mirrors.aliyun.com/repo/Centos-7.repo
2)安装常用软件
yum install -y tree(树目录) bash-completion(自动补全) wget vim(编辑)
2、使用CentOS7.4 光盘镜像(连不上网络)
#mount 给/dev/cdrom 创建一个入口 /mnt
mount /dev/cdrom /mnt
# cd /mnt/
# ls -l /mnt/Packages/
Display all 3895 possibilities? (y or n)
# ls -l /mnt/Packages/bash-completion-2.1-6.el7.noarch.rpm
-rw-rw-r--. 2 root root 87272 Jul  4  2014 /mnt/Packages/bash-completion-2.1-6.el7.noarch.rpm
# rpm -ivh  /mnt/Packages/bash-completion-2.1-6.el7.noarch.rpm
Preparing...                          ################################# [100%]
    package bash-completion-1:2.1-6.el7.noarch is already installed
# ll /mnt/Packages/telnet-
telnet-0.17-64.el7.x86_64.rpm         telnet-server-0.17-64.el7.x86_64.rpm
# ll /mnt/Packages/telnet-0.17-64.el7.x86_64.rpm
-rw-rw-r--. 2 root root 65632 Aug 11  2017 /mnt/Packages/telnet-0.17-64.el7.x86_64.rpm
rpm -qa 查看是否有该命令
关闭SElinux
永久 修改配置文件 重启服务器之后生效
rpm -qa
# enforcing - 已开启 正在运行
# permissive - selinux关闭 警告提示
# disabled - 彻底关闭
SELINUX=enforcing-----》SELINUX=disabled
修改配置前先备份
cp /etc/selinux/config /etc/selinux/config.bak
#快捷键:esc + .(点) 使用上一个命令的最后一个东西(参数)
1、修改
sed 's#SELINUX=enforcing#SELINUX=disabled#g' /etc/selinux/config 显示修改结果(实际没有修改)
sed -i 's#SELINUX=enforcing#SELINUX=disabled#g' /etc/selinux/config (实际修改)
cat /etc/selinux/config 查看结果
2、临时 重启服务器之后失效
[root@oldboyedu-s8 ~]# getenforce
Enforcing
[root@oldboyedu-s8 ~]# #显示当前selinux
[root@oldboyedu-s8 ~]# #显示当前selinux的运行状态
[root@oldboyedu-s8 ~]# setenforce
usage: setenforce [ Enforcing | Permissive | 1 | 0 ]
[root@oldboyedu-s8 ~]# setenforce 0
[root@oldboyedu-s8 ~]# getenforce
Permissive
关闭防火墙
#查询防火墙状态
systemctl status  firewalld.service

#关闭当前正在运行的防火墙  --- 临时
systemctl stop firewalld.service

#让防火墙不会开机自启动 --- 永久
systemctl disable firewalld.service

#systemctl is-active firewalld.service
#is-active  是否正在运行 是否健在
#systemctl is-enabled firewalld.service
#is-enabled   是否开机自启动
定时任务(crond)
检查crond状态
[root@oldboyedu-s8 ~]# rpm -qa   cronie
cronie-1.4.11-17.el7.x86_64
[root@oldboyedu-s8 ~]# systemctl is-active crond.service
active
[root@oldboyedu-s8 ~]# systemctl is-enabled crond.service
enabled

#查看定时任务
[root@oldboyedu-s8 ~]# crontab -l
no crontab for root

#编辑定时任务
[root@oldboyedu-s8 ~]# crontab -e
#oldboyedu.com

#-e  edit
#-l  list

定时任务格式
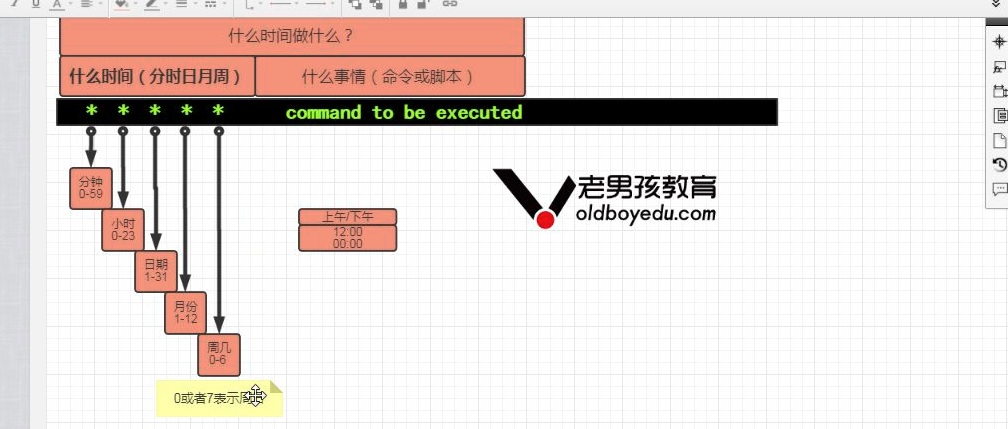
每天的早上8:30到学校上车(go to school)
30 08 * * *   go to school

每天的晚上12点整回家自己开车(go to bed)
00 00 * * *  go to bed

如何修改系统时间
#查看当前时间
[root@oldboyedu-s8 ~]# date
Thu Apr 26 12:13:53 CST 2018
#修改时间
[root@oldboyedu-s8 ~]# date -s "20180101 01:01:01"
Mon Jan  1 01:01:01 CST 2018

让系统自动同步时间
yum install ntpdate -y
[root@oldboyedu-s8 ~]# ntpdate  ntp1.aliyun.com
26 Apr 12:19:53 ntpdate[18819]: step time server 182.92.12.11 offset 9976502.795919 sec
[root@oldboyedu-s8 ~]# date
Thu Apr 26 12:20:24 CST 2018


ntpdate  ntp1.aliyun.com
ntpdate  ntp2.aliyun.com
ntpdate  ntp3.aliyun.com
ntpdate  ntp4.aliyun.com
ntpdate  ntp5.aliyun.com
ntpdate  ntp6.aliyun.com
ntpdate  ntp7.aliyun.com
###1.命令行测试
[root@oldboyedu-s8 ~]# /usr/sbin/ntpdate ntp1.aliyun.com
26 Apr 12:28:11 ntpdate[19018]: adjust time server 182.92.12.11 offset 0.000723 sec
###2.命令写入定时任务
[root@oldboyedu-s8 ~]# crontab -e
#sync(国定) time
*/2 * * * * /usr/sbin/ntpdate ntp1.aliyun.com
###3.进行检查与测试
[root@oldboyedu-s8 ~]# date -s "20190101"
Tue Jan 1 00:00:00 CST 2019
[root@oldboyedu-s8 ~]# date
Tue Jan 1 00:00:01 CST 2019
[root@oldboyedu-s8 ~]# date
Thu Apr 26 12:31:25 CST 2018