引言
利用WPF的动画可以轻而易举的实现各种各样的特效,如擦除,滑动进入等,先看两个效果图
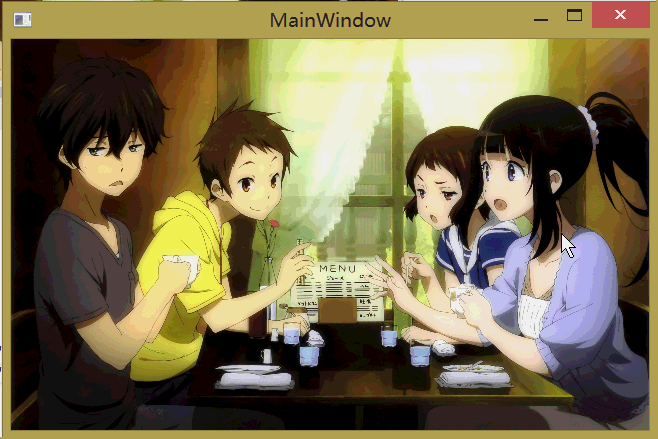
第一个效果
这个动画其实利用了OpacityMask和LinearGradientBrush,将画刷的两个渐变点设置在右边,再由动画控制两个渐变点在一定时差间往左边移动,形成擦除效果,如下
<Window x:Class="WpfApplication4.MainWindow"
        xmlns="http://schemas.microsoft.com/winfx/2006/xaml/presentation"
        xmlns:x="http://schemas.microsoft.com/winfx/2006/xaml"
        Title="MainWindow" Height="350" Width="525">
    <Grid>
        <Image Stretch="Fill" Source="1345512835abyjpp.jpg"  RenderTransformOrigin="0,0" >
        </Image>
        <Image Stretch="Fill" Name="img" Source="1345512821B4h2Gt.jpg">
            <Image.OpacityMask>
                <LinearGradientBrush   StartPoint="0,0" EndPoint="1,0" >
                    <GradientStop Offset="1" Color="Black"></GradientStop>
                    <GradientStop Offset="1" Color="Transparent"></GradientStop>
                </LinearGradientBrush>
            </Image.OpacityMask>
            <Image.Triggers>
               <EventTrigger RoutedEvent="Image.MouseDown">
                   <EventTrigger.Actions>
                        <BeginStoryboard>
                            <Storyboard>
                                <DoubleAnimation Storyboard.TargetProperty="OpacityMask.GradientStops[0].Offset" To="0" FillBehavior="Stop" Duration="0:0:5" ></DoubleAnimation>
                                <DoubleAnimation Storyboard.TargetProperty="OpacityMask.GradientStops[1].Offset" To="0" FillBehavior="Stop"  BeginTime="0:0:0.2" Duration="0:0:5" ></DoubleAnimation>
                            </Storyboard>
                        </BeginStoryboard>
                   </EventTrigger.Actions>
               </EventTrigger>
            </Image.Triggers>
        </Image>
    </Grid>
</Window>
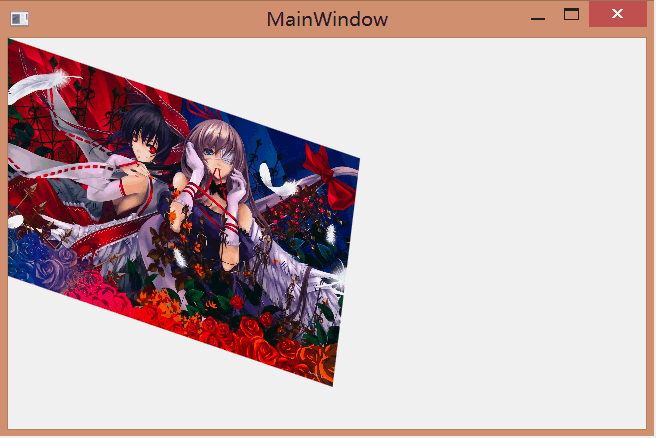
第二个效果
其实第二个动画是用Blend做出来的,Blend在动画和行为这方面比VS做起来容易些.Blend生成的动画代码都采用EasingDoubleKeyFrame,另外你自己可以加上一些缓动函数,代码如下
<Window x:Class="WpfApplication5.MainWindow"
        xmlns="http://schemas.microsoft.com/winfx/2006/xaml/presentation"
        xmlns:x="http://schemas.microsoft.com/winfx/2006/xaml"
        Title="MainWindow" Height="350" Width="525">
    <Window.Resources>
        <Storyboard x:Key="Storyboard1" >
            <DoubleAnimationUsingKeyFrames RepeatBehavior="Forever"  Storyboard.TargetProperty="(UIElement.RenderTransform).(TransformGroup.Children)[2].(RotateTransform.Angle)" Storyboard.TargetName="image">
                <EasingDoubleKeyFrame KeyTime="0:0:3" Value="0">
                    <EasingDoubleKeyFrame.EasingFunction>
                        <BackEase></BackEase>
                    </EasingDoubleKeyFrame.EasingFunction>
                </EasingDoubleKeyFrame>

            </DoubleAnimationUsingKeyFrames>
            <DoubleAnimationUsingKeyFrames RepeatBehavior="Forever" Storyboard.TargetProperty="(UIElement.RenderTransform).(TransformGroup.Children)[0].(ScaleTransform.ScaleX)" Storyboard.TargetName="image">
                <EasingDoubleKeyFrame KeyTime="0:0:3" Value="1">

                </EasingDoubleKeyFrame>
            </DoubleAnimationUsingKeyFrames>
            <DoubleAnimationUsingKeyFrames RepeatBehavior="Forever" Storyboard.TargetProperty="(UIElement.RenderTransform).(TransformGroup.Children)[0].(ScaleTransform.ScaleY)" Storyboard.TargetName="image">
                <EasingDoubleKeyFrame KeyTime="0:0:3" Value="1">

                </EasingDoubleKeyFrame>
            </DoubleAnimationUsingKeyFrames>
            <DoubleAnimationUsingKeyFrames RepeatBehavior="Forever" Storyboard.TargetProperty="(UIElement.RenderTransform).(TransformGroup.Children)[1].(SkewTransform.AngleX)" Storyboard.TargetName="image">
                <EasingDoubleKeyFrame KeyTime="0:0:3" Value="0">
                     <EasingDoubleKeyFrame.EasingFunction>
                         <BackEase></BackEase>
                    </EasingDoubleKeyFrame.EasingFunction>
                </EasingDoubleKeyFrame>
            </DoubleAnimationUsingKeyFrames>
            <DoubleAnimationUsingKeyFrames RepeatBehavior="Forever" Storyboard.TargetProperty="(UIElement.RenderTransform).(TransformGroup.Children)[1].(SkewTransform.AngleY)" Storyboard.TargetName="image">
                <EasingDoubleKeyFrame KeyTime="0:0:3" Value="0">
                    <EasingDoubleKeyFrame.EasingFunction>
                         <BackEase></BackEase>
                    </EasingDoubleKeyFrame.EasingFunction>
                </EasingDoubleKeyFrame>
            </DoubleAnimationUsingKeyFrames>
        </Storyboard>
    </Window.Resources>
    <Grid>
        <Image x:Name="image"  Source="pack://siteoforigin:,,,/13436987293iebAa.jpg" Stretch="Fill"  >
            <Image.Triggers>
                <EventTrigger RoutedEvent="Loaded">
                        <BeginStoryboard  Storyboard="{StaticResource Storyboard1}"/>
                </EventTrigger>
            </Image.Triggers>
            <Image.RenderTransform>
                <TransformGroup>
                    <ScaleTransform  ScaleY="0.5" ScaleX="0.5"/>
                    <SkewTransform   AngleY="20" AngleX="50"/>
                    <RotateTransform Angle="90"/>
                    <TranslateTransform/>
                </TransformGroup>
            </Image.RenderTransform>
        </Image>
    </Grid>
</Window>
小结
上面只是动画中的两个小示例,都是基于时间的动画.另外,还有基于路径和基于帧的动画,能够实现的花样更多.