Android中的布局分为六种,分别是相对布局、线性布局、表格布局、网格布局、帧布局、绝对布局,良好的布局设计对UI界面至关重要,下面先来看看先相对布局。
相对布局(RelativeLayout):
在Eclipse中开发Android程序时,默认采用的就是相对布局。相对布局通常有两种形式,一种是相对于容器而言的,一种是相对于控件而言的,为了能准确定位布局中的控件,相对布局提供了很多属性。
android:layout_centerHrizontal  水平居中
android:layout_centerVertical    垂直居中
android:layout_centerInparent  相对于父元素完全居中

android:layout_alignParentBottom   贴紧父元素的下边缘
android:layout_alignParentLeft        贴紧父元素的左边缘
android:layout_alignParentRight      贴紧父元素的右边缘
android:layout_alignParentTop        贴紧父元素的上边缘
android:layout_alignWithParentIfMissing     如果对应的兄弟元素找不到的话就以父元素做参照物
android:layout_below        在某元素的下方
android:layout_above        在某元素的的上方
android:layout_toLeftOf     在某元素的左边
android:layout_toRightOf   在某元素的右边

android:layout_alignTop       本元素的上边缘和某元素的的上边缘对齐
android:layout_alignLeft       本元素的左边缘和某元素的的左边缘对齐
android:layout_alignBottom  本元素的下边缘和某元素的的下边缘对齐
android:layout_alignRight     本元素的右边缘和某元素的的右边缘对齐

android:layout_marginBottom   离某元素底边缘的距离
android:layout_marginLeft        离某元素左边缘的距离
android:layout_marginRight      离某元素右边缘的距离
android:layout_marginTop        离某元素上边缘的距离
介绍的这些布局属性,我们经常会用到,下面来看看一个布局界面图感受数形结合感受一下:

线性布局(LinearLayout):
线性布局是Android中较为常用的布局方式,它使用<LinearLayout>标签表示。线性布局主要有两种形式,一种是水平线性布局,一种是垂直线性布局。


表格布局(TableLayout):
在表格布局TableLayout中,行数由TableRow对象控制的,即布局中有多少TableRow对象,就有多少行。每个TableRow中可以放置多个组件。列数由最宽的单元格决定,假如第一个TableRow有两个控件,第二个TableRow有三个控件,那这个TableLayout就有三列。在控件中通过android:layout_column属性指定具体的列数,该属性的值从“0”开始,表示第一列。下面看一个表格布局:
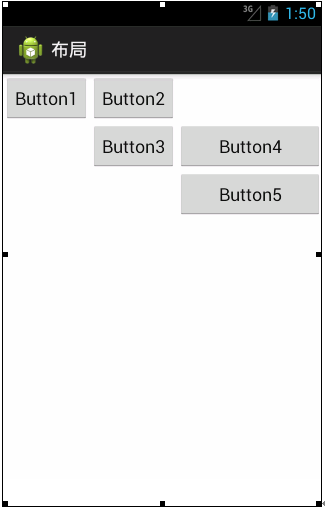
布局中有一个三行三列的表格,也就是有三个TableRow对象。下面看一下表格布局对应的代码:
<?xml version="1.0" encoding="utf-8"?>
<TableLayout xmlns:android="http://schemas.android.com/apk/res/android"
    android:layout_width="fill_parent"
    android:layout_height="fill_parent"
    android:stretchColumns="2" >
    <TableRow>
        <Button
            android:id="@+id/button1"
            android:layout_width="wrap_content"
            android:layout_height="wrap_content"
            android:layout_column="0"
            android:text="Button1" />
        <Button
            android:id="@+id/button2"
            android:layout_width="wrap_content"
            android:layout_height="wrap_content"
            android:layout_column="1"
            android:text="Button2" />
    </TableRow>
    <TableRow>
        <Button
            android:id="@+id/button3"
            android:layout_width="wrap_content"
            android:layout_height="wrap_content"
            android:layout_column="1"
            android:text="Button3" />
        <Button
            android:id="@+id/button4"
            android:layout_width="wrap_content"
            android:layout_height="wrap_content"
            android:layout_column="1"
            android:text="Button4" />
    </TableRow>
    <TableRow>
        <Button
            android:id="@+id/button5"
            android:layout_width="wrap_content"
            android:layout_height="wrap_content"
            android:layout_column="2"
            android:text="Button5" />
    </TableRow>
</TableLayout>
网格布局(GirdLayout):
网格布局是Android4.0新增的布局,它实现了控件的交错显示,能够避免因布局嵌套对设备性能的影响,更利于自由布局的开发。网格布局用一组无限细的直线将绘图区域分成行、列和单元,并指定控件的显示区域和控件在该区域的显示方式,如图所示:

网格布局中的控件可以很整齐的排列,并且可以控制每个控件所占的行数和列数。下面看一下网格布局对应的代码:
<?xml version="1.0" encoding="utf-8"?>
<GridLayout xmlns:android="http://schemas.android.com/apk/res/android"
    android:layout_width="wrap_content"
    android:layout_height="wrap_content"
    android:layout_gravity="center"
    android:columnCount="4"
    android:orientation="horizontal" >
    <Button
        android:layout_column="3"
        android:text="/" />
    <Button android:text="1" />
    <Button android:text="2" />
    <Button android:text="3" />
    <Button android:text="*" />
    <Button android:text="4" />
    <Button android:text="5" />
    <Button android:text="6" />
    <Button android:text="-" />
    <Button android:text="7" />
    <Button android:text="8" />
    <Button android:text="9" />
    <Button
        android:layout_gravity="fill"
        android:layout_rowSpan="3"
        android:text="+" />
    <Button
        android:layout_columnSpan="2"
        android:layout_gravity="fill"
        android:text="0" />
    <Button android:text="00" />
    <Button
        android:layout_columnSpan="3"
        android:layout_gravity="fill"
        android:text="=" />
</GridLayout>
上述代码中,可以看到有很多个Button,个别的Button按钮中包含一些属性,如android:layout_column表示该按钮在第几列,android:layout_rowSpan表示该控件占用几行,android:layout_columnSpan表示该控件占用几列。
在这里要特别注意的是:由于GridLayout是Android4.0之后有的新功能,如果要在项目中使用这种布局,需要把SDK的最低版本指定为Android4.0(API14)以上,所以我们需要配置好SDK版本:
<uses-sdk
     android:minSdkVersion="14"
     android:targetSdkVersion="17" />
帧布局(FrameLayout):
帧布局是Android布局中最简单的一种,帧布局为每个加入其中的控件创建一个空白区域(称为一帧,每个控件占据一帧)。采用帧布局方式设计界面时,只能在屏幕左上角显示一个控件,如果添加多个控件,这些控件会按照顺序在屏幕的左上角重叠显示,且会透明显示之前控件的文本,如图所示:
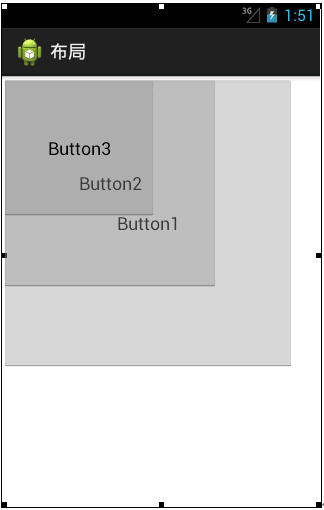
从图中可以看出,界面中添加了3个Button控件,Button1是最先添加的大按钮,Button2是接着添加的较小按钮,Button3是最后添加的小按钮,这三个控件叠加显示在屏幕的左上角。
下面看一下帧布局对应的代码,具体如下:
<?xml version="1.0" encoding="utf-8"?>
<FrameLayout xmlns:android="http://schemas.android.com/apk/res/android"
    android:layout_width="match_parent"
    android:layout_height="match_parent" >
    <Button
        android:id="@+id/button1"
        android:layout_width="294dp"
        android:layout_height="294dp"
        android:text="Button1" />
    <Button
        android:id="@+id/button2"
        android:layout_width="218dp"
        android:layout_height="214dp"
        android:text="Button2" />
    <Button
        android:id="@+id/button3"
        android:layout_width="156dp"
        android:layout_height="143dp"
        android:text="Button3" />
</FrameLayout>
绝对布局(AbsoluteLayout):
绝对布局需要通过指定x、y坐标来控制每一个组件的位置,放入该布局的组件需要通过android:layout_x和android:layout_y两个属性指定其准确的坐标值,并显示在屏幕上,布局如图所示:

从图我们就可以看出,组件是以屏幕左上角为坐标原点,将Button1的坐标设置为(50,50),Button2的坐标设置为(200,150),根据这个坐标精确定位组件在屏幕中的位置,相对应的代码如下:
<?xml version="1.0" encoding="utf-8"?>
<AbsoluteLayout xmlns:android="http://schemas.android.com/apk/res/android"
    android:layout_width="match_parent"
    android:layout_height="match_parent" >
    <Button
        android:id="@+id/button2"
        android:layout_width="wrap_content"
        android:layout_height="wrap_content"
        android:layout_x="50dp"
        android:layout_y="50dp"
        android:text="Button1" />
    <Button
        android:id="@+id/button1"
        android:layout_width="wrap_content"
        android:layout_height="wrap_content"
        android:layout_x="200dp"
        android:layout_y="150dp"
        android:text="Button2" />
</AbsoluteLayout>
上述代码中,Button控件的android:layout_x属性表示该控件在X坐标的第50dp像素上,android:layout_y属性表示控件在Y坐标的第50dp象素上,Button2也是通过这两个属性设置的控件位置。
而我们需要注意的是,理论上绝对布局可以完成任何的布局设计,且灵活性很大,但是实际的工程应用中不提倡使用这种布局。因为使用这种布局不但需要精确计算每个组件的大小,而且当应用程序运行在不用屏幕的手机上产生的效果也不相同,因此,一般不推荐使用绝对布局。