由于mysql被Oracle收购了,随时都有可能变成付费产品,所以呢这里我们使用由mysql创始人Michael Widenius在mysql基础上重新创建的一个分支mariadb。
主要由开源社区在维护,采用GPL授权许可 MariaDB的目的是完全兼容MySQL,包括API和命令行,使之能轻松成为MySQL的代替品。
我们的环境是:
主服务器 centos 7 192.168.10.129 mariadb-5.5.60
从服务器 centos 7 192.168.10.130 mariadb-5.5.60
1、配置yum源
[root@localhost ~]# mkdir /etc/yum.repos.d/backup

[root@localhost ~]# mv /etc/yum.repos.d/* /etc/yum.repos.d/backup/   # 备份系统自带yum源
[root@localhost ~]# wget -O /etc/yum.repos.d/CentOS-Base.repo http://mirrors.aliyun.com/repo/Centos-7.repo   # 使用阿里的源

[root@localhost ~]# wget -O /etc/yum.repos.d/epel.repo http://mirrors.aliyun.com/repo/epel-7.repo    # 阿里源

[root@localhost ~]# yum clean all        # 清除原来的yum缓存

[root@localhost ~]# yum makecache        # 生成新的缓存
注意:这里的阿里源mariadb的版本是mariadb-5.5.60,如果你想使用最新版的mariadb阿里源可能不适合你。你需要使用官方的源。
vi /etc/yum.repos.d/MariaDB.repo    # 添加mariadb的官方yum库
[mariadb]
name = MariaDB
baseurl = http://yum.mariadb.org/10.1/centos7-amd64
gpgkey=https://yum.mariadb.org/RPM-GPG-KEY-MariaDB
gpgcheck=1
使用如下命令安装最新版的mariadb(注:本文没有使用最新版的mariadb)
[root@localhost ~]#yum install MariaDB-server MariaDB-client -y # 安装mariadb的服务端和客户端
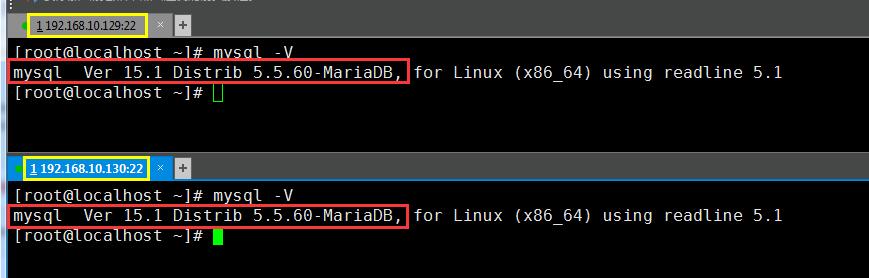
2、使用yum分别在两台机器上安装mariadb
[root@localhost ~]# yum install mariadb-server mariadb -y # 安装mariadb的服务端和客户端
如果一切顺利你会看到如下的界面
3、mariadb服务管理
在Centos 7中使用yum安装的程序,都可以使用systemctl来进行管理:
[root@localhost ~]# systemctl start mariadb     // 开启mysql服务
[root@localhost ~]# systemctl stop mariadb      // 停止mysql服务
[root@localhost ~]# systemctl restart mariadb   // 重启mysql服务
[root@localhost ~]# systemctl enable mariadb    // 设置开机启动
[root@localhost ~]# systemctl disable mariadb   // 禁止开机启动
4、初始化mariadb
MariaDB 安装完毕并成功启动后为了确保数据库的安全性和正常运转,需要先对数据库程序进行初始化操作。


 1 [root@localhost ~]# systemctl start mariadb     // 启动mysql服务
 2 [root@localhost ~]# mysql_secure_installation   // 初始化mysql数据库
 3
 4 // 进入mariadb的初始化配置模式
 5 NOTE: RUNNING ALL PARTS OF THIS SCRIPT IS RECOMMENDED FOR ALL MariaDB
 6       SERVERS IN PRODUCTION USE!  PLEASE READ EACH STEP CAREFULLY!
 7
 8 In order to log into MariaDB to secure it, we'll need the current
 9 password for the root user.  If you've just installed MariaDB, and
10 you haven't set the root password yet, the password will be blank,
11 so you should just press enter here.
12
13 ERROR 1045 (28000): Access denied for user 'root'@'localhost' (using password: YES)
14 Enter current password for root (enter for none):    // 这里输入mysql数据库root密码,默认没有密码
15 OK, successfully used password, moving on...
16
17 Setting the root password ensures that nobody can log into the MariaDB
18 root user without the proper authorisation.
19
20 Set root password? [Y/n] y     //  是否为mysql数据库root用户设置密码,这里我们设置密码
21 New password:    // 输入要设置的密码
22 Re-enter new password:   // 确认输入的密码
23 Password updated successfully!
24 Reloading privilege tables..
25  ... Success!
26
27
28 By default, a MariaDB installation has an anonymous user, allowing anyone
29 to log into MariaDB without having to have a user account created for
30 them.  This is intended only for testing, and to make the installation
31 go a bit smoother.  You should remove them before moving into a
32 production environment.
33
34 Remove anonymous users? [Y/n] y   //  是否要删除匿名用户,这里删除掉。要不然可以在不输入用户名和密码的情况下登陆数据库
35  ... Success!
36
37 Normally, root should only be allowed to connect from 'localhost'.  This
38 ensures that someone cannot guess at the root password from the network.
39
40 Disallow root login remotely? [Y/n] n   // 是否拒绝root用户从远程登陆数据库,这里允许root用户远程登陆数据库
41  ... skipping.
42
43 By default, MariaDB comes with a database named 'test' that anyone can
44 access.  This is also intended only for testing, and should be removed
45 before moving into a production environment.
46
47 Remove test database and access to it? [Y/n] y   // 是否删除mysql自带的test测试数据库,这里没什么用就删除了吧
48  - Dropping test database...
49  ... Success!
50  - Removing privileges on test database...
51  ... Success!
52
53 Reloading the privilege tables will ensure that all changes made so far
54 will take effect immediately.
55
56 Reload privilege tables now? [Y/n] y   // 是否立即生效,这里立即生效
57  ... Success!
58
59 Cleaning up...
60
61 All done!  If you've completed all of the above steps, your MariaDB
62 installation should now be secure.
63
64 Thanks for using MariaDB!
5、配置mariadb数据库的编码
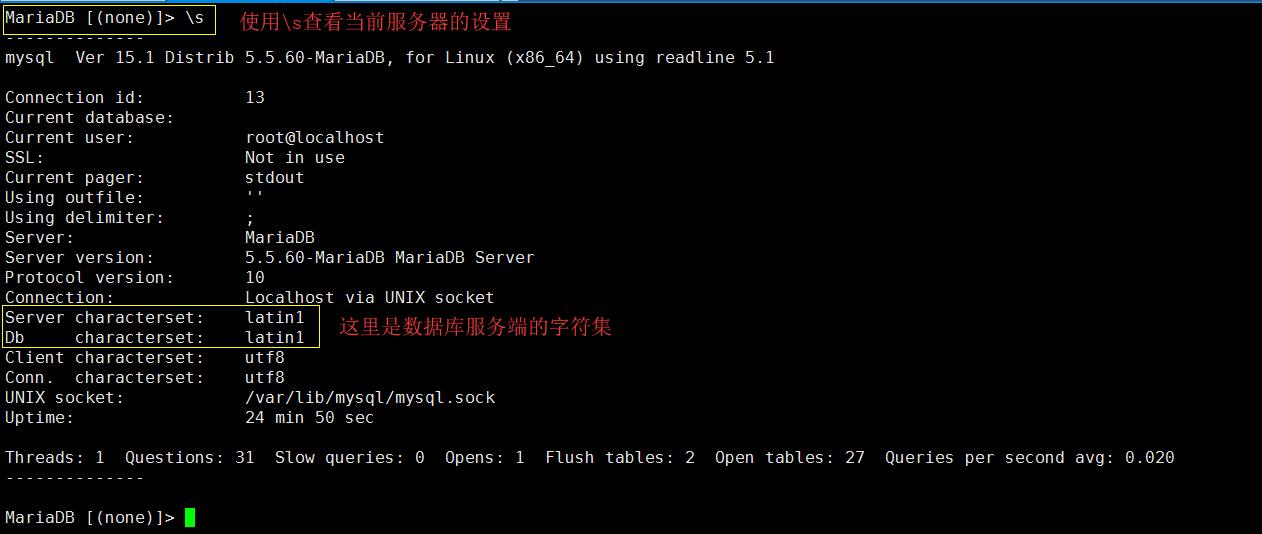
mariadb的默认数据库编码是拉丁文,如果你不信我们登陆数据库看一下:
[root@localhost ~]# mysql -uroot -p
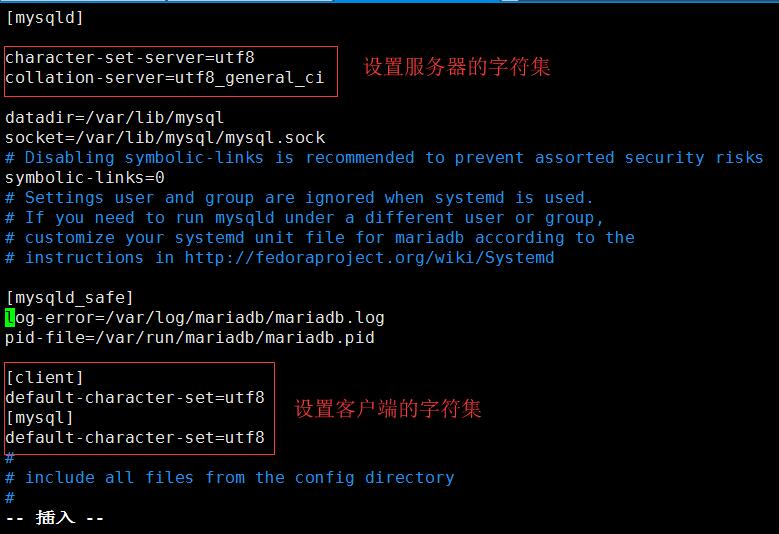
对于我们炎黄子孙来说拉丁文明显不合我意,所以我们需要调整下my.cnf的配置文件
[root@localhost bin]# vim /etc/my.cnf
[mysqld]

character-set-server=utf8           // 设置服务端的字符集
collation-server=utf8_general_ci    // 设置服务端的字符集

datadir=/var/lib/mysql
socket=/var/lib/mysql/mysql.sock
# Disabling symbolic-links is recommended to prevent assorted security risks
symbolic-links=0
# Settings user and group are ignored when systemd is used.
# If you need to run mysqld under a different user or group,
# customize your systemd unit file for mariadb according to the
# instructions in http://fedoraproject.org/wiki/Systemd

[mysqld_safe]
log-error=/var/log/mariadb/mariadb.log
pid-file=/var/run/mariadb/mariadb.pid

[client]                //  设置客户端的字符集
default-character-set=utf8
[mysql]                //  设置客户端的字符集
default-character-set=utf8
#
# include all files from the config directory
#
!includedir /etc/my.cnf.d
设置完成以后,我们需要重启mariadb服务,两台服务器的配置一样,这里就不再赘述,下面进入主题。
6、设置192.168.10.129中mysql为主服务器。
6.1在my.cnf配置文件中添加如下信息:
[mysqld]
server-id=1        # 设置主服务器的id
log-bin=mysql-bin  # 设置二进制日志文件名称,主服务器执行sql语句的二进制文件
character-set-server=utf8        # 服务端的字符集
collation-server=utf8_general_ci # 服务端的字符编码
datadir=/var/lib/mysql
socket=/var/lib/mysql/mysql.sock
# Disabling symbolic-links is recommended to prevent assorted security risks
symbolic-links=0
# Settings user and group are ignored when systemd is used.
# If you need to run mysqld under a different user or group,
# customize your systemd unit file for mariadb according to the
# instructions in http://fedoraproject.org/wiki/Systemd

[mysqld_safe]
log-error=/var/log/mariadb/mariadb.log
pid-file=/var/run/mariadb/mariadb.pid

[client]   # 客户端字符集
default-character-set=utf8
[mysql]    # 客户端字符集
default-character-set=utf8
#
# include all files from the config directory
#
调整好配置文件需要重启mariadb服务
[root@localhost ~]# systemctl restart mariadb
6.2配置mariadb主服务器
MariaDB [(none)]> grant replication slave on *.* to 'slave_user'@'%' identified by '123.com'; // 添加同步账号
MariaDB [(none)]> flush table with read lock; // 为防止在导出数据库时,有人写入数据,这里先把数据库加把锁
MariaDB [(none)]> show master status;
// 我们的主服务器信息如下,这里的两个选项很重要,因为在配置从服务器时需要File、Position两个字段的数据:
+------------------+----------+--------------+------------------+
| File             | Position | Binlog_Do_DB | Binlog_Ignore_DB |
+------------------+----------+--------------+------------------+
| mysql-bin.000001 |      369 |              |                  |
+------------------+----------+--------------+------------------+
// mysql-bin便是我们在my.cnf文件中设置的二进制文件名
// 369是当前二进制文件所处的位置,从服务器一定要和这个位置一致。
// 此时当前shell正处于锁表状态,我们在开一个shell,导出所有数据库
[root@localhost ~]# mysqldump -uroot -p --all-databases > all.sql
// 数据导出后,解锁表
MariaDB [(none)]> unlock tables;
// 将导出的数据库发给从服务器192.168.10.130
[root@localhost ~]# scp all.sql root@192.168.10.130:/opt/
7、配置192.168.10.130从服务器
7.1调整my.cnf配置文件
[root@localhost ~]# vim /etc/my.cnf
[mysqld]
server-id=3   # 设置从服务器的id
character-set-server=utf8    # 设置服务端字符集
collation-server=utf8_general_ci  # 设置服务端字符集

datadir=/var/lib/mysql
socket=/var/lib/mysql/mysql.sock
# Disabling symbolic-links is recommended to prevent assorted security risks
symbolic-links=0
# Settings user and group are ignored when systemd is used.
# If you need to run mysqld under a different user or group,
# customize your systemd unit file for mariadb according to the
# instructions in http://fedoraproject.org/wiki/Systemd

[mysqld_safe]
log-error=/var/log/mariadb/mariadb.log
pid-file=/var/run/mariadb/mariadb.pid

[client]   # 设置客户端字符集
default-character-set=utf8
[mysql]    # 设置客户端字符集
default-character-set=utf8
#
# include all files from the config directory
#
7.2将主服务器192.168.10.129数据导入到本地数据库中
[root@localhost ~]# mysql -uroot -p
MariaDB [(none)]> source /opt/all.sql  // 将主服务器发来的数据库文件导入到本地数据库
重启mysql服务
[root@localhost ~]# systemctl restart mariadb
登陆mysql服务开启从服务器
[root@localhost ~]# mysql -uroot -p
MariaDB [(none)]> change master to master_host='192.168.10.129', master_user='slave_user', master_password='123.com', master_log_file='mysql-bin.000001', master_log_pos=369;
master_host:主服务器IP地址
master_user:主服务器中创建的同步账户
master_password:同步账户的密码
master_log_file:主服务器sql语句二进制文件(主服务器中show master status中的File)
master_log_pos:主服务器当前sql语句在二进制文件中的位置(主服务器中show master status中的Position)。
MariaDB [(none)]> start slave; // 开启从服务器
MariaDB [(none)]> show slave statusG // 查看从服务器信息
*************************** 1. row ***************************
Slave_IO_State: Waiting for master to send event
Master_Host: 192.168.10.129
Master_User: slave_user
Master_Port: 3306
Connect_Retry: 60
Master_Log_File: mysql-bin.000001
Read_Master_Log_Pos: 614
Relay_Log_File: mariadb-relay-bin.000002
Relay_Log_Pos: 774
Relay_Master_Log_File: mysql-bin.000001
Slave_IO_Running: Yes
Slave_SQL_Running: Yes
Replicate_Do_DB:
Replicate_Ignore_DB:
Replicate_Do_Table:
Replicate_Ignore_Table:
Replicate_Wild_Do_Table:
Replicate_Wild_Ignore_Table:
Last_Errno: 0
Last_Error:
Skip_Counter: 0
Exec_Master_Log_Pos: 614
Relay_Log_Space: 1070
Until_Condition: None
Until_Log_File:
Until_Log_Pos: 0
Master_SSL_Allowed: No
Master_SSL_CA_File:
Master_SSL_CA_Path:
Master_SSL_Cert:
Master_SSL_Cipher:
Master_SSL_Key:
Seconds_Behind_Master: 0
Master_SSL_Verify_Server_Cert: No
Last_IO_Errno: 0
Last_IO_Error:
Last_SQL_Errno: 0
Last_SQL_Error:
Replicate_Ignore_Server_Ids:
Master_Server_Id: 1
1 row in set (0.00 sec)
8、验证我们的主从配置是否正确
如果你也做到了和下面这张图一样那么恭喜你,配置成功啦。
