观察者模式:
观察者具体应用有两个:通知机制(notification)和KVO(key-value-observing)机制
通知机制:
谁要监听值的变化,谁就注册通知 ,特别要注意,通知的接受者必须存在这一先决条件不用通知的时候,记得移除。
- 在第三个界面中, 建⽴一个通知中心, 通过通知中心, 发送通知(发送通知的过程就是传值的过程,将要传输的值作为object的值传给第一个界面
- 在第⼀个界面建⽴一个通知中心, 通过通知中⼼,注册一个监听事件
- 在第一个界⾯中,设置接收到通知的事件。
- 在第⼀个界⾯面中的dealloc中, 将通知中心remove掉

- 任何对象对可以发送通知到中心,同时任何对象可以监听中心的通知。
发送通知的代码如下: [[NSNotificationCenter defaultCenter] postNotificationName:@”myNotificationName” object:broadcasterObjec]; - 注册接收通知的代码如下:
[[NSNotificationCenter defaultCenter]
addObserver:listenerObject selector:@selector(receivingMethodOnListener:) name:@”myNotificationName” object:nil];
实现:将B界面的值传给A界面,所以B界面发送通知到通知中心,A界面注册成为监听者,监听B值的变化,接受从通知中心回传的B的值。如果c页面也想接受B的值,也同样注册成为监听者就行。(所以可以实现多对多)
A界面:RootViewController B界面:SecondViewController
在B界面建立通知中心,将要传的值nameTextField.text通过通知中心发送
//SecondViewController.m

-(IBAction)notificationMethod:(id)sender {

[[NSNotificationCenter defaultCenter] postNotificationName:@'ChangeNameNotification'  object:self  userInfo:@{@'name':self.nameTextField.text}];

[self dismissViewControllerAnimated:YES completion:nil];

}
在A页面的控制器中,注册通知:
//RootViewController.m

- (void)viewDidLoad.{

[super viewDidLoad];

[[NSNotificationCenter defaultCenter] addObserver:self selector:@selector(ChangeNameNotification:) name:@'ChangeNameNotification' object:nil];

}
调用,显示
//RootViewController.m

-(void)ChangeNameNotification:(NSNotification*)notification{

NSDictionary *nameDictionary = [notification userInfo];

self.nameLabel.text = [nameDictionary objectForKey:@'name'];

.}

当我们不使用时,要记得删掉通知:

//RootViewController.m

-(void)dealloc{

[[NSNotificationCenter defaultCenter] removeObserver:self];

}
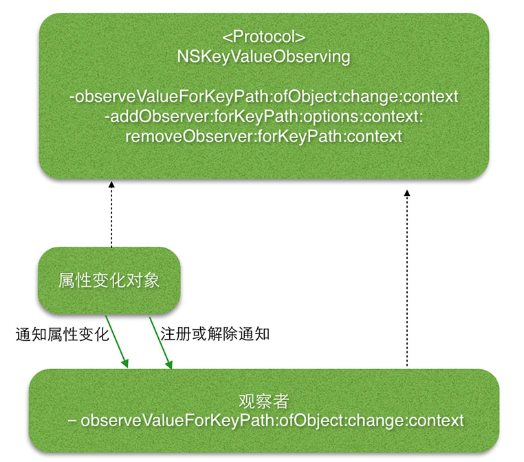
KVO机制:
当指定的对象的属性被修改后,则对象就会接受到通知。简单的说就是每次指定的被观察的对象的属性被修改后,KVO就会自动通知相应的观察者了。
KVO提供了观察某一属性变化的方法,极大的简化了代码。这种观察-被观察模型适用于这样的情况,比方说根据A(数据类)的某个属性值变化,B(view类)中的某个属性做出相应变化。
(这样的机制听起来类似Notification,但是notification是需要一个发送notification的对象,一般是 notificationCenter,来通知观察者。而kvo是直接通知到观察对象。)
1.实现变化方法:(重写)
-(void) observeValueForKeyPath:(NSString *)keyPath ofObject:(id)object change:(NSDictionary *)change context:(void*)context
2.注册接收变化:
-(void)addObserver:(NSObject *)anObserver forKeyPath:(NSString *)keyPath options:(NSKeyValueObservingOptions)options context:(void*)context
(keyPath就是要观察的属性值,options给你观察键值变化的选择,而context方便传输你需要的数据)
实现:
@property (nonatomic,copy) NSString * name;

@property (nonatomic,copy) NSString * title;

@property (nonatomic,assign) NSUInteger age;
在控制其中我们将其初始化并赋值
   self.hero = [[Hero alloc] init];

    self.hero.name = @"亡灵";

    self.hero.title = @"将军";

    self.hero.age = 102;
现在我们的这个对象基本有值了,那么我们将这个对象的name监听下他的改变
[self.hero addObserver:self forKeyPath:@"name" options:NSKeyValueObservingOptionNew|NSKeyValueObservingOptionOld context:nil];
触发通知并将值改变
- (void)touchesBegan:(NSSet *)touches withEvent:(UIEvent *)event{

    self.hero.name = @"祭祀";

}
在制定的回调函数中,处理收到的更改通知
- (void)observeValueForKeyPath:(NSString *)keyPath ofObject:(id)object change:(NSDictionary *)change context:(void *)context{

    if([keyPath isEqualToString:@"name"])

    {

        NSLog(@"赋值后--%@",self.hero.name);

        NSLog(@"新的值--%@",change[@"new"]);

        NSLog(@"以前的值--%@",change[@"old"]);


    }

}

//最后注销观察者

- (void)dealloc{

    [self.hero removeObserver:self forKeyPath:@"name"];

}