目录:
- 类图
- submit方法(RunnableFuture接口newTaskFor方法)
- FutureTask类
- 声明。
- 核心属性:任务运行状态、核心属性。
- 构造器。
- 核心方法。
类图
上节课我们说到了execute方法,此方法虽然可以将任务让如线程池中运行,但却不能返回线程执行的结果,所以针对于这种情况JUC提供了submit方法用于获取执行结果。
首先我们来看看submit方法所处的类及其类结构:
1 ThreadPoolExecutor pool = new ThreadPoolExecutor(corePoolSize, maxPoolSize, keepAliveTime, unit, workQueue,
2         threadFactory, handler);
3 pool.submit(() -> {
4 });
我们点进去后就可以看到submit方法是在AbstractExecutorService中定义的。
综上我们来利用IDEA看下submit()方法相关的类图。
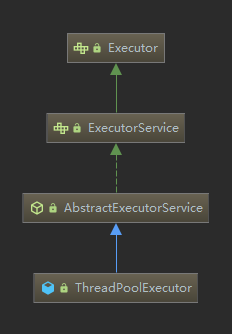
可见,关系也不复杂,然后我们来看看submit方法是如何实现的。
submit方法(RunnableFuture接口newTaskFor方法)
 1 public Future<?> submit(Runnable task) {
 2     if (task == null) throw new NullPointerException();
 3     RunnableFuture<Void> ftask = newTaskFor(task, null);
 4     execute(ftask);
 5     return ftask;
 6 }
 7
 8 public <T> Future<T> submit(Runnable task, T result) {
 9     if (task == null) throw new NullPointerException();
10     RunnableFuture<T> ftask = newTaskFor(task, result);
11     execute(ftask);
12     return ftask;
13 }
14
15 public <T> Future<T> submit(Callable<T> task) {
16     if (task == null) throw new NullPointerException();
17     RunnableFuture<T> ftask = newTaskFor(task);
18     execute(ftask);
19     return ftask;
20 }
完没通过submit的三个方法可以看出,其实现逻辑基本一致,都是通过newTaskFor实现的,只是入参稍不一致。
所以我们着重来看下newTaskFor:
1 protected <T> RunnableFuture<T> newTaskFor(Runnable runnable, T value) {
2     return new FutureTask<T>(runnable, value);
3 }
4
5 protected <T> RunnableFuture<T> newTaskFor(Callable<T> callable) {
6     return new FutureTask<T>(callable);
7 }
同样的,newTaskFor是基于FutureTask实现的,并且都返回了RunnableFuture接口。
——————————————————————————————————————————————————————————————————————
我们来看看RunnableFuture接口的定义:
1 public interface RunnableFuture<V> extends Runnable, Future<V> {
2     void run();
3 }
从定义来看RunnableFuture是一个可以获取到执行结果的特殊Runnable,而Runnable接口我们都知道,这里就不再赘述了,直接看Future的定义。
 1 public interface Future<V> {
 2
 3     /**
 4      * 取消任务
 5      */
 6     boolean cancel(boolean mayInterruptIfRunning);
 7
 8     /**
 9      * 判断任务是否被取消
10      */
11     boolean isCancelled();
12
13     /**
14      * 判断任务是否已经执行完毕
15      */
16     boolean isDone();
17
18     /**
19      * 获取任务执行结果
20      */
21     V get() throws InterruptedException, ExecutionException;
22
23     /**
24      * 在指定时间内获取任务执行结果
25      */
26     V get(long timeout, TimeUnit unit)
27         throws InterruptedException, ExecutionException, TimeoutException;
28
29 }
而Futrue正是给RunnableFuture提供获取线程执行结果等能力的父接口。
FutureTask类
上面我们把submit的实现过了一下,而最重要的逻辑还是在newTaskFor()中,也就是java.util.concurrent.FutureTask类中;所以FutureTask才是重中之重。
还是和之前一样,我们从声明、核心属性、构造器、核心方法几个方面来分析。
声明:
1 public class FutureTask<V> implements RunnableFuture<V> {}
声明很简单,实现了RunnableFuture接口,而这个接口上面说过了,不再赘述。
核心属性:
1、任务运行状态:
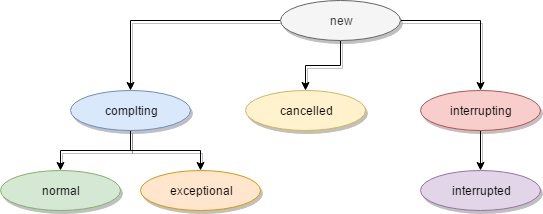
1 private volatile int state;
2 private static final int NEW          = 0;
3 private static final int COMPLETING   = 1;
4 private static final int NORMAL       = 2;
5 private static final int EXCEPTIONAL  = 3;
6 private static final int CANCELLED    = 4;
7 private static final int INTERRUPTING = 5;
8 private static final int INTERRUPTED  = 6;
状态流转如下:
NEW -> COMPLETING   -> NORMAL
NEW -> COMPLETING   -> EXCEPTIONAL
NEW -> COMPLETING
NEW -> INTERRUPTING -> INTERRUPTED
接下来我来一一解释下这几种状态的示意:
- NEW:表示是个新的任务或者还没被执行完的任务,这是初始状态。
- COMPLETING:任务已经执行完成或者执行任务的时候发生异常,但是任务执行结果或者异常原因还没有保存到outcome字段的时候(outcome字段用来保存任务执行结果,如果发生异常,则用来保存异常原因),状态会从NEW变更到COMPLETING。但是这个状态会时间会比较短,属于中间状态。
- NORMAL:任务已经执行完成并且任务执行结果已经保存到outcome字段,状态会从COMPLETING转换到NORMAL;这是一个最终态。
- EXCEPTIONAL:任务执行发生异常并且异常原因已经保存到outcome字段中后,状态会从COMPLETING转换到EXCEPTIONAL;这是一个最终态。
- CANCELLED:任务还没开始执行或者已经开始执行但是还没有执行完成的时候,用户调用了cancel(false)方法取消任务且不中断任务执行线程,这个时候状态会从NEW转化为CANCELLED状态。这是一个最终态。
- INTERRUPTING:任务还没开始执行或者已经执行但是还没有执行完成的时候,用户调用了cancel(true)方法取消任务并且要中断任务执行线程但是还没有中断任务执行线程之前,状态会从NEW转化为INTERRUPTING;这是一个中间状态。
- INTERRUPTED:调用interrupt()中断任务执行线程之后状态会从INTERRUPTING转换到INTERRUPTED。这是一个最终态。
- 有一点需要注意的是,所有值大于COMPLETING的状态都表示任务已经执行完成(任务正常执行完成,任务执行异常或者任务被取消)。
综上所述,其实这几个状态无非就是用于标识用户是否开始执行,并且执行时是否发生了异常,我们可以从单词的示意中快速理解。
- NEW:初始化;任务刚创建出来或还没执行完。
- ----------------------------------------------------------------------------------
- COMPLETING:完成中;任务已执行完或执行时发生了异常,但是这个最终结果呢还没记录下来,所以叫完成中,属于中间态。
- NORMAL:正常之意,表示无异常情况;它是COMPLETING的后续状态,表示正常执行无异常情况。
- EXCEPTIONAL:异常;它是COMPLETING的后续状态,表示执行时发生了异常。
- ----------------------------------------------------------------------------------
- CANCELLED:取消;还没执行或还未执行完成被取消,调用了cancel(false)。
- ----------------------------------------------------------------------------------
- INTERRUPTING:中断中;还没执行或还未执行完成就收到cancel(true)中断指令,此时还未完成中断。
- INTERRUPTED:中断;调用interrupt()中断了线程。
- ----------------------------------------------------------------------------------
——————————————————————————————————————————————————————————————————————
2、基本属性:
1 /** 将要执行的任务 */
2 private Callable<V> callable;
3 /** 用于get()方法返回结果,也可能用户get()方法抛出异常 */
4 private Object outcome; // non-volatile, protected by state reads/writes
5 /** 执行callable的线程,调用FutureTask.run()方法,通过CAS设置 */
6 private volatile Thread runner;
7 /** 栈结构的等待队列,该属性是栈顶节点 */
8 private volatile WaitNode waiters;
构造器:
 1 public FutureTask(Callable<V> callable) {
 2     if (callable == null)
 3         throw new NullPointerException();
 4     this.callable = callable;
 5     this.state = NEW;       // ensure visibility of callable
 6 }
 7
 8 public FutureTask(Runnable runnable, V result) {
 9     this.callable = Executors.callable(runnable, result);
10     this.state = NEW;       // ensure visibility of callable
11 }
构造器很简单,有直接传入Callable的,还有传入Runnable然后通过Executors.callable()封装的,我们来看看它是如何封装的。
 1 public static <T> Callable<T> callable(Runnable task, T result) {
 2     if (task == null)
 3         throw new NullPointerException();
 4     return new RunnableAdapter<T>(task, result);
 5 }
 6
 7 static final class RunnableAdapter<T> implements Callable<T> {
 8     final Runnable task;
 9     final T result;
10     RunnableAdapter(Runnable task, T result) {
11         this.task = task;
12         this.result = result;
13     }
14     public T call() {
15         task.run();
16         return result;
17     }
18 }
通过一个实现了Callable的内部类RunnableAdapter来适配,通过简单的调用了run()方法,并将结果返回出去;原理很简单,不做赘述。
核心方法:
1、run():
为什么要看run方法呢,因为submit()方法中回调execute(),而execute中的addWorker会启动线程,并且执行run方法,submit的run方法正式线程核心逻辑的重写,当然要说啦。
 1 public <T> Future<T> submit(Callable<T> task) {
 2     if (task == null) throw new NullPointerException();
 3     RunnableFuture<T> ftask = newTaskFor(task);
 4     execute(ftask);
 5     return ftask;
 6 }
 7
 8 public void execute(Runnable command) {
 9     // ......
10 }
11
12 private boolean addWorker(Runnable firstTask, boolean core) {
13     // ......
14     if (workerAdded) {
15         t.start();
16         workerStarted = true;
17     }
18     // ......
19 }
接下来让我们来瞅瞅run()方法的逻辑:
 1 public void run() {
 2     // 1、如果状态不是NEW,说明任务已经执行过或被取消,直接返回
 3     // 2、如果状态是NEW,则尝试CAS吧当前线程保存在runner中,CAS失败则直接返回
 4     if (state != NEW ||
 5         !UNSAFE.compareAndSwapObject(this, runnerOffset,
 6                                      null, Thread.currentThread()))
 7         return;
 8     try {
 9         Callable<V> c = callable;
10         // 只有状态为NEW才会被执行
11         if (c != null && state == NEW) {
12             V result;
13             // 执行标记,正常执行为true,异常为false
14             boolean ran;
15             try {
16                 // 执行任务
17                 result = c.call();
18                 ran = true;
19             } catch (Throwable ex) {
20                 result = null;
21                 ran = false;
22                 // 标记异常状态
23                 setException(ex);
24             }
25             if (ran)
26                 // 任务正常执行,调用set方法
27                 set(result);
28         }
29     } finally {
30         // runner must be non-null until state is settled to
31         // prevent concurrent calls to run()
32         runner = null;
33         // state must be re-read after nulling runner to prevent
34         // leaked interrupts
35         int s = state;
36         // 如果任务被中断,执行中断处理
37         if (s >= INTERRUPTING)
38             handlePossibleCancellationInterrupt(s);
39     }
40 }
逻辑如上,流程很清楚,着重讲下上面提到的几个方法:
- set(result);
- setException(ex);
- handlePossibleCancellationInterrupt(s);
——————————————————————————————————————————————————————————————————————
set(result):
1 protected void set(V v) {
2     if (UNSAFE.compareAndSwapInt(this, stateOffset, NEW, COMPLETING)) {
3         outcome = v;
4         UNSAFE.putOrderedInt(this, stateOffset, NORMAL); // final state
5         finishCompletion();
6     }
7 }
- 首先通过CAS吧state的状态从NEW改成COMPLETING。
- 修改成功后将v赋给outcome,再把state修改为NORMAL,也就是表示现在可以获取返回值了。
- 最后调用finishCompletion()唤醒等待队列中的所有节点。
 1 private void finishCompletion() {
 2     // assert state > COMPLETING;
 3     for (WaitNode q; (q = waiters) != null;) {
 4         // 通过CAS把栈顶元素值为null,相当于弹出栈顶元素
 5         if (UNSAFE.compareAndSwapObject(this, waitersOffset, q, null)) {
 6             for (;;) {
 7                 Thread t = q.thread;
 8                 if (t != null) {
 9                     q.thread = null;
10                     // 唤醒线程
11                     LockSupport.unpark(t);
12                 }
13                 // 拿到下一个节点,并重写赋给q,相当于一个一个遍历,类似于i++
14                 WaitNode next = q.next;
15                 if (next == null)
16                     // 直到next为空,也就是遍历到最后一个节点
17                     break;
18                 q.next = null; // unlink to help gc
19                 q = next;
20             }
21             break;
22         }
23     }
24
25     done();
26
27     callable = null;        // to reduce footprint
28 }
被唤醒的线程会从各自awaitDone方法中的LockSupport.park()阻塞中返回,返回进行新的一轮循环。
——————————————————————————————————————————————————————————————————————
setException(ex):
1 protected void setException(Throwable t) {
2     if (UNSAFE.compareAndSwapInt(this, stateOffset, NEW, COMPLETING)) {
3         outcome = t;
4         UNSAFE.putOrderedInt(this, stateOffset, EXCEPTIONAL); // final state
5         finishCompletion();
6     }
7 }
逻辑和set方法类似,只不过将outcome赋值完成后会把状态变成EXCEPTIONAL。
——————————————————————————————————————————————————————————————————————
handlePossibleCancellationInterrupt(s):
1 private void handlePossibleCancellationInterrupt(int s) {
2     if (s == INTERRUPTING)
3         while (state == INTERRUPTING)
4             Thread.yield(); // wait out pending interrupt
5 }
如果正在响应中断(EXCEPTIONAL),则等待响应中断结束(INTERRUPTED)。
——————————————————————————————————————————————————————————————————————
2、get()
同理,为啥看学习get()方法的源码呢,你有没有注意到我finishCompletion()方法中所说的,被唤醒的线程会从各自awaitDone方法中的LockSupport.park()阻塞中返回,返回进行新的一轮循环。
没错,阻塞正式在get()方法中的。
1 public V get() throws InterruptedException, ExecutionException {
2     int s = state;
3     if (s <= COMPLETING)
4         s = awaitDone(false, 0L);
5     return report(s);
6 }
awaitDone():
 1 private int awaitDone(boolean timed, long nanos)
 2     throws InterruptedException {
 3     // 计算等待拦截时间
 4     final long deadline = timed ? System.nanoTime() + nanos : 0L;
 5     WaitNode q = null;
 6     boolean queued = false;
 7     for (;;) {
 8         // 如果阻塞线程被中断,则在等待队列中删除该节点后抛出InterruptedException
 9         if (Thread.interrupted()) {
10             removeWaiter(q);
11             throw new InterruptedException();
12         }
13
14         // 如果当前状态大于COMPLETING,说明任务要么正常结束、要么异常结束、要么被取消了
15         // 此时把thread置为null后返回结果
16         int s = state;
17         if (s > COMPLETING) {
18             if (q != null)
19                 q.thread = null;
20             return s;
21         }
22         // 如果处于中间态COMPLETING,表示任务已结束,但还未同步结果
23         // 此时让出执行权,让其它线程优先执行
24         else if (s == COMPLETING) // cannot time out yet
25             Thread.yield();
26         // 如果等待节点为空,则构造一个等待节点
27         else if (q == null)
28             q = new WaitNode();
29         // 如果还没入队,则把当前节点加入waiters首节点,并替换原来的waiters
30         else if (!queued)
31             queued = UNSAFE.compareAndSwapObject(this, waitersOffset,
32                                                  q.next = waiters, q);
33         // 如果timed=true则表示有限等待
34         else if (timed) {
35             nanos = deadline - System.nanoTime();
36             if (nanos <= 0L) {
37                 removeWaiter(q);
38                 return state;
39             }
40             // 阻塞等待特定时间
41             LockSupport.parkNanos(this, nanos);
42         }
43         else
44             // 阻塞等待直到被其它线程唤醒
45             LockSupport.park(this);
46     }
47 }
就是对几个运行状态的处理,是不是so easy啦。
report():
 1 /**
 2  * 上报状态
 3  */
 4 private V report(int s) throws ExecutionException {
 5     Object x = outcome;
 6     // 正常执行完成,返回任务执行结果
 7     if (s == NORMAL)
 8         return (V)x;
 9     // 任务被取消,抛出CancellationException异常
10     if (s >= CANCELLED)
11         throw new CancellationException();
12     // 其它状态,抛出ExecutionException异常
13     throw new ExecutionException((Throwable)x);
14 }
——————————————————————————————————————————————————————————————————————