目录:
- 配置文件路径解析
- 环境和属性
- 源码分析
配置文件路径解析
在了解Spring容器如何解析配置文件路径前,我们先来看一段代码
1 <?xml version="1.0" encoding="UTF-8"?>
2 <beans xmlns="http://www.springframework.org/schema/beans"
3        xmlns:xsi="http://www.w3.org/2001/XMLSchema-instance"
4        xsi:schemaLocation="http://www.springframework.org/schema/beans http://www.springframework.org/schema/beans/spring-beans.xsd">
5
6     <bean class="com.jdr.spring.TestBean" name="testBean"/>
7
8 </beans>
1 public class TestBean {
2     public void run() {
3         System.out.println("testBean run...");
4     }
5 }
1 public class TestSpring {
2     public static void main(String[] args) {
3         ClassPathXmlApplicationContext ctx = new ClassPathXmlApplicationContext("beans.xml");
4         TestBean testBean = (TestBean) ctx.getBean("testBean");
5         testBean.run();
6     }
7 }
上面这段代码通过ClassPathXmlApplicationContext来解析beans.xml,并且执行了TestBean的run方法,我相信有点Spring基础的同学都是能看懂的。
而本次学习的重点也不是如何使用ClassPathXmlApplicationContext,而是ClassPathXmlApplicationContext是如何解析beans.xml的。
废话不多说,我们先看看TestSpring的源码。
———————————————————————————————————————————————————————
通过查看源码我们可以发现,ClassPathXmlApplicationContext主要代码如下。
1 public ClassPathXmlApplicationContext(String[] configLocations, boolean refresh, ApplicationContext parent)
2         throws BeansException {
3
4     super(parent);
5     setConfigLocations(configLocations);
6     if (refresh) {
7         refresh();
8     }
9 }
首先第5行先设置了Spring上下文的配置位置,然后调用了refresh函数,此函数执行了Spring容器启动前的一些操作,不是本次的重点,后续再说。
setConfigLocations的核心代码如下:
 1 public void setConfigLocations(String... locations) {
 2     if (locations != null) {
 3         Assert.noNullElements(locations, "Config locations must not be null");
 4         this.configLocations = new String[locations.length];
 5         for (int i = 0; i < locations.length; i++) {
 6             this.configLocations[i] = resolvePath(locations[i]).trim();
 7         }
 8     }
 9     else {
10         this.configLocations = null;
11     }
12 }
13
14 protected String resolvePath(String path) {
15     return getEnvironment().resolveRequiredPlaceholders(path);
16 }
其中,setConfigLocations函数的代码很简单,就必不再赘述。我们直接看下resolvePath做了一些什么事。
我们可以看到在调用了getEnvironment后,便又调用了resolveRequiredPlaceholders。这个地方就是占位符解析和替换的工作。接下来我们首先要了解的知识就是“Spring环境、属性和占位符”。
环境和属性
Spring环境和属性由四个部分组成:
- PropertySource:属性源。key-value 属性对抽象,用于配置数据。
- PropertyResolver:属性解析器。用于解析属性配置。
- Profile:剖面。只有被激活的Profile才会将其中所对应的Bean注册到Spring容器中
- Environment:环境。Profile和PropertyResolver的组合。
详解:
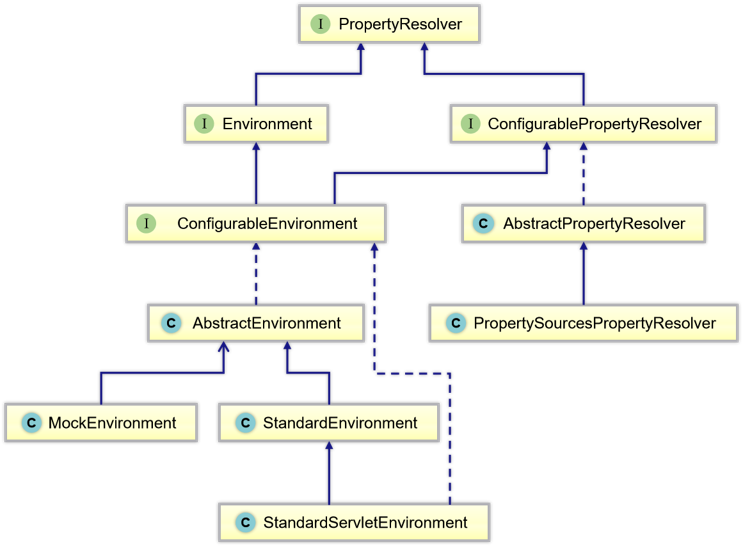
- PropertySource:提供了可配置属性源上的搜索操作。
- PropertyResolver:属性解析器,用于解析任何基础源的属性的接口。
- ConfigurablePropertyResolver:提供属性类型转换的功能。
- AbstractPropertyResolver:解析属性文件的抽象基类。设置了解析属性文件所需要ConversionService、prefix、suffix、valueSeparator等信息。
- PropertySourcesPropertyResolver:PropertyResolver的实现,对一组PropertySources提供属性解析服务。
- ConversionService:用于在运行时执行类型转换。
- Environment:集成在容器中的抽象,它主要包含两个方面,Profiles和Properties。
- ConfigurableEnvironment:设置激活的profile和默认的profile的功能以及操作Properties的工具。
———————————————————————————————————————————————————————
PropertySource:
PropertySource是在Spring Environment之上提供了可配置属性源上的搜索操作,其核心代码如下。
 1 public abstract class PropertySource<T> {
 2
 3     // 属性值名
 4     protected final String name;
 5
 6     // 属性对象
 7     protected final T source;
 8
 9     // 获取属性名
10     public String getName() {
11         return this.name;
12     }
13
14     // 获取属性对象
15     public T getSource() {
16         return this.source;
17     }
18
19     // 属性名是否存在
20     public boolean containsProperty(String name) {
21         return (getProperty(name) != null);
22     }
23
24     // 根据属性名获取属性
25     public abstract Object getProperty(String name);
26 }
属性搜索过程是按照层次结构执行的。默认情况下,系统属性优先于环境变量。
因此,在调用env.getProperty("foo")时,如果在系统属性和环境变量中都设置了foo属性,则系统变量将优先于环境变量。
完整层次结构如下所示,优先级最高的条目位于顶部:
- ServletConfig参数
- ServletContext参数
- JNDI环境变量(如:"java:comp/env/")
- JVM system properties("-D"命令行参数,如-Dfoo="abcd")
- JVM system environment(操作系统环境变量)
注意:属性值不会被合并,而是会被前面的条目覆盖。
———————————————————————————————————————————————————————
PropertyResolver:
属性解析器,用于解析任何基础源的属性的接口,其接口定义如下:
 1 public interface PropertyResolver {
 2
 3     // 是否包含指定key
 4     boolean containsProperty(String key);
 5
 6     // 返回指定key对应的value,若没有则返回null
 7     String getProperty(String key);
 8
 9     // 返回指定key对应的value,若没有则返回defaultValue
10     String getProperty(String key, String defaultValue);
11
12     // 返回指定key对应的value,并解析成指定类型。如果没有对应值则返回null
13     <T> T getProperty(String key, Class<T> targetType);
14
15     // 返回指定key对应的value,并解析成指定类型。如果没有对应值则返回defaultValue
16     <T> T getProperty(String key, Class<T> targetType, T defaultValue);
17
18     // 转换指定key的value为指定类型。如果没有则返回null
19     // 如果value不能转换成指定类型,则抛出ConversionException
20     @Deprecated
21     <T> Class<T> getPropertyAsClass(String key, Class<T> targetType);
22
23     // 返回指定key的value值,如果没有则抛出异常
24     String getRequiredProperty(String key) throws IllegalStateException;
25
26     // 转换指定key的value为指定类型,如果没有则抛出异常
27     <T> T getRequiredProperty(String key, Class<T> targetType) throws IllegalStateException;
28
29     // 解析${}占位符并替换为getProperty方法返回的结果,无法解析的占位符会被忽略
30     String resolvePlaceholders(String text);
31
32     // 解析${}占位符并替换为getProperty方法返回的结果,无法解析的占位符会抛异常
33     String resolveRequiredPlaceholders(String text) throws IllegalArgumentException;
34 }
源码分析
最后我们来看下Spring容器到底是如何解析配置的。
 1 // 1、根据对应环境,解析path里的占位符
 2 protected String resolvePath(String path) {
 3     return getEnvironment().resolveRequiredPlaceholders(path);
 4 }
 5
 6 // 2、对占位符进行解析
 7 @Override
 8 public String resolveRequiredPlaceholders(String text) throws IllegalArgumentException {
 9     return this.propertyResolver.resolveRequiredPlaceholders(text);
10 }
11
12 // 3、创建占位符解析工具
13 @Override
14 public String resolveRequiredPlaceholders(String text) throws IllegalArgumentException {
15     if (this.strictHelper == null) {
16         this.strictHelper = createPlaceholderHelper(false);
17     }
18     return doResolvePlaceholders(text, this.strictHelper);
19 }
20
21 // 4、替换占位符
22 public String replacePlaceholders(String value, PlaceholderResolver placeholderResolver) {
23     Assert.notNull(value, "'value' must not be null");
24     return parseStringValue(value, placeholderResolver, new HashSet<String>());
25 }
可以从上述代码中得知,替换占位符的核心代码便是parseStringValue函数,我们来看看它的实现。
 1 protected String parseStringValue(
 2         String value, PlaceholderResolver placeholderResolver, Set<String> visitedPlaceholders) {
 3     // ex: value = spring-${config}.xml
 4     StringBuilder result = new StringBuilder(value);
 5
 6     // 找到占位符前缀下标(${)
 7     int startIndex = value.indexOf(this.placeholderPrefix);
 8     while (startIndex != -1) {
 9         // 找到占位符前缀对应的后缀下标
10         int endIndex = findPlaceholderEndIndex(result, startIndex);
11         if (endIndex != -1) {
12             // 获取result中startIndex + this.placeholderPrefix.length()到endIndex的值
13             // 也就是占位符中的字符,spring-${config}.xml >>> config
14             String placeholder = result.substring(startIndex + this.placeholderPrefix.length(), endIndex);
15             String originalPlaceholder = placeholder;
16             if (!visitedPlaceholders.add(originalPlaceholder)) {
17                 throw new IllegalArgumentException(
18                         "Circular placeholder reference '" + originalPlaceholder + "' in property definitions");
19             }
20             // 递归调用,解析占位符中包含的占位符(嵌套占位符)
21             placeholder = parseStringValue(placeholder, placeholderResolver, visitedPlaceholders);
22             // 获取占位符对应的值
23             String propVal = placeholderResolver.resolvePlaceholder(placeholder);
24             if (propVal == null && this.valueSeparator != null) {
25                 int separatorIndex = placeholder.indexOf(this.valueSeparator);
26                 if (separatorIndex != -1) {
27                     String actualPlaceholder = placeholder.substring(0, separatorIndex);
28                     String defaultValue = placeholder.substring(separatorIndex + this.valueSeparator.length());
29                     propVal = placeholderResolver.resolvePlaceholder(actualPlaceholder);
30                     if (propVal == null) {
31                         propVal = defaultValue;
32                     }
33                 }
34             }
35             if (propVal != null) {
36                 // 递归调用,解析先前解析的占位符值中包含的占位符
37                 // 也就是解析完propVal后,propVal可能是占位符(占位符嵌套)
38                 propVal = parseStringValue(propVal, placeholderResolver, visitedPlaceholders);
39                 result.replace(startIndex, endIndex + this.placeholderSuffix.length(), propVal);
40                 if (logger.isTraceEnabled()) {
41                     logger.trace("Resolved placeholder '" + placeholder + "'");
42                 }
43                 startIndex = result.indexOf(this.placeholderPrefix, startIndex + propVal.length());
44             }
45             else if (this.ignoreUnresolvablePlaceholders) {
46                 // Proceed with unprocessed value.
47                 startIndex = result.indexOf(this.placeholderPrefix, endIndex + this.placeholderSuffix.length());
48             }
49             else {
50                 throw new IllegalArgumentException("Could not resolve placeholder '" +
51                         placeholder + "'" + " in value "" + value + """);
52             }
53             visitedPlaceholders.remove(originalPlaceholder);
54         }
55         else {
56             startIndex = -1;
57         }
58     }
59
60     return result.toString();
61 }
62
63 private int findPlaceholderEndIndex(CharSequence buf, int startIndex) {
64     // 因为后缀的下标肯定在前缀之后,所以要加上前缀的长度,才能精准定位到对应的后缀下标
65     int index = startIndex + this.placeholderPrefix.length();
66     int withinNestedPlaceholder = 0;
67     while (index < buf.length()) {
68         // StringUtils.substringMatch: buf的第index下标的字符是否为this.placeholderSuffix
69         if (StringUtils.substringMatch(buf, index, this.placeholderSuffix)) {
70             if (withinNestedPlaceholder > 0) {
71                 withinNestedPlaceholder--;
72                 index = index + this.placeholderSuffix.length();
73             }
74             else {
75                 return index;
76             }
77         }
78         else if (StringUtils.substringMatch(buf, index, this.simplePrefix)) {
79             withinNestedPlaceholder++;
80             index = index + this.simplePrefix.length();
81         }
82         else {
83             index++;
84         }
85     }
86     return -1;
87 }
parseStringValue的核心逻辑在while循环中;从其循环逻辑来看,如果value入参不包含this.placeholderPrefix的话则直接返回value。
this.placeholderPrefix则是resolveRequiredPlaceholders函数中createPlaceholderHelper传入的,我们来看看其逻辑。
 1 public static final String PLACEHOLDER_PREFIX = "${";
 2 public static final String PLACEHOLDER_SUFFIX = "}";
 3 public static final String VALUE_SEPARATOR = ":";
 4
 5 private String placeholderPrefix = SystemPropertyUtils.PLACEHOLDER_PREFIX;
 6 private String placeholderSuffix = SystemPropertyUtils.PLACEHOLDER_SUFFIX;
 7 private String valueSeparator = SystemPropertyUtils.VALUE_SEPARATOR;
 8
 9 private PropertyPlaceholderHelper createPlaceholderHelper(boolean ignoreUnresolvablePlaceholders) {
10     return new PropertyPlaceholderHelper(this.placeholderPrefix, this.placeholderSuffix,
11             this.valueSeparator, ignoreUnresolvablePlaceholders);
12 }
从上述代码中,我们便可以知道parseStringValue中的几个属性值分别如下:
- private final String placeholderPrefix = "${";
- private final String placeholderSuffix = "}";
- private final String valueSeparator = ":";
- private final boolean ignoreUnresolvablePlaceholders = false;
———————————————————————————————————————————————————————
有了上面这些基础的东西后,就能轻松阅读parseStringValue的逻辑了。
所以我们上面的测试类TestSpring中的ClassPathXmlApplicationContext ctx = new ClassPathXmlApplicationContext("beans.xml");解析出来的便还是原值beans.xml。
如果我们改成下面这样,也是也是能够解析出来的。
 1 public class TestSpring {
 2
 3     public static void main(String[] args) {
 4         Properties properties = System.getProperties();
 5         properties.setProperty("config", "beans");
 6         ClassPathXmlApplicationContext xml = new ClassPathXmlApplicationContext("${config}.xml");
 7         TestBean testBean = (TestBean) xml.getBean("testBean");
 8         testBean.run();
 9     }
10 }
当然,如果你仔细分析了parseStringValue后,你会发现其实它是支持嵌套占位符的,比如这样:
 1 public class TestSpring {
 2
 3     public static void main(String[] args) {
 4         Properties properties = System.getProperties();
 5         properties.setProperty("config", "beans");
 6         properties.setProperty("prefix", "spring");
 7         properties.setProperty("prefix-config", "${prefix}");
 8
 9         ClassPathXmlApplicationContext xml = new ClassPathXmlApplicationContext("${prefix-config}-${config}.xml");
10         TestBean testBean = (TestBean) xml.getBean("testBean");
11         testBean.run();
12     }
13 }