前言
上一节我们针对插件最基本的原理进行了一个简单的demo实现,但是由于插件的Context对象被宿主所接管,因此无法加载插件程序的资源。那么如何解决这个问题捏?
有人提出这样的方案:将apk中的资源解压到某个目录下,然后通过读文件的方法进行资源加载,虽然理论上可以实现,但是实际操作起来难度很大,首先资源文件格式不一(xml、图片等),其次针对不同分辨率的手机,Android设备也会加载同名不同路径下的图片,因此这种方案实现起来难度非常大。也有人说,可以将插件资源复制一份到宿主工程中,然而如果这样做了,我们在插件更新的时候,必须宿主也得更新资源后更新,同时这样也会增加宿主工程安装包的大小,这与我们当时使用插件化来解决问题的思想不符,因此这种方案也不可使用。那么我们应该使用什么样的原理呢?
原理
通过看Android的源代码,我们发现Context下有这两个抽象的方法:

而Context对象获取资源就是靠这两个函数来完成的,而这两个抽象的方法在ContextImpl.java中实现是这个样子的:
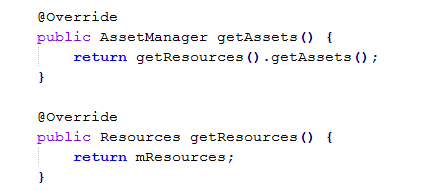
于是我们需要一个Resources的对象,查阅代码之后,最终发现了AssetManager.java下的这个函数:
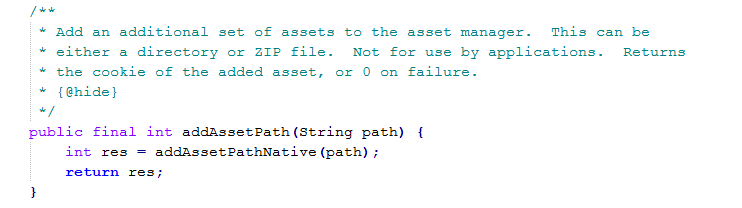
看英文注释,我们发现这个函数,我们可以传递给一个zip包或者是资源的路径,同时这个函数还是隐藏的函数,因此我们还是使用反射来,调用这个函数后就可以得到Resources的对象了。
实现
所以我们需要在宿主中实现一个 loadResources() 这样的函数,用来加载插件的资源:
 1 package com.bryan.host;
 2
 3 import java.io.File;
 4 import java.lang.reflect.Constructor;
 5 import java.lang.reflect.InvocationTargetException;
 6 import java.lang.reflect.Method;
 7
 8 import dalvik.system.DexClassLoader;
 9
10 import android.annotation.SuppressLint;
11 import android.app.Activity;
12 import android.content.pm.PackageInfo;
13 import android.content.pm.PackageManager;
14 import android.content.res.AssetManager;
15 import android.content.res.Resources;
16 import android.content.res.Resources.Theme;
17 import android.os.Bundle;
18 import android.provider.MediaStore.Video;
19
20 public class ProxyActivity extends Activity
21 {
22     ......
23
24     /* 用来加载资源的*/
25     protected AssetManager mAssetManager;
26     protected Resources mResources = null;
27     protected Theme mTheme = null;
28
29     ....
30
31     /* 加载插件的指定activity*/
32     @SuppressLint("NewApi") protected void OpenAppointActivity(final String className)
33     {
34         ....
35
36         try
37         {
38             loadResources();
39             ...
40
41             /* 反射 调用插件中的设置代理 */
42             ...
43
44             /* 反射告诉插件是被宿主调起的*/
45             ....
46
47         } catch (Exception e)
48         {
49             e.printStackTrace();
50         }
51     }
52
53
54     protected void loadResources()
55     {
56         try
57         {
58             AssetManager assetManager = AssetManager.class.newInstance();
59             Method addAssetPath = assetManager.getClass().getMethod("addAssetPath", String.class);
60             addAssetPath.invoke(assetManager, mExtraDexPath);
61             mAssetManager = assetManager;
62         } catch (Exception e) {
63             e.printStackTrace();
64         }
65         Resources superResources = super.getResources();
66         mResources = new Resources(mAssetManager, superResources.getDisplayMetrics(), superResources.getConfiguration());
67         mTheme = mResources.newTheme();
68         mTheme.setTo(super.getTheme());
69     }
70
71     /* 重写这两个加载资源的函数 */
72     @Override
73     public AssetManager getAssets()
74     {
75         if (mAssetManager != null)
76         {
77             return mAssetManager;
78         }
79         return super.getAssets();
80     }
81
82     @Override
83     public Resources getResources() {
84         if (mResources != null)
85         {
86             return mResources;
87         }
88         return super.getResources();
89     }
90
91 }
注意这个函数的位置,一定要放到反射插件的OnCreate之前,其次重写 getAssets() 和 getResources() 即可。
插件工程我们需要在BaseActivity中处理 getAssets() 和 getResources() 这两个函数,方法与之前类似,考虑插件自己启动还是被宿主加载的两种情况:
 1 package com.bryan.plugin;
 2
 3
 4 import android.app.Activity;
 5 import android.content.Intent;
 6 import android.content.res.AssetManager;
 7 import android.content.res.Resources;
 8 import android.os.Bundle;
 9 import android.view.View;
10 import android.view.ViewGroup.LayoutParams;
11
12 public class BaseActivity extends Activity
13 {
14     /* 宿主工程中的代理Activity*/
15     protected Activity mProxyActivity;
16
17     /* 判断是被谁调起的,如果是宿主调起的为1 */
18     int Who = 0;
19
20     public void setProxy(Activity proxyActivity)
21     {
22         mProxyActivity = proxyActivity;
23     }
24
25     @Override
26     protected void onCreate(Bundle savedInstanceState)
27     {
28
29
30         if (savedInstanceState != null)
31         {
32             Who = savedInstanceState.getInt("Host", 0);
33         }
34         if (Who == 0)
35         {
36             super.onCreate(savedInstanceState);
37             mProxyActivity = this;
38         }
39     }
40
41     ......
42
43     /* 重写几个重要的添加布局的类 */
44     ......
45
46
47     /* 重写加载资源的方法  */
48     @Override
49     public Resources getResources() {
50         if (Who == 0)
51         {
52             return super.getResources();
53         }
54         else
55         {
56             return mProxyActivity.getResources();
57         }
58     }
59
60
61     @Override
62     public AssetManager getAssets() {
63         if (Who == 0)
64         {
65             return super.getAssets();
66         }
67         else
68         {
69             return mProxyActivity.getAssets();
70         }
71     }
72
73
74 }
Base中处理完成之后,我们在插件主Activity中尝试一下加载资源的代码:
 1 package com.bryan.plugin;
 2
 3 import android.content.Context;
 4 import android.graphics.Color;
 5 import android.graphics.drawable.BitmapDrawable;
 6 import android.os.Bundle;
 7 import android.view.View;
 8 import android.view.View.OnClickListener;
 9 import android.view.ViewGroup.LayoutParams;
10 import android.widget.Button;
11 import android.widget.ImageView;
12 import android.widget.LinearLayout;
13
14 public class MainActivity extends BaseActivity {
15
16     @Override
17     protected void onCreate(Bundle savedInstanceState) {
18         super.onCreate(savedInstanceState);
19
20         // 初始化处理布局
21         InitView();
22     }
23
24     private void InitView()
25     {
26         View view = CreateView(mProxyActivity);
27         mProxyActivity.setContentView(view);
28
29         System.out.println("MainActivity.InitView()" + "activity name is :"+mProxyActivity.getClass().getSimpleName());
30     }
31
32     private View CreateView(final Context context)
33     {
34         LinearLayout linearLayout = new LinearLayout(context);
35
36         linearLayout.setLayoutParams(new LayoutParams(LayoutParams.MATCH_PARENT, LayoutParams.MATCH_PARENT));
37         linearLayout.setBackgroundColor(Color.parseColor("#F4F4D6"));
38         Button button = new Button(context);
39         button.setText("plugin button");
40         linearLayout.addView(button, LayoutParams.WRAP_CONTENT,LayoutParams.WRAP_CONTENT);
41         ImageView image = new ImageView(context);
42         image.setImageBitmap(new BitmapDrawable( getResources().openRawResource(R.drawable.qq)).getBitmap());
43        linearLayout.addView(image, LayoutParams.WRAP_CONTENT,LayoutParams.WRAP_CONTENT);
44         button.setOnClickListener(new OnClickListener() {
45             @Override
46             public void onClick(View v) {
47                 StartActivityByProxy("com.bryan.plugin.TestActivity");
48             }
49         });
50         return linearLayout;
51     }
52 }
我们在插件的资源中插入一张qq的图片,资源名字命名为qq,然后在加载资源的地方加入41-43行的代码,这通过这样的方式来进行加载资源。
结果
首先运行插件工程:

其次运行宿主工程:


可以看到在宿主工程中成功加载了插件工程的资源。
看样子我们已经解决了一个很棘手的问题,还剩一个Activity生命周期函数失效的问题,下一节我们来讲这个。