1:创建一个HelloWorld的类
 1 package com.spring.helloworld;
 2
 3 public class HelloWorld {
 4     private String name;
 5
 6     public void setName(String name) {
 7         System.out.println("helloWorld的set方法");
 8         this.name = name;
 9     }
10     public void hello(){
11         System.out.println("helloworld:"+name);
12     }
13     public HelloWorld() {
14         System.out.println("helloWorld的构造器");
15     }
16 }
2:正常使用 HelloWorld类:
1         HelloWorld helloWorld=new HelloWorld();
2         helloWorld.setName("beijing");
3         helloWorld.hello();
3:使用Spring容器IOC:
把2中的创建对象。传入属性都交给Spring来管理
<?xml version="1.0" encoding="UTF-8"?>
<beans xmlns="http://www.springframework.org/schema/beans"
    xmlns:xsi="http://www.w3.org/2001/XMLSchema-instance"
    xsi:schemaLocation="http://www.springframework.org/schema/beans http://www.springframework.org/schema/beans/spring-beans.xsd">

    <bean id="helloWorld" class="com.spring.helloworld.HelloWorld">
        <property name="name" value="aa"></property>
    </bean>
</beans>
id:就相当于是HelloWorld这个类的引用。如果不写。访问的时候直接写类的全类名也是可以的。
4:使用IOC容器
    //1:创建IOC容器
      //ApplicationContext是一个接口。代表IOC容器
        //ClassPathXmlApplicationContext 是ApplicationContext接口下ConfigurableApplicationContext接口下的一个实现类。用来加载配置文件。
         ApplicationContext act=new ClassPathXmlApplicationContext("applicationContext.xml");
        //2:从IOC中获得Bean实例 有id
        HelloWorld helloWorld=(HelloWorld) act.getBean("helloWorld");
      //3:没有id
      HelloWorld helloWorld2=(HelloWorld) act.getBean("com.spring.helloworld.HelloWorld");

        helloWorld.hello();
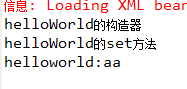
说明容器创建的时候先去调用构造器。然后调用set方法。
一:构造器注入的方式:
 1 package com.spring.helloworld;
 2
 3 public class Student {
 4     private String name;
 5     private String age;
 6     private Integer sal;
 7     public Student(String name, String age, Integer sal) {
 8         super();
 9         this.name = name;
10         this.age = age;
11         this.sal = sal;
12     }
13     @Override
14     public String toString() {
15         return "Student [name=" + name + ", age=" + age + ", sal=" + sal + "]";
16     }
17
18 }
写配置文件:
<bean id="student" class="com.spring.helloworld.Student">
        <constructor-arg value="lu" type="java.lang.String"/>
        <constructor-arg value="19" type="java.lang.String"/>
        <constructor-arg value="99" type="java.lang.Integer"/>
    </bean>
后面加上type 就是为了去和构造器中的字段一一对应。
然后从IOC容器中得到创建的Student对象。
Student student=(Student) act.getBean("student");
        System.out.println(student);
****特殊字符: 用<![CDATA[ ]]>
<constructor-arg type="java.lang.String">
            <value><![CDATA[<19>]]></value>
        </constructor-arg>
二:set注入
package com.spring.helloworld;

public class Car {
    private String company;
    private String brand;
    private int maxSpeed;
    public void setCompany(String company) {
        this.company = company;
    }
    public void setBrand(String brand) {
        this.brand = brand;
    }
    public void setMaxSpeed(int maxSpeed) {
        this.maxSpeed = maxSpeed;
    }
    @Override
    public String toString() {
        return "Car [company=" + company + ", brand=" + brand + ", maxSpeed="
                + maxSpeed + "]";
    }

}
XML文件配置:
1 <bean id="car" class="com.spring.helloworld.Car">
2         <property name="company" value="Audi"/>
3         <property name="brand" value="shanghai"/>
4         <property name="maxSpeed" value="420"/>
5     </bean>
三:构造器注入。Car对象作为Student的一个属性。如何注入?
package com.spring.helloworld;

public class Student {
    private String name;
    private String age;
    private Car car;
    public Student(String name, String age, Car car) {
        super();
        this.name = name;
        this.age = age;
        this.car = car;
    }
    @Override
    public String toString() {
        return "Student [name=" + name + ", age=" + age + ", car=" + car + "]";
    }

}
XML配置文件:
1):ref元素指向一个Car的id。
<bean id="car" class="com.spring.helloworld.Car">
        <property name="company" value="Audi"/>
        <property name="brand" value="shanghai"/>
        <property name="maxSpeed" value="420"/>
    </bean>
    <bean id="student" class="com.spring.helloworld.Student">
        <constructor-arg>
            <value>lu</value>
        </constructor-arg>
        <constructor-arg>
            <value>19</value>
        </constructor-arg>
        <constructor-arg ref="car"/>
    </bean>
2):内部Bean。
<bean id="student" class="com.spring.helloworld.Student">
        <constructor-arg>
            <value>lu</value>
        </constructor-arg>
        <constructor-arg>
            <value>19</value>
        </constructor-arg>
        <constructor-arg>
            <bean class="com.spring.helloworld.Car">
                <property name="company" value="Audi"/>
                <property name="brand" value="shanghai"/>
                <property name="maxSpeed" value="420"/>
            </bean>
        </constructor-arg>
    </bean>
四:list集合set注入
 1 <bean id="car" class="com.spring.helloworld.Car">
 2         <property name="company" value="Audi"></property>
 3         <property name="brand" value="shanghai"></property>
 4         <property name="maxSpeed" value="420"></property>
 5     </bean>
 6     <bean id="car2" class="com.spring.helloworld.Car">
 7         <property name="company" value="Audi2"></property>
 8         <property name="brand" value="shanghai"></property>
 9         <property name="maxSpeed" value="430"></property>
10     </bean>
11     <bean id="car3" class="com.spring.helloworld.Car">
12         <property name="company" value="Audi3"></property>
13         <property name="brand" value="shanghai"></property>
14         <property name="maxSpeed" value="440"></property>
15     </bean>
16     <bean id="student" class="com.spring.helloworld.Student">
17         <constructor-arg>
18             <value>lu</value>
19         </constructor-arg>
20         <constructor-arg>
21             <value>19</value>
22         </constructor-arg>
23         <property name="cars">
24             <list>
25                 <ref bean="car"/>
26                 <ref bean="car2"/>
27                 <ref bean="car3"/>
28             </list>
29         </property>
30     </bean>
五:Map集合
set注入:
private Map<String,Car> cars;


    public void setCars(Map<String, Car> cars) {
        this.cars = cars;
    }
    <property name="cars">
            <map>
                <entry key="AA" value-ref="car"></entry>
                <entry key="BB" value-ref="car2"></entry>
            </map>
        </property>
构造器注入:
<constructor-arg>
            <map>
                <entry key="AA" value-ref="car"></entry>
                <entry key="BB" value-ref="car2"></entry>
            </map>
        </constructor-arg>
六:使用p:命名空间 只能是SET注入(这种方法不能是构造器注入)
1 <bean id="car" class="com.spring.helloworld.Car" p:company="Audi" p:brand="shanghai" p:maxSpeed="450"></bean>
car作为Student的一个属性。
<bean id="student" class="com.spring.helloworld.Student"
        p:name="lu" p:age="19" p:cars-ref="car"
    />
p:cars-ref="car" 跟的是对应的car的id中的值
使用p标签的时候先要在配置文件中加上要使用的标签
xmlns:p="http://www.springframework.org/schema/p"
七:自动装配
<bean  id="cars" class="com.spring.helloworld.Car" p:company="Audi"  p:brand="shanghai" p:maxSpeed="450"></bean>
    <bean id="student" class="com.spring.helloworld.Student"
        p:name="lu" p:age="19" autowire="byName"
    />
Car中的id对应的是Student中的属性名。
<bean  id="a" class="com.spring.helloworld.Car" p:company="Audi"  p:brand="shanghai" p:maxSpeed="450"></bean>
    <bean id="student" class="com.spring.helloworld.Student"
        p:name="lu" p:age="19" autowire="byType"
    />
byType:根据bean的类型和当前bean的属性的类型进行自动装配。若IOC容器中有1个以上的类型匹配的bean,则抛异常
八:bean的作用域
1:scope="singleton"
<bean  id="car" class="com.spring.helloworld.Car"
    p:company="Audi"  p:brand="shanghai" p:maxSpeed="450"
    />
默认是单例的。
Car car=(Car) act.getBean("car");
        Car car2=(Car) act.getBean("car");
        System.out.println(car==car2);
public Car() {
        System.out.println("构造器");
    }

说明car和car2是同一个对象。在创建IOC容器的时候就已经创建bean了。
2:scope="prototype"

在创建IOC容器的时候没有创建。每请求一次。创建一个。car和car2不是同一个对象。protorype:原型的。每次请求的都是新的bean。
九:导入外部资源文件
jdbc.user=luwei
jdbc.password=123456
jdbc.driverClass=com.mysql.jdbc.Driver
jdbc.jdbcUrl=jdbc:mysql:///luwei

jdbc.initPoolSize=5
jdbc.maxPoolSize=10
<!-- 导入外部的资源文件 -->
    <context:property-placeholder location="classpath:db.properties"/>

    <!-- 配置数据源 -->
    <bean id="dataSource" class="com.mchange.v2.c3p0.ComboPooledDataSource">
        <property name="user" value="${jdbc.user}"></property>
        <property name="password" value="${jdbc.password}"></property>
        <property name="driverClass" value="${jdbc.driverClass}"></property>
        <property name="jdbcUrl" value="${jdbc.jdbcUrl}"></property>

        <property name="initialPoolSize" value="${jdbc.initPoolSize}"></property>
        <property name="maxPoolSize" value="${jdbc.maxPoolSize}"></property>
    </bean>