Struts2 拦截器 [Interceptor]
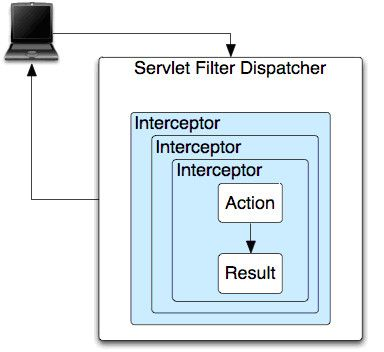
拦截器的工作原理如上图,每一个Action请求都包装在一系列的拦截器的内部。拦截器可以在Action执行直线做相似的操作也可以在Action执行直后做回收操作。
每一个Action既可以将操作转交给下面的拦截器,Action也可以直接退出操作返回客户既定的画面。
如何自定义一个拦截器?
自定义一个拦截器需要三步:
1 自定义一个实现Interceptor接口(或者继承自AbstractInterceptor)的类。
2 在strutx.xml中注册上一步中定义的拦截器。
3 在需要使用的Action中引用上述定义的拦截器,为了方便也可将拦截器定义为默认的拦截器,这样在不加特殊声明的情况下所有的Action都被这个拦截器拦截。
Interceptor接口声明了三个方法:
public interface Interceptor extends Serializable {

    void destroy();

    void init();

    String intercept(ActionInvocation invocation) throws Exception;
}
Init方法在拦截器类被创建之后,在对Action镜像拦截之前调用,相当于一个post-constructor方法,使用这个方法可以给拦截器类做必要的初始话操作。
Destroy方法在拦截器被垃圾回收之前调用,用来回收init方法初始化的资源。
Intercept是拦截器的主要拦截方法,如果需要调用后续的Action或者拦截器,只需要在该方法中调用invocation.invoke()方法即可,在该方法调用的前后可以插入Action调用前后拦截器需要做的方法。如果不需要调用后续的方法,则返回一个String类型的对象即可,例如Action.SUCCESS。
另外AbstractInterceptor提供了一个简单的Interceptor的实现,这个实现为
public abstract class AbstractInterceptor implements Interceptor {

     public void init() {
    }

    public void destroy() {
    }


    public abstract String intercept(ActionInvocation invocation) throws Exception;
}
在不需要编写init和destroy方法的时候,只需要从AbstractInterceptor继承而来,实现intercept方法即可。
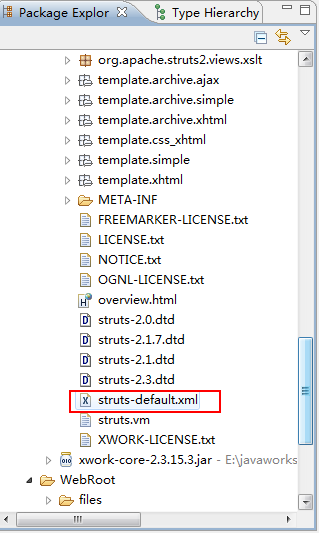
拦截器在哪个地方?

最下面:
现在写自定义的拦截器:
package com.interceptor.file;

import com.opensymphony.xwork2.ActionInvocation;
import com.opensymphony.xwork2.interceptor.Interceptor;

public class MyInterceptor implements Interceptor{

    private static final long serialVersionUID = 1L;

    public void destroy() {
    }

    public void init() {
    }

    public String intercept(ActionInvocation invocation) throws Exception {
        System.out.println("拦截器---前");
        String result = invocation.invoke();//把控制权还交给拦截器。 invoke()方法就是 回调下一个拦截器。
        System.out.println("拦截器---后");
        return result;
    }

}
在struts.xml中配置

然后使用的时候放到要拦截的方法前面就行了。下面的执行顺序就是:
zidingyidelanjieqi---->token---->defaultStack
<action name="testToken" class="com.token.file.tokenAction">
            <interceptor-ref name="zidingyidelanjieqi"></interceptor-ref>
            <interceptor-ref name="token"></interceptor-ref>
            <interceptor-ref name="defaultStack"></interceptor-ref>
            <result>/success.jsp</result>
            <result name="invalid.token">/error.jsp</result>
        </action>
自定义拦截器栈:
一个配置文件只能有一个<interceptors/>
<interceptors>
                    <!-- <interceptor/> 自定义拦截器的名字。
                         <interceptor-stack/>  自定义拦截器栈的名字。
                         <interceptor-ref/>  把自定义的拦截器放到栈里。
                     -->
                    <interceptor name="lanjieqi-1" class="com.interceptor.file.MyInterceptor"></interceptor>
                    <interceptor name="lanjieqi-2" class="com.interceptor.file.MyInterceptor2"></interceptor>
            <interceptor-stack name="zhan">
                <interceptor-ref name="lanjieqi-1"/>
                <interceptor-ref name="lanjieqi-2"/>
                <interceptor-ref name="defaultStack"> <!-- defaultStack栈作为一个拦截器放到zhan栈中 -->
                    <param name="fileUpload.maximumSize">2097152</param>
                    <param name="fileUpload.allowedTypes">text/html,text/xml</param>
                    <param name="fileUpload.allowedExtensions">html,dtd,xml</param>
                </interceptor-ref>
            </interceptor-stack>
        </interceptors>

    <!-- 使用默认拦截器 -->
    <default-interceptor-ref name="zhan"></default-interceptor-ref>