1.下载redis包
wget wget http://download.redis.io/releases/redis-4.0.11.tar.gz
2.解压安装
#解压
tar zxvf redis-4.0.11.tar.gz
#安装
 cd redis-4.0.11
#执行make
#执行make时报错:/bin/sh: cc: command not found--如果没报错可跳过
sudo yum -y install gcc gcc-c++ libstdc++-devel

##报错
# make[1]: Entering directory `/opt/redis-2.6.14/src'
# CC adlist.o
# In file included from adlist.c:34:
# zmalloc.h:50:31: error: jemalloc/jemalloc.h: No such file or directory
# zmalloc.h:55:2: error: #error "Newer version of jemalloc required"
# make[1]: *** [adlist.o] Error 1
# make[1]: Leaving directory `/opt/redis-2.6.14/src'
# make: *** [all] Error 2

#执行
make MALLOC=libc
#执行完上面的命令后,系统提示 'Hint: To run 'make test' is a good idea'

make test #报错: You need tcl 8.5 or newer in order to run the Redis test

#安装tcl
sudo yum install tcl
继续执行
[root@localhost redis-4.0.11]# cd src && make install

#Hint: It's a good idea to run 'make test' ;)

#   INSTALL install
#    INSTALL install
#    INSTALL install
#    INSTALL install
#    INSTALL install

#看到显示INSTALL install说明成功
3.验证启动redis-server
换到redis src目录下
 cd src
 ./redis-server

#7965:C 07 Nov 10:38:19.858 # oO0OoO0OoO0Oo Redis is starting oO0OoO0OoO0Oo
#7965:C 07 Nov 10:38:19.858 # Redis version=4.0.11, bits=64, commit=00000000, modified=0, pid=7965, just started
#7965:C 07 Nov 10:38:19.858 # Warning: no config file specified, using the default config. In order to specify a config file use ./redis-server /path/to/redis.conf
#7965:M 07 Nov 10:38:19.860 * Increased maximum number of open files to 10032 (it was originally set to 1024).
#                _._
#           _.-``__ ''-._
#      _.-``    `.  `_.  ''-._           Redis 4.0.11 (00000000/0) 64 bit
#  .-`` .-```.  ```/    _.,_ ''-._
# (    '      ,       .-`  | `,    )     Running in standalone mode
# |`-._`-...-` __...-.``-._|'` _.-'|     Port: 6379
# |    `-._   `._    /     _.-'    |     PID: 7965
#  `-._    `-._  `-./  _.-'    _.-'
# |`-._`-._    `-.__.-'    _.-'_.-'|
# |    `-._`-._        _.-'_.-'    |           http://redis.io
#  `-._    `-._`-.__.-'_.-'    _.-'
# |`-._`-._    `-.__.-'    _.-'_.-'|
# |    `-._`-._        _.-'_.-'    |
#  `-._    `-._`-.__.-'_.-'    _.-'
#      `-._    `-.__.-'    _.-'
#          `-._        _.-'
#              `-.__.-'
#
#7965:M 07 Nov 10:38:19.863 # WARNING: The TCP backlog setting of 511 cannot be enforced because /proc/sys/net/core/somaxconn is set to the lower value of 128.
#7965:M 07 Nov 10:38:19.863 # Server initialized
#7965:M 07 Nov 10:38:19.863 # WARNING overcommit_memory is set to 0! Background save may fail under low memory condition. To fix this issue add 'vm.overcommit_memory = 1' to /etc/sysctl.conf and then reboot or run the command 'sysctl vm.overcommit_memory=1' for this to take effect.
#7965:M 07 Nov 10:38:19.863 # WARNING you have Transparent Huge Pages (THP) support enabled in your kernel. This will create latency and memory usage issues with Redis. To fix this issue run the command 'echo never > /sys/kernel/mm/transparent_hugepage/enabled' as root, and add it to your /etc/rc.local in order to retain the setting after a reboot. Redis must be restarted after THP is disabled.
#7965:M 07 Nov 10:38:19.863 * Ready to accept connections
#
日志说明:
1.当前的Redis版本的是4.0.11
2.Redis的默认端口是6379
3.Redis建议要使用配置文件来启动
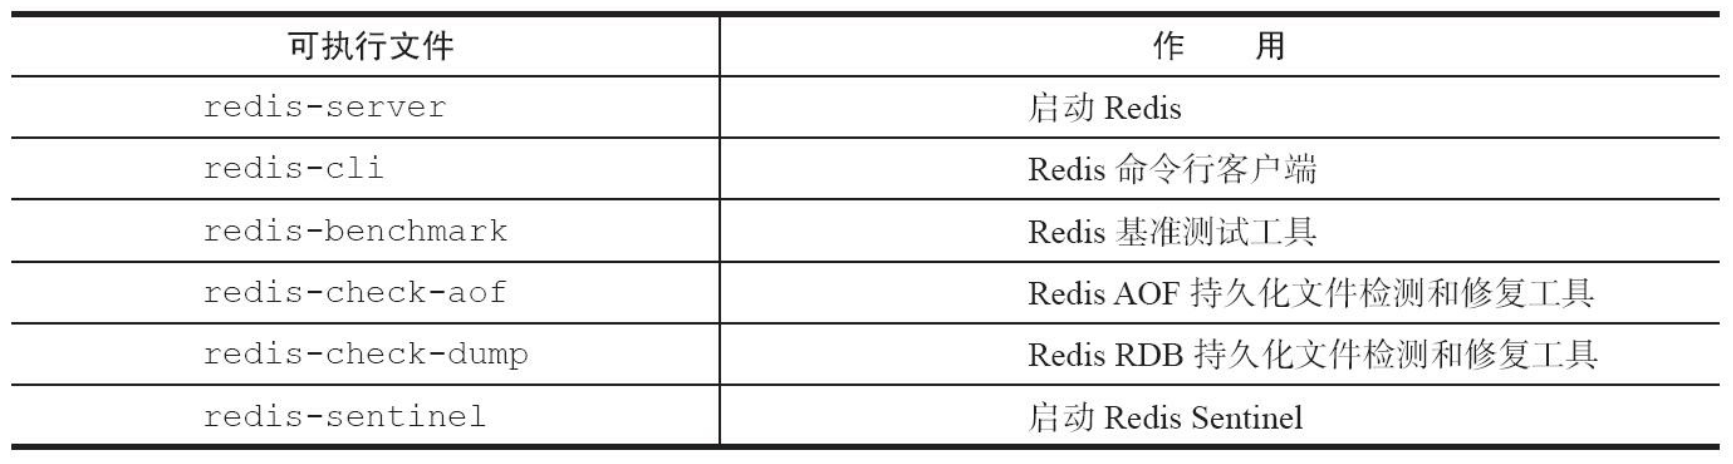
redis可执行文件说明:
4.配置
(1)配置为redis-server守护进程(即启动不会被redis-server占用窗口导致我们无法干别的事情)
#修改redis.conf
[root@localhost src]# cd ..
[root@localhost redis-4.0.11]# vim redis.conf
#可通过查询命令:/daemonize 进行快速定位
daemonize yes   # 守护进程模式开启


[root@localhost redis-4.0.11]# cd src/
[root@localhost src]# ./redis-server ../redis.conf
#7976:C 07 Nov 10:52:22.184 # oO0OoO0OoO0Oo Redis is starting oO0OoO0OoO0Oo
#7976:C 07 Nov 10:52:22.184 # Redis version=4.0.11, bits=64, commit=00000000, modified=0, pid=7976, just started
#7976:C 07 Nov 10:52:22.184 # Configuration loaded

#查看时候启动
[root@localhost src]# ps -aux|grep redis
#root       2835  0.0  0.1 150932  1540 pts/0    T    09:46   0:00 wget http://download.redis.io/releases/redis-4.0.11.tar.gz
#root       7977  0.0  0.2 141836  2040 ?        Ssl  10:52   0:00 ./redis-server 127.0.0.1:6379
#root       7982  0.0  0.0 112720   984 pts/0    R+   10:53   0:00 grep --color=auto redis
配置参数说明:


1. Redis默认不是以守护进程的方式运行,可以通过该配置项修改,使用yes启用守护进程

    daemonize no

2. 当Redis以守护进程方式运行时,Redis默认会把pid写入/var/run/redis.pid文件,可以通过pidfile指定
    pidfile /var/run/redis.pid

3. 指定Redis监听端口,默认端口为6379,作者在自己的一篇博文中解释了为什么选用6379作为默认端口,因为6379在手机按键上MERZ对应的号码,而MERZ取自意大利歌女Alessia Merz的名字

    port 6379

4. 绑定的主机地址

    bind 127.0.0.1

5.当 客户端闲置多长时间后关闭连接,如果指定为0,表示关闭该功能

    timeout 300

6. 指定日志记录级别,Redis总共支持四个级别:debug、verbose、notice、warning,默认为verbose

    loglevel verbose

7. 日志记录方式,默认为标准输出,如果配置Redis为守护进程方式运行,而这里又配置为日志记录方式为标准输出,则日志将会发送给/dev/null

    logfile stdout

8. 设置数据库的数量,默认数据库为0,可以使用SELECT <dbid>命令在连接上指定数据库id

    databases 16

9. 指定在多长时间内,有多少次更新操作,就将数据同步到数据文件,可以多个条件配合

    save <seconds> <changes>

    Redis默认配置文件中提供了三个条件:

    save 900 1

    save 300 10

    save 60 10000

    分别表示900秒(15分钟)内有1个更改,300秒(5分钟)内有10个更改以及60秒内有10000个更改。


10. 指定存储至本地数据库时是否压缩数据,默认为yes,Redis采用LZF压缩,如果为了节省CPU时间,可以关闭该选项,但会导致数据库文件变的巨大

    rdbcompression yes

11. 指定本地数据库文件名,默认值为dump.rdb

    dbfilename dump.rdb

12. 指定本地数据库存放目录

    dir ./

13. 设置当本机为slav服务时,设置master服务的IP地址及端口,在Redis启动时,它会自动从master进行数据同步

    slaveof <masterip> <masterport>

14. 当master服务设置了密码保护时,slav服务连接master的密码

    masterauth <master-password>

15. 设置Redis连接密码,如果配置了连接密码,客户端在连接Redis时需要通过AUTH <password>命令提供密码,默认关闭

    requirepass foobared

16. 设置同一时间最大客户端连接数,默认无限制,Redis可以同时打开的客户端连接数为Redis进程可以打开的最大文件描述符数,如果设置 maxclients 0,表示不作限制。当客户端连接数到达限制时,Redis会关闭新的连接并向客户端返回max number of clients reached错误信息

    maxclients 128

17. 指定Redis最大内存限制,Redis在启动时会把数据加载到内存中,达到最大内存后,Redis会先尝试清除已到期或即将到期的Key,当此方法处理 后,仍然到达最大内存设置,将无法再进行写入操作,但仍然可以进行读取操作。Redis新的vm机制,会把Key存放内存,Value会存放在swap区

    maxmemory <bytes>

18. 指定是否在每次更新操作后进行日志记录,Redis在默认情况下是异步的把数据写入磁盘,如果不开启,可能会在断电时导致一段时间内的数据丢失。因为 redis本身同步数据文件是按上面save条件来同步的,所以有的数据会在一段时间内只存在于内存中。默认为no

    appendonly no

19. 指定更新日志文件名,默认为appendonly.aof

     appendfilename appendonly.aof

20. 指定更新日志条件,共有3个可选值:
    no:表示等操作系统进行数据缓存同步到磁盘(快)
    always:表示每次更新操作后手动调用fsync()将数据写到磁盘(慢,安全)
    everysec:表示每秒同步一次(折中,默认值)

    appendfsync everysec


21. 指定是否启用虚拟内存机制,默认值为no,简单的介绍一下,VM机制将数据分页存放,由Redis将访问量较少的页即冷数据swap到磁盘上,访问多的页面由磁盘自动换出到内存中(在后面的文章我会仔细分析Redis的VM机制)

     vm-enabled no

22. 虚拟内存文件路径,默认值为/tmp/redis.swap,不可多个Redis实例共享

     vm-swap-file /tmp/redis.swap

23. 将所有大于vm-max-memory的数据存入虚拟内存,无论vm-max-memory设置多小,所有索引数据都是内存存储的(Redis的索引数据 就是keys),也就是说,当vm-max-memory设置为0的时候,其实是所有value都存在于磁盘。默认值为0

     vm-max-memory 0

24. Redis swap文件分成了很多的page,一个对象可以保存在多个page上面,但一个page上不能被多个对象共享,vm-page-size是要根据存储的 数据大小来设定的,作者建议如果存储很多小对象,page大小最好设置为32或者64bytes;如果存储很大大对象,则可以使用更大的page,如果不 确定,就使用默认值

     vm-page-size 32

25. 设置swap文件中的page数量,由于页表(一种表示页面空闲或使用的bitmap)是在放在内存中的,,在磁盘上每8个pages将消耗1byte的内存。

     vm-pages 134217728

26. 设置访问swap文件的线程数,最好不要超过机器的核数,如果设置为0,那么所有对swap文件的操作都是串行的,可能会造成比较长时间的延迟。默认值为4

     vm-max-threads 4

27. 设置在向客户端应答时,是否把较小的包合并为一个包发送,默认为开启

    glueoutputbuf yes

28. 指定在超过一定的数量或者最大的元素超过某一临界值时,采用一种特殊的哈希算法

    hash-max-zipmap-entries 64

    hash-max-zipmap-value 512

29. 指定是否激活重置哈希,默认为开启(后面在介绍Redis的哈希算法时具体介绍)

    activerehashing yes

30. 指定包含其它的配置文件,可以在同一主机上多个Redis实例之间使用同一份配置文件,而同时各个实例又拥有自己的特定配置文件

    include /path/to/local.conf
(2)设置redis开机自启动
#使用kill命令杀死进程
[root@localhost redis-4.0.11]#  kill -9 7977

#设置redis开机自启动
[root@localhost etc]# mkdir redis
[root@localhost redis-4.0.11]# cp redis.conf /etc/redis/6379.conf
[root@localhost redis-4.0.11]# cp utils/redis_init_script /etc/init.d/redisd
[root@localhost redis-4.0.11]# cd /etc/init.d/
[root@localhost init.d]# chkconfig redisd on

#service redisd does not support chkconfig

#解决方法:
#使用vim编辑redisd文件,在第一行加入如下两行注释,保存退出

# chkconfig:   2345 90 10
# description:  Redis is a persistent key-value database

#注释的意思是,redis服务必须在运行级2,3,4,5下被启动或关闭,启动的优先级是90,关闭的优先级是10。

[root@localhost var]# service redisd start
#报错: /var/run/redis_6379.pid exists, process is already running or crashed
#[重要]如果是没有数据的情况下
[root@localhost var]# rm /var/run/redis_6379.pid
[root@localhost redis]# service redisd start
#Starting Redis server...
#8206:C 07 Nov 11:31:26.807 # oO0OoO0OoO0Oo Redis is starting oO0OoO0OoO0Oo
#8206:C 07 Nov 11:31:26.807 # Redis version=4.0.11, bits=64, commit=00000000, modified=0, pid=8206, just started
#8206:C 07 Nov 11:31:26.807 # Configuration loaded
[root@localhost redis]# ps -aux|grep redis
#root       8207  0.0  0.1  38240  1988 ?        Ssl  11:31   0:00 /usr/local/bin/redis-server 127.0.0.1:6379
#root       8212  0.0  0.0 112720   984 pts/0    R+   11:31   0:00 grep --color=auto redis
测试一下redis-cli
#客户端测试
[root@localhost redis]# cd /soft/redis-4.0.11
[root@localhost redis-4.0.11]# cd src/
[root@localhost src]# ./redis-cli
127.0.0.1:6379> set "a" "valueA"
#OK
127.0.0.1:6379> get "a"
#"valueA"
停止redis服务
redis-cli shutdown
Redis的日志输出如下
# User requested shutdown... #客户端发出的shutdown命令
* Saving the final RDB snapshot before exiting.
#保存RDB持久化文件(RDB是Redis的一种持久化方式)
* DB saved on disk #将RDB文件保存在磁盘上
# Redis is now ready to exit, bye bye... #关闭
关闭服务需要注意:
1) Redis关闭的过程: 断开与客户端的连接、 持久化文件生成, 是一种相对优雅的关闭方式。
2) 除了可以通过shutdown命令关闭Redis服务以外, 还可以通过kill进程号的方式关闭掉Redis, 但是不要粗暴地使用kill-9强制杀死Redis服务, 不但不会做持久化操作, 还会造成缓冲区等资源不能被优雅关闭, 极端情况会造成AOF和复制丢失数据的情况。
3) shutdown还有一个参数, 代表是否在关闭Redis前, 生成持久化文件:
redis-cli shutdown nosave|save