在Android学习过程中,碰到很多地方需要使用到网络编程相关的东西。很可惜以前没接触过网络编程相关的知识,但是为了能够继续深入的学习Android开发,只好从头开始一点一点学起,希望能够补充一些关于网络编程的知识。
首先,需要搭建网络编程的开发编译环境,这里选择了MyEclipse和Tomcat作为开发的平台。关于如何下载、安装以及配置MyEclipse和Tomcat,可以参考百度文库《Java Web开发环境的安装与配置》(http://wenku.baidu.com/view/9673f831eefdc8d376ee325f.html),讲解的非常详细,按照上面的手顺一步步的安装,应该没有问题。
如何使用MyEclipse和Tomcat开发工具,在上述文档中也有简单提及。不过,还是让我们在实战中慢慢摸索吧。
1.Http协议简介
Http(超文本传输协议)用于传送www方式的数据。www基于客户端/服务器模型,由Web浏览器和Web服务器构成,两者之间采用Http进行通信。
Http协议采用请求/响应模型,是基于TCP/IP协议之上的协议,是Web浏览器和Web服务器之间的应用层协议,是通用的、无状态的面向对象的协议。
1.1Http协议工作原理
Web浏览器和Web服务器之间是如何建立连接的呢?主要是通过以下四个步骤实现的。
第一步,在客户端的浏览器中获取用户的输入内容。
第二步,浏览器得到网址后,内部会将域名发送到DNS上,进行域名解析,得到它的IP地址之后就会链接到对应的服务器上,从浏览器到服务器端口使用的是TCP/IP协议来完成的。
第三步,使用Socket套接字来实现TCP/IP协议。
第四步,服务器的80端口监听客户端的链接,完成客户端到服务器的连接。
上述四个步骤的具体实现过程如图1所示。而在Internet内部可以通过三种方式来实现发送和接收数据,分别是Http协议、FTP协议和TCP/IP协议。

图1 浏览器连接服务器内部原理图
由图1可以看出,服务器返回客户端的内容有三种形式,分别是:
(1)以Html代码的形式返回。
(2)以xml字符串的形式返回,在Android开发中经常使用这种形式。
(3)以Json数据形式返回,从网络流量的角度考虑,Json方式要比xml方式好一些,且便于解析。
1.2Http协议请求体
客户端向服务器发送一个请求,请求体中一般包含了请求方法(post或get)、URL、协议版本、请求修饰符、客户信息和内容的类似MIME的消息结构等。
Http协议请求体的内容如图2所示。
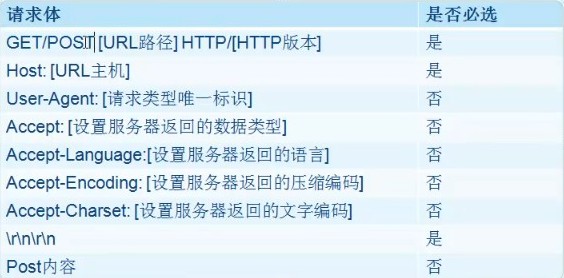
图2 Http协议请求体内容
1.3Http协议响应体
服务器回应客户端的请求,以一个状态行作为响应,响应体的内容包括消息协议的版本、成功或错误编码、服务器信息以及实体内容等。
Http协议响应体的内容如图3所示。
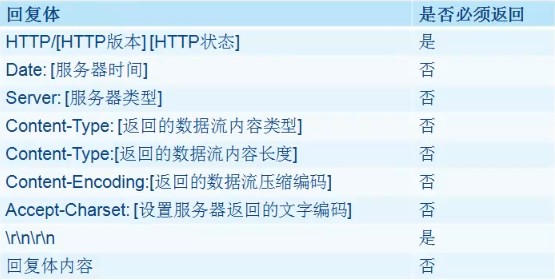
图3 Http协议响应体内容
2.Java Web实例
学习了Http协议的相关知识之后,就可以动手做一个简单的Java Web实例了。
因为是第一次进行Java Web的开发,所以虽然是一个简单的实例,我还是会详细的记录开发过程中的每一步,算是当作备忘录吧。
2.1新建工程
运行MyEclipse软件之后,选择菜单栏的“File”,再选择“New”,然后选择“Web Project”,就会弹出如图4所示的“New Web Project”对话框。
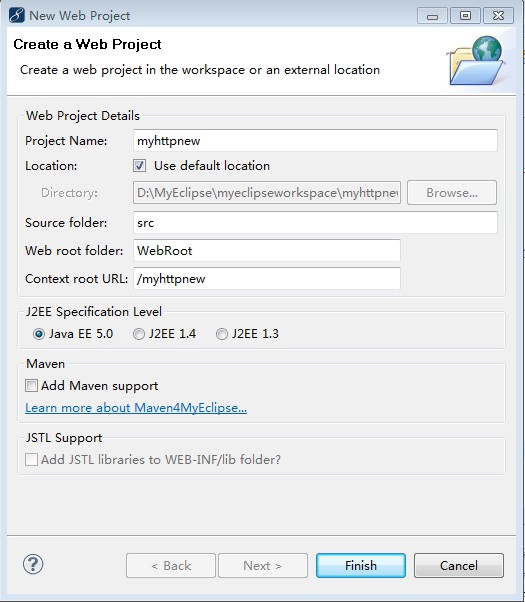
图4 New Web Project对话框
在如图4所示的“New Web Project”对话框中,需要在Project Name后的输入框中输入项目名称,比如“myhttpnew”,然后还需要勾选“Java EE 5.0”,最后点击“Finish”按钮即可完成创建。
创建完成后,在左侧的边框栏中即可显示出项目的资源目录结构,如图5所示。
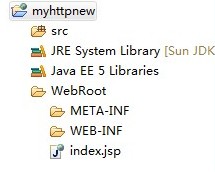
图5 项目资源目录
2.2修改index.jsp文件
双击打开index.jsp文件,可以看到其源代码如下:
View Code
 String basePath = request.getScheme()+"://"+request.getServerName()+":"+request.getServerPort()+path+"/";
 %>

 <!DOCTYPE HTML PUBLIC "-//W3C//DTD HTML 4.01 Transitional//EN">
 <html>
   <head>
     <base href="<%=basePath%>">

     <title>My JSP 'index.jsp' starting page</title>
     <meta http-equiv="pragma" content="no-cache">
     <meta http-equiv="cache-control" content="no-cache">
     <meta http-equiv="expires" content="0">
     <meta http-equiv="keywords" content="keyword1,keyword2,keyword3">
     <meta http-equiv="description" content="This is my page">
     <!--
     <link rel="stylesheet" type="text/css" href="styles.css">
     -->
   </head>

   <body>
     This is my JSP page. <br>
   </body>
 </html>
这段代码是一个基础的Java Web框架,我们可以对其进行适当修改,就可以做一个简单的Web网页了。需要修改的地方有pageEncoding以及<head>和<body>中的部分内容,修改后的源码如下:
View Code <%@ page language="java" import="java.util.*" pageEncoding="utf-8"%> <% String path = request.getContextPath(); %> <!DOCTYPE HTML PUBLIC "-//W3C//DTD HTML 4.01 Transitional//EN"> <html> <head> <title>测试HTTP协议体的内容</title> <meta http-equiv="pragma" content="no-cache"> <meta http-equiv="cache-control" content="no-cache"> <meta http-equiv="expires" content="0"> <meta http-equiv="keywords" content="keyword1,keyword2,keyword3"> <meta http-equiv="description" content="This is my page"> <!-- <link rel="stylesheet" type="text/css" href="styles.css"> --> </head> <body> <form name="form1" action="" method="post"> 用户名<input type="text" name="username" value=""/><br/> 密 码<input type="password" name="password" value=""/><br/> <input type="submit" name="submit" value="提交"/> </form> </body> </html>
在修改后的代码中,指定了编码方式为“utf-8”,设置了网页标题为“测试HTTP协议体的内容”。最重要的是改变了<body>中的内容,增添了“用户名”输入框和“密码”输入框以及一个“提交”按钮。
打开并运行Tomcat,在浏览器中输入“localhost:8080/myhttpnew”,即可看到程序的运行效果如图6所示。
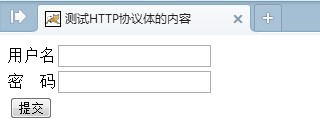
图6 网页预览效果
在图6所示的网页中,我们可以输入用户名和密码,并点击“提交”,但是网页不会有任何的响应,因为还缺少服务器回应客户端请求的操作,所以我们还需要添加一些代码来完成服务器对客户端的请求所做出的回应。
2.3服务器回应客户端请求
为了方便管理代码,可以新建一个包,然后将代码放在指定的包当中。
在src目录上单击鼠标右键,选择“New”,再选择“Package”,弹出如图7所示的“New Java Package”对话框。

图7 New Java Package对话框
在图7所示的“New Java Package”对话框中,需要在Name后的输入框中输入包名,比如“com.login.manager”,然后点击“Finish”,完成包的创建,可以看到在src目录的下面多了一条目录结构“com.login.manager”。
紧接着,我们还需要创建一个Servlet,用来完成服务器回应客户端的代码的实现。
在目录结构“com.login.manager”上单击鼠标右键,选择“New”,再选择“Servlet”,将弹出如图8所示的“Create a New Servlet”对话框。
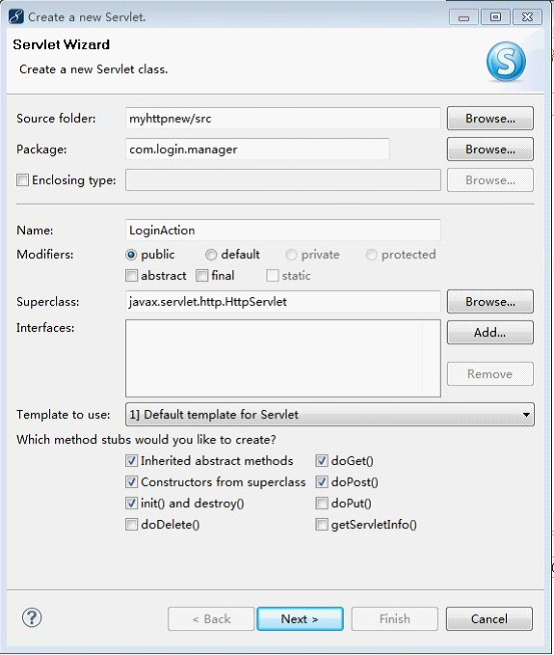
图8 Create a New Servlet对话框
在图8所示的“Create a New Servlet”对话框中,在Name后面的输入框中输入新建的类名,比如“LoginAction”,并且该类是继承自“javax.servlet.http.HttpServlet”的,然后点击“Next”,弹出如图9所示的“Create a New Servlet”对话框。

图9 Create a New Servlet对话框2
直接点击“Finish”按钮,完成Servlet的创建。创建完成后,将在目录“com.login.manager”下新增一个文件“LoginAction.java”,这正是我们所创建的用来完成服务器回应客户端的代码的实现的文件。
打开LoginAction.java文件,可以看到其源码如下:
View Code
 package com.login.manager;

 import java.io.IOException;
 import java.io.PrintWriter;

 import javax.servlet.ServletException;
 import javax.servlet.http.HttpServlet;
 import javax.servlet.http.HttpServletRequest;
 import javax.servlet.http.HttpServletResponse;

 public class LoginAction extends HttpServlet {

     /**
      * Constructor of the object.
      */
     public LoginAction() {
         super();
     }

     /**
      * Destruction of the servlet. <br>
      */
     public void destroy() {
         super.destroy(); // Just puts "destroy" string in log
         // Put your code here
     }

     /**
      * The doGet method of the servlet. <br>
      *
      * This method is called when a form has its tag value method equals to get.
      *
      * @param request the request send by the client to the server
      * @param response the response send by the server to the client
      * @throws ServletException if an error occurred
      * @throws IOException if an error occurred
      */
     public void doGet(HttpServletRequest request, HttpServletResponse response)
             throws ServletException, IOException {

         response.setContentType("text/html");
         PrintWriter out = response.getWriter();
         out
                 .println("<!DOCTYPE HTML PUBLIC "-//W3C//DTD HTML 4.01 Transitional//EN">");
         out.println("<HTML>");
         out.println("  <HEAD><TITLE>A Servlet</TITLE></HEAD>");
         out.println("  <BODY>");
         out.print("    This is ");
         out.print(this.getClass());
         out.println(", using the GET method");
         out.println("  </BODY>");
         out.println("</HTML>");
         out.flush();
         out.close();
     }

     /**
      * The doPost method of the servlet. <br>
      *
      * This method is called when a form has its tag value method equals to post.
      *
      * @param request the request send by the client to the server
      * @param response the response send by the server to the client
      * @throws ServletException if an error occurred
      * @throws IOException if an error occurred
      */
     public void doPost(HttpServletRequest request, HttpServletResponse response)
             throws ServletException, IOException {

         response.setContentType("text/html");
         PrintWriter out = response.getWriter();
         out
                 .println("<!DOCTYPE HTML PUBLIC "-//W3C//DTD HTML 4.01 Transitional//EN">");
         out.println("<HTML>");
         out.println("  <HEAD><TITLE>A Servlet</TITLE></HEAD>");
         out.println("  <BODY>");
         out.print("    This is ");
         out.print(this.getClass());
         out.println(", using the POST method");
         out.println("  </BODY>");
         out.println("</HTML>");
         out.flush();
         out.close();
     }

     /**
      * Initialization of the servlet. <br>
      *
      * @throws ServletException if an error occurs
      */
     public void init() throws ServletException {
         // Put your code here
     }

 }
在这里,我们只需要修改其中的doPost()方法即可,修改后的doPost()方法源码如下所示:
View Code
     /**
      * The doPost method of the servlet. <br>
      *
      * This method is called when a form has its tag value method equals to post.
      *
      * @param request the request send by the client to the server
      * @param response the response send by the server to the client
      * @throws ServletException if an error occurred
      * @throws IOException if an error occurred
      */
     public void doPost(HttpServletRequest request, HttpServletResponse response)
             throws ServletException, IOException {

         response.setContentType("text/html");
         PrintWriter out = response.getWriter();

         String username = request.getParameter("username");
         String password = request.getParameter("password");

         if(username.equals("admin") && password.equals("123")) {
             //表示服务器端返回的结果
             out.print("login is success!");
         }else {
             out.print("用户名或密码不正确!");
         }

         out.flush();
         out.close();
     }
除此之外,我们还需要修改index.jsp文件中的<body>标签下的<form>标签中的action=""为action="<%=path%>/servlet/LoginAction",即指定响应执行的路径。
重新启动Tomcat,并在图6所示的网页中输入用户名“admin”,密码“123”,点击“提交”之后,即可看到服务器响应了客户端的请求,并给出了相应的回应信息“login is success!”,如图10所示。

图10 服务器响应结果
至此,我们就完成了一个简单的Java Web实例。
备注:本博文根据《老罗Android开发视频教程》android之Http协议编程第一集学习总结而得。《老罗Android开发视频教程》网址http://www.verycd.com/topics/2929580/