1.1 监听onpaste事件
1.1.1 定义和用法
npaste 事件在用户向元素中粘贴文本时触发。
注意: 虽然使用的 HTML 元素都支持 onpaste 事件,但实际上并非支持所有元素,例如 <p> 元素, 除非设置了 contenteditable 为 "true" (查看下文的更多实例)。
提示: onpaste 事件通常用于 type="text" 的 <input> 元素。
提示: 有三种方式可以在元素中粘贴内容:
1》按下 CTRL + V
2》从浏览器的编辑菜单中选择 "Paste(粘贴)"
3》右击鼠标按钮在上下文菜单中选择 "Paste(粘贴)" 命令。
1.1.2 语法
HTML 中:
<element onpaste="myScript">
JavaScript 中:
object.onpaste=function(){myScript};
JavaScript 中, 使用 addEventListener() 方法:
object.addEventListener("paste", myScript);
注意: Internet Explorer 8 及更早 IE 版本不支持 addEventListener() 方法。
当向 <p> 元素上粘贴文本内容时执行 JavaScript (注意 contenteditable 设置为 "true"):
<p contenteditable="true" onpaste="myFunction()">尝试在段落中粘贴内容。</p>
1.1.3 event.clipboardData
通过事件回调中的event参数,获取剪贴板数据event.clipboardData(不是所有的浏览器都支持)
// '/image/.test(event.clipboardData.types)' // 检查是否为图片
// 获取图片二进制数据(似乎浏览器的实现都会有大小差异)
Array.each(event.clipboardData.items,function(item){
if(/image/.test(item.type)) {
var blob = item.getAsFile();
varURL =window.URL ||window.webkitURL;
var source = URL.createObjectURL(blob);
console.log(source)
}});通过Ajax将数据发送到后端服务器,后端将图片存储起来后,返回一个图片可访问地址
访问这个地址就可以看到图片了
1.2 使用样例
1》绑定单个元素事件
window.addEvent("paste",function(e){ });
<html>
<head>
    <title>test chrome paste image</title>
<style>
    DIV#editable {
        width: 400px;
        height: 300px;
        border: 1px dashed blue;
    }
</style>
<script type="text/javascript">

window.onload=function() {
    function paste_img(e) {
    debugger;
        if ( e.clipboardData.items ) {
        // google-chrome
            alert('support clipboardData.items(chrome ...)');
            ele = e.clipboardData.items
            for (var i = 0; i < ele.length; ++i) {
                if ( ele[i].kind == 'file' && ele[i].type.indexOf('image/') !== -1 ) {
                    var blob = ele[i].getAsFile();
                    window.URL = window.URL || window.webkitURL;
                    var blobUrl = window.URL.createObjectURL(blob);
                    console.log(blobUrl);

                    var new_img= document.createElement('img');
                    new_img.setAttribute('src', blobUrl);
                    var new_img_intro = document.createElement('p');
                    new_img_intro.innerHTML = 'the pasted img url(open it in new tab): <br /><a target="_blank" href="' + blobUrl + '">' + blobUrl + '</a>';

                    document.getElementById('editable').appendChild(new_img);
                    document.getElementById('editable').appendChild(new_img_intro);
                }

            }
        } else {
            alert('non-chrome');
        }
    }
    document.getElementById('editable').onpaste=function(){paste_img(event);return false;};
}

</script>
</head>
<body >
    <h2>test image paste in browser</h2>
    <div id="non-editable" >
        <p>copy the following img, then paste it into the area below</p>
        <img src="./128.png" />
    </div>
    <div id="editable" contenteditable="true" >
        <p>this is an editable div area</p>
        <p>paste the image into here.</p>
    </div>
</body>
</html>
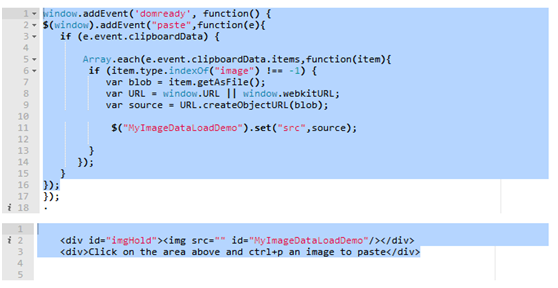
2》遍历循环所有的事件