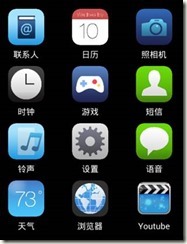
本节将实现以下效果
Ps:看起来很不错的样子吧,而且很像九宫格/se
-----------------------------------------------------------------------
Step 1:新建Layout,里面创建GridView
<GridView
android:id="@+id/gridView"
android:layout_width="wrap_content"
android:layout_height="wrap_content"
android:layout_marginTop="10dp"
android:numColumns="3"
android:horizontalSpacing="10dp"
android:verticalSpacing="10dp" >
</GridView>[s2]
Step 2:创建Java代码
实现这一效果使用的是ListView
所以在需要涉及ListView的有关知识
ListView需要数据源,适配器,监听器
① 考虑到GridView中含有图片,文字,所以事先加入图片,文字
private int[] icon={R.drawable.address_book, R.drawable.calendar,R.drawable.camera, R.drawable.clock, R.drawable.games_control,R.drawable.messenger, R.drawable.ringtone, R.drawable.settings, R.drawable.speech_balloon, R.drawable.weather,
R.drawable.world, R.drawable.youtube};
private String[] iconName={"联系人", "日历", "照相机", "时钟", "游戏", "短信", "铃声", "设置","语音", "天气", "浏览器", "Youtube"};
② 新建适配器
---由于含有图片,文字,所以使用的是SimpleAdapter适配器
Ps:SimpleAdapter的参数讲解
SimpleAdapter(Context context, List<? extends Map<String, ?>> data, int resource, String[] from, int[] to)
* SimpleAdapter()
* ---->>context:上下文
* ---->data:数据源 List<? extends Map<String, ?>> data,一个Map所组成的List集合
* 每一个Map都会对应ListView列表中的一行
* 每一个Map(键~值对)中的键必须包含所有在from中所指定的键
* ---->resource:列表项布局文件的ID
* ---->from:Map中的键名
* ---->to:绑定数据视图中的ID,与from成对应关系
adapter=new SimpleAdapter(this, getData(), R.layout.view_grid[s3] , new String[]{"image","text"}, new int[]{R.id.image,R.id.text});//新建适配器
gridView.setAdapter(adapter);
ps:R.layout.view_grid的样式代码
<LinearLayout xmlns:android="http://schemas.android.com/apk/res/android"
android:layout_width="match_parent"
android:layout_height="match_parent"
android:orientation="vertical"
android:gravity="center"
android:background="#000000">
<ImageView
android:id="@+id/image"
android:src="@drawable/ic_launcher"
android:layout_width="60dp"
android:layout_height="60dp"/>
<TextView
android:id="@+id/text"
android:layout_marginTop="5dp"
android:layout_width="wrap_content"
android:layout_height="wrap_content"
android:textColor="#ffffff"
android:text="文字"/>
</LinearLayout>
③ 添加数据源
private List<Map<String,Object>>dataList;//声明
dataList=new ArrayList<Map<String,Object>>();
private List<Map<String,Object>> getData() {
for(int i=0;i<icon.length;i++){
Map<String,Object>map=new HashMap<String,Object>();
map.put("image", icon[i]);
map.put("text", iconName[i]);
dataList.add(map);
}
return dataList;
}
④ 创建监听器
实现接口
public class View extends Activity implements OnItemClickListener
gridView.setOnItemClickListener(this);
⑤ 实现监听事件
public void onItemClick(AdapterView<?> arg0, android.view.View arg1,
int position, long id) {
Toast.makeText(this, "我是"+iconName[position],Toast.LENGTH_SHORT).show(); }
[s1] /*
* 1.准备数据源
* 2.新建适配<SimpleAdapter>
* 3.GridView加载适配器
* 4.GridView配置事件监听器(onItemClickListener)
*/
[s2] android:numColumns="" 每一行显示多少列android:horizontalSpacing="" 两列之间的间距
android:verticalSpacing="" 两行之间的间距
[s3]这是新建的Layout
(也就是显示的文字和图片的样式)
