express框架学习
express框架怎么创建
前提:创建文件夹,下载express(npm i express),创建js文件,在js文件中写入下面代码
1.引入express框架
const express = require('express')
2.创建网络服务器
const app = express()
3.get,post请求
app.get('/', (req, res) => {
    // send()
    // 1.send方法内部会检测响应内容的类型
    // 2.send方法会自动设置http状态码
    // 3.send方法会帮我们自动设置响应内容类型和编码
    res.send('Hello world')
})
4.监听端口
app.listen(3000)
express中间件
注:可以使用app.use(),也可以使用app.get('路径')
app.use匹配所有的请求方式,代表接收所有的请求,必须使用next(); 不然会卡到这一步
app.use((req,res,next)=>{
    next();
})
app.use第一个参数也可以传入请求地址,表示只要是这个请求地址的,不管什么请求方式都可以接受
app.use('/admin',(req,res,next)=>{
	next();
})
express中间件应用
1.路由保护,客户端在访问需要登录的页面时,可以先使用中间件判断用户的登录状态,从而判断是否禁止用户进入页面
app.get('/list', (req, res, next) => {
    let isLogin = false
    if (isLogin) {
        // 如果isLogin为true,则证明用户登录了
        next();
    } else {
        res.send('您没有登录,没有权利访问这个站点')
    }
})

app.get('/list', (req, res) => {
    res.send('这是list页面的内容')
})
2.网页维护公告,在所有路由的最上面定义接收所有请求的中间件,直接为客户端做出响应,网站正在维护中
app.use((req, res, next) => {
    res.send('网页正在维护中')
    // 页面维护,只需要把next去掉,不让他接着走就可以了
    // next();
})
3.自定义404页面,并改变请求状态为404,没改变之前为200,这是express框架自己定义的
app.use((req,res)=>{
    // 改变请求状态
    res.status(404)
    res.send('没有这个页面')
})  // 写在所有请求后
错误处理中间件
注: next()如果没有参数,就执行下一个处理函数,如果有参数,就执行错误处理函数
同步方法,遇到throw new Error会执行错误处理中间件
app.get('/', (req, res)=>{
    // 只要走到了throw new Error这一步,就证明出现了错误,直接调用错误处理中间件
    throw new Error('程序发生率未知错误')
})

// 错误处理中间件
app.use((err,req,res,next)=>{
    // err.message就是错误信息,也就是throw new Error中的内容
    res.status(500).send(err.message)
})
异步方法,是通过next(err)来触发错误处理中间件的
// 引入文件读取模块
const fs = require('fs')

app.get('/list', (req, res, next) => {
    fs.readFile('./demo.txt', 'utf8', (err, result) => {
        // err为错误内容,result为读取文件的内容
        if (err) {
            // 如果有错误内容,通过next(err)触发错误处理中间件
            next(err)
        } else {
            res.send(result)
        }
    })
})

// 错误处理中间件
app.use((err, req, res, next) => {
    // err.message就是错误信息,也就是throw new Error中的内容
    res.status(500).send(err.message)
})
捕获异常/错误
不管是异步还是同步,都可以通过try{}catch(err){}
// 引入fs文件读取模块
const fs = require('fs')
// 引入promise异步处理
const promisify = require('util').promisify
const readFile = promisify(fs.readFile)

app.get('/index', async (req, res, next) => {
    try {
        await readFile('./aaa.json')
    } catch (ex) {
        next(ex)
    }
})

// 错误处理中间件
app.use((err, req, res, next) => {
    // err.message就是错误信息,也就是throw new Error中的内容
    res.status(500).send(err.message)
})
构建模块化路由
// 创建路由对象
const home = express.Router()
// 将路由和请求路径进行匹配
app.use('/home', home)
// 在home路由下继续创建路由
home.get('/index', (req, res) => {
    res.send('欢迎来到展示页面')
})
// 访问/home/index
实际运用中
home.js
const express = require('express')
const home = express.Router()
home.get('/index', (req, res) => {
    res.send('这是home下的index')
})
// 导出home
module.exports = home
express.js
// 引入express框架
const express = require('express')
// 创建网站服务器
const app = express()

// 在express.js中引入home.js
const home = require('./router/home')
// 使用app.use来将路由和请求路径进行匹配
app.use('/home', home)


// 监听端口
app.listen(3000)
console.log('网站服务器启动成功');
GET参数的获取
express框架使用req.query即可获取GET参数,框架内部会将GET参数转换为对象并返回
// 例如: http://localhost:3000?name=zhangsan&age=30
app.get('/', (req, res) => {
    console.log(req.query); // {"name": "zhangsan","age": "30"}
})
POST参数的获取
express获取post请求,需要解析post数据
// 解析post数据
app.use(express.urlencoded())
//接受请求
app.post('/add',(req,res)=>{
	// 接受请求参数
	console.log(req.body);
})
express路由传参
注:这也叫做RESTful API 路由
// 例子:localhost:3000/10
app.get('/index/:id',(req,res)=>{
    // 通过req.params来接受参数
    res.send(req.params) // 结果 {"id": "10"}
})
静态资源的访问处理
在请求路径的同级目录下,新建public文件夹,下面放一些静态资源,如:images图片等
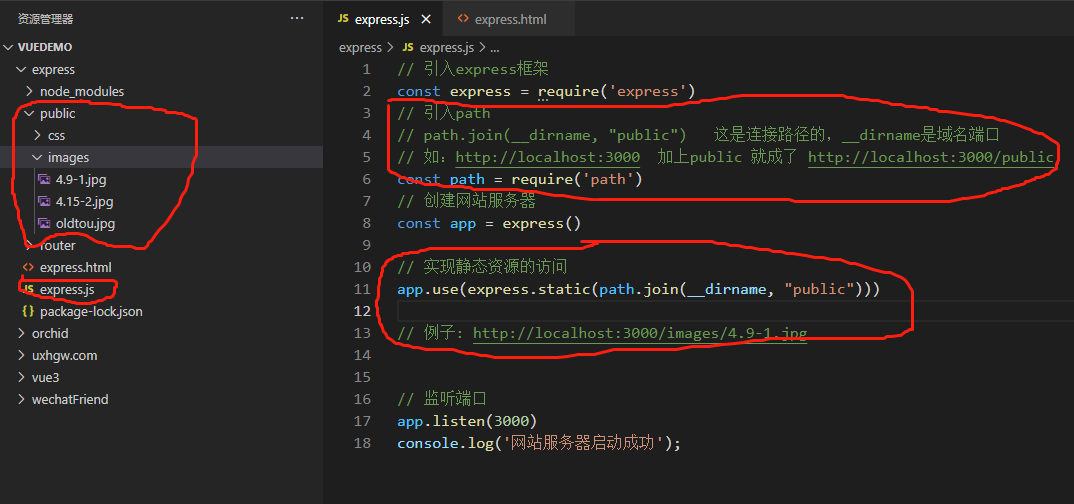
// 引入express框架
const express = require('express')
// 引入path
// path.join(__dirname, "public")   这是连接路径的,__dirname是域名端口
// 如:http://localhost:3000  加上public 就成了 http://localhost:3000/public
const path = require('path')
// 创建网站服务器
const app = express()

// 实现静态资源的访问
app.use(express.static(path.join(__dirname, "public")))

// 例子: http://localhost:3000/images/4.9-1.jpg


// 监听端口
app.listen(3000)
console.log('网站服务器启动成功');
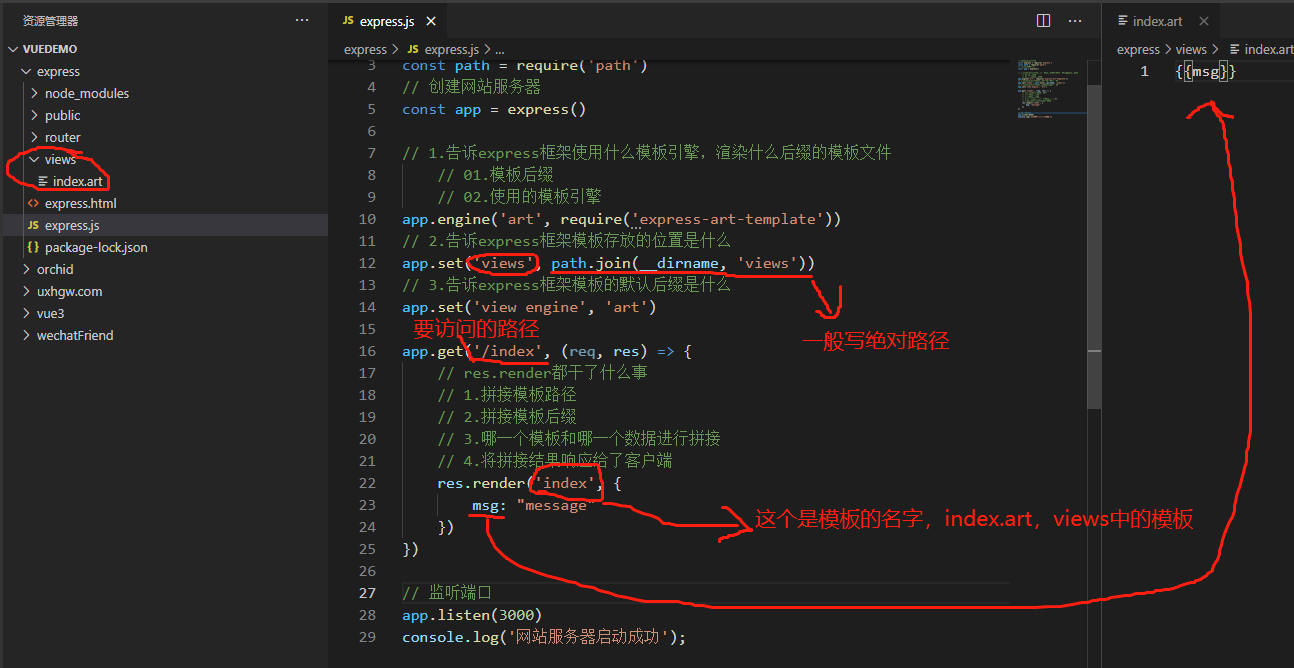
模板引擎
注:需要下载npm i art-template express-art-template
// 1.告诉express框架使用什么模板引擎,渲染什么后缀的模板文件
    // 01.模板后缀
    // 02.使用的模板引擎
app.engine('art', require('express-art-template'))
// 2.告诉express框架模板存放的位置是什么
app.set('views', path.join(__dirname, 'views'))
// 3.告诉express框架模板的默认后缀是什么
app.set('view engine', 'art')

app.get('/index', (req, res) => {
    // res.render都干了什么事
    // 1.拼接模板路径
    // 2.拼接模板后缀
    // 3.哪一个模板和哪一个数据进行拼接
    // 4.将拼接结果响应给了客户端
    res.render('index', {
        msg: "message"
    })
})
app.locals对象
将变量设置到app.locals对象下面,这个数据在所有的模板(art)中都可以获取到.
express.js中
// app.locals对象可以在所有的模板中访问
app.locals.users = [{
    name: "张三",
    age: 20
},{
    name: "李四",
    age: 20
}]
index.art模板中
<ul>
	// 循环开始
    {{each users}}
    <li>
        {{$value.name}}
        {{$value.age}}
    </li>
    // 循环结束
    {{/each}}
</ul>